
Changing the color and tone of a video
Using videos as Smart Objects
Correcting a video layer using filters
Cloning and healing within a video file
The basics of improving your video files by correcting lighting and color, adding artistic effects, or cloning and healing inside of them is not much different than making these changes to an image file. The tools themselves are the same, and the effects they have on video files are identical to the effects they have on image files. The difference lies in how you want the effects applied to your video; they can be applied to the entire file, to a portion of the file, or to an individual frame.
This chapter demonstrates different methods of application and gives examples of instances where you would use each one.
Color correction can enhance almost any photo. Videos are even more susceptible to environmental lighting problems that need correction. When it comes to color correcting a video layer, you can use the Image menu to change the video frame by frame, or you can create a Fill or Adjustment layer that affects the entire video layer. Unless you are creating a special effect or animating a color correction, you want to skip the tedious process of color correcting frame by frame.
Note
This chapter assumes you know how and why to apply adjustment layers in Photoshop. In Chapter 13, you can learn about the individual Fill and Adjustment layers and what they can do to correct not only photos but videos as well.
On the other hand, color corrections are individual to the image you are working with. They are different than filters in this respect. You can sharpen (to some degree) a video file arbitrarily over the entire file and probably not be disappointed with the results, but if you adjust the levels of a video file that contains a combination of lighter and darker images, you will find that the overall results are horrible. As you color correct, you want to carefully split the video layer into sections that consist of similar areas in color and tone.
Splitting video layers into several individual layers to color correct them with Fill or Adjustment layers that are also full layers is a tricky process. You have layer organization to worry about, of course, but you must also consider the effects of the Fill or Adjustment layers. Because these layers are not automatically linked to a particular video layer, by default they affect any layer below them in the hierarchy. I show you how you can add fills and adjustments to just the video layer you want to affect.
A Fill or Adjustment layer is added to the Layers panel and can be placed directly over the video layer or linked with it so it affects the entire layer. You can see an Adjustment layer in its simplest use in Figure 27.1. With only one video layer in the Layers panel, the Adjustment layer affects it and nothing else.
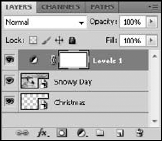
Figure 27.1. A Fill or Adjustment layer is a full layer in the Layers panel that affects any layer below it in the hierarchy.
In addition, every Fill or Adjustment layer is created with a layer mask. If you have an area of your video file selected, the mask automatically reflects that selection. If you don't have anything selected in the file, the mask is white, indicating that the entire file is selected. You can delete or change the layer mask at any time, remembering that it also affects the entire video file.
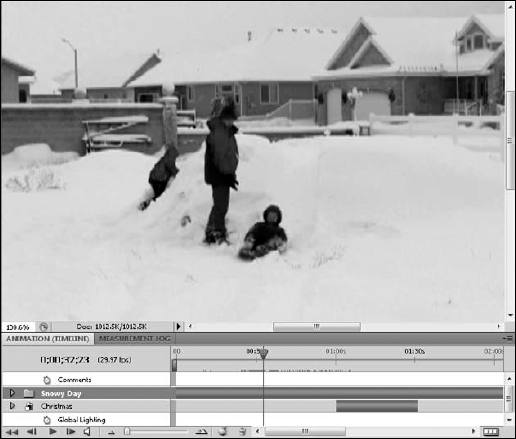
Just like image files or vector files added to a video file, when newly placed, an Adjustment layer continues through the duration of your video file and affects all the layers below it. For instance, you can see in Figure 27.2 that even though I corrected the lighting of the Snowy Day layer, the Adjustment layer is affecting the Christmas layer as well. You can restrict the effects of an Adjustment layer by clipping it to the layer below it, changing its duration, merging the adjustment layer with the video layer, and changing the video into a Smart Object.
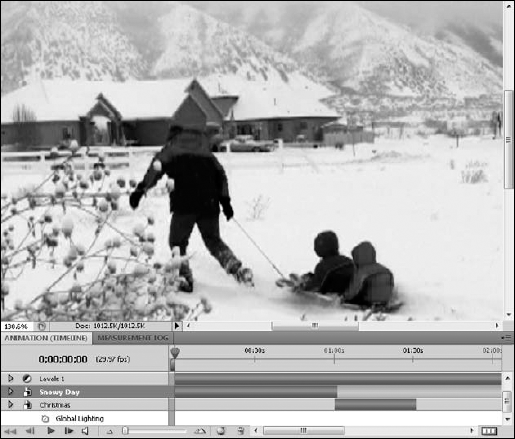
Figure 27.2. Because the Adjustment layer continues for the duration of the video file, it affects the Christmas layer as well as the Snowy Day layer it was created to correct.
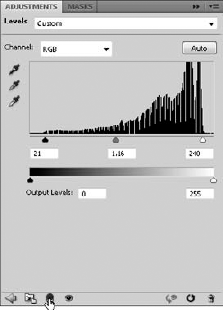
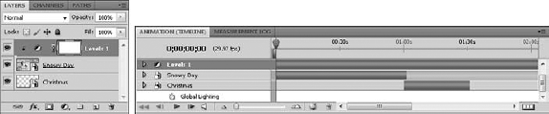
Using the Adjustments panel, you can clip the adjustment you create to a single layer in your video. This ensures that the adjustment affects only the layer it is clipped to and not any layers below it. Do this by selecting the Clip to Layer icon in the Adjustments panel, as shown in Figure 27.3. This affects the Adjustment layer in the Layers panel by adding an arrow to it, indicating that it affects only the layer below it. The layers in the Animation panel will look the same, as you can see in Figure 27.4, but the adjustment no longer has any effect after the visibility of the Snowy Day layer has turned off.
Note
You can't clip a Fill layer to the layer below it, only the adjustments that can be applied and changed using the Adjustments panel. You can use any of the other methods of restricting layers mentioned in this section on a Fill layer.
When you add a Fill or Adjustment layer to your video, the duration is automatically set to the entire length of the time line. You already know that this is fairly easy to adjust; just drag the beginning and end of the layer duration bar so it is exactly as long as you need it to be, as shown in Figure 27.5. The benefits of this method are obvious: It's easy, it's visible, and the layers are still viewable and editable in the Layers panel. You can take one more step to make this option even more attractive: You can group the layers.

Figure 27.5. Adjusting the duration of a Fill or Adjustment layer is an easy way to restrict its effects to just one segment of your video file.
If you have only two or three video layers that you are color correcting individually, you can probably manage the Fill and Adjustment layers in the Timeline without too much trouble, but you can see that things could really get out of hand quickly, especially if you need to create several adjustments on a single layer. The best way to work with layers is to group them. Create a new group by clicking the New Group icon in the Layers panel. Give the group a unique name, and drag the layers that you want grouped together into it, as shown in Figure 27.6.
Tip
When adjusting layers to precise lengths, be sure to zoom in so you can see each frame. To trim a layer to an exact location, choose Trim Layer Start (End) to current time from the Timeline menu.
Merging a Fill or Adjustment layer with the layer or layers you want it to affect has the benefit of isolating its effects to the selected layer as well as cleaning up the Layers panel and the Timeline. The down side of this method is that merging a Fill and Adjustment layer with another layer makes the fill or adjustment a permanent change. You can't remove it or adjust its effects.
To merge two or more layers, hold the Ctrl/
The last way to restrict the effects of a Fill or Adjustment layer to an individual layer is to turn that layer into a Smart Object. Right-click the video layer in the Layers panel, and choose Convert to Smart Object. This turns the video layer into an embedded file that you can open and change independent of other layers in the file. After you have turned the layer into a Smart Object, simply open it before adding the Fill or Adjustment layer. This method has the benefit of keeping the Layers panel and Timeline less cluttered while still retaining the full capability to adjust or remove the effects. The only downside of using Smart Objects is the extra steps required to make changes to a Smart Object file.
Figure 27.7 shows two Smart Object layers placed neatly in the Timeline. One has a Black & White Adjustment placed over it, while the other has an Invert Adjustment, not because I thought the Invert Adjustment would add artistic merit to the video, but because it can be seen in a black and white figure.

Figure 27.7. Turning a video layer into a Smart Object has the advantage of cleaning up the Timeline while preserving the ability to make changes to the settings of a Fill or Adjustment layer.
Note
When you create a Smart Object from a video layer, the Smart Object doesn't have an Altered Video property. As I show you later in this chapter, the Altered Video property allows you to make changes to your video on a frame-by-frame basis. To change the video frame by frame, you need to open the Smart Object and change the video layer in the embedded file.
You can add filters to a file in two ways: add them directly to a regular file or change the file into a Smart Object and add Smart Filters. This has special implications for a video file, because adding a Filter directly to it changes only one frame of video, causing your filter to blip in and out of existence too fast for the eye to see. To avoid having to add a filter one frame at a time, you need to change your video file into a Smart Object.
When you change a layer into a Smart Object, the thumbnail in the Layers panel changes to show that the layer is treated differently. After you've converted a video layer to a Smart Object, you can see a difference in the Animation (Timeline) panel as well. Figure 27.8 shows the Animation (Timeline) panel after the video layer has been changed to a Smart Object. There is no Altered Video property for a Smart Object. Now this layer is just like an image or 3D layer; any changes made to it affect the entire layer.
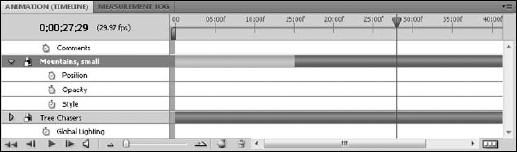
Figure 27.8. There is no Altered Video property in a Smart Object, even if it was once a video layer.
Adding a Smart Filter to a Smart Object that is an embedded video file is no different than adding a Smart Filter to any other Smart Object. Choose a filter from the Filter menu, change the settings if necessary, and add it to your file. You can use corrective filters, such as the sharpening or blurring filters, or you can create artistic effects by applying the more interesting filters.
When a filter is added to a video file that has been turned into a Smart Object, it affects the entire layer, and the filter is applied as a sublayer in the Layers panel, as shown in Figure 27.9. Now, as you play back your video, you see the filter's effects all the way through.

After you've converted a video layer to a Smart Object, you can use the embedded video file to make changes to the Altered Video property. You can do this by double-clicking the Smart Object layer thumbnail. Photoshop opens the original document containing your video layer, as shown in Figure 27.10. When you finish making changes to the original file, save it and the changes are reflected in the new file containing the Smart Object. Turning your file into a Smart Object adds a few steps to the editing process, but if you want to apply a filter across the entire video layer, it's the only way to go.
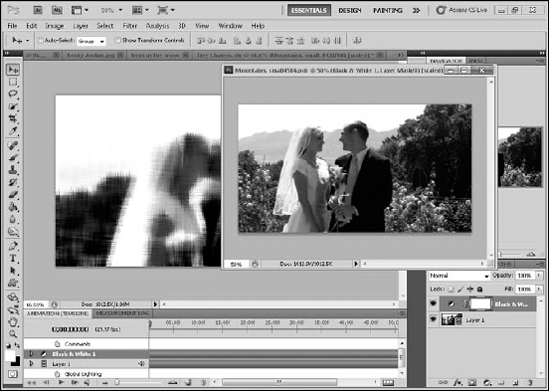
Figure 27.10. Double-clicking the thumbnail of a Smart Object gives me two files to work with: one with a video layer that can be changed frame by frame and the Smart Object file.
In essence, having the option to turn a video layer into a Smart Object gives you full editing capability. You can apply a filter frame by frame or you can apply the filter to the entire video clip. The method you use depends on the effect you are trying to create, of course. Using a filter to correct a video layer usually incorporates the entire file. If you are creating special effects, however, you may want to change your filter frame by frame or add it to a small segment of your video.
Note
The filters, including Smart Objects and Smart Filters, are covered thoroughly in Chapter 13.
As a general rule, cloning and healing in video layers is done on a frame-by-frame basis, simply because the nature of a video is movement, and movement makes cloning or healing a specific area difficult to do and still achieve desirable results. There are instances, however, where you may be able to create a fix that lasts at least several frames, saving you from the tedious process of cloning frames one at a time.
In order to do this, the video must be stable, probably taken with the camera on a tripod, and the object or flaw that you want to remove must be stationary over several frames. The 3D video pictured in Figure 27.11 is a perfect example. The fern in the background is stationary through several frames. By creating a new blank layer over the video file and sampling all layers, I can create one clone fix that takes the fern out over several frames, as shown in Figure 27.12. The fix works until the shadow of the ball intersects with the cloned area, as shown in Figure 27.13. At this point, I end the duration of the clone layer and use the Altered Video property to clone each frame separately, as demonstrated later in this chapter.
Note
You can try this clone fix by downloading Figure 27.11 from the Web site.

Figure 27.11. This video is stable and the fern is stationary, so I can clone it out of several frames with just one fix.

Figure 27.12. A blank layer placed over my video layer contains the fix, so the default duration lasts the entire video.
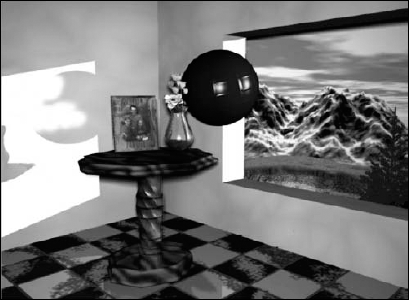
Figure 27.13. The clone no longer works at this point in the video, so I change the duration of the clone layer and make frame-by-frame fixes.
Note
You can learn all about the cloning and healing tools and how to use them in Chapter 15. You also find this video file used in another cloning example in that chapter.
I introduced you to the basics of Rotoscoping in Chapter 26, and now I show you how you can use the Rotoscoping techniques to apply corrections to your video on a frame-by-frame basis.
There are several reasons to make these changes frame by frame; one of the more obvious reasons is using the cloning and healing tools to remove unwanted elements. Other changes that can only be animated frame by frame are transformations. You also can animate adjustments and filters by changing them frame to frame. In Figure 27.14, I animated a color adjustment over a still photo to give it more life.
Tip
To animate an adjustment on a still image, you need to copy and paste the pixels into a video layer with an Altered Video property.
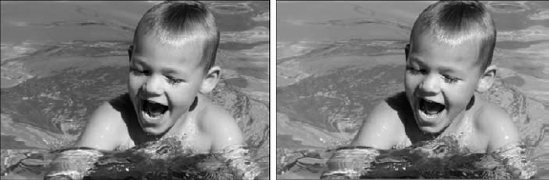
Figure 27.14. To animate a color change, you need to apply the Color Balance adjustment frame by frame.
Note
If you find yourself in a situation where you are performing the same tasks over and over to achieve similar results—and you usually will when you start animating frame by frame—it's time to create an Action. An Action fully automates the process. For example, you can animate a color change by creating an Action that works at any time on any video file just by clicking the Action button. You also can create a color change sequence that prompts the user for input when the color balance dialog box is used, so that the animation has custom settings every time the Action is used. You can learn to create timesaving Actions in Chapter 5.
Throughout this book whenever I've talked about adding adjustments to a file, I've shown you how to create an Adjustment layer using either the Layers panel icon or the Adjustment panel. The versatility of having adjustments that can be moved and edited has greatly outweighed the hassle of adding one more layer to the Layers panel. If you want to add adjustments to a video frame by frame, however, that all changes.
You can create an Adjustment layer that affects only one frame of video, but you need to reduce its duration in the Timeline to one frame, and then create a new Adjustment layer for the next frame. You can see that unless you are planning to change only a handful of frames, less than a blink of an eye in a standard video file, creating a new Adjustment layer for each frame of video quickly becomes unwieldy.
So, for the first time in this book, I am going to suggest you use the Image
With the video layer selected, choose Image
The filters are simpler to add to a single frame of video than an adjustment. As I mentioned earlier in this chapter, you can't add a filter to an entire video file unless it is a Smart Object. Simply adding any filter to a video file creates a new segment in the Altered Video property. There are several reasons for adding a filter frame by frame. You can animate it by applying or reducing the filter effects over time, or you may want to apply a mask so the filter is applied only to selected areas of a video file. As the video changes, the mask needs to change as well, requiring individualized frame work.
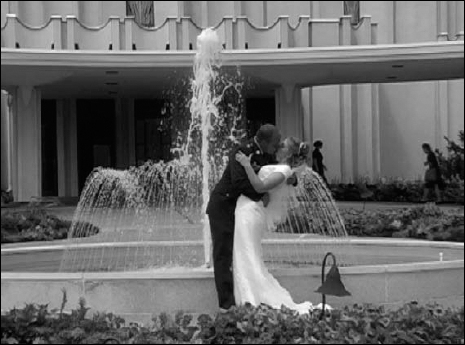
Most of the cloning and healing you do to a video file needs to be done frame by frame. The ability to use alternate clone sources is vital because you can clone one frame into another. For example, Figure 27.15 shows an image of a happy couple on their wedding day. They are preparing for a romantic kiss. The video effect is in slow motion, there's a great love song playing in the background, and love is in the air. Jump ahead several frames to Figure 27.16. The kiss is still very romantic, the music is still playing, but some unromantic company has joined the shot.

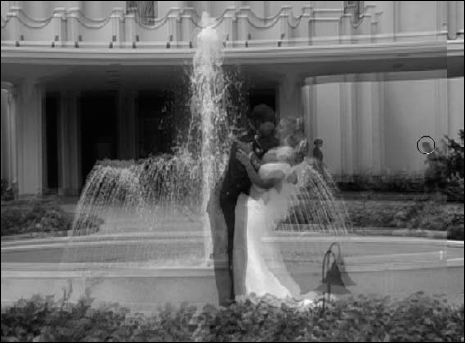
To fix this problem, activate the Clone Stamp tool and open the Clone Source panel. Rewind to the first frame, and Alt-click or Option-click to use it as a source. Using the overlay, place it over each of the next few frames to clone out the company with a few quick swipes of the mouse. Although the couple is moving, it's easy to use the architecture of the building as well as the light in the flower bed to line up the overlay exactly, as shown in Figure 27.17. After the overlay is lined up, I can simply click and drag the Clone Stamp tool over the areas I want to hide, and the illusion is perfect, as shown in Figure 27.18.
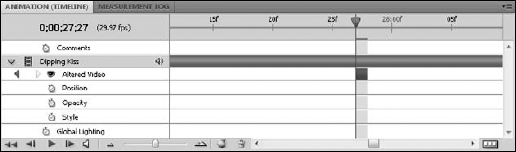
Of course, you can see in Figure 27.19 that only one frame of my video has been changed so far. I'm in for a long frame-by-frame fix. Using the Clone Stamp is so much fun that it might even be enjoyable. To really utilize the five clone sources available to you in the Clone Source panel, you probably want to choose five different frames to clone so that as the camera moves even a miniscule amount, you have a clone source that easily matches the angle and size.

As you use the Cloning tool to change a video file frame by frame, one option in the Clone Source panel is going to be critical to your success. When you choose a clone source from a video file, you have the option to lock the source to the frame that you originally sampled or to move the source the same number of frames you move from the first target in the Timeline. In other words, after fixing the frame in Figure 27.19, I plan to move onto the next frame of video to fix that frame as well. If the Lock Frame box is checked in the Clone Source panel, as shown in the first panel in Figure 27.20, the clone source remains the same frame that I used to change the previous frame of video. In this case, frame 837 continues to be my source. If the Lock Frame box is not checked, the clone source moves ahead one frame in my video. The second Clone Source panel in Figure 27.20 shows that the frame offset remains −3 frames, no matter what frame I target.
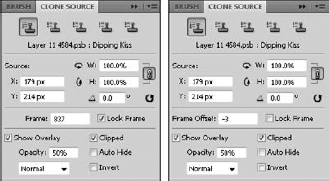
Figure 27.20. Lock the target frame if you want it to be consistent throughout your edits with the Cloning tool.
If your video is fairly stable, you may find that it's easier to use a locked source that you know is clear and free of defects. If your video is unsteady, it might be easier to use a frame offset that is only one or two frames away from the frame you are changing. In most cases, this helps to keep the source and sample frames fairly similar.
In this chapter, you learned that applying fixes to a video file can be a tricky process involving both the Layers panel and the Animation (Timeline) panel. Mastering the properties of each one has given you the capability to make corrections to your video as a whole or to make them frame by frame. You learned how to do these things:
Add adjustments to video files
Use filters to create fun artistic effects
Clone and heal video layers