
Setting and editing keyframes
Animating layer properties
Rotoscoping
Animating DICOM images
Animation and keyframes are a big part of how the Animation (Timeline) panel works and the effects you can create with your video files. Before I show you how to perform basic color correcting and image effects on your video files, I show you how to use the keyframes in the Animation (Timeline) panel to change your effects over time.
Just as you've always known since you were a kid, video and animation are produced by creating a series of images and showing them at such a high speed that it fools our brains into thinking that we are watching true motion. A standard frame rate to create realistic motion is 30 frames per second. When I was a kid, I always wondered who had to draw and color the millions of pictures it took to make a full-length animation. Now I've watched enough special features titled "The Making of..." to have a pretty good notion that animators even in the days before computers had many tips and tricks up their sleeves to make the animating process smooth and efficient
Animating in Photoshop not only employs many of the tips and tricks of efficient animating, it also can automate some of the most tedious tasks. We've all seen clay animation productions—the animations created by moving clay figures a miniscule amount and taking a picture and then repeating the process until all the pictures put together create a movie. I'll tell you up front that some of the animation in Photoshop is going to be just like that, frame-by-frame animation. Not all of it, though, and that's where keyframes come into play.
A keyframe is one of the essential components of animating in Photoshop. A keyframe allows you to skip many of the tedious steps between "key" points in your animation. In this chapter, I show you what a keyframe is, what it does, and how you can create and edit it.
So what is a keyframe? When you are creating sequential images for an animation, a keyframe is any frame that defines a turning point in that animation. For example, if you want to animate a bouncing ball, the keyframes are the frame where the ball meets the ground and changes direction, and the frame where the ball feels the inevitable pull of gravity to pull it back down. All the frames in between are just continuations of the up or down movement.
The in-between frames are sometimes referred to as "inbetweens" or "tweens" for short. Creating these frames is called tweening or, in Photoshop terms, interpolating. When you create keyframes in the Photoshop Animation panel, Photoshop has the capability of interpolating the frames between keyframes. This provides you as the user with an animation experience that is fun and easy, rather than tedious.
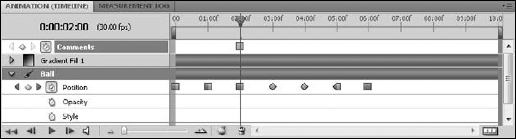
A keyframe is indicated in the timeline by a little diamond or square, depending on the interpolation setting applied to it. The diamond or square is yellow if it is selected or gray if it's not. You can create keyframes in different areas of animation such as position, opacity, style, or global lighting.
Creating a keyframe in the timeline is a fairly simple process. I begin a bouncing ball animation by creating a layer containing a circle over a blank canvas background.
You can create a keyframe by following these simple steps:
Create a new file in Photoshop.
Use the default Photoshop size or larger.
Use the Ellipse tool found in the Toolbox to draw a circle.
Press and hold the Shift key while you are doing it to constrain it to a perfectly circular shape. You can jazz it up by adding a color or layer style. I added the Blue Glass (Button) style found in the Styles panel for a quick ball effect.
Right-click your newly created shape layer to open the pop-up menu, and select Rasterize Layer.
Select Window

Click the triangle next to the layer name in the Animation panel to show the layer properties.
Click the Time-Vary Stopwatch next to the word Position to activate it.
Make sure the current time indicator is to the beginning of the timeline.
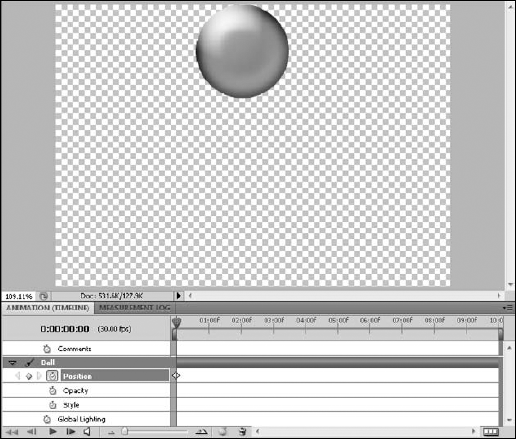
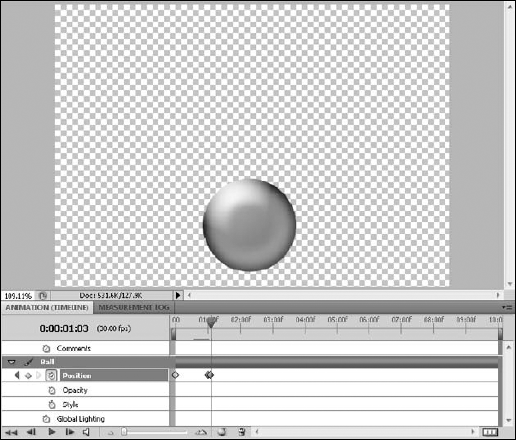
Move your object, or selection, through the canvas to the position you want to use as the start of your animation, as shown in Figure 26.1.
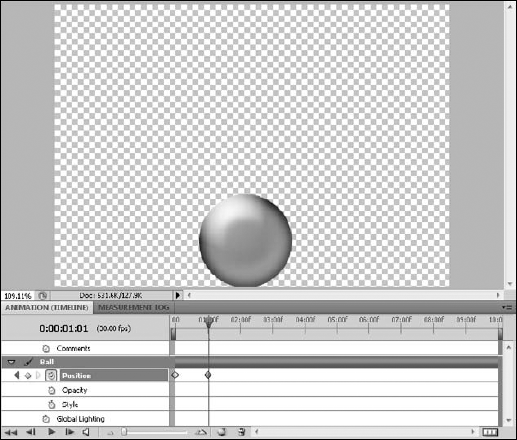
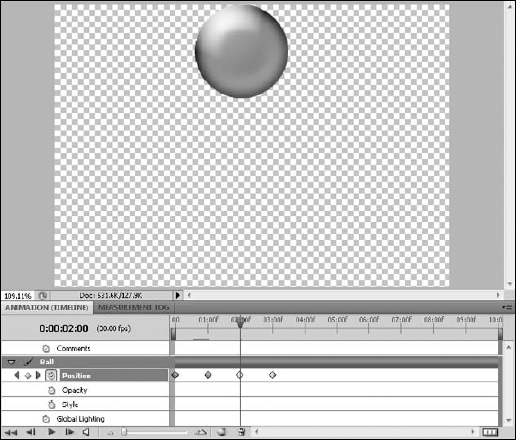
Drag the current time indicator forward to 1 second.
Move your object again.
Automatically, a keyframe is created, as shown in Figure 26.2.
Slide the current time indicator between the keyframes or play back this simple animation to watch how tweening works.
Now, throwing you into this exercise was like throwing you off the deep end of the pool. Don't worry; I won't let you sink. I just wanted you to get used to the water. I covered a few areas that you aren't familiar with yet, but let's go over them right now.
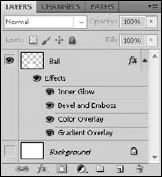
In Figures 26.3 and 26.4, note the differences in the layer properties listed in the Layers panel as opposed to the Animation (Timeline) panel. The Layers panel shows the ball layer just as it would look without the Animation (Timeline) panel open. The Animation (Timeline) panel, on the other hand, shows us all new aspects of this layer.
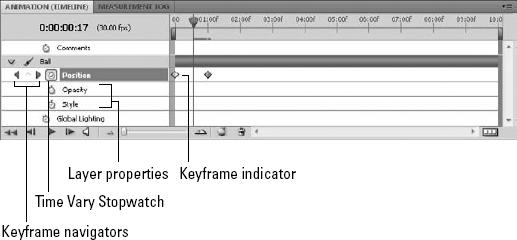
As you click the triangle next to the layer name, you open a whole new world of possibilities. The layer properties that open are different areas where you can create keyframes. Anywhere you can create a keyframe, you also can create animation. In essence, you can animate in any of the listed layer properties. The properties listed in Figure 26.4 allow you to animate in any of the following ways: by changing the position of the layer, by changing the opacity of the layer, by changing the layer style, or by adjusting the global lighting. Other possible layer properties exist. If my layer contained a mask, for example, I could animate the mask position or the mask enable.
The stopwatch next to each of these sublayers is more correctly called the Time-Vary Stopwatch. By default, the Time-Vary Stopwatch is disabled, and keyframes cannot be created. Clicking this Time-Vary Stopwatch in each of these layers enables keyframing for that layer.
Warning
Disabling the Time-Vary Stopwatch after you have created keyframes deletes them. Be very careful that you do not accidentally disable the Time-Vary Stopwatch and lose all the work you put into creating keyframes.
As you enable the Time-Vary Stopwatch, the keyframe navigators come into view. These navigators enable you to jump from one keyframe to the next. The direction you jump depends on the arrow you click, of course. You can edit the layer properties at existing keyframes as long as the current time indicator is placed directly over the keyframe. If the current time indicator is not placed directly over the keyframe, instead of that keyframe being edited, a new keyframe is created. This is an excellent reason to use the keyframe navigators.
For instance, in Figure 26.5, I tried to change the drop position of the ball. The current time indicator wasn't placed correctly over the keyframe indicator, so I created a new keyframe. When I play this animation back, I end up with a jump in the ball's position at the end. If I had used the keyframe navigator, the current time indicator would be correctly placed to make the edit.
If you click between the two arrows of the keyframe navigator, you create a new keyframe. This isn't usually the most efficient method, because after you have created it, you need to change the layer property. If you change the layer property first, a keyframe is automatically created.
You can copy, paste, and delete keyframes inside the timeline. This is an incredibly useful way to create lots of keyframes in a relatively short amount of time:
Select a keyframe by using the keyframe navigator or by placing the current time indicator over it.
A selected keyframe is highlighted in yellow. You also can select more than one keyframe by dragging a selection marquee around the keyframes you want to select or by clicking the Animation (Timeline) panel menu and choosing Select All Keyframes.
After you've selected one or more keyframes, right-click one of them to open the menu options for the keyframe.
You also can find these options in the panel menu.
Move the current time indicator to the location in the timeline where you want to place the first keyframe.
Open the Animation (Timeline) panel menu, and select Paste Keyframe.
As you can see in Figure 26.6, I created a second bounce for the ball. I can go on copying and pasting keyframes to continue the bouncing motion.
You can delete a keyframe in the same way, by right-clicking it and choosing Delete Keyframes or by choosing delete from the panel menu. You also can click the Delete button at the bottom of the Animation (Timeline) panel.
Warning
The hotkeys (Ctrl/
You can drag selected keyframes around in the timeline, placing them wherever you want. For example, one second is a very slow and ponderous bounce. Rather than creating a new keyframe closer to the beginning of the timeline, I can just drag the second keyframe closer to the first.
Interpolation is defined as the way that Photoshop determines what happens between the keyframes. The type of interpolation I've demonstrated so far has been Linear interpolation. This setting is called Linear interpolation because the interpolation creates a path between keyframes. That path might be a continuous change of position, or it might be a shadow being gradually created through time. This is commonly called tweening. There is a second interpolation setting that doesn't create a steady change. This interpolation setting is called Hold interpolation. When you create a keyframe with a Hold interpolation, Photoshop holds the current status of the layer until the next keyframe, which defines a new status.
Linear interpolation is the default setting in Photoshop, and you've seen how it works. After you've created keyframes, Photoshop figures out the difference between them and fills in the missing images at the frame rate specified in your file.
The shortest distance between two points is a straight line, and Photoshop doesn't take any other route. No matter what you do with the file before creating a second keyframe, Photoshop creates a smooth, mathematically exact transition between the two.
I emphasize mathematically exact because when you first try out this method of animation, you find more keyframes in a movement than you expected. I don't think I've ever seen a ball that bounced at a mathematically exact rate. They usually go faster right after hitting the ground, hang in the air a little and then come down, speeding up as they do. That adds at least four keyframes to my bounce.
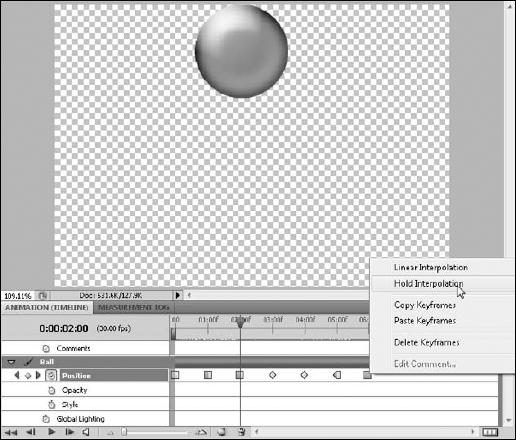
Changing keyframes to a Hold interpolation is as easy as right-clicking them and choosing Hold Interpolation from the menu. The keyframes selected change to squares rather than diamonds, indicating that the interpolation is set to Hold. In Figure 26.7, I changed the keyframes in the position timeline to Hold interpolations. Now instead of steadily bouncing, the ball disappears and instantly reappears in a new position at each keyframe.
You also can see in Figure 26.7 that not all of the keyframe indicators are diamonds or squares. The second to last keyframe indicator looks like it can't decide which one it wants to be. The diamond on the left side of the keyframe indicator shows that the transition coming in is a Linear interpolation. The square on the right half indicates that the interpolation going out is set to Hold.
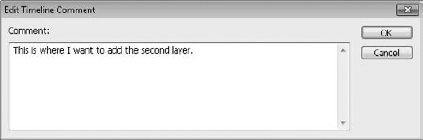
You may have noticed that there is a property at the top of the Animation (Timeline) panel labeled Comments. In this layer, you can place comments on your project. The comments are created just like keyframes. First, click the Time-Vary Stopwatch in the comment layer. This creates your first comment box. Type your comment, and click OK, as shown in Figure 26.8. An indicator is placed inside the comment layer, as shown in Figure 26.9. To create subsequent comments, click between the keyframe navigators. You also can open the Animation (Timeline) panel menu and select Edit Timeline Comment to create a new comment. Do not click the Time-Vary Stopwatch again; this deletes all your comments.
To read your comments, hover over the comment indicator until a window pops up, displaying the comment. To edit a comment, right-click the indicator and select Edit Comment.
You can do so much with keyframes, and you can have lots of fun doing it. But you may get stopped short trying to use keyframes to animate something they just won't do, so before I move onto the specifics of animating each layer property, I want to let you know what cannot be animated using keyframes:
You can't animate transformations using a keyframe. That includes both 2D and 3D transformations. That means no scaling, warping, rotating, or even changing the light settings. If you change any one of these properties on an object or selection, that property remains constant throughout your animation.
You can't animate filters using keyframes. Although you can convert your layers to Smart Objects and add Smart Filters to them, giving them their own sublayer, these sublayers do not have their own property setting in the timeline and cannot be altered over time using keyframes
You can't animate any image adjustments. Level adjusting and color correction can be animated by creating a Fill or Adjustment layer and animating its opacity, but you can't color correct an existing layer over time using keyframes.
You can't animate the painting tools using keyframes. As fun as that would be, painting over time must be done frame-by-frame within Photoshop.
Now that I have the unpleasant limitations out of the way, I focus on what we can do with keyframes. The next few sections take you through the particulars of animating the common properties of every layer: position, opacity, style, and global lighting.
Note
You can absolutely animate the previously listed properties in Photoshop, just not using keyframes. I show you how this is done in Chapter 28.
As I demonstrated in the previous section, you can animate the position of objects or selections within a layer. These positions must be changed with the Selection tool rather than by transformations.
You learned that creating a keyframe is a relatively simple process. Creating the right keyframe, however, can be tricky—even more so while animating position than any other layer style.
The timing of a movement is vital. If you are attempting to create a realistic movement, such as a bouncing ball, you must time it so it looks like it's truly bouncing. Too slow and you get a floating quality. Too fast and you get a spastic ball.
Choosing how many keyframes to place in a movement is key to creating a successful animation. Most true-to-life movements are not mechanical and precise. Placing several keyframes throughout a movement, even if it is in the same direction, can add variations in movement and speed that makes it seem more realistic.
I am also going to show you how you can animate positions across multiple layers, animating objects together so that they move in unison, as well as animating them individually.
These are difficult concepts to demonstrate using still shots in a book, so follow along with the exercises and try things out for yourself so you can see the results on your own computer screen.
For the first exercise, I use my bouncing ball example again. I reduce the size of it significantly so it has much more room to bounce.
You can create a less mechanical bounce to your ball by adding extra keyframes to the timeline:
Create a new file in Photoshop.
Use the default Photoshop size or larger.
Use the Ellipse tool found in the Toolbox to draw a circle.
Hold down the Shift key while you are doing it to constrain it to a perfectly circular shape. You can jazz it up by adding a color or layer style.
Right-click your newly created shape layer to open the pop-up menu, and select Rasterize layer.
Select Window
Click the triangle next to the layer name in the Animation panel to show the layer properties, and click the Time-Vary Stopwatch next to the word Position to activate it.
Set the current time indicator to the beginning of the timeline, and move the ball to the top of the canvas.
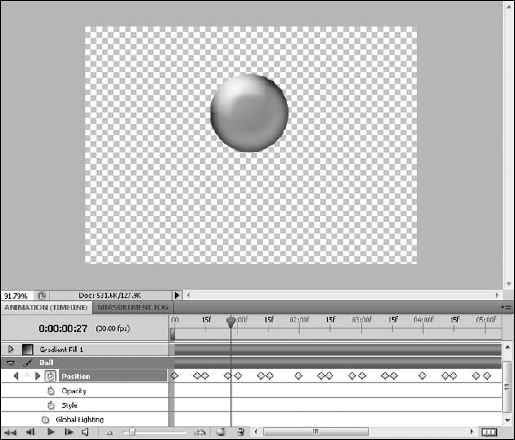
Move the Zoom slider to the right to expand the timeline enough to see half-second increments.
The Zoom slider is found at the bottom of your Animation (Timeline) panel. As you increase the size of the timeline, a 15f appears in the time ruler to indicate the half second mark. The 15f indicates that 15 frames have gone by.
Set the current time indicator to one-half second, and move the ball down to the bottom of the canvas.
Move the current time indicator about one-third of the way between the two keyframes, and move the ball up slightly to create a new keyframe.
This makes the first part of the ball drop slower than the second.
Select all three keyframes, and copy them by right-clicking one of them and selecting Copy Keyframe from the menu.
Tip
You can select all the keyframes in any given layer property by clicking the name of the layer property.
Move the time indicator to one second, and paste the keyframes.
Move the time indicator about a third of the way between one-half second and one second, when the ball is on its way back up, and create a new keyframe by moving the ball farther up along the path.
This makes the ball move faster through the first part of the bounce.
Tip
You can adjust the position of a keyframe by clicking and dragging it in the timeline.
Copy and paste all the keyframes several times at each new half second until the ball bounces several times in succession.
Your timeline should look similar to the one in Figure 26.10.
As you play this animation back, you see that adding a few additional keyframes improves the animation. You can add more keyframes that give the ball a brief pause at the apex of each bounce, or you can edit the position of the ball with each subsequent bounce so it doesn't bounce as high each time. You could even have it bouncing all over the walls like a trapped super ball. Trial and error will help you find the spots where a keyframe would be beneficial.
There may come a time when you want to animate the position of objects in different layers at the same time. For instance, if I added text to the bouncing ball, I would want the text to move along with the ball as it bounced around my screen.
To animate both layers at once, you simply need to select the position layer property in both layers by holding down the Ctrl/
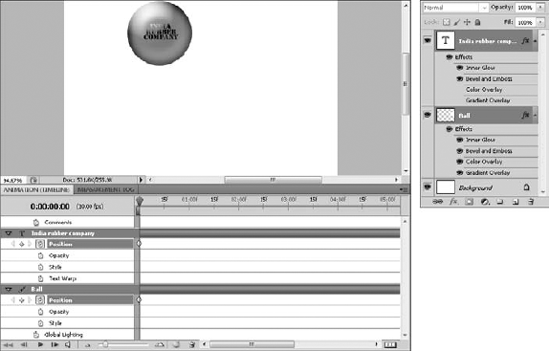
Figure 26.11. You can animate the position of two layers at once by selecting the position properties in both layers in the Animation (Timeline) panel.

Figure 26.12. Now I can move the ball and the text together without losing the editing capability of either.
Warning
As long as the Time-Vary Stopwatch is active, you don't even have to be displaying the layer properties to set a keyframe. Any change in any of the layer properties sets a new keyframe, even if you can't see it. This means you can wreak havoc on your animation without even thinking by moving your layers around the document. Lock the position of your layer (using the Lock icons at the top of the Layers panel) whenever you are not actually creating keyframes.
The principles of animating opacity are essentially the same as animating position. You can create some pretty cool effects by changing the opacity of layers over time. Create ghosts, change the level of special effects, or simply create a fade transition. This feature can be especially useful in creating video special effects. Keep in mind that as you learn the basics of creating keyframes, the applications of using keyframes can be very advanced.
Changing the opacity of a layer is as simple as adjusting the Opacity setting in the Layers. If the Time-Vary Stopwatch is activated in the opacity layer property, simply adjusting the opacity at different locations in the timeline creates keyframes.
With opacity, setting the keyframes isn't nearly as tricky as it is with changing position. It's as easy as deciding what opacity you want where in your animation and setting keyframes at those points. It required only two keyframes to reveal my secrets, as shown in Figure 26.13. You'd think they'd expect it from me by now, but my very gullible family was very relieved.
The important thing here is not how hard it is to animate opacity; it's the flexibility that the tools in Photoshop give this animating capability. You can animate the opacity of any layer in your project, including a Fill and Adjustment layer or a layer style that has been converted to its own layer. You can't animate the actual creation of a paint job or text, but as long as it's on its own layer you can animate its opacity, fading it in or out over time. Of course, you can set the keyframes to hold interpolations as well, allowing your images or special effects to pop in and out of sight.
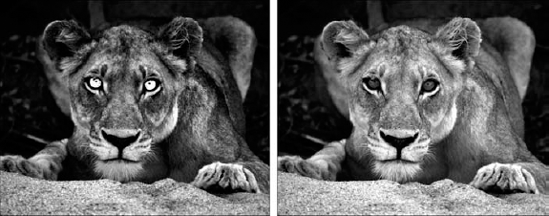
In Figure 26.14, I created a Black & White Adjustment layer over the image of a lion, tinted it green, and gave it the Darken Blend mode. This simulated this photo being taken with an infrared camera. By fading the opacity of the Black & White Adjustment layer over time, I can show you the daytime image that I started out with.
Animating Layer styles is the most diverse of the animation capabilities in Photoshop. Animating position or opacity changes just one setting of the layer selected, but there are ten different layer styles. Every time you change the setting of any one of these styles, you can create a keyframe. Use the styles one at a time or together, or bring styles in and out at will. Adjusting layer styles is the capability to animate a mind-boggling amount of special effects.
Layer styles can be added to a layer by clicking the Layer Styles icon (the fx) at the bottom of the Layers panel and choosing a style from the list. When you select a layer style, the Layer Styles dialog box opens. From the dialog box, you can edit the properties of the layer style you selected and select additional layer styles, as shown in Figure 26.15.
Note
The individual Layer Styles and their settings are covered in detail in Chapter 21.
After you add a layer style, click the Time-Vary Stopwatch next to the style property. Adjust the current time indicator, and double-click the layer style in the Layers panel to bring up the Layer Styles dialog box again. Making any change in the Layer Style dialog box—such as adjusting the settings, adding a style, or deleting the style—creates a new keyframe. If you are over an existing keyframe, the changes you make to the layer style change the settings for that keyframe.
In Figure 26.14, I created an Adjustment layer over the lion and animated it by fading the opacity. You can fade the opacity of a layer style, but not using the opacity setting in the Layers panel. You need to set the opacity of the style in the Layer Style dialog box.
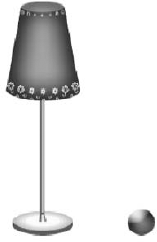
Most of the time, animating layer styles is just plain fun. By animating a bouncing ball in conjunction with animating an inner glow, you can create the illusion of breaking a light bulb out of the lamp shown in Figure 26.16.
You can break the lamp by bouncing the ball in the house following these steps:
Note
For this exercise, you can find a PSD of the lamp saved as Figure 26-16 on the Web site.
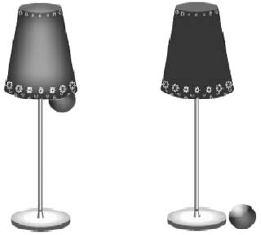
Open Figure 26-16, a PSD file that contains the lamp with an inner glow effect applied to it and the ball as separate layers that are ready to animate.
Select Window
Click the triangle next to the Ball layer in the Animation (Timeline) panel to open the layer properties.
Click the Time-Vary Stopwatch next to the Position property.
Create several keyframes throughout the position property to animate the ball bouncing around the canvas.
At some point, have the ball go up under the lampshade. From there, the ball drops straight down, bouncing once or twice before coming to rest.
Click the triangle next to the Ball layer to close the layer properties.
Click the triangle next to the Lamp Copy layer to open the layer properties.
Move the Current Time Indicator to the beginning of the timeline.
When you animate the Layer Style of the lamp shade, you want the glow to be on in the beginning of the animation.
Click the Time-Vary Stopwatch in the Styles property to activate keyframes.
Drag the current time indicator to the moment when the ball goes up under the lampshade and hits the light.
In the Layers panel, click the eye next to Effects on the lamp Copy layer.
This turns off the light and creates a keyframe in the Style property.
Select both keyframes in the Style property by clicking the property name or by dragging a selection marquee around both.
Right-click one keyframe, and choose Hold Interpolation.
This causes the light of the lamp to go out instantaneously instead of over time.
Rewind and play back your animation, making any adjustments necessary, as shown in Figure 26.17.
Tip
As you create animation files with several layers and styles, you'll find that the playback goes slower and slower. To get a better feel for the speed of your project, choose Allow Frame Skipping from the Animation (Timeline) panel menu. This allows Photoshop to skip frames in playback mode. This helps playback go much, much faster, if a bit unclean. The final rendered product contains all the frames specified in the document settings.
In discussing the layer properties, I neglected to mention Global Lighting. That's because Global Lighting is not a layer property; it is a property that is constant throughout the project. You can see in the Animation panel that it sits, like the comment timeline, independent of any of the layers in the panel, as shown in Figure 26.18.
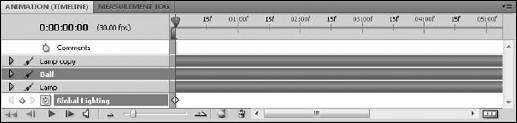
The lighting is set in a layer style that requires an angle of light, such as the drop shadow or bevel and emboss. In any of the settings for these features, you can select Global Lighting, indicating that you would like the light settings to stay consistent throughout all the styles applied to that particular layer. After you've done that, anytime you change the setting of the light in any of the layer styles, the light changes in all other applicable styles.
Global Lighting on the Animation panel affects the entire project, changing the light settings for all applicable styles throughout the layers. You animate Global Lighting just as you would any layer property, by clicking the Time-Vary Stopwatch and setting keyframes, changing the lighting position at each one.
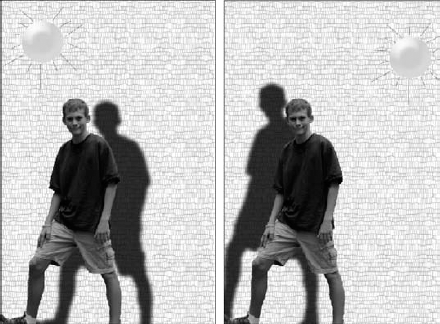
In Figure 26.19, I animated the Global Lighting of the boy's shadow. It moves gradually from one side to the other, giving the illusion that in true teenage style, this boy is just hanging out all day. By animating the Global Lighting, I ensured that any other special effects I might add to this file are lighted in the same way.
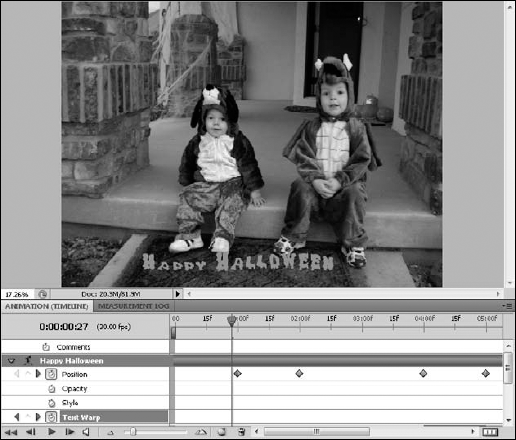
Text is just like any other layer in the Animation panel: you can edit it by changing its position, opacity, or style. This is a fun and easy way to create fun captions or credits for animations, videos, or slideshows. Text has one more property that can be animated. The Text Warp property can be animated as well. Creating keyframes in the Text Warp property lets your text squirm all over the screen.
You animate the Text Warp by creating a text layer and opening its properties in the Animation (Timeline) panel. Of course, the layer properties that you want to animate must to be activated, so click the Time-Vary Stopwatch in the Text Warp layer as well as any other layer you want to animate.
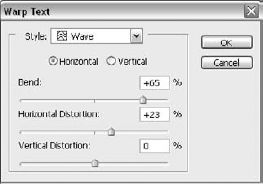
Now all you have to do is make the changes. To warp your text, simply choose the Warp Text option from the options bar that appears at the top of the Photoshop work area whenever you have the Text tool highlighted. You open a Warp Text dialog box where you can set just the kind of text warp you want, as shown in Figure 26.20. From the drop-down list, you can select several types of warp, such as Arc, Wave, Flag, and so on. Then you can adjust the look of the warp you have chosen by moving the sliders in the areas of Bend, Horizontal Distortion, and Vertical Distortion. When you are finished, click OK. The warp is created, and so is a keyframe, as show in Figure 26.21.
Now you can move on, creating a keyframe whenever you want to change the warp of the text or any of the other text properties, and really give your video some punch! You can see an example in Figure 26.22.
When you add a mask to a layer in your image, you add two more properties of your layer that can be animated. You can animate the Mask Position or the Mask Enable.
Animating the mask position allows you to change the position of the mask along with the position of the layer itself. If you have a mask created over a layer and you change only the position of that layer, the layer actually moves through the mask, changing which areas of the layer are visible. In order to keep the mask in place, you must animate the position of the mask as well.
Of course, you also can animate the mask without animating the layer position to create a unique effect. In some cases, you must animate the mask to create the illusion of movement in your layer. If you create a shape, for example, notice that a layer mask is created over a fill over the entire document. You can't really animate the position of a color fill with any noticeable results, which is why I had you rasterize the shape layer in the first example given in this chapter, but you can animate the position of the mask to create the illusion that the shape is moving around the document.
You also can use the Mask Enable animation property to turn masks on or off in an animation. This property works only with a Hold interpolation. In other words, the mask is enabled or disabled, never halfway in between.
Tip
Because the Mask Enable property cannot contain Linear interpolation, you can't dissolve a mask in or out. You can create the same effect, however, by creating two layers. The first contains the unmasked area and the second contains the previously masked area (no mask would be needed in this case). Then you could animate the opacity of the second layer.
In the previous sections, I showed you how to employ the basics of animating using keyframes in the timeline. Keyframes are very limiting, however. You can't animate filters or even paint over time with them.
You can animate just about anything, however, by employing the technique of Rotoscoping. Rotoscoping has been around almost as long as movies themselves. It entails tracing animated characters or scenes over live action film. It's a very useful tool in aiding animators to create more realistic movement because they are copying that movement from life. It's also used to create special effects, such as the light sabers in the Star Wars films.
Today, with the use of computers, Rotoscoping has taken on a broader definition. Now when you hear the term, it can mean any painting or editing of a video frame, whether or not that frame is over a live action scene. With its powerful painting capabilities and filters, Photoshop is the champion Rotoscoping tool.
Although Rotoscoping involves making time-consuming changes to video frame by frame, the effects that are possible are well worth the effort.
The first thing you want to do to start animating frame by frame in the Animation (Timeline) panel is to create a new video layer. Only video layers contain the Altered Video layer that can be changed frame by frame, so if your document doesn't already contain a video file, you need to do this in order to animate changes at all. Even if you already have video layers in your document, you want to create a new video layer in which to store changes. In fact, it's a good idea to create a new layer for each major element in your animation.
Creating a new video layer is as simple as choosing Layer
Tip
The first thing you want to do with a blank video layer is give it a unique name that's descriptive of the element on that layer.
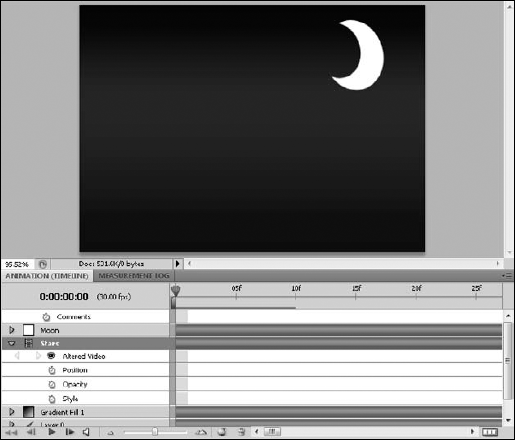
A video layer has one additional property to other types of layers in the Animation (Timeline) panel. That property, as you can see in Figure 26.23, is an Altered Video sublayer. Within that sublayer, frames can be altered one at a time to create an animation.
Now that you have a new blank video layer, you are ready to animate. You can animate frame by frame in the timeline by creating modified frames inside of the blank video layer. I show you how this is done.
You can create individual frames inside any video layer by following these steps:
With the blank video layer highlighted, move the current time indicator in the timeline to the position where you want to make the first change.
Paint or otherwise make changes to the layer.
Click the triangle next to the name of your blank video layer.
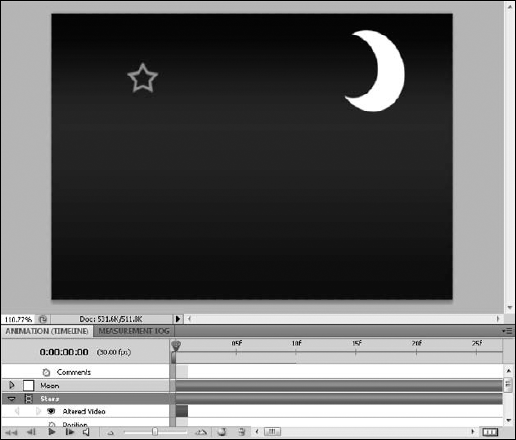
This shows you the properties of that layer, including the Altered Video sublayer. Within the Altered Video sublayer, a small segment has appeared, indicating an altered frame, as shown in Figure 26.24.
To build onto the changes you have already made, choose Layer
Make further changes to your animation.
Continue duplicating frames and making changes to your animation until you have completed it, as shown in Figure 26.25.
You may not want to build on the animation created in a previous frame. That's okay; just navigate to an unaltered frame and make new changes. You can move to the next frame by using the frame advance in the playback controls or by selecting Go to Next Frame in the Timeline panel menu. You also can choose Layer
Tip
You may have noticed that there are no shortcuts for the menu-intensive task that I just had you complete. When you are duplicating frames as often as building animation requires, you get pretty tired of constantly navigating through the menu to do it. Bet you'd like to create a shortcut, right? Choose Edit
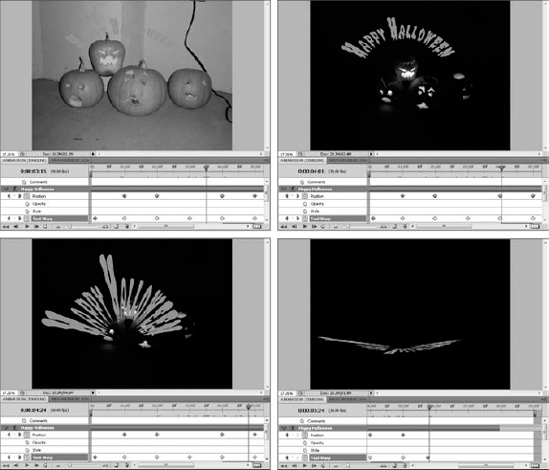
An onion skin, a real onion skin right off of an onion, is semitransparent and very thin. Onion skin paper is also semitransparent and thin—that's how it got its name. This quality has made it ideal for using in animation to make the transitions smoother from one frame to the next. The idea is that the previous frame can be traced onto the next frame, making the small changes necessary to create movement.
Computer animation has made using onion skins an incredibly simple process. By temporarily making your animation frames semitransparent, you can create the next step in your animation by referring to the last one.
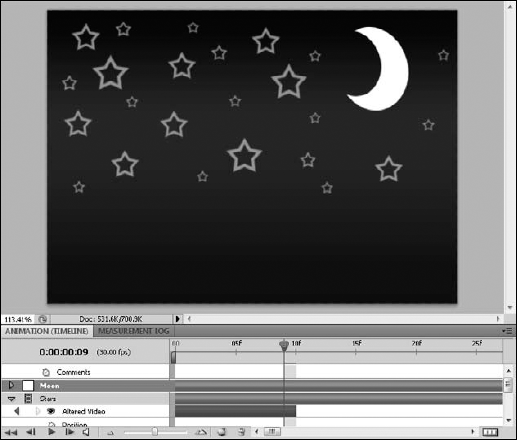
Figure 26.25. By animating these stars frame-by-frame, they appeared a little at a time in the night sky.
That's the basic idea. Photoshop allows you to set parameters for the Onion Skins that go way beyond just being able to see the last frame from the present frame. Besides having multiple settings for the Onion Skins themselves, there are other benefits of using Photoshop. You can create Onion Skins in any layer and make modifications in a different layer. For example, you might want to animate a motion trail for something that is moving in a video layer, a space ship maybe. You could create Onion Skins in the live action video layer and paint over the motion in a blank video layer.
To access the Onion Skin settings, select Onion Skin settings from the Animation (Timeline) panel menu. The Onion Skin Options dialog box opens, and you can set any number of ways for your Onion Skins to work. As you make changes in the dialog box, you can see how they affect the view of the current frame in the timeline in real time, as shown in Figure 26.26.
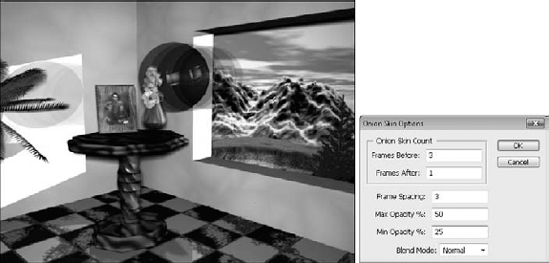
Figure 26.26. The Onion Skin Options have a much greater range of options than a piece of tracing paper.
Onion Skin Count: You can set the number of frames that you want to show through to the current frame, both before and after the current frame. You can show up to eight frames before and eight after.
Frame Spacing: This determines whether the frames being shown are consecutive or appear with gaps in between. A setting of 1 means the frames are shown in consecutive order. A frame setting of 2 means that only every other frame is shown.
Max and Min Opacity: If you have more than one Onion Skin count, you probably want to see the closer frames at a higher opacity than those that are farther out from the current frame. These two settings allow you to set the maximum opacity for the closer frames and the minimum opacity for the farthest frames. The frames in the middle are a setting somewhere in between the two opacities.
Blending Mode: The blending mode changes the way that the opacity setting is applied to the Onion Skins. Different files are easier to work with in different blending modes. You can choose from four blend modes in the Onion Skin Options: Normal, Multiply, Screen, and Difference.
When you have made the changes to the Onion Skin Options, click OK to close the dialog box. The Onion Skins are automatically enabled with the setting you specified. You can toggle the Onion Skins on and off by using the Onion Skin icon at the bottom of the Animation panel.
As you move along in your animation, the Onion Skins move with you, helping you to create any frame along the timeline. You can change the settings at any time as your needs change.
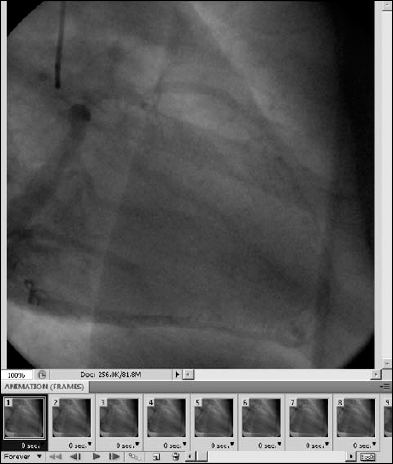
A DICOM file is a medical image or series of images created when you have a sonogram, a CT scan, an MRI, or any number of procedures that take an image of the inside of your body. Photoshop has the capability to view these files as well as animate them. Animating a DICOM file is very similar to importing an image sequence. Of course, to create an animation, you must have a series of DICOM images.
To open a series of DICOM files and animate them, follow these steps:
Choose File
Browse to a DICOM file that is a series of images.
DICOM files have the capability of saving an image sequence as one file. Select the file, and click OK. A dialog box opens, allowing you to set the parameters for opening the DICOM file, as shown in Figure 26.27.
Select the frames you want to animate by holding the Ctrl/

Select Import Frames as Layers from the options on the right side of the dialog box to create a layer for each frame that is imported.
Select Anonymize if you want to scrub out the headers contained in the DICOM images.
Click Open.
From the Animation (Timeline) panel menu, select Make Frames from Layers.

Figure 26.27. You can open a DICOM file in several ways, or you can simply export it to a .jpg. In this example, you want to animate it, so we need to create a layer for each image in the DICOM file.
You can see in Figure 26.28 that a frame has been created for each image contained in the DICOM file. Now you can view the file as an animation or export it as a video file format.
In this chapter, you learned how keyframes play an important part in making animation easy and fun. With the powerful Photoshop tools at your disposal in creating animations, what you can create is limited only by your imagination. You learned how to do these things:
Create and edit a keyframe
Animate the different properties of a layer
Animate text warp
Animate one frame at a time
Animate DICOM files