Creating realistic composites
Placing secondary images using masks
Creating a photo montage
Creating panoramas
When you begin to do more with Photoshop than just correcting photos, the first thing you might think of is image composites. An image composite is any image that has added elements, from a simple text caption to a complex photo montage.
Probably the most difficult part of creating a composite is the ability to create a realistic image that doesn't look like it's been made from more than one element. Even when the image itself is implausible, such as a shark silhouetted in the wave holding up a surfer, or a snowman in the desert, you want your viewers to look twice and wonder if just maybe it might be true. I've lost count of the photos off the Internet that friends and relatives have forwarded and asked, "Photoshopped or not?"
In this chapter, you learn a few tricks of the trade for making your composites look great. I'm sure as you work you'll come up with a few tricks of your own. Every composite has its own unique problems to overcome. Having a thorough knowledge of the tools at your disposal in Photoshop is the best way to solve them.
Creating a composite is much more than just slapping two files together and hoping they mesh well. Placement, perspective, lighting, and color all play key roles in whether a composite looks great or looks mashed together.
Fortunately, there's a reason why a Photoshopped image is an image that is considered too good to be real. I've shown you the tools you need to create great composites; now I show you how to use those tools together to do just that.
Photoshop can open well over 40 different types of file formats. You can combine most of these types with the others. Photoshop has no problem combining a 3D file with a JPEG or TIFF image or layering it on top of an Illustrator file. More incredibly, Photoshop maintains the original aspects of each of these files so they can still be edited and manipulated inside of a composite in the same way as they were edited and manipulated in a file by themselves. In fact, in many ways, making the changes to a file after it has been placed is easier. That way, you can be sure the changes are consistent with the end result you are trying to achieve.
There are no magic tricks to combining files. It is not only incredibly easy, but you can combine files in more ways than one. If you want to copy layers from one file to another, the easiest way, especially if you already have the files open, is to drag the object layer from the first file into the window of the second. You can see how this is done in Figure 21.1.
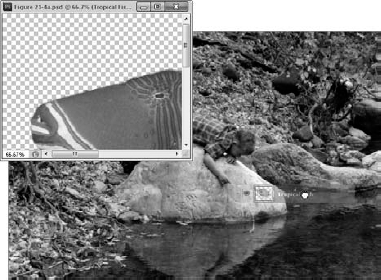
Figure 21.1. Combining files can be as simple as dragging the object layer from the file you want to move into the window of the background file.
You also can combine files by copying and pasting the file, or a selection from the file, into the background image. As you paste a selection into your file, a new layer is created containing that selection. This gives you control over moving the selection and making edits to it.
If you want more immediate control over where your placed file will be located on the background file and how large it will be, use the Place function by choosing File
You can use the numeric values in the Options bar to set the position, size, and orientation of the placed file. When you have placed the file where you want it, click the check mark in the Options bar to accept the changes you made, as shown in Figure 21.2.
Another quick way to combine two complete files is to drag the second from the Mini Bridge into the first open file. It is placed just as if you had used the Place command—as a new layer with a bounding box around it. If you are placing multiple files, this is the best way to do it.
After you've placed a file as a new layer, you can edit and adjust it just as you would any other layer. You can move the content of a layer by selecting it in the Layer panel and using the Move tool to drag and drop it where you want it to be.
Changing the size or rotating a file can be done by selecting Edit
Warning
Be sure the layer of the file you are attempting to change is highlighted in the Layers panel. If it's not, you just may find yourself making changes to the wrong file.

Figure 21.3. By transforming the fish with the warp tool, I can make it look like it's moving downstream.
If you need more leeway to move your files around or enlarge them, change the canvas size by selecting Image
When you have a 3D object placed with another file, you may find that they don't really seem to fit together. You can use these quick tricks to make the files blend together better.
When you create a selection of a file to place into a new file, you occasionally get rough, pixilated edges or an edge with a shadow around it. You can soften these edges as you make the selection or after you have placed it, as long as the area is still selected. Click Refine Edges in the Selection toolbar, or select Select
Note
The Refine Edge dialog box and all its options are covered in Chapter 9.
Most objects in a lighted environment create a shadow somewhere in that environment. Creating a drop shadow is limited in mimicking an actual shadow, but in the right setting, a drop shadow works very well to create a shadow effect. You also can add a drop shadow to help blend the edges of an object or file you've placed.
Create a drop shadow by highlighting the desired layer and clicking the fx icon at the bottom of the Layers panel. Select Drop Shadow from the option list and adjust the settings, looking at the file for a preview, until you've created the effect you want.
Note
The Layer Styles, including an example of creating a drop shadow, are covered in Chapter 10.
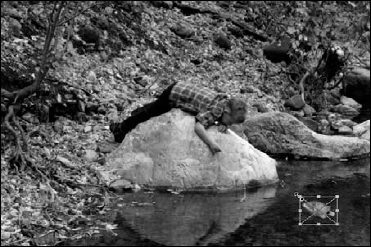
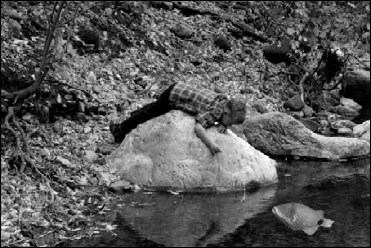
Sometimes a selection placed in an image file looks hard, lacking the color subtleties and the light and shadow of the image. This is especially true of the fish placed in Figure 21.4. The bright colors do not blend realistically with the earth tones of the mountain stream. Because none of the stream color appears on the fish, it looks just like what it is—a picture of a tropical fish sitting on top of the stream. I can blend the fish in by decreasing its opacity and fill settings. In many cases, decreasing these settings until just before you can really make out any details coming through gives your image a softer, more blended look. In this case, I definitely want the stream to come through very strongly, so decreasing the opacity of the fish down around 50 percent gives me the best results, as you can see in Figure 21.5.
Note
You can try combining these two files by downloading Figure 21-4a and Figure 21-4b from the Web site.
Changing the Blending mode is a more dramatic way of changing the way a placed file blends into its background than changing the Opacity or Fill setting. Blending modes are usually for creating artistic effects rather than realism in a composite. You can change the Blending mode by selecting the layer and using the Blending mode drop-down menu in the Layers panel to select a blending option. I used the Color Burn Blending mode to create the composite you see in Figure 21.6.
Note
You can see how the final product was created by downloading the PSD file Figure 21.6 available on the Web site.
Note
You can learn the basics of Blending modes in Chapter 10.
If you have the top layer selected when you create a Fill or Adjustment layer, the layer is placed over all the layers in your document. By making the same changes to all the files in a composite, they have more in common and blend better. Even something as simple as placing a warming filter over both file layers can create depth and bond the files with a common look. Of course, the more dramatic fills and adjustments create an even more dramatic bond.
Add a Fill or Adjustment layer by clicking the icon in the bottom of the Layers panel and choosing the fill or adjustment you want to apply.
Note
You can learn more about the Fill and Adjustment layers in Chapter 13.
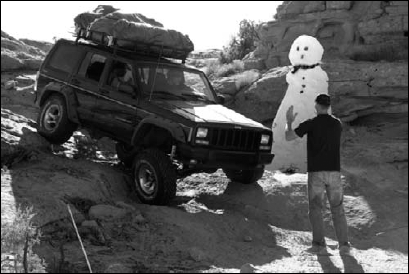
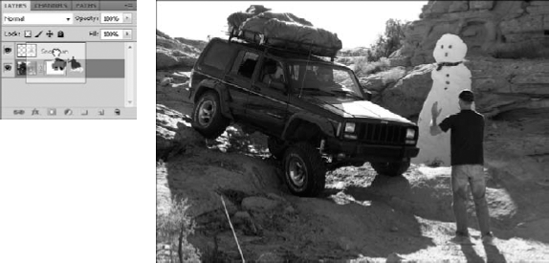
Probably the most effective method of blending files together is to use a mask to tuck the second file behind components of the first one. This method can make viewers look twice at even the most improbable photos. In Figure 21.7, the snowman is distinctly out of place in the desert, but it isn't out of place in this photo, because it's placed so it sits correctly according to perspective. It's behind the Jeep and the man guiding it, but in front of the rocks in the background.
This is accomplished using a mask to cut the man and the Jeep out of the snowman so they appear to be in front of him from the perspective of the viewer.
You can use masks to tuck in a composite object by following these steps:
Note
You can download Figure 21-8 and Figure 21-10 from the Web site to follow along with this exercise.
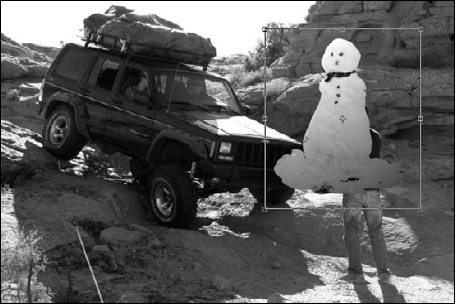
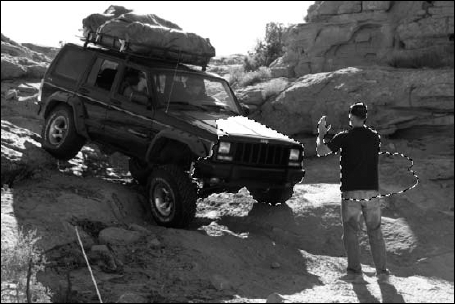
Create a selection around the snowman, as shown in Figure 21.8.
You can take the time to select his arms or just cut them off in the interest of time. You need a little bit of the snow around his feet for a realistic look; you can make a rough selection around this area. Refine the edges of the selection if you desire. I found that a rougher edge was best for this photo combination because of the marked difference in the colors involved.
Use Ctrl/

Open the Jeep photo, and use Ctrl/

Select Edit

He will be sitting in the front of the entire photo, as shown in Figure 21.9, so this is just a rough adjustment.
Click the visibility button (the "eye"-con) next to the snowman layer to make him invisible.
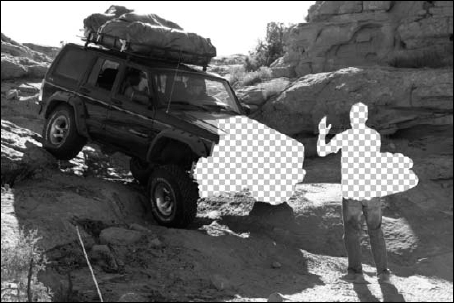
With the jeep layer selected, create a selection around the man and the jeep where they intersect with the snowman when it is visible.
In areas where they don't intersect, the selection doesn't have to be precise, as shown in Figure 21.10.
Choose Select

Refine the edges of the selection.
You want to leave hard edges here so they stand out crisply against the snowman, but you should decontaminate the colors so you don't see a red-rock-colored halo around the edges.
Output the selection to a layer mask, and click OK.
This masks the man and the Jeep in the areas that weren't selected so they disappear from the image, as shown in Figure 21.11.
Note
You can click the Add Layer Mask button in the Layers panel to immediately create a mask from the selection.
Turn the visibility of the snowman layer back on.
Click and drag the mask from the Jeep layer to the Snowman layer, as shown in Figure 21.12.
This masks out the areas of the Snowman that cover the man and the Jeep.
Click the link between the mask and the Snowman to unlink them.
This makes it possible for you to move or resize the snowman without moving or resizing the mask that should stay exactly where it's been placed.
Resize or reposition the snowman as needed to make it fit into the image.
The masks do the most work when it comes to making the snowman look like it belongs in this image, but you can do other things as well. I changed the levels of the snowman until it was less gray and blended better into the sunny background. I also used the Lighting Effects filter to make the snowman appear lit from the same direction as the other elements in the photo. A drop shadow would go a long way in creating realism as well. If you decide to make one, it should be done before the mask is applied to the snowman layer so that the shadow won't have the mask as part of it. You also need to create a new layer mask for the shadow so it doesn't lie across the man guiding the Jeep.
Note
You can find another example of creating a mask to tuck in a second image in Chapter 10, which also includes quite a bit more information on masks and how they work.
You create a photo collage by combining two or more photos in a single image to tell a bigger story than any of the original photos by themselves. Photo collages can be used for a number of purposes. For example, collages can showcase a photographer's work or tell a specific story for a magazine article.
Photo collages can be created in Photoshop in several ways. Figure 21.13 shows some examples of photo collages.
Although all photo collages are different, all seem to have at least a few basic elements that should concern you:
Background: Because we are using multiple photos in the collage, you must have a common background to place the photos on. The background can be either blank or one of the photos. If you want a photo to be the background, you need to crop or size that photo to the correct size of the finished collage. Which method you use is determined by the requirements of how the collage will be used.
Size: Because we are dealing with multiple photos, typically the photos need to be resized. For example, one of the collages in Figure 21.13 shows a full-size background photo with three smaller photos on top.
Layout: Another important part of a collage is the layout—the position and angle of each photo. The angle can make all the difference to the look of the collage. Photoshop makes it easy to rotate and move images in a collage.
Layering: Layering is different from layout and is specific to collages. A collage is really a 3D photo. Layout provides the first two dimensions, and layering provides the third. Photoshop allows you to stack multiple photos on top of each other and quickly adjust which image is closest to the top by dragging and dropping layers in order in the Layers panel.
Shape: Typically, the shape of a photo is rectangular. Many collages keep the original shapes of the photographs. Usually, a layout with square, crisp edges gives a collage a professional look and feel. But sometimes, changing the shape of images in a collage is a better option. You can achieve a homey, scrapbook look by using selections and vector shapes to change the shape of the images in a collage.
Layer Styles: Adding layer styles such as borders, bevels, or drop shadows to the individual photos makes them pop, giving them a three-dimensional look and distinguishing them from one another.
Before you create a collage, make any color corrections or other image adjustments to the individual images you are planning to use in the collage. Making these changes is much easier in the original document with fewer layers.
Use the following steps to create a collage of multiple photos:
Create the background.
If you want a specific photo to be the background, open the photo and crop or size it to the correct size of the finished collage. If you are creating a background, start with a new document and add any color, patterns, or other elements you want.
Tip
When creating a collage on a created background, it is best to create the background as big as possible. This allows you to bring the images in full-size to keep as much detail in them as possible. You can always resize the image down after the collage is created. This won't work when you use a photo for the background, however, because you are limited to the size of the photo.
The easiest way to do this, especially if you have several files, is to create a collection of the files you are planning to use in Bridge and then use Mini Bridge to drag them into the background document, as shown in Figure 21.14. The photos are added to the original document as layers, and you can move and resize them as they are placed.
Select the layer containing the photo you want to work with.
With multiple images on multiple layers, it is more important than ever that the Layers panel become an integral part of your workflow. Figure 21.15 shows a Layers panel with 19 layers representing different images placed in a collage.
Note
Learn how to optimize your use of the Layers panel in Chapter 10.
Tweak the size and placement of your images.
Although you were given the opportunity to resize images as they were placed in the document, seeing them all together and making other changes, such as the shape of the image, usually means you can continuously tweak size and placement. You can move the selected image using the Move tool, or resize or rotate it using the Edit

Adjust the order of the layers in using the Layers panel.
If your photos overlap each other, you may need to adjust which photo is on top. To change which photo appears on top in the image, drag the photo layer higher or lower in the Layers panel.
Change the shape of each photo.
If you want your photo to be a different shape than the (probably) rectangular image you brought in, change the shape by creating a selection inside the image and deleting the unselected pixels or creating a mask to hide them as shown in Figure 21.16.
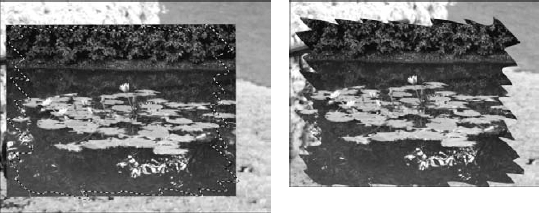
Figure 21.16. Changing the shape of an image is as easy as creating a selection and deleting extra pixels or creating a mask to hide them.
Tip
You can use a vector shape (either a preset or one you've drawn yourself) to create a path and use the Paths panel to create a selection. You also can use a vector shape to create a clipping mask. If your Layers panel is full of image layers, you can create a Smart Object from each image and change its shape in the original file.
Use Layer Styles to add borders, bevels, drop shadows, or other elements to your photo.
These elements change as you change your photo. If you were to transform your photo, for instance, the effect would change with it. The changes add depth to individual photos, as you can see in Figure 21.17.
Tip
You can add the same Layer Styles to each layer by right-clicking the layer style, copying it, and then right-clicking on each layer and using the menu option to paste the layer style. You can't use the hotkeys for this operation, because the hotkeys copy and paste the layers themselves. You can assign hotkeys to this function, however.
Whether or not you have a wide angle lens, you can use Photoshop to create a photo panorama that is much larger and higher quality than you could capture in one shot from multiple photos. The Photomerge utility in Photoshop makes creating panoramas a relatively simple process.
The most critical part of using software to create a panoramic photo from multiple shots is taking the appropriate photos in the first place. Being aware of how Photomerge works to create a panorama will give you the knowledge you need to take appropriate photos. These aspects of taking multiple shots for a panorama will help you create the best results:
Rotational positioning: Rotational positioning involves standing in the exact same place and rotating the camera around that single point to take the photos. The pictures should be taken with the most stability possible, so using a tripod or monopod is the most ideal method.
Warning
A common mistake made when capturing panoramic photos is to use parallel positioning. Parallel positioning involves taking a photo perpendicular to the scene and then moving the camera to a point that is parallel to the first point, still perpendicular to the scene and the same distance away from the scene. This type of positioning makes it very difficult for software to adjust the scene for the appropriate perspective.
Overlap: To create the ideal conditions for blending the images into a seamless panorama, each image should overlap the next by 40–70 percent. Less than this, Photomerge may not be able to line up identical areas in the image. More than this, it has a hard time appropriately blending the images.
Focal length: Be sure to maintain the same focal length in all the images you want to use for a panorama; don't zoom into some of the shots and not others.
Lighting: Maintain the same exposure for each photo. This can be trickier than it sounds. If the sun or other bright elements are present in some but not all of your images and your camera is set for automatic exposure, some of your images may be much darker than others. If you have a camera where the exposure can be set manually, you may want to do that.
Use the following steps to create a single panoramic photo in Photoshop:
Note
You can find the three photos that are used in the following exercise on the Web site saved as Figure 21.18a, Figure 21.18b, and Figure 21.18c.
Open the photos you want to include in the panorama, and close any other photos that may be open in the editor.
The three photos used in this example are shown in Figure 21.18.
Warning
Do not make any adjustments to the photos, such as lighting and color, at this point. Photoshop has a harder time trying to merge the photos if there are even slight differences in these settings between photos.
Select File

Click the Add Open Files button to load the files that are currently open in Photoshop to the Use files list.
You can also use the browse button to browse to the files you want to merge if you don't have them open in Photoshop.
Choose a Layout option from the Layout menu.
You can choose from these layout options:
Auto: This option allows Photoshop to evaluate and determine which of the following settings works best for your photos. Just like any of the automated processes in Photoshop, this is a hit-and-miss setting.
Perspective: Using the center photo as a guide, the other photos are matched using the overlap areas and stretched or distorted to create continuance in the other photos.
Cylindrical: This option flattens out the bowtie effect that's created when taking several images in a circle.
Spherical: This option makes a panorama that is meant to be seen in a circle around the viewer.
Collage: This resizes or rotates the images so that overlapping areas match but doesn't skew or otherwise warp the images.
Reposition: This option doesn't transform the images in any way; it just overlaps them as best as possible.
For this example, choose Reposition because the images don't need to be transformed in any way to look good together.
Note
In Photoshop CS3, Photomerge had an interactive layout option that allowed you to make changes to the semi-finished panorama. In CS4, this option was removed because of significant improvements in Photomerge. If you would like to have more control over the Photomerge process, you can still add this option as a plug-in. PhotomergeUI is available in the optional downloads provided by Adobe on its Web site.
Choose any of the following operations:
Blend images together: This option finds the borders of the images and blends them together optimally for the best results.
Vignette removal: If some or all of the images have lens vignettes, select this option to have them removed while the merge is taking place.
Geometric distortion correction: Use this option if any of the photos being used have distortions caused at the time of capture, such as barrel, pincushion, or fisheye distortions.
There are not any vignettes or geometric distortions in the image of the hotel, so you only need to select Blend images together for this example.
Click OK.
Photoshop needs several seconds to analyze and blend the photos together. When the merge is complete, it is displayed as a new document in Photoshop, as you can see in Figure 21.20.
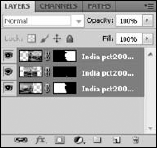
Although the panorama is displayed as a single document in Photoshop, it actually is composed of as many layers as there were photographs to begin with, each with a mask that displays the areas that were cut from each photo to blend them together, as you can see in Figure 21.21. This makes it possible for you to make changes to the way the merge was created by adjusting each layer and each layer mask.
This chapter demonstrated how the tools you have learned up to this point can be used to create the best composites. The examples in this chapter were limited, but the possibilities are unlimited. You learned techniques that will help you create great composites, including these:
The best way to combine files
Several ways to make a composite seamless
Using masks to make an added element look like it belongs in an image
Using Photomerge to create seamless panoramas

