
Using the Channel Mixer to enhance grayscale
Understanding the Channels panel
Creating, duplicating, splitting, and merging channels
Creating and using alpha channels
Adding spot color channels to images
Color channels are a core component of both color and grayscale images. Color images are composed of separate color channels that, when combined, make up the colors in the image. Understanding the color channels and the tools that Photoshop provides will help you make better use of the color data in your images.
Photoshop provides two main tools to help you manipulate and manage the color channels in images: the Channel Mixer and the Channels panel. Using these tools, you can see, manipulate, and even create channels in your image to increase your options when making selections and adjustments.
This chapter discusses using the Channel Mixer to mix, swap, and combine the color data in your images and using the Channels panel to manage channels, create and use alpha channels, and create spot color channels.
In Chapter 4, we discussed how the images that we see are just light emitted from a computer screen or reflecting off a photo. We also discussed that the colors we see can be divided into the levels of three frequency ranges of light-stimulating receptors in the eye. Photoshop uses this same concept to represent digital images. Each pixel in a color digital image contains a series of values that define the actual color of the pixel. For example, each pixel in an RGB image contains a value describing the level of red, a value describing the level of green, and a value describing the level of blue.
A channel is the series of values for only one color for the entire image. For the red channel, each pixel contains only one value describing the level of red. Splitting the image into individual color channels allows Photoshop to provide some very powerful tools when editing images and creating special effects.
Photoshop provides tools to adjust channels based on the color mode of the image. For example, if the color mode is RGB, Photoshop provides red, blue, and green tools; if the color mode is CYMK, Photoshop provides cyan, yellow, magenta, and black tools.
Individual channels are treated as grayscale images by Photoshop because color is based on the mix of the channels; with only one channel, Photoshop cannot determine color. That is why when you view a single channel of an image, it is displayed in grayscale.
An advantage to breaking color into channels is that each color channel contains part of the detail of the image. Notice the three channels shown in Figure 11.1. Each channel contains different parts of the detail that make up the entire image. Breaking the image out into detail gives you greater options when trying to work with the detail in an image.
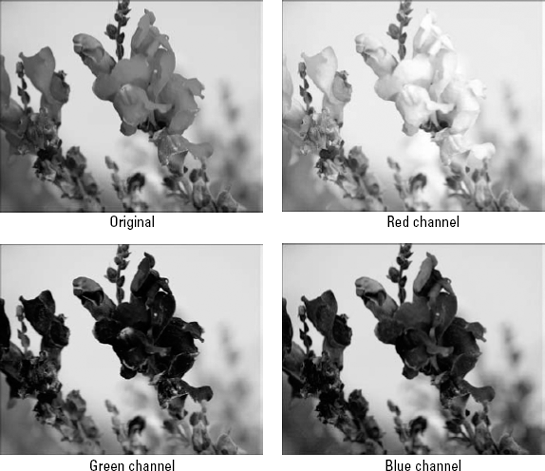
Figure 11.1. The red, green, and blue color channels of an image each contain part of the full detail in the image.
Note
The image shown in Figure 11.1 can be found on this book's Web site as Figure 11-1.jpg. You can open it in Photoshop and view each of the color channels.
One of the most powerful, yet least commonly used, tools in Photoshop is the Channel Mixer. To reach the Channel Mixer, shown in Figure 11.2, select Image
You may wonder whether mixing channels is the same thing as adjusting the colors in the image using one of the other adjustment tools. The answer is no. When you mix two or more channels, you are not mixing the colors of the channels so much as you are mixing the detail provided in the channel. Mixing the channels allows you to change the detail levels in each channel, which provides a different result when you later make other adjustments such as changing the hue or tone in the image.
Note
The Channel Mixer is available only when you are using the RGB and CYMK color modes. If you need to eventually work in the lab, grayscale, or other color modes, you want to do the channel mixing before changing the color mode from RGB or CYMK.

The Channel Mixer provides these options when mixing the channels in an image:
Preset: This allows you to select from a previously saved mix of channels. Photoshop provides several black and white preset settings that apply different color filters, including infrared. This is useful if you need to make the same mix to more than one photo or if you want to save a certain mix and then try others. To save the current Channel Mixer settings, select Save Preset using the drop-down menu button next the Preset drop-down list.
Output Channel: This allows you to select the output channel that receives the mix of data from the set of source channels.
Warning
The current data in the output channel is overwritten by the values specified in the set of source channels.
Red: This specifies the percent of the red channel levels to mix into the output channel. You can use the slider or type in the value directly.
Green: This specifies the percent of the green channel levels to mix into the output channel. You can use the slider or type in the value directly.
Blue: This specifies the percent of the blue channel levels to mix into the output channel. You can use the slider or type in the value directly.
Constant: This specifies the grayscale value of the output channel. When you specify negative values, more black is added to the output channel. When you specify positive values, more white is added.
Monochrome: When this option is selected, the output channel is changed to gray and the preview of the image is in grayscale. This is the perfect option to use when you want to adjust a color image before converting it to grayscale.
There are three basic reasons to mix the color channels in an image. The most common is to selectively control how color channels are mixed to create a grayscale image. Another reason is to mix channels with more details to enhance channels with less. The third reason is to completely swap channels to create special effects without altering the other channels.
Using the Channel Mixer, you can specify how much of the level data, or detail, from each of the three channels to mix into one single channel. This allows you to change the actual color channel composition of the image.
Color mixing is done by selecting an output channel in the Channel Mixer and then setting the percentages of each color channel that will be used to form the new channel. For example, consider a single RGB pixel. If we use the Channel Mixer to change the red channel to be a composite of 0 percent red, 50 percent green, and 50 percent blue, then the red value for each pixel would be changed to 0 percent of the red value plus 50 percent of the green value plus 50 percent of the blue value.
Color mixing is useful when you have a channel in an image that contains very little detail because it was taken in colored lighting or some other situation that alters the color tone in the image. Using a mix of the other two channels, you can add more detail to channels that are lacking.
Warning
The Channel Mixer allows you to use any combination percentage values of −200% to 200% for each source channel. That means you can end up with a total percentage that is not 100 percent. If you change the values such that the total does not equal 100 percent, the overall tonal content of the image is altered. This typically is not a desired result.
A great way to apply a special effect in an image is to completely swap color channels. This has the effect of changing the look of the entire image without altering the actual detail in the image. The effect changes depending on the color channels that you swap and the content of the channels in the image.
To swap colors in an image, follow these steps:
Select Image

Set the Output Channel to Red.
Change the value of the Red channel to 0%.
Change the value of the Blue channel to 100%.
Change the value of the Red channel to 100%.
Change the value of the Blue channel to 0%.
Click OK.
The Red and Blue color channels are swapped in the image. The result is that the red tones are changed to blue and vice versa, as shown in Figure 11.4. Although you cannot see the full effect on the image in Figure 11.4, you can go to this book's Web site and follow these steps to see the full effect.


Figure 11.4. Swapping the Red and Blue channels results in a complete change to the color tones in an image that can create some fantastic effects.
Note
The image shown in Figure 11.4 can be found on this book's Web site as Figure 11-4.jpg. You can open it in Photoshop and use the steps in this section to see the changes when you swap the blue and red color channels. As another experiment you could try to swap the green and red color channels.
The most common use of the Channel Mixer is to prepare images to be converted to grayscale. When you convert an image to grayscale, Photoshop uses 40 percent of the red and green channels and 20 percent of the blue channel. For general purposes, those values have produced the best results.
The Channel Mixer gives you complete control in how much of each channel is applied to the output when converting a color image into grayscale. Use these steps to convert an image to grayscale using the Channel Mixer:
Open the image in Photoshop, as shown in Figure 11.5.
Select Image
Check the Monochrome check box.
This changes the output channel to Gray. The Red and Green source channels are set to 40% and the Blue channel is set to 20%, as shown in Figure 11.6. The image will be converted to a monochrome grayscale. The image results of the default values are not very appealing, as also shown in Figure 11.6.
Adjust the Red slider, which has the effect of adjusting the red levels in the image.
In this example, the value is changed to 0%, as shown in Figure 11.7.
Adjust the Green slider, which also has the effect of adjusting the image, but in this case it is a different set of detail in the green levels.
In this example, the value is changed to 110%, as shown in Figure 11.7
Adjust the Blue slider, which has the effect of adjusting the blue levels in the image bringing back some of the detail lost from increasing the red and green channels.
In this example, the value is left at 20%, as shown in Figure 11.7
Click OK to apply the channel mixer settings to the image, as shown in Figure 11.7.
The results are much better contrast and tone than was achieved with the default values in Figure 11.6. Setting the values in the Channel Mixer varies greatly between different images. You will want to play with the sliders trying different values while previewing the results in the images.
After you have applied the Channel Mixer settings, select Image


Note
When you use Image

Figure 11.7. The results of using custom values in the Channel Mixer to create the Grayscale channel are much better than those with the default settings.
Note
The image shown in Figure 11.5 can be found on this book's Web site as Figure 11-5.jpg. You can open it in Photoshop and use the steps in this section to see the effects of mixing the channels to create a better grayscale image.
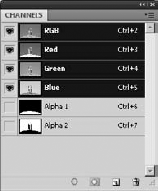
The Channels panel shown in Figure 11.8 provides access to all the channels contained in the images. To open the Channels panel, select Window
Note
When working with RGB and CYMK images, the top entry in the Channels panel is a composite channel of the RGB or CYMK channels. When you select the composite channel, all the component channels are selected.
Using the Channels panel, you can view and select individual channels, remove channels, and create new channels. The following sections discuss using the Channels panel to work with the color channels in an image.

A useful feature of the Channels panel is the ability to select one or more of the channels individually. When only one channel is selected, changes that you make by drawing, erasing, and applying filters are made to that channel only. This allows you to create special effects on specific channels or fine-tune adjustments to a single channel.
You can select channels in the Channels panel by clicking them with the mouse or by pressing the Ctrl/
You also can specify whether a channel is visible by clicking the visibility box next to the channel in the Channels panel. When the eye is displayed in the box, the channel is visible in the image display. When the eye is not displayed in the box, the channel data is not used to render the image display.
Channels can be deleted from the image by selecting the channel in the Channels panel and then clicking the trash can button (refer to Figure 11.8). When you delete a channel, the level data contained in that channel is removed from the image.
When you delete one of the component channels from an RGB or CYMK image, the composite channel also is removed and the color mode of the image changes to Multichannel. Typically, you are only deleting channels that you add to an image, such as an alpha channel or a spot channel.
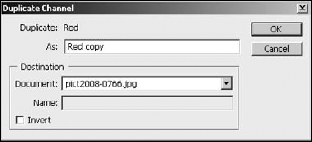
A useful feature of the Channels panel is the ability to quickly duplicate one of the existing channels. This allows lots of flexibility when editing channels. After you duplicate the channel, you can make adjustments to the duplicate channel and simply change the visibility between the duplicate and the original to see the different effects. You also can use this feature to save a channel as another document.
To create a duplicate of an existing channel, right-click the channel in the Channels panel and select Duplicate Channel from the pop-up menu. A dialog box similar to the one in Figure 11.9 is displayed. You can specify the following settings when duplicating a channel:
Document: This selects the document where the duplicate channel will be added. Document defaults to the current image file; however, you can select any open document or a new file.
Name: This specifies the name of the new file if Document is set to new.
Invert: This creates a completely inverted copy of the original channel. The lighter areas of the copy are dark and vice versa.
Photoshop also provides the ability to split the channels contained in an image into separate document files. This is useful when you want to apply lots of adjustments to the individual channels and then merge them later.
To split the channels of an existing image into multiple documents, select Split Channels from the Channels panel menu (refer to Figure 11.8). The current document is replaced by a set of documents representing each channel in the image, as shown in Figure 11.10. You can then edit and save each channel separately.
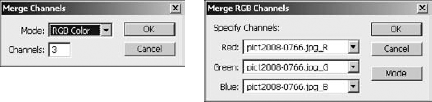
To merge the channels back into a color image, select Merge Channels from the Channels panel menu. A Merge Channels dialog box similar to the one shown in Figure 11.11 is displayed that allows you to specify the color mode and number of channels to be included in the new color image. Click OK to bring up the Merge mode dialog box, also shown in Figure 11.11. This dialog box allows you to specify which files to use for each channel of the specified color mode when creating the color image.
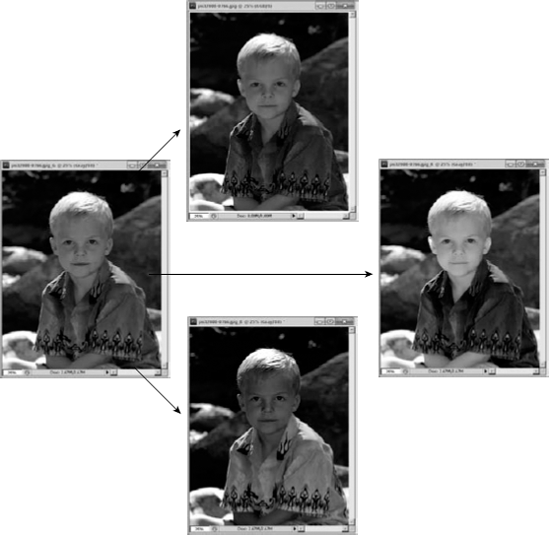
Figure 11.10. Splitting color channels of an image results in a new set of grayscale documents being created, each containing the data from a separate channel. The filenames are the same as the original with an additional letter denoting the channel.
Photoshop makes it extremely easy to share channels between images. This is useful when you need to move channel data between documents.
To move a channel between two documents, simply select the channel in the Channels panel and drag it to another image, as shown in Figure 11.12. A new alpha channel is created in the second image. The contents of the alpha channel are the levels from the selected channel in the original image.

One of the major advantages of having access to the separate channels in Photoshop is the enhanced ability to make selections. Because each channel provides a different aspect into the detail of the image, each has different contrast in relation to each part of the image.
Because you can select each channel individually, you can use individual channels to make different selections in the image. When you want to select a specific item in the image, use the color channel that provides the greatest contrast around the edges of that item.
This example illustrates how to use channels to make better selections:
Open the image in Photoshop as shown in Figure 11.13.
Select Window
After the Channels panel is open, view each channel individually.
Select the Red channel.
The first selection we want to make is that of the rock the boys are standing on. Notice from Figure 11.14 that the red channel provides the best contrast between the rock and the rest of the image.
Use the Quick selection tool, discussed in Chapter 9 to draw across the center of the rock, so it is selected as shown in Figure 11.15.
Then click the Save Selection as a Channel button to save the selection as an alpha channel, as also shown in Figure 11.15.

Figure 11.15. Selecting the rock in the red channel is easy with the quick selection tool because of the higher contrast.
Next we want to select the sky in the background. Notice from Figure 11.14 that the blue channel provides the best contrast around the edges of the sky. So we want to select the blue channel this time.
Use the Quick selection tool to draw across the sky and pick up the edges around the boys to create the selection shown in Figure 11.16.
Again click the Save selection as a Channel to save the selection as an alpha channel.


Figure 11.16. Selecting the sky in the blue channel is easy with the quick selection tool because of the higher contrast.
Using the channel method, we more easily created the two selections than would have been possible using the composite RGB channel. The resulting selections are now channels that can be used as needed for further editing, as shown in the Channels panel in Figure 11.17.
Note
The project file used in the example of this section can be found on this book's Web site as Figure 11-17.psd. You can open it in Photoshop and play around creating selections using different color channels.
In the previous section, we discussed storing a selection in an additional channel called an alpha channel. The alpha channel describes additional information used when processing the actual pixel data. The alpha channel does not provide any data about the color content of a pixel but rather how to process the data.
The main purpose of the alpha channel is to provide transparency information that can be applied to an image. As with the other channels, each pixel in the alpha channel can have a value from 0 to 255 where 0 represents that the pixel is 100 percent transparent and 255 represents that the pixel is 100 percent opaque.
Another useful feature of alpha channels is that you can use them to store and retrieve selections for later use. The alpha channels allow you to have quick access to previous selections and even share them between documents by dragging the alpha channel from one document to another.
Alpha channels are created from selections. The simplest way to create an alpha channel is to make a selection and then save the selection as an alpha channel using these steps:
Open an image in Photoshop.
Select Window
Select an area of the photo that you want to use for alpha channel data, as shown in Figure 11.18.
Click the Save Selection as Alpha Channel button in the Channels panel, to convert the selection to an alpha channel.
An alpha channel is created containing the current selection.

Note
The project file used in the example of this section can be found on this book's Web site as Figure 11-17.psd. You can open it in Photoshop and play around the alpha channels using different color channels.
One of the best features of alpha channels is the ability to retrieve the selection information used to create them. This allows you to work with several selections in one or in multiple files without having to constantly save and reload them.
Selection data can be retrieved from an alpha channel by selecting the channel in the Channels panel and clicking the Load Channel as Selection button at the bottom of the panel. This clears the current selection if there is one and creates a new one from the selection data in the selected alpha channel.
A great thing about alpha channels is that they are actually channels with real data that can be adjusted using filters and painting tools. This allows you to modify the alpha channel in a variety of ways. One of easiest ways is to simply use a paint tool to paint directly on the channel.
The following example uses the paint tool to quickly modify the existing alpha channel created in the preceding section:
Select the alpha channel in the Channels panel.
The image display shows the alpha channel, as shown in Figure 11.19.
Then select the Brush tool from the Toolbox.
Change the foreground color to white.
Use the Brush tool to paint white over any pixels you would like to include in the selection.
In the example in Figure 11.19, the boy on the right is removed.

A layer mask is similar to an alpha channel; in fact, when you link a layer mask to layer, the layer mask appears in the Channels panel. However, a layer mask applies to a specific layer and not the entire image. The alpha channel applies as a separate channel to the entire image.
The difference between alpha channels and layer masks is most apparent when you are viewing the image in Photoshop. When you create an alpha channel, the view doesn't change, as you can see in Figure 11.20. However, when you create a layer mask using the same selection, the pixels in the layer mask are masked from the layer and from the image view, as shown in Figure 11.20.
Note
When you save a file in a format that supports the alpha channel, the alpha channel data is stored as a separate channel and does not affect the pixel values in the rest of the channels. When you save a file with layer masks, the layer mask is flattened and the pixels in the channels of the image are altered.

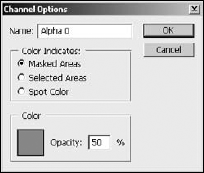
You can change what the data contained in the alpha channel means by setting the channel options. The channel options are set by selecting Channel Options from the Channels panel menu to display the Channel Options dialog box, shown in Figure 11.21. From the Channel Options dialog box, you can set the following channel options:
Name: This allows you to select a name that appears in the Channels panel for this channel. It's useful if you are working with several alpha channels.
Masked Areas: When this is selected, the masked areas are highlighted by the overlay color selected in the Color field. This helps when determining the nature of the selection. Use this option when you want to see the actual pixels of the data that is not being affected by the alpha channel.
Selected Areas: When this is selected, the selected areas are highlighted by the overlay color selected in the Color field. Use this option when you want to see the actual pixels of the data that is being affected by the alpha channel.
Spot Color: When this is selected, the alpha channel is converted into a spot color channel and Opacity option is changed to a Solidity option. Spot colors are discussed in the next section.
Color: This specifies the color of the channel overlay. The overlay is displayed in the document window when the alpha channel visibility is on in the Channels panel. This allows you to view more easily the alpha channel selection because either the selection or the mask is overlaid with the specified color. When you click the color, a color chooser window is displayed, allowing you to specify the color.
Opacity: This specifies the opacity of the overlay channel. Turning up the opacity allows you to better see the pixels behind the overlay. You may need to play around with this setting to see enough of the background image to determine the exact selection.
Solidity: This specifies the Solidity of the spot color channel. Turning up the solidity adjusts how much tint of the spot color is applied to the image or other channels when merged with the spot color channel.
Spot colors are used for offset printing. A spot color is simply a single color that is impressed on the paper in a single pass through the printer. Offset printing is the process of printing in multiple passes using one spot color per pass.
You use spot colors when printing images for two main reasons. First, it is much less expensive to use spot colors when printing than mixing the standard CYMK inks to create the colors needed. Second, you may want to add a color to your image that cannot be created using a mix of the CYMK inks.
The process of creating a spot color channel is similar to that of creating an alpha channel with a few extra steps. The following steps take you through an example of creating a spot channel:
Open the image in Photoshop as shown in Figure 11.22.
Use the Magic Wand tool to select the area of the image that you want to turn into a spot channel. In the case of Figure 11.22, you would want to select the outside of the martial artist.
Press Ctrl/

Select Window
Select New Spot Channel from the Channels panel menu to open the New Spot Channel dialog box as shown in Figure 11.23.
Click the Color field to open the Select Spot Color dialog box.
Choose the color you want to use for the spot color. In this case, Pantone 2717 EC was chosen.
Set the Solidity of the spot color.
In this case, we used 50%.
Click OK to create the spot color channel.
The new channel is displayed in the Channels panel, as shown in Figure 11.24.
Select the new spot channel in the Channels panel.
Click the Load Channel as Selection button in the Channels panel to load the selection used to create the spot channel.
Press Ctrl/
The spot channel becomes a tonal spot channel, shown in Figure 11.25, instead of a solid. When printed, the spot color selected in Step 6 is used to print the pixels in that area of the image.


The spot channel can be merged into the rest of the image. The solidity value of the spot channel determines how much of the spot channel ink is applied to the pixels in the image. To merge the spot channel with the background data in the image, select Merge Spot Channel from the Channels panel menu.
When printing spot colors, you need to be careful that ink from the image content does not overlap the ink from spot colors. Overlapping image content and spot colors results in ink mixing, which typically is not a desired result.
To prevent the colors from overlapping, you need to create knockout by setting the background color to white and deleting all pixels in the image content under the spot color so the spot color ink is the only ink printed on that portion of the paper.
Creating a knockout can create another problem. Because there is no ink beneath the knockout, a white border may appear around the spot color if the ink doesn't print perfectly. To solve this problem, create a trap between the spot color and the image content, shrinking the selection of the spot color by 1 pixel. This allows each of the spot colors to bleed into the image content a bit and eliminate the white border.
Note
Trapping is a prepress technique that involves creating small overlaps between adjacent colors in an image. Trapping allows the colors to bleed together to avoid white outlines that can occur because of alignment when printing.
Follow these steps to create a knockout and trap to avoid spot colors from overlapping:
Create the spot channel as described earlier in this chapter.
Select a spot channel in the Channels panel.
Click the Load Channel as Selection button to get the selection of the channel.
Click the composite channel for the image in the Channels panel.
The selection should now be visible in the composite channel of the image.
Set the background color to be white.
White means that no ink will be printed on that portion of the paper.
Create the trap by selecting Select
Set the Contract By option to 1 pixel.
This allows the spot channel to overlap onto the image content so the inks overlap, eliminating the possible white border between the two.
Create the knockout by pressing the Delete key to delete the image content beneath the spot color. If the Fill dialog box is displayed instead of just deleting the pixels, select white and click OK.
This chapter discussed using the Channel Mixer to have direct access to mixing, swapping, and combining the color data in your images. Using the Channel Mixer allows you to change the color composition without changing the original detail in the image.
This chapter also discussed how to use Channels panel to view and manage channels including alpha channels and spot color channels. Alpha channels are not color channels, but rather they contain information such as transparency about certain areas of images. Spot colors are used when printing specific colors in passes rather than a mix using the standard CYMK ink cartridges.
In this chapter, you learned the following:
How to mix the color channels to create a better grayscale conversion
That swapping two color channels can drastically change the look of an image without affecting the detail
That you can split channels into multiple monotone documents, edit them, and then merge them back into a single color image
How to share channels between multiple images
That alpha channels can be created from a selection
How to use alpha channels to store and retrieve selection data
How to effectively create spot color channels that can be used in offset printing