
Transformations
Puppet Warp
Liquify
Vanishing Point
Distorting images sounds so traumatic that it's hard at first to think of anything but special effects when you hear it. On the contrary, most image distortions are simple functions such as resizing them or adjusting the perspective to make up for lens distortions. Many of the distortions and transformations available in Photoshop are helpful when creating image composites. Using skew, warp, or vanishing point can change the way you perceive an image and make it blend better with other images.
This is especially true of layers that are not composed of images. Text and other vector layers can be transformed and distorted for the same reasons. You can use vanishing point to place text in perspective on any surface in an image. You can warp and distort shapes to give them the appearance of motion or just to give them the appearance of three dimensions.
The big news in this chapter is the all-new Puppet Warp transformation added to Photoshop CS5. It goes way beyond the standard Warp transformation to give you unprecedented control over specific areas in any image.
Transforming an image can be anything from rotating it or changing its size to making it completely unrecognizable by warping or skewing the pixels until nothing is where it belongs. Some of these changes are basic fixes—rotating an image that's been captured in portrait mode, scaling a placed image so it fits with the original document, or fixing perspective problems caused by camera mechanics. Other transformations are all about creating artistic effects—tugging and pulling objects and anatomy so they no longer look like the original captured image.
Note
Most transformations can't be performed on a background layer because it's locked. Double-click the background layer to change it into a standard layer.
New to CS5 is the Puppet Warp tool, which gives the Warp tool a whole new dimension and you as a user much more control. Not only does it include a mesh with several more control points than the standard Warp transformation, but you also can use pins to lock or maneuver the control points so the only pixels that move are the ones you want to move.
When you choose any of the transformations, a bounding box is created around it. Notice that in the center of most of the transformation bounding boxes, you see a crosshair, as shown in Figure 19.1. This crosshair is called the reference point. The reference point indicates the area of your image that is stable. For instance, when you rotate an image, it rotates around the reference point. If the reference point is in the center of your image, it rotates in place. If it is placed on a corner of the image, the image rotates around that corner. The same is true of the Skew, Distort, and Perspective transformations. If you want the center of the image to be stationary while you perform these transformations, center the reference point. If not, you need to move the reference point.
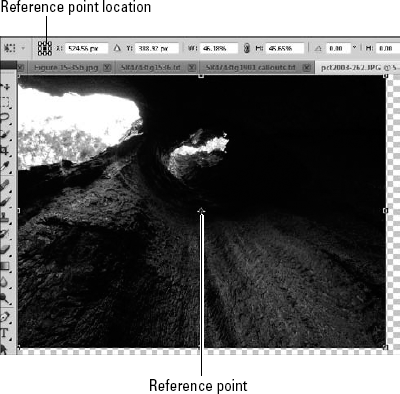
You can move the reference point in two ways. You can use the reference point location and click any of the circles shown to change it to black, moving the reference point to that location. You also can simply drag the reference point into any other position on your image.
Scale simply changes the size of whatever you have selected, whether it is a layer or an active selection. You'll probably find yourself scaling frequently. Whenever you are combining more than one file, you commonly need to scale one or the other of them so they are a good size match. Even elements such as a text or shape layers can be scaled. To scale, choose Edit
You can use the Rotate option to straighten a photo, tilt a photo in a collage, angle text, or any number of things to create the look you want. You probably don't want to use this option to turn a photo that is lying on its side due to being taken by turning your camera or scanning in a photo sideways. The Rotate (180°, 90° CCW, 90° CW) Degrees options farther down the Transform submenu are much faster.
To rotate a selected layer, choose Edit

The Skew transformation allows you to move the corner handles independently of one another to pull or push the pixels in that corner closer to or away from the reference point. This transformation actually morphs the pixels in the area that is being pushed or pulled by merging them or doubling them so it looks as if the image is still contained in its entirety in the skewed shape.
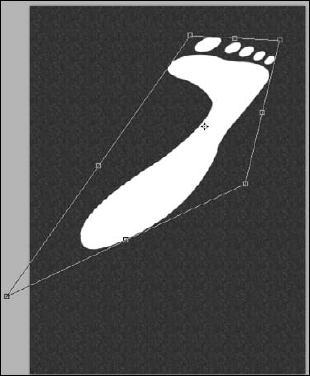
Skewing text is more constrained. Rather than each corner being moved independently, the sides move together to create a sheering effect. An example can be seen in Figure 19.4.
To skew a selection, choose Edit

Distorting an image works much like taking a printed photograph and bending this way and that to make it look different. Distorting in Photoshop works better, of course, because you can make more dramatic distortions without creating any wrinkles. The Distort option can make your selection look angled, bubbled, or squished.
Choose Edit
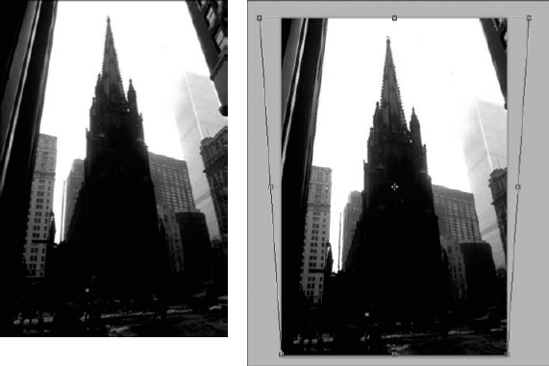
The Perspective transformation widens either the top or the base (or both) of your image to correct perspectives that can be warped by fish-eye lenses or simply by the focal length of the image taken. The need for a perspective fix is most obvious in photos of tall buildings taken from the ground. Because of the perspective created by the lens, the buildings actually look as if they are leaning toward one another, as you can see in Figure 19.6. With a simple Perspective transformation, the tilt of the building is corrected and the subject of the image becomes the focal point. Pulling on the side handles when using the Perspective transformation skews it.
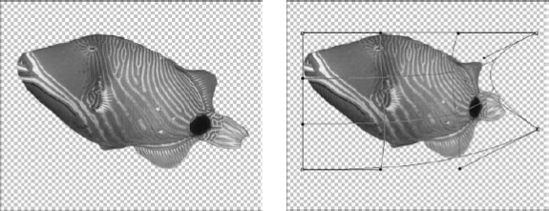
Warp is different from every other transformation I've shown you so far. Instead of a bounding box with handles, the Warp transformation creates a 3×3 grid across your image. This grid can be adjusted at each of its conjunction points to distort the image. The area around the point used changes the most, with the surrounding areas being affected radiating out from the central point. Each corner of the grid also has two control point handles that control the curve of the grid and, therefore, the warp.
Choose Edit
You can use any one of several preset warps by using the drop-down box in the options bar shown in Figure 19.8.

With a few hotkeys memorized and a bit of ingenuity, you can perform any one of the above transformations with the Free Transform option. The best thing about this option is that it already has a hotkey assigned to it, so rather than choosing Edit
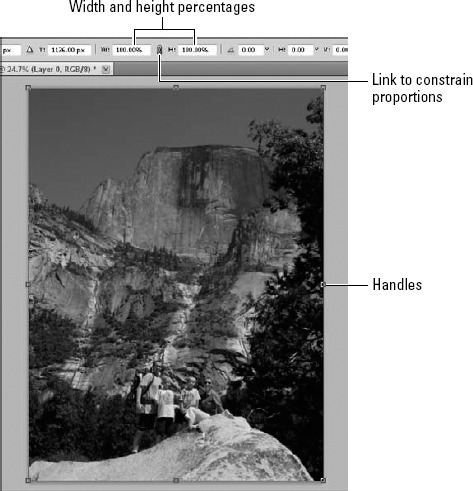
Scale: The bounding box is all set to scale your selection. Just drag any of the handles like you would if you were using the Scale transformation alone.
Rotate: Hover just outside any of the handles on the bounding box to display the two-sided arrow that indicates you can rotate. Drag and rotate freely.
Skew: To skew your selection, hold down the Ctrl/

Distort: You can distort by holding the Ctrl/
Perspective: To change the perspective, hold the Shift+Ctrl or
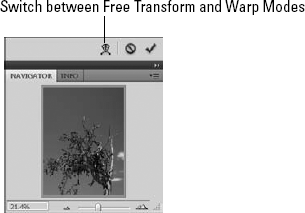
Warp: You can warp a selection from any of the other transform tools by clicking the Switch between Free Transform and Warp Modes button shown in Figure 19.9. This toggles between the standard bounding box and the grid you see when performing a Warp transformation.
The Content-Aware Scale allows you to make images larger or smaller without shrinking or distorting the subject of the image. This is great for making photos smaller without actually cropping out any content or making photos larger to expand a background to get a more dramatic effect or in order to add features to the image.
Content-Aware Scale can work automatically by letting Photoshop guess what the main subject of the image is or by locking any pixels that are skin tones. At best, these methods are hit-and-miss and leave you little control. The best way to use the Content-Aware Scale is to create an alpha channel that protects the areas you want to stay constant.
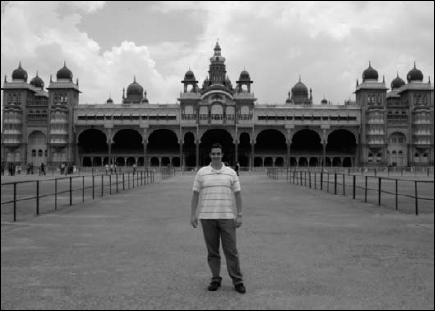
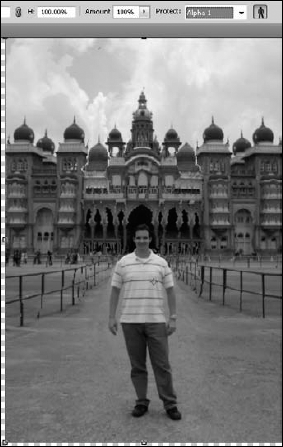
Figure 19.10 is a photo of Brad in front of an Indian palace. Using the Content-Aware Scale, I can change the perspective of the palace in the background. This is a great photo to use, because you can see how far you can push the hard lines in the image before they are broken up or warped. Keep an eye on the columns of the palace and the fence as you make changes.
Note
You can download Figure 19-10 and use this photo to try the Content-Aware Scale. Find it on this book's Web site.
I am going to show you the results of four different ways to use the Content-Aware Scale. First, without any protection at all; second, protecting skin tones; third, protecting an alpha channel and skin tones; and last, protecting just the alpha channel. For this example, I created two layers, one with the image and the second a transparent background that is larger than the image so I can scale larger.
Try different methods of using the Content-Aware Scale by following these steps:
Create a selection around Brad.
It doesn't have to be extremely precise, but a good outline is best.
In the Channels panel, click Save Selection as Channel to create an alpha channel that protects Brad from being squished.
Turn on the visibility of the image, and disable the visibility of the alpha channel; then return to the Layers panel.
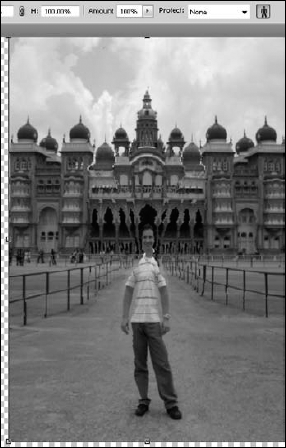
Choose Edit

In the Options bar, make sure the Protect option is None and the Protect Skin Tones button (the silhouette of the man) is not highlighted.
Squeeze or stretch the image at will, keeping an eye on Brad and the straight lines of the palace.
You actually have quite a bit of latitude, especially side to side. Eventually, as you squeeze the photo down, you lose Brad's face. Figure 19.11 is just smaller than I could make the picture and retain a realistic version of Brad. The lines of the palace are just starting to warp as well. This image is significantly smaller than the original, so the Content-Aware Scale worked very well.
Click the Protect Skin Tones button.
This shows you a real-time change, as shown in Figure 19.12; now Brad's face is less distorted and his arms look right, but the rest of his body is hopelessly puckered and out of shape, along with most of the surrounding palace. This isn't the right option for this photo!
Use the Protect drop-down menu to choose Alpha 1.
Now the pixels protected by the alpha channel should revert to their original state. In Figure 19.13, Brad looks great, but the palace is sadly out of shape. Turns out that Photoshop is interpreting the putty-colors of the palace as skin tones. Maybe protecting the skin tones is not the best option.
Click the Protect Skin Tones button to turn it off.
Figure 19.14 shows the best result yet. Brad is protected, and the palace has very few lines that are out of shape. By stretching this image just a little bit, I get a satisfactory result.


The Puppet Warp tool is new in CS5, and it gives you lots of control when it comes to changing the way a previously flat, two-dimensional image looks. It works by placing a mesh over the selected area in your image, giving you the ability to warp and move individual areas of the image, almost as if it were a piece of fabric. Using pins to hold areas in place and others to move your image, you can choose which areas to move, how they'll move, and how far.
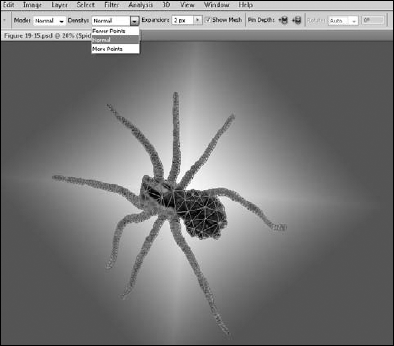
It's fun to try on an image with several independent areas. Figure 19.15 shows a spider on its own layer. Using Puppet Warp, you can move each of her legs independently.

Figure 19.15. The independent nature of each one of these spider's legs makes her ideal for playing with the Puppet Warp tool.
Follow these steps to use Puppet Warp on the spider:
Note
Find the PSD of this spider saved as Figure 19-15 on the Web site.
Select the layer containing the cutout of the spider.
Choose Edit
This changes the options bar and places a grid over the spider, as shown in Figure 19.16. You can change the density of the mesh in the options bar. Increasing the density gives you control over more specific areas, and decreasing the density allows you to move larger areas.
Set the expansion found in the options bar.
The expansion determines how many pixels outside the selected object the mesh will extend. A larger expansion makes movements larger and less precise. The default expansion of 2 pixels works well for this exercise.
Click different areas of the spider to place pins in different places.
Every time you place a pin, that spot on the spider is locked down and doesn't move unless you drag the pin. When you do move a pin, it uses the closest pin as a fulcrum to rotate the selected area around. For instance, if you place just one pin on the center of the spider and then move a second pin placed on the spider's leg, the entire spider rotates around the pin placed on her body. In order to move a leg by itself, at least four pins are needed: two on the body to hold it firm, one on the knee of the leg that you want to move, and one on the end of the leg, as shown in Figure 19.17.
From the options bar, choose a mode that determines how the mesh responds to movement by the pin.
Rigid keeps the distances in the mesh more stable, making it harder to stretch the mesh and therefore the pixels. It is the best choice for limbs or other rigid objects. Normal makes the mesh loose, more like a fabric as it's moved, similar to moving a rag puppet. Distort not only moves the pinned area but also changes its perspective, making it larger or smaller, depending on the direction it is being moved. You want the spider's legs to stay straight, so choose Rigid, as shown in Figure 19.18.
Choose the pin at the end of the leg, and move the leg.
You can move it freely, rotating it on the knee pin, even bending it toward the spider's body if you choose. I want to change the apparent plane the spider is walking on to a horizontal one rather than vertical, so I bend the leg so it's supporting the spider from underneath, as shown in Figure 19.19.

Figure 19.19. Using multiple pins, I have changed the perspective of where the ground is underneath the spider.
Tip
You can select and move more than one pin by holding down the Shift key as you click each pin.
Change the rotation of the mesh around the selected pin.
You can do this from the options bar by choosing Auto or Fixed from the Rotate drop-down menu. Auto rotates the selection automatically based on how you move the pin. Fixed allows you to set your own rotation. You can type a rotation degree into the appropriate box, or you can hold down the Alt/Option key while you hover to the outside of the pin until a Rotation tool appears, as shown in Figure 19.20, and allows you to rotate the mesh around your selected pin. In the case of the spider, you can add feet or reduce unnatural bends caused by the initial pin movement.
If you've warped too far and aren't sure how to get back to where you started, you can delete your pins.
You can delete any of the pins you placed by holding down the Alt/Option key and clicking directly on the pin (scissors should appear) or by hitting the Delete button to delete any selected pins. Removing a pin also removes all the effects that are associated with that pin. If it held an area in place while another pin was moved, that area moves as if the pin had never been placed. If the pin was used to move the mesh, the mesh returns to the starting point.


Playing with the legs of a spider is a fun way to learn the basics behind the Puppet Warp tool, but although moving individual elements can be entertaining, the Puppet Warp tool is more useful in making adjustments and corrections in your everyday images. For instance, you could use it to correct crooked lines created by using the Content-Aware Scale or to tweak the perspective of images that have more complicated lens aberrations than just widening the top fixes.
Although the Liquify filter can be used for creating textures, giving tummy tucks, or several other serious Photoshop tasks, I predict that you'll be laughing too hard to get much serious work done. The Liquify filter is so versatile that it almost qualifies as an application all on its own. It's certainly more than just a tool.
When you select the Liquify filter by choosing Filter
The Liquify utility works in a very similar way to the Puppet Warp. A mesh overlay is placed over your image, creating a grid that can be pulled and warped to change your image as if it were made of fabric. Each tool uses the mesh in a different way to create a different effect. The Reconstruct tools also are based on the mesh.
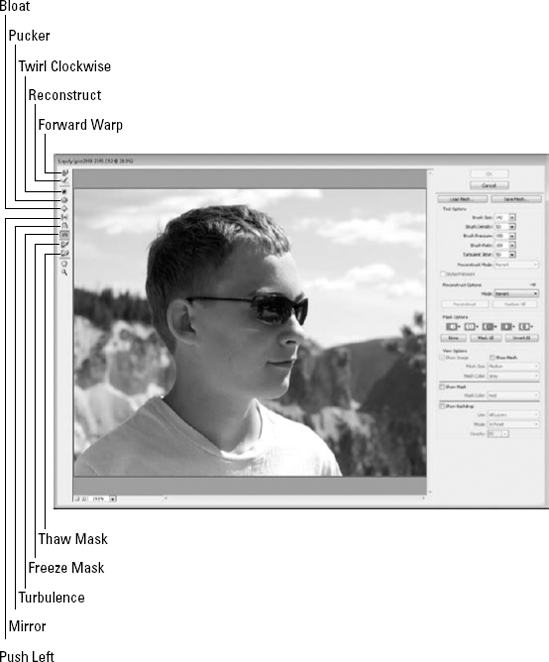
The Liquify tools are stacked neatly in their own Toolbox on the left of the Liquify utility. Some will be familiar to you, namely the Hand tool and the Zoom tool. Others are unique to the Liquify utility. These tools are listed here in the order in which they appear in the Toolbox.
Note
While you are in the Liquify workspace, each of these tools can be accessed by a hotkey. Hover over each tool to see its name and hotkey.
Forward Warp: The Forward Warp tool drags the pixels starting at the center of your cursor forward following the direction you drag. The effects look just like the wake of a boat. This is a very basic way to push pixels around and can create very specific results, as seen in Figure 19.22.
Reconstruct: The Reconstruct tool is a simple way to restore specific areas of your image. Brush over areas that you've already distorted, and they are restored to their original pixel composition.
Tip
Holding down the Alt/Option key while either the Forward Warp tool or the Reconstruct tool is activated temporarily changes it to the other of these two tools.
Twirl Clockwise: Using the Twirl Clockwise tool is like a curling iron for your pixels. Hold down your mouse button to twirl them around your cursor. Be sure to hold your mouse in one spot to do this; the longer you hold, the tighter the twirl is. If you want the twirl to go counter-clockwise, hold down the Alt/Option key while you twirl.
Pucker: Using the Pucker tool is like having a mini black hole in the center of your cursor; the longer you hold down your mouse button, the more pixels are sucked into the center of your cursor. It creates a pinched or puckered look. Great for hips and thighs.
Bloat: This tool has the opposite effect of the Pucker tool, pushing pixels out from the center of your cursor. Great for lips and cheeks. Holding down the Alt/Option key with the Pucker and Bloat tools changes one tool into the other.
Push left: This is another great tool for getting rid of bulges. Dragging this tool upward literally pushes the pixels the width of the brush to the left, blending the pixels to the right into the space left behind. This has a dramatic effect on hard lines, as demonstrated in Figure 19.23. Despite its name, you can push pixels right as well as left by dragging downward, pushing them up by dragging to the right and down by dragging left. Holding the down Alt/Option key reverses any one of these effects.
Mirror: This effect is great for creating reflections or just really cool special effects, as shown in Figure 19.23. You can drag left to mirror the pixels under your cursor, right for the pixels above, down for the pixels to the right, and up for the pixels to the left. Don't worry. Doing it makes more sense than reading about it; you'll get the hang of it. The first brushstroke sets the conjunction point, and as long as subsequent strokes overlap each other (and go in the same direction), the first mirror effect is perpetuated. After you create an independent stroke, a new mirror effect is created.
Turbulence: Turbulence randomly scrambles the pixels within the cursor. You can move the cursor around your image for an effect that is similar—although not as precise—as the Forward Warp, or you can hold it in place to swirl the pixels randomly and eventually create a "burnt" area.
The Mask tools: These tools help you protect areas of your image that you don't want to be liquefied. You can mask areas before or after you've used an effect on it, and the Mask tool won't change the effect. It just protects that area from further changes. Click the Freeze Mask tool, and use the brush to paint over areas you want protected. The Thaw Mask tool "liquifies" the areas again so they can be changed.


The tool options modify the behavior of the brush used to apply the Liquify effects. They are basic brush settings and should be familiar to you if you've used Photoshop at all:
Brush Size: This option changes the size of your brush and, therefore, the size of the effect that is being applied. The brush used to twirl curls in Figure 19.22 was much smaller than the brush used to make the broad mirror strokes in Figure 19.23.
Brush Density: This option sets the amount of distortion that takes place the farther the pixels are from the cursor. If you set your brush to a density of 100, the effects are the same at the edges of the cursor as they are in the center.
Brush Pressure: Use this setting to determine how fast the distortions are applied. If you want to apply settings slowly and carefully, lower the brush pressure.
Brush Rate: This option works with the tools that are applied over time as you hold the mouse in place with the button pressed, such as the Twirl and Turbulence tools. It determines the speed that these effects are applied in this way.
Turbulent Jitter: The Turbulence tool scrambles your pixels, and the Turbulence Jitter setting determines how widely they are scrambled. A lower jitter scrambles pixels in a smaller area, avoiding the burnt look, but not creating a dramatic effect. A larger jitter scrambles pixels every which way inside your cursor.
You can save meshes, just as you would save selections, to use later. The mesh is what is placed over your image and changes as you use the Liquify tools to warp and distort your image. By saving the mesh, you are really saving the Liquify settings that you have applied to your document. These settings are actually saved as an independent file and can be opened even if you have a completely different image in the Liquify utility.
At the top of the options panel, click Save Mesh to save your current liquify status. You can browse and save the document independently of the image, just as if you were saving a new document in Photoshop. Make sure you choose a location where you can easily locate it later. To load a saved mesh, click the Load Mesh button and browse to the location of the mesh file. It is loaded into the Liquify utility and takes effect on the current image immediately, replacing the mesh that was previously there.
When you are having fun with Liquify, it's easy to go overboard. The Reconstruct option that you'll probably use the most is the Restore All button. Simply click this button to restore your image to the one that you opened.
The Reconstruct options are a little more complicated. They don't restore your image completely; each one works with a different algorithm to reconstruct certain aspects of your image and lessen the effects of any distortion you applied to it. The Reconstruct options work using the mesh, and the results you get are affected by any Freeze Masks you place over either areas of distortion or even areas where a distorted object used to be.
Figure 19.24 shows examples of these Reconstruct modes:
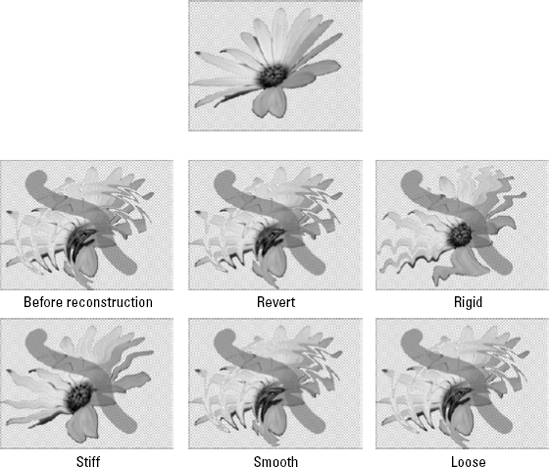
Revert: This mode reverses the effects of the distortion uniformly and a little at a time. Areas that are masked are not affected.
Rigid: This mode restores the right angles in the mesh, removing distortions that twist the mesh past those right angles. In Figure 19.24, you can see that the results are a more recognizable and jagged image.
Stiff: This mode reconstructs your image with only two or three clicks, but if you have any distorted areas frozen, the borders feather into the areas that have been reconstructed rather than creating a hard line between the masked and unmasked areas.
Smooth: This mode works best if the frozen areas are distorted differently than the unfrozen areas, after you have used another Reconstruct mode, for instance. Smooth copies the distortion effects of the frozen areas and propagates them through the unfrozen areas.
Loose: This effect is similar to the Smooth mode, but it creates more continuity.
Note
All the reconstruction modes have cumulative effects, meaning that you can continue to click the Reconstruct button in any mode to achieve a bigger result. You also can choose another Reconstruct mode and layer it on top of any other reconstructions you've already applied.
The mask options in the Liquify utility change the way masks interact with one another. Using the drop-down menu that appears when you click any mask option, you can create or modify an existing Freeze Mask with any selections, transparencies, layer masks, or alpha channels already present in your image.
These options look similar to the options that modify your selections, but if you are used to the way the selection options work to change your selections, these options are going to confuse you, because they do not work the same way at all. In fact, they don't even work consistently with each other. For instance, the Replace Selection option adds a mask over the element you choose from the drop-down menu (Transparency, for instance), but every other option ignores the mask and uses the unmasked area as the selection. On top of that, all these options treat masks created by the Freeze Mask tool as selected areas, so when you add a transparency to a Freeze Mask, it looks more like an intersection.
So, if you are using two different alpha channels from the drop-down menu, the mask options work just the way you think they are going to, but using these options with the Freeze Mask tool is confusing. Instead of giving you a list of what the mask options should do, I provide you with an image of what they really do. In Figure 19.25, I created a Freeze Mask that runs through the flower and the transparency. As I clicked each mask option, I selected transparency from the drop-down menu.
Note
In order to use a selection from the drop-down menu, you need to create a selection in the original document, save the selection using the Select menu, and then deselect the image before opening it in Liquify. If your image contains an active selection when you open it in Liquify, you can liquify only the selected area.
The three buttons at the bottom of the mask options are much more straightforward:

The View options let you change the way you view the image in the Liquify utility.
Show Image: Change the visibility of the image by toggling this option on and off. If the mesh, mask, or backdrop is visible, you see those elements, but if not, the document window is white.
Show Mesh: Turning this option on shows the mesh overlay that allows Liquify to work its magic. You can change the size of the mesh to small, medium, or large, affecting the detail of the Liquify effects. You also can change the color of the mesh.
Show Mask: You can toggle the visibility of the mask on and off with this option. You also can change the color of the mask.
Show Backdrop: If your image contains other layers, you can view them by clicking Show Backdrop. These layers are not changed in the Liquify utility, but they may affect the way you want to make changes to the selected layer. You have several different viewing options that give you versatility in viewing other layers.
After you have finished making changes in the Liquify utility, click OK to apply the changes you made to your file and exit the utility.
When you talk about the vanishing point in an image, you are referring to the fact that as objects get farther away from the camera, they become smaller, eventually vanishing against the horizon. The rate at which this happens is the perspective of the image. Because the make-up of every image is different, the vanishing point is also different. Some images that contain hard corners, such as photos of buildings, can have more than one vanishing point.
Different perspectives and multiple vanishing points can make it difficult to make fixes by cloning or create composites that look realistic, because it isn't always easy to get the perspective just right, even using the Transformation tools.
The Vanishing Point filter allows you to match the perspective of the target image when you clone or combine images so the new elements look realistic. Compared to trying to free-transform or eyeball an element until the perspective is just right, the Vanishing Point filter is simple and easy to use.
Note
Vanishing point changes the perspective of two-dimensional images, which usually has the effect of making them look even more two-dimensional because there will be missing elements, such as compensating shadows or more than one side. Using vanishing point to create banners, posters, car art, or other two-dimensional elements is the ideal way to use it.
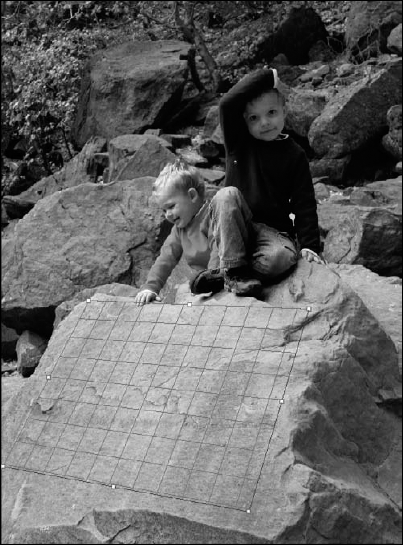
Figure 19.26 shows a photo with at least two vanishing points: the plane of the rock surface is one perspective, and the boys are a different perspective. You can use the Vanishing Point filter to clone an image of the boys onto the rock or to copy another image there.

Figure 19.26. I can use Vanishing Point to change the perspective of elements in the image to match the perspective of the rock plane.
Follow these steps to learn how to use the Vanishing Point filter:
Note
Download Figure 19-26 from the Web site to follow along with this exercise.
Duplicate the layer you are going to open in Vanishing Point.
The Vanishing Point filter makes changes directly to the layer, so you want to keep your changes non-destructive to the original layer.
With the duplicate layer selected, choose Filter
The Vanishing Point utility opens. The Create Plane tool is automatically selected. Vanishing Point uses planes drawn by the user to determine perspective.
Use the Create Plane tool to draw a four-sided plane that exhibits the perspective you want to emulate.
In Figure 19.27, I drew a grid that matches the plane of the rock face.
Edit the plane if needed.
After you draw the grid, the Edit Plane tool is automatically selected. You can move the grid as a whole or change it by selecting one of the handles. If the grid is blue, you've done a great job—it's in perspective. If it's yellow or red, you need to readjust it.
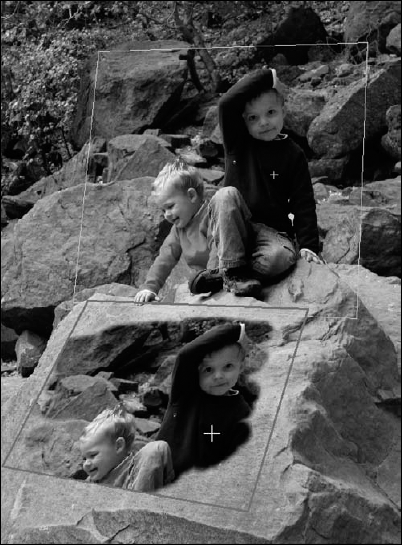
Draw a second plane.
Click the Create Plane tool, and draw a plane that is in perspective with the children, as shown in Figure 19.28.
Now you have several options:
Clone one plane into the other. Using the Stamp tool, you can Alt/Option-click in one plane and drag to clone it into the other plane. You can see in Figure 19.29 that the perspective of the boys has changed from plane to the next.
Create a selection in either plane. Use the Marquee tool to create a selection in one plane and hold down the Alt/Option key while you drag it to another plane. The results are square and lack the softness that can be created with the Stamp tool, but the perspective changes and the image appears in the second plane.
Use the Transform tool to resize and rotate a newly moved selection.
Use the Brush tool to paint. The color, size, and other features of the brush were set before Vanishing Point was opened. You also can use the Eyedropper to change the paint color.
Copy a selection from another document into the Vanishing Point utility. By using Ctrl/
Click OK to exit Vanishing Point and apply the changes to your image.

Tip
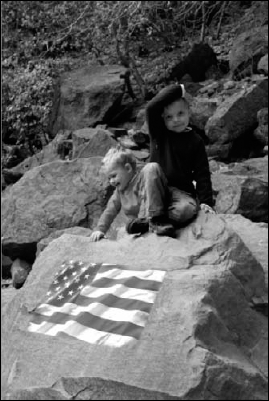
As you select each tool, the options bar at the top of Vanishing Point changes to reflect that tool. Watch for options that make the tools easier to use and more versatile. For instance, with the Marquee tool selected, I used the Heal option to blend the flag into the rock so it looked more realistic.
In this chapter, I showed you several ways to distort or otherwise transform your images and several different reasons to do so. Whether you are resizing, tweaking images so they fit better into composites, or simply having fun creating artistic effects, you should have the skills to do so. You learned how to do the following:
Perform several transformations
Effectively use the Content Aware scale
Use the all-new Puppet Warp
Work in the Liquify utility
Use Vanishing Point to change perspective