Creating Location Documents
Notes always needs to know where you are when you are working, and this information is taken from a Location document. The Location document tells Notes such details as how you connect to the network, what port you use, where your mail file is, prefixes for dialing, and the local time zone.
Five location documents automatically appear during the installation process: Home (Modem), Office Network, Travel (Modem), Island (Disconnected), and Internet. You'll find them in your Personal Address Book in the Locations view. You can customize them to suit your needs or create your own Location documents.
Typically, the Office location is the one you use when you are in the office, connected to the LAN (Local Area Network) via a network port. Home is set up for a remote connection via modem, as is Travel. In the Travel Location document, however, you might want to specify your area code so that Notes dials 1 and the area code of your home server. The Home and Travel documents assume you are using a local replica of your mail database.
To customize the Home Location document, follow these instructions:
If the location indicated on the Status bar is not "Home," click the location indicated on the Status bar and choose Home as your location. "Home" is now your "current" location.
Click Home on the Status bar and choose Edit Current. You'll see the Home Location document (see Figure 22.4).
Tip
Don't Want to Switch Location? If you want to create a new Location document but don't want to switch your current location setting to do it, open your Personal Address Book, select the Advanced, Locations view, select the Location document you want to modify, and click the Edit Location button on the Action bar.
In the Basics section, choose Dial Up modem.
In the Ports section, check the port you use for the location in the Ports to Use field. The available ports are those you already enabled.
In the Servers section, enter the name of your home server in the Home/Mail Server field. Your home server is the server to which you connect at work that stores your mail database. Type its full name (for example, Sales/ABC Company is the name of the server Sales in the organization ABC Company).
Figure 22.4. The Home Location document.
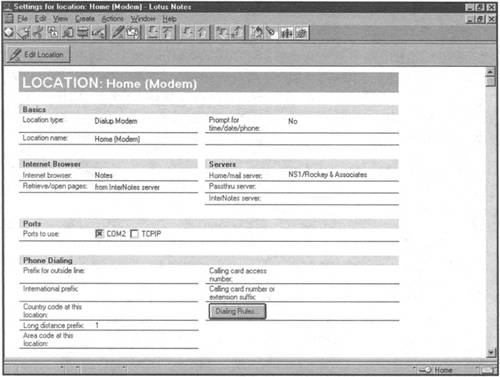
If you use a Passthru server, specify the name of that server in the Passthru Server field.
Note
Passthru Server Some companies have many Lotus Notes servers. They might determine that one of those servers will act as the traffic controller for incoming calls; this is referred to as a Passthru server, as your call must pass through that server to reach the server where your mail is stored. Ask your Lotus Notes administrator if you're going to be dialing into a Passthru server. You need the Passthru server name and telephone number, as well as the server name that contains your mail database.
In the Phone Dialing section, provide your telephone dialing instructions.
The remaining fields on this form contain default information or don't apply to Mail options. Consult with your Notes administrator if you're using an InterNotes server. Click the Save and Close button on the Action bar to save the file and close the document.
Before you begin replicating or before you send or receive mail remotely, you must select the location with the correct communications settings:
Click the Location button on the Status bar.
Select the location you want to use.
If you need to edit a location, click the Edit Location button on the Action bar in the Locations view of your Personal Address Book. Or, click the Location button on the Status bar and select Edit Current. To delete a Location document, click the Delete Location button on the Action bar in the Locations view of your Personal Address Book.
In this lesson, you learned how to set up Lotus Notes for mobile use. In the next lesson, you will learn how to use Notes from a remote location.