
IN THIS CHAPTER
Exploring the Word window
Working with document files
Changing views
Assigning document properties
Protecting documents
By far, way far, Microsoft Word is the single most popular word-processing program in use today. It's the go-to program for creating anything related to text, including letters, manuscripts, proposals, newsletters, blogs, memos, tables, and so on. Not only can you create documents of all kinds, you also can share them with others across e-mail, networks, the Internet, and more. Microsoft Word truly is the workhorse of the Office suite, allowing users amazing versatility in creating documents that range from the very simple to the very complex, from one-page letters to hundred-page reports. Whether you're creating a simple flyer or building a detailed thesis paper, Word offers you dozens of tools and features to create a professional-looking document in no time flat.
Microsoft Word 2008 for Mac is the latest version of the Office productivity suite, on par with Office 2007 for the PC. Before this, the last big version of Word was Office 2004 for Mac. If you're new to Word, or just trying to get up and running fast with this latest version, this chapter is the place to start. Here, you'll find detailed information about the new and improved interface; learn how to open, close, and save document files; see how to change the way you view text onscreen; and learn about the various ways to add data behind the scenes to a document or protect it from unauthorized use.
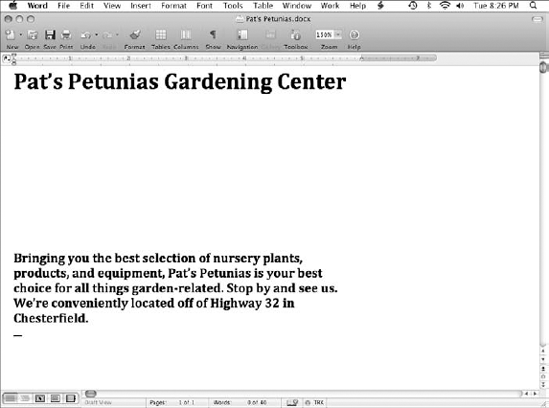
Microsoft Word 2008 for Mac sports a much updated look compared to previous versions of the program. With a fashionably tweaked user interface, Word 2008 for Mac now blends in with all the other Office and Mac programs, displaying modern-looking windows, toolbars, and icons. Figure 5.1 shows the new and improved Word window with a blank document displayed. Pretty spiffy, eh? Before you take yours out for a spin, take a few minutes and review the various parts of the program window, as explained in this section.

Figure 5.1. Behold, the new and improved Word 2008 program window. In this figure, the blank document window appears in Print Layout view. Depending on what view mode is selected, your screen may vary in appearance.
Every Office program window, including Word, has a similar look and feel. This helps the programs seem, well, seamless. After you master the basics in one program, you can count on finding the same tools and icons in the same places in the other programs. So after you figure out your way around Word, for example, you can use those same skills to navigate Excel or PowerPoint. The following descriptions give you a look at the basic window elements.
At the top of the Word window, or the top of any program window for that matter, you'll always find a title bar and menu bar. This bar area lists the name of the program, such as Word, and the main menu categories. To reveal a menu, simply click the menu name and a list of associated or related commands appears. To activate a command, click the command name. Depending on the command, submenus or a dialog box may appear for further input. For example, if a menu command has an arrow icon next to it, a submenu appears when the menu command is selected. If a menu command has ellipses (dots) next to it, a dialog box appears allowing you to give more input before assigning the feature.
What about Keyboard Shortcuts?
When assigning commands from Word's menus, you may prefer to keep your fingers flying on the keyboard to save time and effort. There are plenty of keyboard shortcuts for all the Word commands and for all the other programs in the Office suite. Word even helps you learn the shortcuts by listing them next to menu commands. Almost all keyboard shortcuts involve pressing
Choose Tools
Macros.
The Macros dialog box opens.
Scroll down the list, and click ListCommands.
Click Run.
The List Commands dialog box appears.
Click Current menu and keyboard settings.
Click OK.
Word creates a table in the document with all the commands and shortcut keys.
Click Print or press

Depending on your document settings, the printed list is probably about 20 pages long and includes shortcuts for commands you may never use. However, having the list is handy while you're trying to learn shortcut keys for your favorite tasks.
Just below the menu bar, you'll find program window controls and the document name. The program window controls, which are the three colored circle icons located at the far left side, allow you to close, minimize, and zoom the document window, as outlined below:
The document name at the top of the program window simply lists any assigned name you gave to the saved file. If the document name has not been saved yet, the default name appears, such as Document1, Document2, and so on. You can click and drag the document name icon just like you drag other Mac icons in the Finder. Called the document proxy icon, it works just like the folder proxy icons you use in the Finder. For example, you might drag the current document to another folder or drag it over to the Trash to delete it. You also can
Directly below the title bar and menu bar is the Standard toolbar. This toolbar displays a row of tool icons for common Word tasks, such as opening or printing documents. To activate a feature or command, just click the associated icon. By default, the Standard toolbar appears every time you create a new document. Depending on the Word task you are performing, other toolbars may appear when needed. Word offers 12 different toolbars, or you can create your own custom toolbar. (See Chapter 12 to learn more about customizing toolbars. To learn more about using toolbars in Office, see Chapter 3.)
Tip
You can Control-click an empty area of a toolbar to display a shortcut menu of related commands. For example, if you Control-click the Standard toolbar, you can view commands for changing how icons are displayed on the toolbar, accessing other toolbars, and resetting or customizing the toolbar. For example, if you want to view icons only, click the Icon Only command.
If you click a tab, you can view group tabs for specific categories of elements. Figure 5.2 shows the Document Elements tab selected with the Cover Pages group displayed. You can scroll through the list of items and click the one you want to apply.

Figure 5.2. The Elements Gallery offers a library of preset design and formatting features you can apply to documents, such as cover pages, headers and footers, and tables.
You also can click the Gallery button on the Standard toolbar to view the Elements Gallery, or you can choose View
Word's Ruler feature is actually two rulers you can use to help position text and objects and set margins, indents, and tabs. The horizontal ruler at the top of the document shows the horizontal positioning of the page, while the vertical ruler on the left side of the document window shows vertical positioning. You can turn the Ruler feature on or off by choosing View
The Word Toolbox is packed full of useful tools for completing common tasks. Tools are grouped into palettes that appear as heading bars in the Toolbox. Simply click the palette name to display the palette and view the associated tools and features. You can use this same technique to collapse the palette view again and hide the tools. You learn more about using the Toolbox later in this chapter.
As you add more and more text to your document, you can use the scroll bars to move your view of the document. For example, you can drag the vertical scroll box up or down to move around in the document, or you can drag the horizontal scroll box to move left or right. You also can click the scroll arrows to move around the document. In addition, you can use the Navigation buttons to move up or down a page.
The Status bar, located at the very bottom of the screen, offers lots of useful information. For starters, it contains your document's page count, word count, spelling and grammar status, and the Track Changes feature. The far-left side of the bar displays the various view buttons you can apply. To learn more about Word's views, see "Changing Views" later in this chapter. To learn more about the spelling and grammar features, see Chapter 11. To learn about the Word Count tool, see Chapter 9. To learn about the Track Changes feature, see Chapter 10.

The Word Toolbox consolidates what were formerly separate tool palettes in previous versions of Word into one convenient palette in Word 2008 for Mac. By placing all the common palettes into one easy interface, Word makes accessing commonly used tools and features effortless. Figure 5.4 shows the Toolbox with the Formatting Palette, with the Font and the Alignment and Spacing tools displayed.

To open or hide the Toolbox, use any of these methods:

Choose View
The Word Toolbox includes the following palettes: Formatting, Object, Citations, Scrapbook, Reference Tools, Compatibility Report, and Projects Gallery. To view any particular palette, click the associated palette button at the top of the palette box. For example, if you click the Formatting Palette button, the Toolbox displays formatting tools in sections or panes that you can expand or collapse based on your formatting needs. The name of the active palette appears at the top of the Toolbox. The Formatting Palette (refer to Figure 5.11) has panes for controlling fonts, styles, alignment and spacing, bulleted and numbered lists, borders and shading, margins, and themes. You can click a section or pane name to view its associated tools.
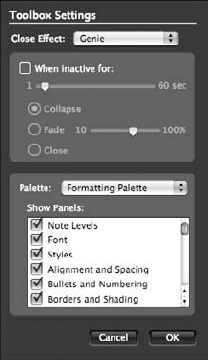
Lastly, you can click the Toolbox Settings button, the small gray icon located in the top-right corner of the palette window, to access Toolbox Settings, shown in Figure 5.5. Use the options in this panel to make the Toolbox automatically close or change appearance when not in use or to select which tool panes you want to appear in the palettes. For example, you can instruct the Toolbox to collapse after a set amount of time or close completely. If you make any changes to the settings, click OK, and Word returns you to the Toolbox.
Files you create in Word are called documents. Every time you open Word, a new, blank document is waiting for you to begin using. As you create files in Word, you'll want to open and reuse them again, so mastering the techniques of creating, opening, and saving files is essential to using Word and the rest of the Microsoft Office 2008 for Mac suite.
Starting new documents is incredibly easy in Word, and you can utilize any of these methods to do so:

You also can click the arrow icon next to the New button to display a menu to specify what kind of new document you want to open: New Blank Document, New Blank Notebook Layout Document, or New Blank Publishing Layout Document.
Choose File
Press
Any of the above methods opens a blank document. If you want to create a specific kind of document, you can use Word's Project Gallery. The Project Gallery, shown in Figure 5.6, is your one-stop shop for projects you create in the Office suite. For example, you can create newsletters, business cards, flyers, ledger sheets, resumes, and much more. This feature, also available in Excel, PowerPoint, and Entourage, includes all kinds of ready-made templates for creating documents. The Project Gallery also keeps track of recent project files.
To create a project with the Project Gallery, follow these steps:
Click File.
Click Project Gallery.
The Project Gallery window opens.
Click the New tab.
Click a document category.
Click the type of document you want to create.
Click Open.
Word creates and opens the new file.

Figure 5.6. The Project Gallery offers a variety of templates you can use to create new Word documents.
When you create a new project, Word displays the document with placeholder, or dummy, text. You can replace the text with your own text. When you finish creating the document, you can save it with a unique filename and reuse it again later.
After you put lots of work into creating a document, you can save it and revisit it again later to make changes or print it. In fact, if you try exiting the document without saving, Word prompts you to save your data. You can use the Save As dialog box, shown in Figure 5.7, to assign a unique filename to a document, as well as specify a location in which to save the file, choose a file format, or check compatibility.
Elements Gallery versus Projects Gallery
You may be wondering "what's the difference between the Elements Gallery and the Projects Gallery?" The Elements Gallery focuses on inserting specific types of items into a document, such as preset headers and footers, cover pages, table of contents pages, and more. The Projects Gallery, on the other hand, offers a library of preset templates for creating entire documents. The Elements Gallery, which is only a quick click away using the Gallery button on the Standard toolbar, offers five distinct categories of elements you can add, including charts, tables, and graphics. In many instances, when you add an item from the Elements Gallery, it ends up adding a new page to the document length. So if you're looking for a quick and easy element to insert, check out the Elements Gallery.

Figure 5.7. When saving a file, you specify a unique name for the document and choose a destination where you want to store the file.
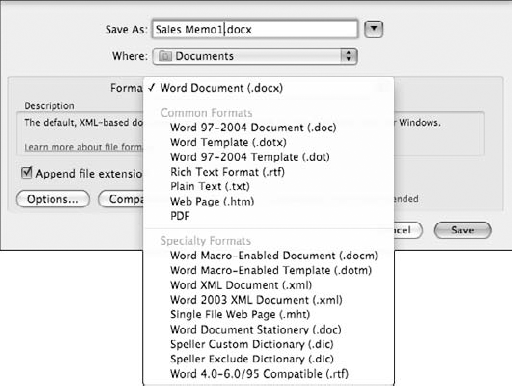
By default, Word documents are saved in the .docx file type. This format is an XML-based format for Word for Mac 2008 and Word 2007 for Windows. You can choose another file type, as needed. For example, if you're sharing the file with someone who uses an older version of Word, you can choose an older file format compatible with the program they're using. Word offers a list of common file formats you can choose from, including plain text (.txt), Web page (.htm), and PDF (.pdf). You can also choose from specialty formats, such as Word macro-enabled document (.docm) or Word 2003 XML document (.xml). Word automatically tacks on the file extension for the format you select, such as .docx. You do not necessarily need the file extension letters, but they do help computers identify the type of file it is, so leaving the Append file extension check box selected in the Save As dialog box is a good idea. Table 5.1 defines the available file formats.
Table 5.1. Word File Formats
File Format | Description |
|---|---|
Word Document (.docx) | Saves the document in XML format for Word 2008 for Mac and Word 2007 for Windows. |
Word 97-2004 Document (.doc) | Saves the document in a format compatible with Word 98-Word 2004 for Mac and Word 97-Word 2003 for Windows. |
Word Template (.dotx) | Saves the document in XML template format, compatible with Word 2008 for Mac and Word 2007 for Windows. |
Word 97-2004 Template (.dot) | Exports a template compatible with Word 98-Word 2004 for Mac and Word 97-Word 2003 for Windows. |
Rich Text Format (.rtf) | Exports a cross-platform file and preserves the content and formatting for viewing in other programs, such as WordPerfect. |
Plain Text (.txt) | Exports the document content without formatting, useful for sharing the document if the destination program cannot read any of the other available formats. |
Web Page (.htm) | Saves the document content for display on the Web, compatible with Mac and Windows Web browsers. |
PDF (.pdf) | Exports the document as a PDF file. |
Word Macro-Enabled Document (.docm) | Saves the document with XML-based document format preserving VBA macro coding. Note: VBA macros do not work in Word 2008. |
Word Macro-Enabled Template (.dotm) | Exports the XML-based template along with VBA macro coding. Note: VBA macros do not work in Word 2008. |
Word XML Document (.xml) | Saves the document content as an XML file, compatible with Word 2007 for Windows. |
Word 2003 XML Document (.xml) | Exports the content as an XML file, compatible with Word 2003 for Windows. |
Single File Web Page (.mht) | Formats the document as a single Web page, including all page elements. |
Word Document Stationery (.doc) | Exports the document with a Stationery Pad Finder flag, so when it is opened, a new document is created. |
Speller Customary Dictionary (.dic) | Saves the document as a dictionary file, allowing for stored words and terms not part of the original, main dictionary feature. |
Speller Exclude Dictionary (.dic) | Saves the document as a dictionary file along with all of your preferred spelling of words. |
Word 4.0-6.0/95 Compatible (.rtf) | Saves the document as an RTF format compatible with Word 3.0 through Word 6.0 for Mac, and Word 6.0 through Word 95 for Windows. |
When saving files, you also can choose exactly where to store a document. By default, Word is set up to save documents to the Documents folder. If you want to save the file to another folder or drive, you must specify a location.
Before you start saving files, you should know about the Compatibility Report tool. As soon as you open the Save As dialog box, you'll notice a red warning blurb recommending a compatibility check. This feature is helpful if you're sharing documents with people who are using different versions of Word. If you activate the Compatibility Report feature, Word runs a compatibility test and notifies you if it encounters any issues that might cause a problem or not print properly in another version of Word. This same feature is available on the Compatibility tab of the Toolbox. If you're not sharing files, you do not need to run the tool.
Now that you've had a brief overview of the file-saving process, you're ready to save your files. You can utilize any of the following methods to save a document.
The first time you save a file, follow these steps:

The Save As dialog box opens, as shown in Figure 5.14.
Type a name for the file.
Choose a destination folder or drive on which to store the file.
By default, Word saves the file to the Documents folder.
Optionally, to save the document in another file format, click the Format arrows and choose a format, as shown in Figure 5.8.
Optionally, to check for compatibility issues, click the Compatibility Report button.
Click Save. Word saves the document, and the new filename appears at the top of the document window.
If you run the Compatibility Report tool, Word checks the file for compatibility issues and displays a prompt if it finds any. You can view the issues using the Compatibility Report Palette in the Toolbox. You also can access the Compatibility Report feature through the Compatibility Palette on the Toolbox. To learn more about this feature, see "Using the Compatibility Report feature" later in this section.
After you've saved the file the first time, you don't have to revisit the Save As dialog box again. Instead, employ any of these methods to save your changes:

Choose File
Press
When you want to save a document with a different name, follow these steps:
Choose File
Save As.The Save As dialog box opens.
Type a new name for the file.
Choose a destination folder or drive on which to store the file.
Click Save.
Word saves the document, and the new filename appears at the top of the document window.
In addition to saving your document the regular way, you also can set up Word to create a backup copy of the file when saving. When you activate this option, Word creates two files during the Save process; one is the original and one is a backup file with the name "Backup of" in front of the filename. Both copies are saved in the designated folder or dive. When opting to use the backup feature, consider placing the backup file on a USB drive, an external hard drive, or an iDisk for extra safety. To create automatic backups, follow these steps:
Choose File
Save As.The Save As dialog box opens.
Type a name for the file.
Choose a destination folder or drive on which to store the file.
Click the Options button.
The Save options dialog box opens, as shown in Figure 5.9.
Click the Always create backup copy check box.
Click OK.
Click Save.
Word saves the document and the backup copy to the same folder or drive.

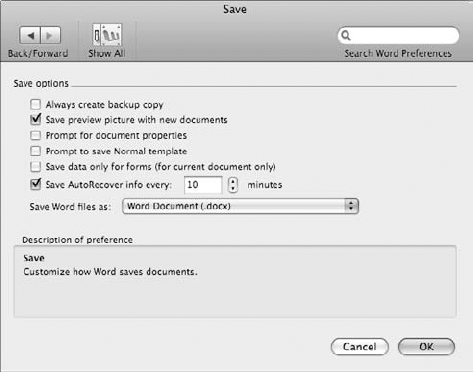
You can use Word's AutoRecover feature to create automatic saves of your document. In case a power glitch of some sort or a computer failure strikes, you'll have a recently saved copy of your work to reopen. AutoRecover saves the current file as a separate AutoRecover file you can open and save under a new name and keep working on the document. You can set AutoRecover to automatically save every 10 minutes, every 15 minutes, or a time specification based on your needs. You don't want to save too often, like every minute, because the AutoRecover feature slows down your computer for a second or two when it kicks into gear.
To create automatic saves, follow these steps:
Choose Word
Preferences.The Word Preferences dialog box opens.
Under the Output and Sharing group, click the Save icon.
The Save preferences appear, as shown in Figure 5.10.
Specify how often you want to save the document in the Save AutoRecover info every box.
You can type in a number or click the arrow buttons to arrive at the number you want.
Click OK.
Word is now set up to automatically save your file.
Note
You also can access the Save preferences through the Save As dialog box. Simply click the Options button in the dialog box while saving a file, and the Save preferences appear.
The Compatibility Report feature is a helpful tool for users who share their document files with people using older versions of Word. Although you're obviously cooler and more hip for having the latest, greatest version of Word, other users you share files with may be using ancient versions of the program, so sending them a copy of the whiz bang company newsletter you created in Word 2008 may result in lots of frustration on their end if they can't open or view the file properly. That's where the Compatibility Report feature comes in. It checks your document and makes it backward compatible. For example, if your document uses features not available in older versions of Word, the report tool warns you and offers you a way to correct any compatibility issues.
One way to check a document for compatibility is to do so when you first save the file. You can activate a Compatibility Report button in the Save As dialog box. This method is covered in "Saving files,", earlier in this chapter. Another way to use the feature is to visit the Compatibility Report Palette in the Toolbox. Here you'll find detailed results of a check, explanations about the issues, and tools for making any fixes or ignoring any problems. Follow these steps to use the Compatibility Report feature:

Click the Compatibility Palette button.
Word opens the Compatibility Report Palette in the Toolbox, as shown in Figure 5.18.
Click the Check compatibility with menu, and choose a document type with which you want to compare.
Word immediately begins checking the document and displays any issues in the Results box, as shown in Figure 5.11.
Click a result to view an explanation in the Explanation box.
To fix a problem, click the Fix arrow button and make a selection.
To ignore a problem, click the Ignore arrow button and make a selection.
You can click the Recheck Document button to check a document again.

After you start creating and saving files, Word makes it easy to open them again. The Open dialog box allows you to open documents stored in various folders and drives on your computer, while the Open Recent submenu on the File menu lists recent files you worked with in Word. You also can use the Project Gallery to open recent Word files.
Compatibility Preferences
You can control what items are compared in the Compatibility Report using the Preferences dialog box. Choose Word
The Open command is a quick way to open a file you created; do so by following these steps:

The Open dialog box opens, as shown in Figure 5.12.
Click the file you want to open.
You can navigate to a folder or device containing the file you want to open using the Navigation Pane.
You also can double-click the document name to quickly open the document.
Click the Open button.
Word opens the document.

Tip
If you don't see the file you want in the Open dialog box, you can change what file types are listed. Simply click the Enable menu, and choose a format. For best results, consider changing the setting to All Readable Documents or All Documents so you can view all the document types.
If you've recently worked with a document, you can quickly access it again using the Recent Files command. Here's how:
The Project Gallery is another easy way to access your documents; here's how:
Click File.
Click Project Gallery.
The Project Gallery window opens.
Click the Recent tab.
Click the document you want to open.
Click Open.
Word opens the file.
You can attach a template to any document in Word using the Templates and Add-ins dialog box. Follow these steps:
Choose Tools
Templates and Add-ins.The Templates and Add-ins dialog box opens, as shown in Figure 5.13.
Click the Attach button.
The Choose File dialog box opens.
Navigate to the template file you want to use, and click the filename.
Click Open.
Click OK.
Word attaches the template to the document.
You also can create a new file based on a preset template found in Word's Project Gallery. See "Creating New Files" earlier in this chapter to learn more.

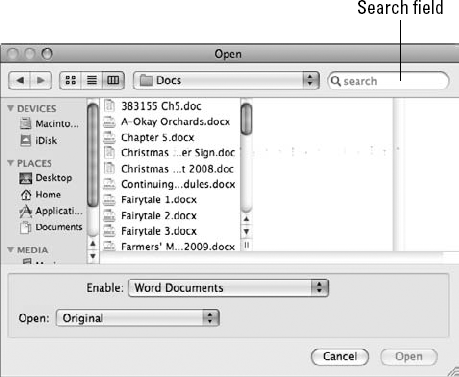
You can use the Open dialog box to search for an existing document on your computer. Using the Spotlight text field, which displays the word "search" by default, you can search for a specific filename, a portion of the name, or keywords pertaining to the name. Follow these steps to search for a file:
Display the Open dialog box, as shown in Figure 5.14. See the previous sections to learn how to open the Open dialog box.
Click inside the Spotlight search field, and type the filename, a portion of the name, or a keyword, as shown in Figure 5.15.
As you type in the search field, Word lists any possible matches.
You can use the buttons at the top of the search window to target your search.
When you find the file you want, double-click the filename to open the document.

Word offers a variety of view modes you can apply to help you as you work with your documents, as well as a Zoom feature you can use to magnify your onscreen text. Word's view modes, including the new Publishing Layout view, offer different features for reading and scrolling through a document's text. The Zoom feature, on the other hand, is used to adjust the viewing size of the area you're looking at onscreen. The view you select has no impact on the actual document; rather, it allows you to change how the document appears in the document window. This section examines the various ways you can view documents.
You can find five view mode buttons located in the bottom-left corner of the program window on the Status bar. These buttons include Draft, Outline, Publishing Layout, Print Layout, and Notebook Layout views. The View menu offers one more view: Web Layout view. Depending on the view you select, certain onscreen elements, such as toolbars or scrollbars, may or may not appear by default. To change views at any time, simply click the view button you want to use. Word immediately switches views. You also can display the View menu and select a view.


After the document is open in Publishing Layout view, as shown in Figure 5.19, it appears on a drawing table, along with a customized toolbar for the view mode, called the Publishing Layout View Standard toolbar. You can assign a new publication template from the Elements Gallery or create your own custom document from scratch. Like a true page layout program, every element in the document is a moveable box, and you literally lay out your document using these boxes; text appears in a text box, graphics appear in object boxes, shapes appear in boxes, and so on. Learn more about using this feature in Chapter 6.


If you're planning to convert your document into a Web page, you can use Web Layout view, shown in Figure 5.21, to see what the document looks like in a browser window. In Web Layout view, no page breaks appear, and no ruler is available for setting margins or indents. To learn more about creating Web pages in Microsoft Office, see Chapter 31.
You can zoom your document to change its magnification setting. The default setting is 100 percent, but you can choose another percentage to zoom in for a closer look at the document or zoom out for a bird's-eye view. You can use the Zoom button on the Standard toolbar to zoom your view, or you can use the Zoom dialog box. The following sections show you how.


You can use the Zoom dialog box to specify a zoom setting. Follow these steps to open the dialog box:
Choose View
Zoom.The Zoom dialog box appears, as shown in Figure 5.23.
Click the zoom setting you want to apply.
Click OK.
Word applies the zoom percentage you specified.

Tip
If you need to quickly view your document without all the onscreen window elements, choose View
Whenever you create and save a document, Word saves some data along with the file, called document properties or metadata. This data includes summary information and statistics about the file, such as when it was created, the last person to save the file, its location, and so on. Quite simply, document properties are a common way to identify and describe any particular document. All Office programs insert some document properties automatically, such as file size and the dates pertaining to file creation.
You can use the Document Properties dialog box to view and set document properties. The dialog box, shown in Figure 5.24, includes five tabs: General, Summary, Statistics, Contents, and Custom. The General tab displays basic information about the file, such as the file type, location, size, creation date, last modified date, and any read-only or hidden attributes settings. The information on this tab is automatically created by Word when you save the file. The Summary tab has a variety of blank text fields you can use to add more information about the file, including title, subject, author, manager, company name, category, keywords, comments, hyperlink base, and what template is attached to the file. You can use these fields, as needed, to add more info. The Statistics tab lists the created and modified dates (again), when it was last printed, who saved the file last, the number of revisions, editing time, and a bunch of statistics on number of characters, words, lines, paragraphs, and pages. The Contents tab displays the contents of the document. Lastly, the Custom tab lets you add your own custom properties to the file, such as client name, destination, and language, and you can set values for each of the properties you add.

Figure 5.24. You can view properties pertaining to a document using the Document Properties dialog box.
To display the Document Properties dialog box, choose File

Word allows you to open and view documents easily. In some cases, perhaps it's too easy, especially when you're trying to keep prying eyes out of important documents. If you're worried about someone viewing personal documents or accessing documents containing private company information, you can utilize Word's document protection features. For example, you can protect your Word files from unauthorized use or changes. Word offers three levels of document protection: read-only, password to open, and password to modify. You can set any of the three security levels using the Preferences dialog box. The following sections discuss how to utilize each of the three security levels.
To allow others to open and view a document, but not make any changes to the original text or formatting, you can set the document to read-only status. If a user makes changes, Word does not allow them to save the changes. They can, however, save the changes as an entirely new document. This leaves your original document intact. To assign read-only status to a document, follow these steps:
Choose Word
Preferences.The Word Preferences dialog box opens, as shown in Figure 5.26.
Note
You also can access Word's security options through the Save As dialog box. Click the Options button, and then click the Show All icon. This takes you to the same dialog box shown in Figure 5.27, and you can follow the steps in this section to assign read-only status.
Click the Security icon.
The Security options appear, as shown in Figure 5.27.
Click the Read-only recommended check box.
Click OK.
The document is now protected and can be read but not altered.


After you assign read-only status, you can no longer change the file yourself until you make the security option inactive again. To do so, simply repeat the steps above and deselect the check box.
The other two security levels Word offers have to do with passwords. You can assign a password to a file so that no one can open it except with a password; this is called the Password to Open option. This is the highest level of security you can assign. You also can assign a password to a document that you can share with others to allow edits to the file, but the file remains read-only to anyone without the password.
Passwords you assign in Word are case-sensitive, which means you can use uppercase and lowercase letters, but remember that you must re-enter the letters in the same fashion. Passwords can contain up to 15 characters, and you can use letters, numbers, and symbols. As with any password situation you come across, though, be sure to write the password down and keep it in a safe place. If you lose it, you lose access to your file, too, and no one, not even Microsoft, can help you gain access to the document again.
To assign a password to a document, follow these steps:
Choose Word
Preferences.The Word Preferences dialog box opens (refer to Figure 5.26).
Click the Security icon.
The Security options appear, as shown in Figure 5.28.
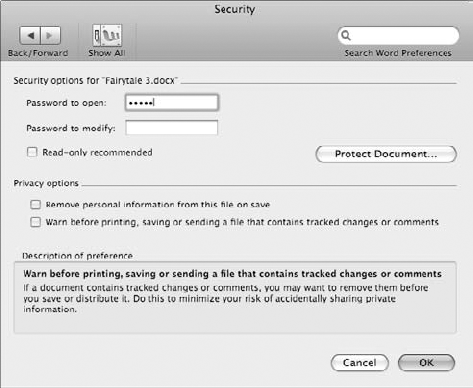
Figure 5.28. You can use the password fields to specify a password for opening the document or a password for making any changes to the document.
Note
You also can access security options through the Save As dialog box; click the Options button, and then click the Show All icon. This opens the Word Preferences dialog box. You can follow the steps in this section to assign a password.
Click the password field you want to assign, and type a password.
Click OK.
The Confirm Password box prompt appears, as shown in Figure 5.29.
Retype the password exactly as you did the first time.
Click OK.
The document is now protected. The next time you open it, you'll be prompted for a password.

To remove a password, repeat the steps, except delete the text you entered in the password field. When you exit the dialog box, Word saves the changes and removes the associated password.
When sharing a document with others for the purposes of editing and tracking changes, you can activate the Protect Document feature and specify which changes are allowed during the process. To do so, click the Protect Document button in the Security options window (refer to Figure 5.28) and choose whether you want to protect tracked changes, comments, or forms. You can then assign a password to the file.
In this chapter, we covered the very basics for working with the program window elements, learning what each element is used for and how to identify it onscreen. Although the information may seem rudimentary, if you learn your way around one Microsoft Office, you'll find it easier to do the same with the other programs. The Office suite shares a similar look and feel, and in many cases, the same tools or window elements.
You also learned how to start new files, start a file based on a preset template using the Project Gallery feature, and how to attach your own template to a document. You also learned how to save your work, create backup files of your documents, and activate the AutoRecover feature. After you've started saving documents, you'll want to open them again, so this chapter also showed you how to open existing files.
When it comes to viewing the actual document, Word has several viewing techniques, and you learned about each view mode, as well as how to use the Zoom feature to change the magnification view of a document. As you're working with text, you're sure to encounter times when you need to zoom in or out to better see your text or how the document looks overall.
Lastly, you learned how to set document properties and how to utilize Word's document protection features to keep your files safe from unauthorized use. Armed with the basics, you're now ready to start building your own Word documents.