
Exploring the PowerPoint window
Working with presentation files
Changing views
Assigning file properties
PowerPoint is the most widely used presentation software on the planet. In fact, Microsoft brags that 30 million presentations are created using the software every day. I'm not sure how they're counting all those, unless everyone's e-mailing them to Bill Gates saying "Hey, look what I made!" Regardless, there is no doubt that PowerPoint is the number one choice when it comes to creating an informative visual display that communicates a message and looks good in the process.
As a presentation program, PowerPoint helps you present information to a target audience. Using a graphical approach in the form of slide shows, PowerPoint is widely used in business and classroom environments to explain or present an idea, a process, a series of information, or just images. You can narrate your presentations yourself while giving them or record narration to go along with them. You can give a presentation using a computer, on a projector screen, or on the Web, or you can print your slides for distribution. The best part is that your presentations always turn out looking professional and polished!
A PowerPoint presentation typically consists of text, graphics, movies, or other objects positioned in layouts on pages, which are called slides. You can make the elements move in and out of a slide using custom animations, and you can make slides move from one to the next using transitions. In this chapter, you learn about the various parts of the program window; creating, opening, and saving presentations; changing view modes; assigning presentation properties; and protecting your presentations from unwanted changes.
Microsoft has tweaked the appearance of PowerPoint along with improvements to all the other Office programs. If you've used previous versions of the software, you'll quickly notice subtle changes to the user interface: It now displays modern-looking windows, toolbars, and icons. Figure 19.1 shows the new and improved PowerPoint window with a blank slide displayed. If you're new to PowerPoint, or if you've used it before and need a refresher course, this section reviews the various parts of the program window.

Figure 19.1. Check out the new and improved PowerPoint 2008 program window. In this figure, the blank slide appears ready for text or graphics.
Note
Depending on how your PowerPoint program is set up, you may be presented with the Project Gallery as soon as you start PowerPoint. This Gallery helps you quickly create an Office file of any kind. If you want to create a PowerPoint presentation based on a template, click the Presentations category and choose a template. To skip the Gallery, click the Cancel button. To stop it from appearing by default, choose PowerPoint
Like all the other Office programs, PowerPoint features a similar look and feel that gives all the programs a seamless appearance. If you've already mastered the basics in one program, such as Word or Excel, you can count on finding the same tools and icons in the same places in PowerPoint. The following descriptions give you a look at the basic window elements found in PowerPoint.
At the top of the PowerPoint window are a title bar and menu bar, as shown in Figure 19.2. This bar area lists the name of the program and the main menu categories. To display a menu, click the menu name and a list of related commands drops down from the menu bar. To activate a command from the menu, click the command name. Depending on the command, submenus or a dialog box may appear for further selections. If you click a menu command that has an arrow icon next to it, a submenu appears. If you click a menu command that has ellipses (dots) next to it, a dialog box opens, and you can specify more input before assigning the feature.
Figure 19.2. The title bar and menu bar display the name of the program and the main groups of menu commands.
Just below the menu bar are program window controls and the presentation name, if you've assigned one. The program window controls, which are the three colored circle icons located at the far-left side, allow you to close, minimize, and zoom the window, as outlined below:
Note
Remember, the program window controls only show icons in the circles when you move the mouse pointer over a control button.
The presentation name at the top of the program window simply lists any assigned name you gave to the saved file. If the presentation has not been saved yet, the default name appears, such as Presentation1, Presentation2, and so on. You can click and drag the presentation name icon just like you drag other Mac icons in the Finder. Called the document proxy icon, it works just like the folder proxy icons you use in the Finder. You can drag the current presentation to the Trash to delete it or drag it to another folder. You also can
Tip
Keyboard command lovers will be happy to know they can still use oodles of keyboard shortcuts in PowerPoint to activate commands and features. Most keyboard shortcuts involve pressing
The Standard toolbar appears below the title bar and menu bar, shown in Figure 19.3. This toolbar displays a row of tool icons for common tasks, such as opening or printing presentations, adding slides, and so on. To activate a feature or command from the toolbar, just click the associated icon. The Standard toolbar appears every time you create a new presentation in PowerPoint. You can add or subtract icons from the toolbar to create your own custom toolbar. Chapter 34 teaches you how to customize toolbars. To learn more about using toolbars in Office, see Chapter 3.
Figure 19.3. The Standard toolbar displays tools for performing common PowerPoint tasks with a click of a button.
Toolbar Tips
You can use five other toolbars in PowerPoint in addition to the Standard toolbar, and you can control which toolbars appear onscreen using the View menu. Choose View
You also can Control+click an empty area of a toolbar to display a shortcut menu of related commands. For example, if you Control+click the Standard toolbar, you can view commands for changing how icons are displayed on the toolbar, accessing other toolbars, and resetting or customizing the toolbar. For example, if you want to view icons only, click the Icon Only command.

Figure 19.4. The Elements Gallery offers a library of preset design items you can apply to your slides.
You also can choose View
The large main area of the program window is the slide pane, shown in Figure 19.6, displaying the current slide. Use this area to view and work with your slide and the various slide elements, such as text boxes. As you add slides to the presentation, a vertical scroll bar appears. For example, you can drag the vertical scroll box up or down to move around in the presentation. If you zoom your view, a horizontal scroll bar appears and you can drag the horizontal scroll box to move left or right to move around the slide. In addition, you can use the Navigation buttons to move up or down a slide.


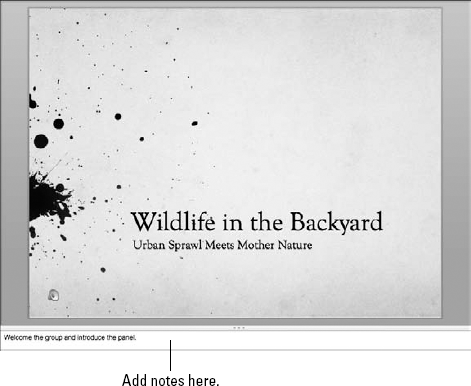
You can use the Notes pane, shown in Figure 19.9, to add notes about a slide. The notes do not appear in the actual presentation, but rather, you can use them yourself when giving the presentation. They appear only on your computer screen, not on the projected screen. You also might use the Notes pane to add notes to yourself about items you need to add to the slide later or a task you need to accomplish before completing the slide.
Files you create in PowerPoint are called presentations. You also may see them referred to as documents from time to time. The terms are interchangeable. As a matter of fact, just about every file you create using the Office suite can be referred to as a document file. Whenever you open PowerPoint, there's a new, blank presentation waiting for you to start using. Granted, the presentation is made up of just one blank slide, but you can easily build from there, adding more slides or "pages" in the presentation. Naturally, as you create files in PowerPoint, you'll want to open and reuse them again, so understanding the techniques of creating, opening, and saving files is essential to using PowerPoint. This section of the chapter shows you how to do all three.
It's very easy to start new presentations in PowerPoint. Use any of these methods:

Choose File

Press

Any of the above techniques opens a blank presentation. If you want to create a specific kind of presentation, you can use PowerPoint's Project Gallery. The Project Gallery (refer to Figure 19.11) is available in PowerPoint, Word, Excel, and Entourage, and includes all kinds of ready-made templates. For example, you can find templates for creating photo albums, pitch books, quiz shows, and widescreen presentations in PowerPoint. The Project Gallery also keeps track of recent project files.
To create a project with the Project Gallery, follow these steps:
Click File.
Click Project Gallery.
The Project Gallery window opens, as shown in Figure 19.11.
Click the New tab.
Click the Presentations category.
Click the type of presentation you want to create.
Click Open.
PowerPoint creates and opens the new presentation file.

As soon as you create a new project with the Project Gallery, PowerPoint displays the presentation along with placeholder boxes for text and graphics, such as photos or clip art. You can replace the placeholder objects with your own text and photos. When you finish creating the presentation, you can save it with a unique filename and reuse it again later.
Which Gallery Is Which?
You can click the Gallery button on the Standard toolbar to display the Elements Gallery, which offers seven distinct categories of elements you can add, including slide themes and layouts. If you're looking for a quick and easy element to insert, check out the Elements Gallery. If you're looking to use an entire presentation, use a template from the Project Gallery.
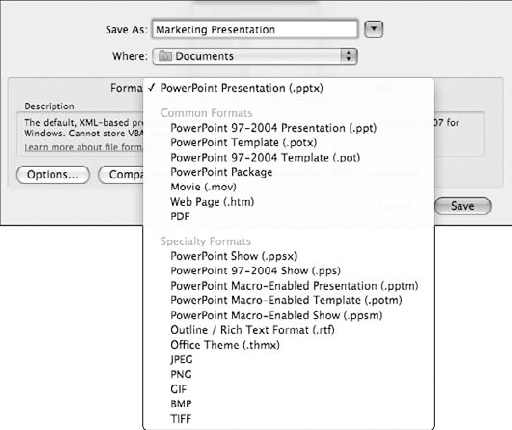
After creating a presentation, you can save it and open it again later to make changes. If you try exiting the presentation without saving, PowerPoint prompts you to save your data. As you've seen in Word and Excel, you can use the Save As dialog box, shown in Figure 19.12, to assign a unique filename to a presentation, as well as specify a location in which to save the file, choose a file format, or check for compatibility.
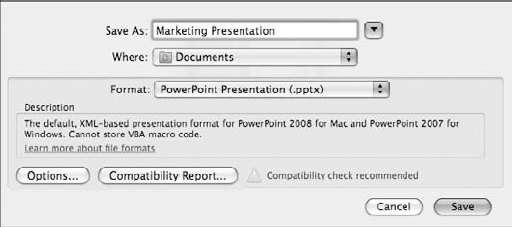
Figure 19.12. When saving a file, you specify a unique name and choose a destination where you want to store the file.
All PowerPoint presentations are saved in the .pptx file type by default. This format is an XML-based format for PowerPoint for Mac 2008 and PowerPoint 2007 for Windows. You can choose another file type, as needed. For example, if you're sharing the file with someone who uses an older version of PowerPoint, you can choose an older file format compatible with the program they're using. You also might choose to save every slide as a graphic to be viewed or copied into another application. The following table defines the available file formats:
Table 19.1. PowerPoint File Formats
File Format | Description |
|---|---|
PowerPoint Presentation (.pptx) | Saves the file in an XML-based document format for PowerPoint 2008 for Mac and PowerPoint 2007 for Windows. |
PowerPoint 97-2004 Presentation (.ppt) | Saves the file in a document format compatible with PowerPoint 98-PowerPoint 2004 for Mac and PowerPoint 97-PowerPoint 2003 for Windows. |
PowerPoint Template (.potx) | Saves the file in an XML-based template format, compatible with PowerPoint 2008 for Mac and PowerPoint 2007 for Windows. |
PowerPoint 97-2004 Template (.pot) | Saves the file in a template format compatible with PowerPoint 98-PowerPoint 2004 for Mac and PowerPoint 97-PowerPoint 2003 for Windows. |
PowerPoint Package | Saves the presentation and any linked files to one folder. |
Movie (.mov) | Exports the presentation as a movie file that can be played in the QuickTime Player. |
Web Page (.htm) | Saves the presentation content for display on the Web, compatible with Mac and Windows Web browsers. |
Exports the presentation as a PDF file. | |
PowerPoint Show (.ppsx) | Saves the file with XML-based presentation format that always opens in Slide Show view as soon as the file is opened. |
PowerPoint 97-2004 Show (.pps) | Opens the file in Slide Show view, compatible with PowerPoint 98 through PowerPoint 2004 for Mac, or PowerPoint 97 through PowerPoint 2003 for Windows. |
PowerPoint Macro-Enabled Presentation (.pptm) | Saves the presentation content as an XML-based format, preserving any VBA macro code. (Note: VBA macros do not work in PowerPoint 2008.) |
PowerPoint Macro-Enabled Template (.potm) | Saves the presentation as an XML-based template format, preserving any VBA macro code. (Note: VBA macros do not work in PowerPoint 2008.) |
PowerPoint Macro-Enabled Show (.ppsm) | Saves the presentation as an XML-based presentation format, preserving any VBA macro code. (Note: VBA macros do not work in PowerPoint 2008.) |
Outline/Rich Text Format (.rtf) | Exports the outline text from your presentation to a file that can be read in other programs, such as Microsoft Word. |
Office Theme (.thmx) | Saves the presentation font, color scheme, and background to be used as a new theme. |
JPEG | Exports each slide in the presentation as a JPEG graphic file. |
PNG | Exports each slide in the presentation as a PNG graphic file. |
GIF | Exports each slide in the presentation as a GIF graphic file. |
BMP | Exports each slide in the presentation as a BMP graphic file. |
TIFF | Exports each slide in the presentation as a TIFF graphic file. |
When saving files, you can choose exactly where to store a presentation. PowerPoint is set up to save presentations to the Documents folder. If you want to save the file to another folder or drive, you must specify a location.
The last thing to mention about saving files is the Compatibility Report tool. When you open the Save As dialog box to save a file, you'll notice a red warning blurb recommending a compatibility check. This feature is helpful if you're sharing documents with people who are using different versions of PowerPoint. If you activate the Compatibility Report feature, PowerPoint runs a compatibility test and notifies you if it encounters any issues that might cause a problem in another version of PowerPoint. This same feature is available on the Compatibility tab of the Toolbox. If you're not sharing files, you do not need to run the tool.
You're probably ready to start saving your own files, so without further adieu, use any of the following methods to save a presentation.
The technique for saving a presentation for the first time probably seems pretty standard by this point in the book since you've already learned how to save Word documents and Excel workbooks, and the process always works the same way; however, I need to tell you these things anyway. It's the law in computer book publishing. Here's the skinny on saving a presentation the first time:

The Save As dialog box opens (refer to Figure 19.12).
Type a name for the file.
Choose a destination folder or drive on which to store the file.
By default, PowerPoint saves the file to the Documents folder.
Optionally, to save the presentation in another file format, click Format arrows and choose a format, as shown in Figure 19.13.
Optionally, to check for compatibility issues, click the Compatibility Report button.
Note
If you run the Compatibility Report tool, PowerPoint checks the file for any compatibility issues and displays a prompt if it finds any. You can view the issues using the Compatibility Report Palette in the Toolbox. See "Using the Compatibility Feature" later in this section to learn more.
Click Save.
PowerPoint saves the presentation, and the new filename appears at the top of the window.
You also can access the Compatibility Report feature through the Compatibility Palette on the Toolbox. To learn more about this tool, see "Using the Compatibility Report feature" later in this section.
After you've saved the file the first time, you don't have to keep reopening the Save As dialog box again to save. Instead, you can apply any of these methods to save your changes:

Choose File
Press
PowerPoint saves the file using the same filename you established before, updating any changes you made to the file. If you do need to change something, such as a storage location, use the Save As dialog box again.
What if you want to create a copy of your presentation and make a few changes, but still keep the original intact? No problem. Just save it under a new filename. Follow these steps when you need to save the file again with a new name or to a new location:
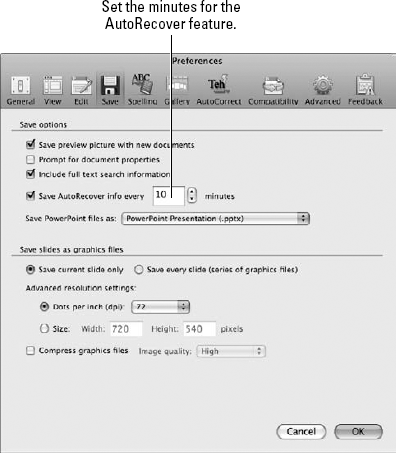
PowerPoint's AutoRecover feature is a clever feature for creating automatic saves of your presentation in case there's a power shortage or computer failure. With AutoRecover activated, you'll have a recently saved copy of your work to reopen again just in case of such a disaster. AutoRecover works by saving the current file as a separate AutoRecover file that you can open and save under a new name. You can set the AutoRecover to automatically save every few minutes; however, for best results, consider setting the feature for every 5 to 10 minutes. A shorter setting slows down your computer every few minutes.
To create automatic saves, follow these steps:
Choose PowerPoint
Preferences.The PowerPoint Preferences dialog box opens.
Click the Save icon.
The Save options appear, as shown in Figure 19.14.
Specify how often you want to save the document in the Save AutoRecover info every box.
You can type in a number or click the arrow buttons to arrive at the number you want.
Click OK.
PowerPoint is now set up to automatically save your file.
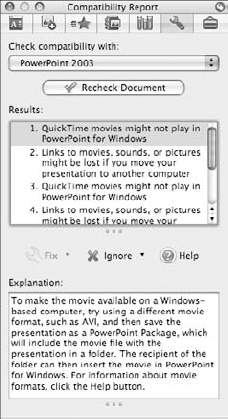
You may remember that this feature was discussed in Chapter 5 with Word. It works the same way in PowerPoint. The Compatibility Report feature is a helpful tool for users who share their presentation files with people using older versions of the software. It checks your file and makes it backward compatible. For example, if your presentation uses features not available in older versions of PowerPoint, the report tool prompts you with a warning box and offers you a way to correct any compatibility issues.
You can activate the Compatibility Report feature through the Save As dialog box or through the Compatibility Report Palette in the Toolbox. The advantage of using the palette method is that you'll find detailed results of a check, explanations about the issues, and tools for making any fixes or ignoring any problems. Follow these steps to use the Compatibility Report feature in the Toolbox:

Click the Compatibility Report Palette button.
PowerPoint opens the Compatibility Report Palette in the Toolbox, as shown in Figure 19.15.
Click the Check compatibility with menu, and choose a document type with which you want to compare.
PowerPoint immediately begins checking the presentation and displays any issues in the Results box.
Click a result to view an explanation in the Explanation box.
To fix a problem, click the Fix arrow button and make a selection.
To ignore a problem, click the Ignore arrow button and make a selection.
You can click the Recheck Document button to recheck a document again.
After you've started creating and saving files in PowerPoint, you'll want to open them again later to view or edit the presentation. You can use the Open dialog box to open presentations stored in various folders and drives on your computer, or you can use the Open Recent submenu on the File menu, which lists recent files you worked with in PowerPoint. A third option is to use the Project Gallery to open recent PowerPoint files.
The following sections explain how to use each method.
This method is a quick and easy way to access your presentations:

The Open dialog box opens, as shown in Figure 19.16.
Click the file you want to open.
You can navigate to a folder or device containing the file you want to open using the navigation pane.
You also can double-click the presentation name to quickly open the presentation.
Click the Open button.
PowerPoint opens the presentation.

Tip
You can click the Enable menu and choose a format if you don't see the file you want in the Open dialog box. For best results, consider changing the setting to All Readable Documents or All Office Documents so you can view all the document types.
If you've recently worked with a presentation, you can quickly access it again using the Open Recent command:
Choose File
Open Recent, as shown in Figure 19.17.Click the file you want to open.
If you don't see your file listed, you can click the More button to open the Project Gallery to the Recent documents tab and look for the file.

Another easy way to find your presentations is to use the Project Gallery; here's how:
Click File.
Click Project Gallery.
The Project Gallery window opens, as shown in Figure 19.18.
Click the Recent tab.
Click the presentation you want to open.
Click Open.
PowerPoint opens the file.

You can use the Open dialog box to search for an existing presentation on your computer. Using the Spotlight text field, which displays the word "search" by default, you can search for a specific filename, a portion of the name, or keywords pertaining to the name. Follow these steps to search for a file:
Display the Open dialog box.
Click inside the Spotlight search field, and type the filename, a portion of the name, or a keyword.
As you type in the search field, PowerPoint lists any possible matches.
You can use the buttons at the top of the search window to target your search.
When you find the file you want, double-click the filename to open the presentation.
PowerPoint offers a variety of view modes you can apply to help you as you work with your presentation, as well as a Zoom feature you can use to magnify a slide. This section examines the various ways you can view your slides and presentations.
PowerPoint offers three view modes for working with slides: Normal view, Slide Sorter view, and Slide Show view. Available as icons you can click in the Status bar area, you can switch between views depending on the work you want to accomplish.


As with Word and Excel, you can zoom your PowerPoint presentation to change its magnification setting. You can choose a percentage to zoom in for a closer look at the slide or zoom out for a bird's eye view. PowerPoint features two ways to zoom. You can use the Zoom button on the Standard toolbar to zoom your view, or you can use the Zoom dialog box. If you're in Normal view, the Zoom feature lets you zoom your view of a slide. If you're in Slide Sorter view, the Zoom setting controls the size of the slide display in the sorter window. Alas, you cannot use the Zoom feature in Slide Show view.

The following sections show you how to use the Zoom tool and the Zoom dialog box.
You can use the Zoom dialog box to specify a zoom setting. Follow these steps to open the dialog box:
Choose View
Zoom.The Zoom dialog box appears, as shown in Figure 19.23.
Click the zoom setting you want to apply.
You can type a zoom percentage directly into the Percent field or click the arrow buttons to set a percentage.
Click OK.
PowerPoint applies the zoom percentage you specified.


Tip
You can use PowerPoint's Rulers and Guides to help you position objects onscreen. To turn on the vertical and horizontal rulers, choose View
PowerPoint saves data along with your file whenever you create and save a presentation. This special data is known as document properties or metadata. Document properties are a common way to identify and describe any particular file. All Office programs insert some properties automatically, such as file size and the dates pertaining to file creation. Other property data can include summary information and statistics about the file, such as when it was created, the last person to save the file, and its current location. You can use the Document Properties dialog box, shown in Figure 19.24, to view and set properties for a PowerPoint presentation file.
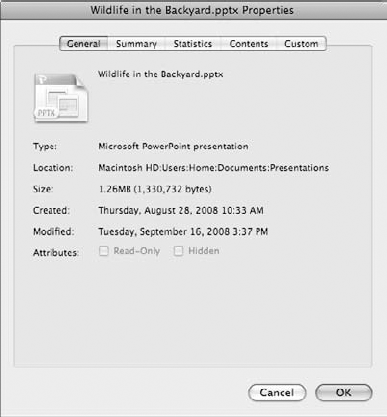
Figure 19.24. You can view properties pertaining to a presentation using the Document Properties dialog box.
The dialog box features five tabs of properties: General, Summary, Statistics, Contents, and Custom. The General tab displays basic information about the file, such as the file type, location, size, creation date, last modified date, and any read-only or hidden attributes settings. The information on this tab is automatically created by PowerPoint when you save the file, and you cannot make changes to it. On the other hand, the Summary and Custom tabs do allow you to enter your own information. The Summary tab has a variety of blank text fields you can use to add more information about the file. For example, you can include information such as a title, subject, author, manager, or company name. You can type in a category, keywords, comments, or hyperlink base. The tab also lists any templates attached to the file. The Statistics tab lists the created and modified dates again, when the file was last printed, who saved the file last, the number of revisions, editing time, and a bunch of statistics on the number of notes, words, paragraphs, and slides. The Contents tab displays contents of the document. Lastly, the Custom tab lets you add your own custom properties to the file, such as client name, destination, language, and so on, and set values for each of the properties you add.
To display the Document Properties dialog box in PowerPoint, choose File

In this chapter, you learned your way around the PowerPoint program window. Like the other Office programs, you learned where to find all the common tools and features for using the program. Not so surprisingly, the tools and features are located in pretty much the same places you discovered them in the other programs.
You discovered how to use the three view modes to view your slides and change the magnification setting to zoom your view while you work. You also learned how to create new presentations, save presentations, and open existing presentation files. Lastly, you learned how to control some of the properties that describe your file that are saved with the document. With all this basic information out of the way, you're ready to start building your own presentations.