
IN THIS CHAPTER
Checking grammar and spelling
Assessing compatibility
Generating mass mailings
Printing documents and envelopes
While news stories tout the "paperless office," that concept is still more wishful thinking than reality. Most documents created in Word eventually wind up in print form. Before your work is ready for prime time, however, it may require some last-minute touchups. Documents with typos and grammatical errors leave readers with the wrong impression about the capability of the writer. Some documents have specific word or line restrictions, such as magazine and newspaper articles.
One of the advances in our society is the ability to reach masses of people with a single message. This is true in the print world as well as online. Word allows you to type a single document and automatically personalize it for a mass mailing list that gets mailed to hundreds of people.
This chapter is about all those odds and ends you should take care of before hitting the Print button as well as tools that help you make the most of that command.
Into every typist's life occasional misspellings must come. Grammatical awkwardness is equally forthcoming, as in the previous sentence. Fortunately, you can correct these problems in Word to avoid embarrassing mistakes on your corporate memo, promotional flyer, or 400-page manuscript.
Chapter 6 explained how to use AutoCorrect. When this feature is enabled, Word catches the most common spelling errors and fixes them without even calling your attention to the change. You can even add your own tricky words to the AutoCorrect list. This feature is not exhaustive, however, so Word offers additional proofreading tools.
Some people are natural spellers and careful typists who make few errors. Most of us don't come anywhere near this high standard, however, and can use some help. You can customize your spelling and grammar preferences in the Preferences dialog box, shown in Figure 11.1. You reach this dialog box by choosing Word

The preference options are extensive:
Check spelling as you type: By default, this option is enabled. Word immediately compares every word you type against its dictionary and marks those that do not match. If you deselect this option, you can still use Word's other spelling tools.
Hide spelling errors in this document: This option disables spell-checking as you type only for the current document. If you are creating a document with lots of non-standard terms, choose this option so Word doesn't fill your text with marks of supposed misspellings.
Always suggest corrections: This option is selected by default. Word takes an educated guess as to possible words you might have intended to type and offers them up in the spelling context menu and Spelling dialog box. If you deselect this option, Word still marks words that don't match any in its dictionary, but doesn't make any alternative suggestions.
Suggest from main dictionary only: Selecting this option turns off any custom dictionaries, forcing Word to use only the main dictionary.
Ignore words in UPPERCASE: Abbreviations and acronyms are usually in uppercase. Selecting this option instructs Word to ignore these words, which might otherwise be flagged as misspellings.
Ignore words with numbers: Word's dictionary contains common number-letter combinations such as 1st and 2nd, but doesn't have a match for CS3 (as in the Adobe Creative Suite) or if you refer to your child as a 3yo (popular shorthand on the Internet for "three-year-old" that's making its way into other casual publications). Select this option to instruct Word to ignore any number-letter combinations.
Ignore Internet and file addresses: This option instructs Word not to check spelling in URLs and file paths, which commonly use non-standard spelling or abbreviations.
Use German post-reform rules: This option is relevant only if you have the German dictionary enabled in Word. The spelling rules for German were reformed in 1996 in an attempt to simplify and standardize the language. Outside of academic and government settings, however, many people still use the pre-reform rules. Thus, Word offers you a choice.
French modes: This option is relevant only if you have the French dictionary enabled in Word. These options determine which set of French spelling rules to honor.
Custom dictionary: You can add new words or terminology specific to your field to a custom dictionary on your computer.
Check grammar as you type: By default, this option is enabled. Word immediately examines every sentence you type against its grammar rules and marks any grammatical errors.
Show grammatical errors in Notebook Layout view: Most documents created in Notebook Layout view deliberately contain disjointed words and incomplete sentences. This option is best left disabled.
Hide grammatical errors in this document: This option disables grammar-checking as you type for the current document only.
Check grammar with spelling: If you want to separate proofreading for grammar from that of spelling, disable this option.
Show readability statistics: This option calculates the approximate reading level of your document based on word usage and complex sentence formation. These statistics are primarily used by teachers, although some fiction authors also use them to get an idea of readability in their work.
Writing style: Your writing style can (and should) vary by the demands of your project. A letter to a friend is less formal than a cover letter for your resume, for example. Fiction writing is much more grammatically relaxed than technical writing. Choose a writing style from the pop-up menu. Choose Custom and then click Settings to pick and choose specific grammatical rules from the Grammar Settings dialog box shown in Figure 11.2.
Check/Recheck document: Click this button to initiate a new review of your document based on any settings you have adjusted.

The Grammar Settings dialog box not only lets you customize which rules to follow, but it also provides options to accommodate variations in grammar, such as putting periods and commas before or after the quotation mark at the end of a quote. Also keep in mind that words that can serve as both nouns and verbs often confuse Word's grammar-checking, particularly when they appear in long sentences with subordinate clauses. Many Word users eventually turn off grammar-checking entirely.
If you learned to type in the old days when you always put two spaces after a period, it's a hard habit to break in favor of the new standard of one space. If nothing else, you may want to have Word check for those errors, although you also can do a Find and Replace for that when you complete your document.
Note
Readability statistics offer only a very general approximation of reading level. Word uses the Flesch Reading Ease score and the Kincaid Grade-Level Score to determine readability. Neither score is completely accurate, nor is Word's formula for determining them. It is based on a strict set of grammatical rules with no ability to assess well-crafted passages that break those rules. While the readability statistics may serve as a point of interest and comparison, you should avoid using them as the basis for any choices you make as a writer or for grading someone's work.
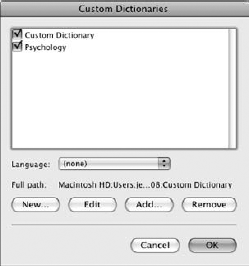
Word's main dictionary contains thousands of words, but it is not exhaustive. This is why Word allows you to add words it does not recognize. While it may appear that Word adds these entries to the main dictionary, in fact, it adds them to a custom dictionary. The integration between these dictionaries is so smooth that you may not realize it's even there, but understanding custom dictionaries opens new doors.
You can directly edit the custom dictionary by entering the Spelling and Grammar preferences and clicking the Dictionaries button to open the Custom Dictionaries dialog box, shown in Figure 11.3. Select the Custom Dictionary, and click Edit. All the words you've ever added to the dictionary appear in an editable list. You may add or delete words in this list as well as correct any errors you mistakenly added to the dictionary.
You can create additional custom dictionaries to suit specific purposes. If you are a chemist, for example, create a dictionary for chemical terms. There are two methods for creating a new custom dictionary. Here's the most direct approach:
Open a new blank document.
Enter each word you want to include on a separate line.
The dictionary is case sensitive, so be sure to add both capitalized and lowercase entries as necessary. If you wish, you can sort your entries alphabetically by selecting the list and choosing Table

Choose File
Save (or+S), and give the dictionary a name.
In the Format menu, choose Speller Custom Dictionary (.dic) format.
Navigate to the Library
PreferencesMicrosoftOffice 2008 folder.Press Save.
Open the Custom Dictionaries dialog box by choosing Word
PreferencesSpelling and GrammarDictionaries, and click Add.Navigate to the new dictionary, and click OK.
Creating a dictionary in this manner makes it easier to use Word's editing and sorting tools and allows you to set the Zoom settings to make the process more comfortable. You also can create custom dictionaries directly in the Custom Dictionaries dialog box:
Open the Custom Dictionaries dialog box by choosing Word
PreferencesSpelling and GrammarDictionaries.Click New to open the New Dictionary dialog box.
Give the dictionary a name, and click Save.
Click Edit to open the new dictionary. Word opens a new blank document.
Populate the dictionary, typing each word on a separate line.
Save the document by choosing File
Save or pressing+S.Return to the Custom Dictionaries dialog box to select or deselect the new dictionary.
As you can see, the biggest difference in the two approaches is whether you first add the file to the Custom Dictionary list and then create the entries or you create the dictionary entries first and then add it. Regardless of which method you use to create it, once complete, you can select and deselect it as needed. You can add more words as you encounter them in your document. Note, however, that if you have the default custom dictionary enabled along with those you created, any new words you add as you write automatically go into the default. To add new words to a specific dictionary, you need to go back to Edit mode for that dictionary and manually add to them.
If you work in other languages, Microsoft installs several foreign dictionaries along with the Office applications. To activate one of these dictionaries, you need to tell Word that you're working in another language. Do this by selecting your text and choosing Tools
Word's main dictionary is pre-populated with the most common words, but it does not allow for variations in spelling. The main dictionary contains the word "color," for example, while you may prefer to use "colour." You cannot delete "color" from the main dictionary because it is not editable. Your only alternative, then, is to create an exclusion dictionary.
An exclusion dictionary lists words in the main dictionary that you want Word to flag as incorrect. In other words, you're telling Word that its main dictionary is wrong. To create an exclusion dictionary, open a blank document. Enter any standard spellings that you want Word to flag as incorrect. Thus, list the word "color" if you want Word to flag it. As with other custom dictionaries, this list is case sensitive, so you should list both "color" and "Color."
Save your exclusion dictionary in the Library
When Word is checking spelling as you type, a red line under a word indicates a spelling error. When you see an error marked in red, you can choose to retype the word correctly or press Control+click on the word to open a context menu with proofing options:
Help: Choose this to open the Help window.
Suggestions: Word makes educated guesses on which word you might have intended and lists them for you to select. When you click a word from this list, Word immediately changes the misspelling. If Word cannot determine your intent, this area states "(no spelling suggestions)." If the correct word does not appear on the list, you need to manually correct it.
Ignore: This choice instructs Word to ignore this particular word, regardless of whether it is spelled correctly.
Ignore All: Choose this to instruct Word to ignore this word throughout the document.
Add: This choice instructs Word to add this word to its dictionary.
AutoCorrect: This accesses matching options from the AutoCorrect list. These are usually the same options that appear in the list of suggestions.
Spelling: Selecting this option opens the Spelling dialog box, shown in Figure 11.4.

A green line under a word or sentence indicates a grammar error. If you spot the problem right away, you can fix it yourself. Otherwise, press Control+click to open a context menu:
Help: This option opens the Help window.
Suggestions: If the error involves capitalization, contractions, or other minimal adjustments, Word suggests solutions. For other errors, such as passive voice or mistaken noun-verb agreement, Word merely identifies the nature of the problem.
Ignore: Choose this to instruct Word to ignore this particular error.
Grammar: This option opens the Grammar dialog box, shown in Figure 11.5.

There's much to be said for immediacy, but having Word mark your text as you type can become a distraction. If you find yourself compelled to fix every mistake immediately and then you lose track of what you were typing, you should disable the Check as you type features. Instead, you can check grammar, spelling, or both when you complete your document (or any other time you want to clean up your document). To do this, choose Tools
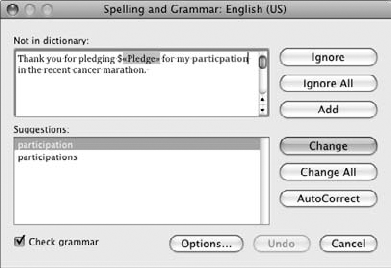
When Word encounters an error, it displays the word or passage in the dialog box. Suggestions on spelling or grammatical matters are listed below the error. To change the word to one of the suggestions, click the correct spelling and press the Change button. To change all occurrences of that misspelling throughout your document, choose Change All. If you want to ignore the error—perhaps it is intentional to illustrate a point or an obscure term or usage—choose either Ignore (for that specific incidence) or Ignore All (to ignore that word throughout the document). If the word is correctly spelled and often-used, click Add to append it to the default custom dictionary. If none of these options solves your problem, you can correct the spelling error directly in the dialog box. Finally, if you commonly make the same typo, click the AutoCorrect button to add the typo and correctly spelled word to the AutoCorrect list.
Many writing assignments, from college papers to newspaper and magazine articles, have page, word, or line guidelines. You can see your document's page and word count at the bottom of the document window, as shown in Figure 11.7. If you require more details, such as the number of characters, paragraphs, or lines in the document, click the word count display at the bottom of the window (or choose Tools

A watermark is a faint picture or text that appears behind the text of your document. Watermarks are commonly used to mark documents as a draft or confidential or to add a seal or logo behind the text. This mark appears on every page of the document, which is particularly useful if portions of a draft or confidential document get separated from the cover page, so co-workers or collaborators still know to treat the pages with care.
If you want to add a watermark to your document, choose Insert
To use a picture as a watermark, click the Picture radio button and click the Select Picture button. Locate the image you want to use, and click OK. The preview area provides an example of how the document will look with the watermark. The Washout option lightens the picture so it doesn't render your text unreadable. Word automatically scales your image to fill most of the page by default, but you can adjust this setting to make the image smaller.
Tip
Watermarks interfere less with your text if they're in black and white. Most image-editing applications, including iPhoto, allow you to convert a color image to black and white. You can add a color watermark, but examine your document closely for readability and realize you will use up your color ink cartridges quickly if you apply such a watermark to a long document.
To use text as a watermark, click the Text radio button. The pop-up menu lists several common text options, or you can type your own message. Change the font and size settings as you wish and apply bold or italics. The transparency setting controls how dark the watermark appears on the page. Higher transparency settings fade the watermark so it doesn't detract from the document content. You can apply color to the watermark text, but just as with pictures, this may not be the best choice. Rather than color, the best way to set off a watermark is to orient it at an angle using the Orientation buttons.
Suppose you want to remove a watermark; let's say you edit your draft and are ready to print the final document, so you want to eliminate the Draft watermark. Return to the Insert Watermark dialog box, and select the No watermark radio button.

You have come up with an idea or assignment, created and formatted a document, added any necessary tables, graphics, bibliographies, and indices, and proofread it. You're now at the moment of truth—time to print.
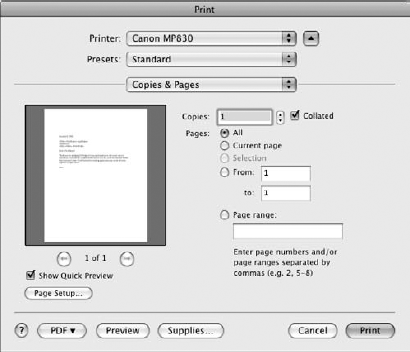
You may need two copies of the document, however, or maybe 15 collated copies. In that case, choose File
Your print options depend to some extent on your installed printer(s), but most printers offer the following panels in the pop-up menu:
Copies and Pages: This panel includes settings for the number of copies, collation, and the range of pages to print. When setting a page range for printing, you can use commas to separate individual pages, such as 5, 18, 21.
Microsoft Word: This panel allows you to print some of the elements that make up your document, such as the document properties, markup, styles, AutoText, and key assignments. You also can choose to print only odd or even pages, which is useful if you are trying to print on both sides of the page without the advantage of a duplex printer.
Layout: This panel enables you to print multiple pages of your document on one printed page. You can add a border to a page or table without affecting your saved document.
Summary: This panel does not print anything. Instead, it summarizes all the print settings you've chosen on the myriad other panels, giving you an overview of how your document will print.
Additional Panels: Your printer may provide many other panels. The Canon MP830 printer, for example, installs panels for Color Matching, Paper Handling, Cover Pages, Scheduler, Quality and Media, Color Options, Special Effects, Borderless Printing, and Duplex Printing and Margin. Each of these panels provides additional printing options, such as the ability to print on special paper or in duplex (both sides of the page automatically).
After reviewing all the panels and options, you can save your settings for future print jobs. Open the Presets pop-up menu, choose Save As, and name your setting combination. You can save multiple configurations for different uses, saving you time in the future.
The Supplies button in the Print dialog box links to the Apple Store. If Apple sells ink cartridges for your particular printer, you can order them here. Apple does not necessarily have the best prices on printer ink, however, nor does it offer an extensive range of products for all printers.
When you have configured the options to your liking, press Print to send the document to your printer.
The PDF button at the bottom of the Print dialog box provides an additional way to save PDF files. You also can save a document as a PDF using the Save As command, but "printing" to a PDF file provides many more options than simply saving the file in PDF format. The PDF pop-up menu, shown in Figure 11.11, allows you to do the following:
Save as PDF: Use this option to save the document as a standard PDF file.
Save as PostScript: A PostScript file contains embedded printing instructions for professional print shops, which often use PostScript laser printers.
Fax PDF: If your computer is connected by modem to a phone line, you can enter a phone number and fax the document without having to print it first.
Mail PDF: This opens Apple's Mail application and attaches the file to a new message. This feature does not work with Entourage.
Save as PDF-X: A PDF-X file is another standard used by professional print shops.
Save PDF to iPhoto: This saves the file in PDF format and places it in your iPhoto library.
Save PDF to Web Receipts Folder: If your document contains an invoice or receipt, using this option saves the document as a PDF and automatically puts it in your Documents
You can do more with PDF files depending upon which applications you have installed in addition to Office. If you use applications such as Journler or Yojimbo, for example, your pop-up menu shows options to Save to Journler and Save to Yojimbo.

As with so many other features, Word offers two methods for previewing your document before printing. Select File

Figure 11.12. Word's internal Print Preview tool allows you to view your document in its entirety before printing.
The Preview button in the Print dialog box opens the Mac OS X Preview application, which is considerably more robust than Word's built-in offering. In addition to scrolling through your pages from the Sidebar, you also can annotate your document and scroll in on selected portions for greater magnification. Best of all, Word temporarily converts your file to PDF for the journey to Preview, which provides yet another gateway to PDF conversion if you choose File
Word provides other printer-related options aside from those in the Print dialog box. Choose File
Switch the Settings menu to Microsoft Word to apply different printer settings for one portion of a document, as shown in Figure 11.14. For example, you can keep a letter and its envelope in the same document. Set the Page Attributes settings for the letter, and then switch to the Microsoft Word settings and select "This point forward" from the Apply Page Setup settings to pop-up menu. Then return to the Page Attributes settings to set the options for the envelope at the end of the document.


Word makes printing envelopes so easy that it's faster than writing them by hand. A printed envelope lends a much more professional appearance to your correspondence. Word also can print labels for various purposes.
Most printers have slots or tray settings to feed envelopes. To set up Word to print to them, follow these steps:
Choose Tools
Envelopes to open the Envelope dialog box, as shown in Figure 11.15.Enter the recipient's address in the Delivery address box.
Click the address card icon to select an address from the Office Address Book. Note that this feature does not open the Mac OS X Address Book application, so this feature is helpful only to Entourage users.
Click the Font button to change the font settings for the address.
Click the Position button to customize the position of the address on the envelope in the Address Position dialog box, as shown in Figure 11.16.
The FIM-A option is intended for courtesy reply envelopes, often sent with bills and other forms of mail that have an expected reply. Word formats these envelopes according to the U.S. Postal Service requirements.
A Delivery point barcode is a scanable code that appears at the bottom of some envelopes. These are not required, but are intended to speed delivery because they enable the USPS to use automated equipment to move your letter along rather than having to hand-sort it.
Enter the Return address. Business envelopes are often preprinted with a return address, so you may want to deselect this option. You can also choose to omit a return address for anonymity, but the USPS does not guarantee to get such envelopes to their destination if you do not apply proper postage. If you select the "Use my address" option, Word inserts the address you entered in the User Information panel of the Preferences dialog box.
Select either Page Setup or Custom from the Printing Options:
Page Setup: If your printer has an envelope slot that can accommodate your envelope, choose this option to open the Print dialog box and select the correct paper size for your envelope. This option works best when you are printing on a standard #10 envelope.
Custom: If your printer lacks an envelope feeder or you are printing on a non-standard envelope size, choose this option to specify the size and Feed method from the Custom Page Options dialog box, shown in Figure 11.17.
If you want Word to insert the envelope into the document from which you launched the Tools
Envelope command, select Insert this envelope into the active document. Otherwise, Word creates a new document for the envelope.Press Print to print the envelope or OK to create the envelope document or insert it into the active document without printing.
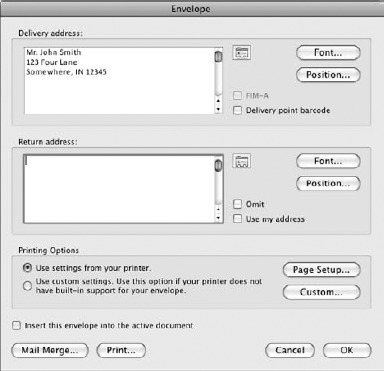


You also can use the Envelope dialog box to open the Mail Merge Manager for a mass mailing. This is explained later in this chapter.
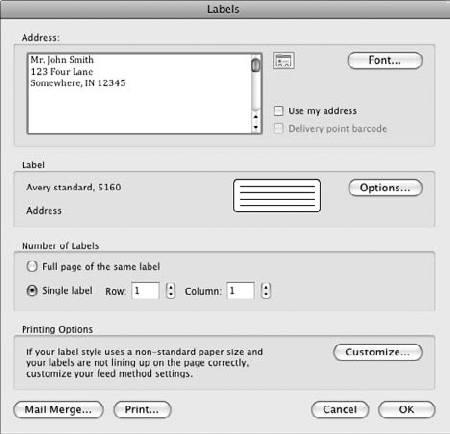
Word can create labels of all shapes and sizes. Beyond the traditional return address label, you can use labels for file folders, CDs, and nametags, among other ideas. You can print a single label or an entire sheet of the same label. Follow these steps to create a label:
Choose Tools
Labels to open the Labels dialog box, shown in Figure 11.18.Enter the text you want to put on the label.
Click the Options button to open the Label Options dialog box, shown in Figure 11.19.
Select your printer type, either dot matrix or laser and ink jet.
Choose the manufacturer of your labels from the Label products menu.
Choose a specific Product number, as listed on the box of labels. The Label information area displays the dimensions of the label, allowing you to verify the specifications for your product.
If you have a generic or unidentified label sheet, choose New Label to enter the dimensions of your labels.
Press OK to close the Label Options dialog box and return to the Labels dialog box.
Choose to print either a full page of the same label or an individual label. If you are printing only one label, you can specify the column and row of that label on the page. This allows you to print a single label and save the remaining labels on the sheet for future print jobs.
Press Print to print the labels immediately or OK to create a new document with the labels formatted on the page.

You can use the Mail Merge button to open the Mail Merge Manager and create a series of labels with different addresses, as explained later in this chapter.
A mass mailing is a form letter sent to multiple recipients. In Word, you can create a letter encoded with fields to customize such information as the recipient address and the salutation. You then merge this letter with a database containing the field data to automate the creation of the individual letters; thus, Microsoft calls this process Mail Merge. Don't let this name sell the power of this feature short, however. You can use mail merge to create an address book, product catalog, billing invoices, or even party invitations.
A mail merge brings two types of files together, a data source and the main document (also called the form letter, although that term may not reflect the true nature of the file). The main document contains the body of your project. If you run a marathon for charity, for example, you might create a form letter to thank your donors.
As you prepare your document, think about the unique data you need for each completed copy. For donor thank-you notes, you need the first and last names of the donor, the donor's complete address, and the amount of the donation. By preparing your form letter first, you can ensure that your data source contains all the fields necessary to complete your task.
Save your document in order to preserve your work so far and give the file a name, but leave it open on your screen. Your document is not complete yet, but you need to add a data source before proceeding.
You can use one of several applications to create your data source. This file contains the unique names and addresses or other custom information you want to include in your merged document. Word can pull this data from an Excel file, FileMaker Pro database, Entourage address book, tab-delimited text file, comma separated value (CSV) file, or a Word table created in a separate document.
No matter the data source, consistency in your data fields is critical to the success of your mail merge. If you do not enter your data consistently—sometimes entering a product's item number into the same field with its name, for example—you create an incomplete and unprofessional catalog. If you want to personalize the salutation in your letter, referring to recipients by their first names, you need separate fields for first and last names so you can select the one you need.
Unless you already have your data compiled in a database or spreadsheet, the fastest way to create a new data source is directly within Word. To do this, follow these steps:
Choose Tools
Mail Merge Manager to open the Mail Merge Manager Palette, shown in Figure 11.20.In the first pane, 1. Select Document Type, click the Create New button and choose the type of mail merge you are creating. Word automatically assumes your current document forms the main document for the merge.
In the second pane, 2. Select Recipients List, click the Get List button and select New Data Source to open the Create Data Source dialog box, shown in Figure 11.21.
In the Field names in header row list, remove any field names you don't require for this project.
If you need additional fields, enter a field name in the Placeholder list and click the Add Placeholder button.
Press OK to close the Create Data Source dialog box, and then name and save the Data Source file. If you will use this data source for future projects, name it something easily remembered. If this compilation of data is unique to this project, you may want to give the file a name related to its associated form letter. If the form letter is named Marathon.docx, for example, the data source file might be named MarathonData.docx.
The Data Form dialog box, shown in Figure 11.22, opens when you save the Data Source file. Fill in the form for your first record, tabbing between each field. Click Add New to add another record. Use the arrows at the bottom of the dialog box to navigate through records you've already created. Choose Delete to erase the current record. If you delete a record in error, choose Restore to re-populate the form.
When you are finished entering records, click OK.


If you prefer, you can enter records directly in the data source document instead of through the Data Form dialog box. To do this, press the View Source button to open the data source file. Your data is stored in a regular Word table, and you can add or delete rows (records) or modify any entry. To return to the Data Form dialog box, click the Data Form button on the Database toolbar, which automatically appears when you open the data source file.
If you already have a database in Excel, FileMaker Pro, or Entourage, or a tab-delimited or CSV file, you can merge it with your main document instead of creating a new data source file. With your form letter open, follow these steps:
Choose Tools
Mail Merge Manager, and click the Create New button to set the document as a form letter, envelope, label, or catalog.In the Select Recipients List pane, press the Get List button.
If your file is an Excel spreadsheet or tab-delimited file, choose Open Data Source.
If your data resides in FileMaker Pro or your Office Address Book (Entourage), choose the appropriate option from the Get List menu.
Navigate to the file on your Mac, and press Open.
Note
Unlike when you create a data source file directly in Word, you cannot edit your records without returning to the original source application.
Whether you create a new data source or use an existing one, you can see the fields listed in the Insert Placeholders pane in the Mail Merge Manager. Now you can add them to your main document.

Step 3 in the Mail Merge Manager reads "Insert Placeholders." All the fields for your data source appear in the Contacts list, as shown in Figure 11.23. To add placeholders to your document, simply select one from the list and drag it into your document. Position the placeholder exactly where you want it to appear in the document before releasing the mouse button. You can edit the main document during this process to accommodate the fields. When entering an address, for example, you need to manually insert a comma and a space between the City and State fields.
The More tab in the Insert Placeholders pane provides more advanced options. If you wanted to prepare your letters in advance, for example, but don't yet know your completion time for the marathon you are running the next day, you can insert an Ask query to prompt you for that information before you print the documents. Other options in the More tab allow you to introduce logic into your mail merge, merging only a particular record if certain conditions are met.
When you finish adding placeholders to your document, save the document. Your Mail Merge Manager settings are saved with the document, so if you come back to it later, the data source file is still linked to the main document. You can now use the Filter Recipients pane to group records by specified fields or sort them alphabetically. If you have a large number of letters, for example, you may choose to sort them by state in order to make it easier to comply with the USPS bulk-mailing regulations.

When you are ready to see the merged documents, use the Preview Results pane to browse through them. If only the placeholder fields appear, click the View Merged Data button to display the actual data merged into the document. Review your document carefully for missing spaces and punctuation or the need for other formatting. Remember, you can apply formatting to a field, so you can add bold or italic to the merged data.
If your review meets your requirements, you are ready to complete the merge. The Complete Merge pane, shown in Figure 11.24, provides several options:
Merging to the Printer: If you want to print your merged documents, press this button and then press Print in the Print dialog box. As with any other print job, you can change the number of copies and set other options before printing.
Merging to a New Document: If you want to personalize the merged documents in some way or are simply not yet ready to print, use this option to save the merged letters to a file. Each copy is separated in the new document by a page break and retains all the formatting of the original main document.
Merging to Email: This option is available only if you use Entourage as your default e-mail program. If you meet this criteria, use this option to open the Mail Recipient dialog box, and then use the To menu to specify which field in your data source contains the e-mail addresses to which you want to send the letters. Provide a subject for the e-mails and specify whether the letter should be sent as the body of the e-mail or as an attachment. Click Mail Merge to Outbox to complete the merge and queue up each individual e-mail in your Entourage outbox.
Note
If you merge into a new document, it no longer has any connection to the original document. If you want to eliminate, filter, or sort records, you need to return to the original mail merge document and create another document (or print at that point). You can, however, manually modify the new document just as you would any other document, such as deleting pages.

As mentioned earlier, you can generate envelopes and labels using the Mail Merge Manager. To create labels, choose Tools
To create envelopes, choose Tools
Tip
If your printer cannot feed multiple envelopes, use the Current Record option from the Merge Data Range pop-up menu in the Complete Merge panel. You can then print one envelope at a time, using the Preview Results to scroll through the records.
In this chapter, we covered how to proofread your document as you type and in a final review. Although you can correct most typos and misspellings while you work, it never hurts to give your document a final spelling and grammar check.
You learned how to create watermarks to mark your draft or confidential document in order to remind readers of its status and prevent mass distribution of sensitive material. You learned how to print your document when it's complete and how to print an accompanying envelope or label. If you are sending the same form letter to a long list of people, you discovered that it's easier to create a mass mailing than to manually edit the document and print each letter individually.
You are now armed with the skills to tackle even the most challenging Word documents. It's time to move on to the next application in the Office suite, Excel.