IN THIS CHAPTER
Starting files with the Project Gallery
Opening recent files with the gallery
Accessing ongoing projects from the Project Center
Setting gallery preferences
Using the Office Scrapbook tool
The very nature of a suite of programs like Microsoft Office 2008 for Mac is that they're designed to work together. Although each program has a unique purpose, you can use them together for even greater productivity. This concept really comes into play when you're working on projects. For example, maybe you've been asked to craft a detailed business proposal. The project may require documents from Word, spreadsheets from Excel, lots of communication through Entourage e-mails, and a slide show presentation in PowerPoint. As you work on the project each day, you need to create all these different kinds of files. That's where the Project Gallery can help. It's a jumping-off point for any kind of Office document you want to create.
With some projects, you end up accumulating lots of different notes and pieces of information before assembling a final product. You can use the Office Scrapbook feature to collect and store all the various pieces of information you want to use later to create a larger project.
In this chapter, you learn how to use both the Projects Gallery and the Scrapbook tool to help you coordinate projects big and small.
The Project Gallery acts like a lobby into the world of Office files. All you have to do is enter and choose which "office" you want to go into. Although we're talking about this feature way in the back of this book, you may have encountered it early on if your gallery is slated to appear by default. Whether it's opened by default or manually, you're presented with a lovely screen full of possibilities whenever you use the feature. Take a look at Figure 33.1. It shows an example of the Project Gallery that appears in Word. This feature is a launching pad for any new file you want to create based on which Office program you open. You simply choose which kind of file you want to create, and you're off and running.
To open the Project Gallery manually, choose File
Tip
If your Project Gallery opens by default and you want to skip it, just press Esc or
When you first open the gallery, the New tab appears, displaying a plethora of file types you can create. The list box on the left offers an abundance of document ideas. Listing everything from blank documents to flyers to CD labels, you're bound to find something you need to create. This collection is actually a variety of templates. Here's a run-down of what templates you can expect to find:
Blank Documents: This category not only includes blank Word, Excel, or PowerPoint documents, it also includes Entourage e-mails and events, a List Wizard, and Word Notebook or Publishing Layout documents. Needless to say, these are all blank and ready for you to fill out.
My Templates: If you've saved any templates, they're listed in this category.
Brochures: This category lists a variety of brochures you can whip up in Word.
Business Cards: Choose from several professional-looking business card documents you can make in Word.
Calendars: Choose from several attractive calendar documents you can create in Word's Print Layout view.
CD Labels: You can create your own DVD or CD labels using these Word templates and use Avery brand stickers to print them out.
Coordinated Forms: This category creates a variety of coordinated business forms and materials using Word, such as agendas, business cards, faxes, invoices, memos, and reports.
Events: Find templates for creating awards, invitations, postcards, and posters in this category.
Flyers: Choose from several flyer templates you can create in Word.
Home Essentials: This category features Excel templates you can create to manage your household, including worksheets with finance tools, fundraising, graph paper, planners, and travel tools.
Labels: Use the Mailing Label Wizard in this category to start your mass mailing projects.
Ledger Sheets: This category contains Excel templates for making account sheets, budgets, invoices, lists, portfolios, and reports.
Marketing: This category offers a slew of Word templates for marketing, including catalogs, menus, proposals, and signs.
Newsletters: This category lists all kinds of newsletters you can create in Word.
Office Themes: This category is full of PowerPoint presentation templates focusing on color.
Presentations: This category is full of PowerPoint presentations, this time focusing on intent, such as photo albums, pitch book, and so on.
Programs: The documents in this category let you whip up programs for your next recital, play, reunion, or other gathering.
Resumes: Tailored to the job seeker, this category lists resumes.
Stationery: Find letterhead, envelope templates, formal letter templates, and other office stationery items in this category.
Tip
You can create your own templates in any of the Office programs and add them to the list in the Project Gallery.
The templates are categorized, and some categories list more than one type to choose from. Categories with Expand Arrows in front of the category name can be expanded to show a larger list of specialized documents. Figure 33.2 shows the Marketing category expanded.
Tip
You can use the Expand Arrow to expand a category, and when it's expanded, a Collapse Arrow appears. Click the Collapse Arrow to collapse the list again.
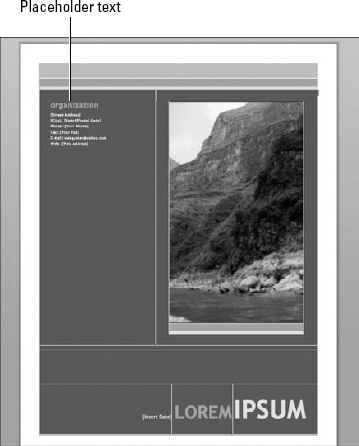
When you select a category from the list, icons representing different types of files appear in the center of the window. For example, when you expand the Marketing category and select Proposals, a preview of various types of proposals appears (refer to Figure 32.2). If you see one you like, click it and click the Open button to start creating the file. The template opens in the appropriate program window, and you can start replacing the placeholder text with your own text. In the case of a proposal, Word opens the proposal document you selected. Figure 33.3 shows an example of a proposal template in Word.
Meanwhile, back in the Project Gallery, you can tell the Project Gallery to show only certain Office files. Just click the Show pop-up menu, shown in Figure 33.4, and choose which file type you want to list. The All Office Documents option is selected by default, but you can choose to show just Word, Excel, PowerPoint, or Entourage documents.
If you can't find the document type you want to create, you might try a keyword search in the Search field. Click the field, type the word or phrase you want to search for, and then press Return. The Project Gallery lists any matches.
Or maybe you have other Office templates you want to use rather than the ones listed in the Project Gallery. If this is the case, you can click the Open Other button in the bottom-left corner of the gallery. This displays the Open dialog box, and you can navigate to the folder and file you want to use.
The splendor of the Project Gallery is this: You don't have to know what Office program you need to use to create the document. Office opens the appropriate program based on the template you choose. So if you're using Word, open the Project Gallery and choose to create a ledger sheet; Microsoft Excel opens automatically to help you start the project.
You can click the Recent tab in the Project Gallery to see a list of all the recent files you've worked on, as shown in Figure 33.5. The list box on the left lets you choose to view files from certain time periods. Click the Today category to see all the files you worked on today. Click the All category to view all the recent Office files you've dallied in. The buttons at the top of the list box let you control how the files are listed. You can choose to list them by icons, show details, or just as a list of filenames. Like the New tab, you can click the Show pop-up menu to control which Office files appear in the list.
With the exception of Entourage, all the Office programs offer you a route to opening recent files within the program. Choose File
Click the Project Center tab in the Project Gallery to access all the ongoing projects you're working on through the Entourage Project Center tool, as shown in Figure 33.6. As you learned in Chapter 27, the Project Center is a very powerful tool for managing all the elements that go into a project, from messages to documents, from tasks to appointments. Basically anything associated with a project is managed in one central area. The Project Gallery works in cahoots with the Project Center to help you keep your projects organized. When you click the Project Center tab, a list of all your current projects appears on the left. You can click a project name to view its files. To open a file from the project, select it and click the Open button. You can then open any file and start working on it right away. You also can make a copy of the file to work on. Click the Open a Copy button to do so.
Note
See Chapter 27 to learn more about the Project Center tool.
The last tab in the Project Gallery is the Settings tab, shown in Figure 33.7. As you can probably guess, this tab features all the ways you can control the gallery. This tab houses three main areas of preferences you can change: General, Documents and Wizards, and File Locations. Under the General area, you can control whether the gallery opens by default or specify a confirmation before opening other programs. You also can set the gallery to always open to a particular tab by clicking the Open on pop-up menu and choosing which tab you always want displayed. If you want to alter the number of recent files listed in the Recent tab, change the setting in the Show this number of recently opened files field.
The Documents and Wizards preferences let you select which types of documents and wizards are listed in the gallery. If you don't plan on using PowerPoint, for example, you can turn off the presentation files. Simply deselect any check boxes you don't want to see in the gallery. They're all selected by default unless you specify otherwise.
The File Locations preferences let you choose what templates are listed. By default, the User Templates that you installed with Office 2008 are displayed in the gallery. If you have another folder of templates you'd rather choose from, click the link and navigate to the folder. If you have any workgroup templates, you can add a link to them as well.
One last thing: If you make a bunch of changes to the preferences, you can always go back to the original settings by clicking the Restore Defaults button.
If you've ever jotted down a note, scribbled an idea, written down a quote, or typed a poem just for safekeeping, you'll find the Office Scrapbook tool useful. As part of the Office Toolbox, the Scrapbook is just as its name implies—a scrapbook of anything you collect and want to keep. Scrapbook items, called clippings, can be snippets of text from a Word document, a list of number data from Excel, a quote to use in a slide show, or a note you want to implement later into a message. Scrapbook items include text, graphics, even an entire file. For example, you might place a photo in the Scrapbook to use in an upcoming project, or you might want to grab a joke from an e-mail message to reuse it in a later message. The Scrapbook tool essentially acts as a compendium of electronic items you want to hang onto. It supports GIF, JPEG, PICT, PNG, BMP, PNTG, text, and Unicode text formats.
When you place items in the Scrapbook, they're copied and pasted, and the Preview window displays the clippings. The original data stays intact, unless you use the Cut command to remove it from its original location. To add any item to the Scrapbook, first select the text, graphic, or other data you want to copy. The quickest way to place it in the Scrapbook is to drag and drop it into the Scrapbook Palette. You also can use the Cut, Copy, and Paste commands to move data to the Scrapbook.
Click Add Selection to add the selected data.
Click Add File to open the Choose a File dialog box, and select the file you want to add.
Click Add from Clipboard to add any data you've cut or copied into the Clipboard.
If you want to make sure you collect everything you're copying in a document, you can activate the Always Add Copy command. This means anything you cut or copy from here on out is added to the Scrapbook.
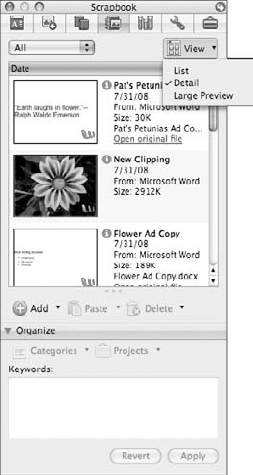
As your Scrapbook collection grows, you can scroll through the list to view various clippings. The clippings are arranged by date. You can collapse the Organize pane to view more clippings in the Preview window. Click the View button, as shown in Figure 33.9, to change how the items are listed. You can view them by List, Detail, or Large Preview views. Detail view is the default selection.
You can use the pop-up filter menu at the top of the palette to filter clippings by creation date, project, category, originating program, item size, or keywords. Figure 33.10 shows the complete list of filtering options displayed when you click the pop-up menu.

Figure 33.10. You can control how items are filtered in the list using the Quick Filter pop-up menu.
To edit the name of any clipping in the list, double-click the name field. Type a new name, and press Return. The Scrapbook now shows the new clipping name.
Click Paste to paste the clipping just as you found it, original formatting and all.
Click Paste as Plain Text to remove all the formatting and just paste the plain text.
Click Paste as Picture to turn the clipping into an object that can be manipulated with any of the Office Picture tools.
You can use the Organize section at the bottom of the Scrapbook Palette to help organize your clippings. For example, you can assign keywords to a clipping that can help you search for it later. Simply select the clipping, and type the keywords you want to associate with the item in the Keywords box, as shown in Figure 33.12, then click the Apply button.
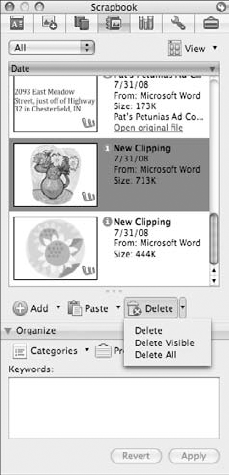
You can easily remove a clipping you no longer want from the Scrapbook Palette. A prompt box appears warning you that the deletion is permanent. After you okay the removal, the clipping is gone forever. Use any of these methods to delete a clipping:

Click the Delete button.
Click the Delete button's arrow key, and choose Delete, as shown in Figure 33.13.
Click the Delete button's arrow key, and choose Delete Visible or Delete All to remove every clipping listed.
In this chapter, you learned how easy it is to start any kind of document regardless of what program you're using. With help from the Project Center, you can quickly open a template and create a Word document, Excel spreadsheet, PowerPoint presentation, or Entourage message or event. In addition, the Project Center includes a few wizards to help you create lists and other custom documents. You also can use the Project Center to navigate to recent files or files associated with any projects you're managing using Entourage's Project Center tool.
This chapter also showed you how to use the Office Scrapbook tool to collect items from various Office programs and reuse again in later documents.


