
IN THIS CHAPTER
Managing tasks
Using To Do lists
Creating notes
Printing tasks and notes
Using the Project Center
Working with My Day
Just how organized are you? Do people stop by your cubicle in awe of the neatness and efficiency, or do they step around your cubicle to avoid the heaping piles of stuff spilling out of your space? If you want to find something in your desk at home, will it take seconds to locate it, or will you spend at least a half-hour moving stuff around trying to find it? When it comes to tasks, notes, and projects, are you renowned for your organizational skills, or do you struggle to manage your bits of papers, sticky notes, and important items you've written down in marker on your own hand? Whether you're messy or neat, organized or disorganized, both types of people will find plenty to like about the Tasks, Notes, and Project Center tools in Entourage. Each of these tools can help you manage the things you need to accomplish at work or at home. For a quick look at all you need to accomplish for the day, you can summon the My Day tool and see your itinerary and goals at a glance without having to open the whole Entourage program window.
In this chapter, you learn how to use the Tasks tool to organize all kinds of tasks and other to-do things you need to keep track of and complete. You also learn how to use the Notes tool to quickly jot down notes you want to hold onto. This chapter also shows you how to manage large and small projects alike using the very powerful Project Center. Lastly, you learn how to make use of the handy My Day feature to view your day's itinerary at a glance. You'll see how easy it is to view all the important items you need to tackle for the day without having to deal with e-mail, tasks, and other distracting activities.
In Entourage, you can use the Tasks tool to create and manage your tasks at work, home, or school. Just what constitutes a task? A task can be any job, chore, action, errand, or situation you need to take care of in a timely fashion. A task can be a single item or part of a greater whole. A task can be as simple as a trip you need to make to the store or as complex as a multi-faceted project with lots of individual elements that need completing. The idea behind the Tasks tool is to give users a way to accomplish goals and objectives. By organizing the things you need to do in one handy place, Entourage can remind you about what needs to be done, show you what items you've already cared for, and generally keep you going in the right direction productivity-wise.

The large Tasks pane displays all the tasks you are tracking, along with tasks you've already completed. Columns in the list box help to organize, filter, and control the tasks you add to the list. The Tasks tool has two different views: Tasks and To Do List. Tasks view (refer to Figure 27.1) shows a list of all the tasks you have entered. The To Do List view, shown in Figure 27.2, looks much like the Tasks view, but it shows all the messages and contacts you've flagged and want to deal with at some point. When you flag a message or contact using the To Do button on the Standard toolbar, Entourage adds a little red flag icon to the message or contact. Entourage also automatically places the message or contact in the To Do List. Both the Tasks view and the To Do List can help you stay on top of things you need to take care of, gently reminding you when necessary.
You can use the Folders List pane to toggle back and forth between the two views. Click Tasks to view the Tasks pane, or click To Do List to view the To Do List pane. You can learn more about filtering each view coming up later this section.

When creating tasks, you can use the New Task window, shown in Figure 27.3. This window contains all the necessary settings and options for creating, prioritizing, and classifying a task. You can find your way to the New Task window using several different methods as outlined below:

Choose File

Press

Control+click a blank area on the Tasks list, and click New Task.
When you first open the window, it's untitled and full of blank fields, with the exception of the date fields. Entourage has filled in the date fields for you using the current date. Of course, you can change the date to whatever you want. The New Task window is essentially a form you fill out. It has its own toolbar, a set of options and fields for filling out details about the task, and a large blank area for holding notes you type or other items you paste into the area. You can press the Tab key to move from field to field in the form, filling out each area along the way.

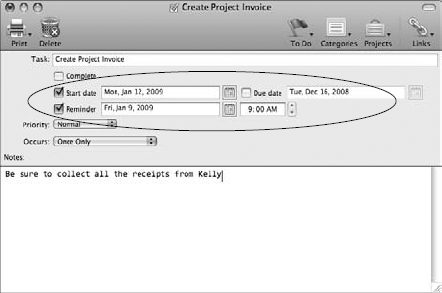
The top of the New Task window form lets you specify a name for the task. Whatever text you type into this field appears as the task title. When assigning names, use labels that can help you quickly see what sort of task it is, such as "Gather Budget Info," "Take Out the Trash," or "Schedule Doctor Appointment." Just below the task name field are some important check boxes. If you're just starting a new task, you probably don't want to select the Complete check box, unless it's something important to a sequence of things to do and you just want to note that it's already done. The Start date check box, when activated, lets you specify a start date for the task, while the Due date check box lets you set a deadline for the task. By default, the current date appears in both fields unless you specify otherwise. If you want Entourage to remind you about the task, you can select the Reminder check box and specify a date.
Just below the check boxes, you can set a priority level for the task using the Priority pop-up menu. You can choose from Highest, High, Normal, Low, or Lowest priority levels. You also can make the task a recurring task using the Occurs pop-up menu. Recurring tasks work the same way as recurring events, which you learned about in Chapter 26. The final portion of the New Task window lets you type notes or paste other items to help you tackle the task. The window's toolbar displays tools for printing, deleting, assigning categories or projects, adding links, and flagging the task for the To Do List. For example, you might link a task to an e-mail message, a contact in your Address Book, or an event on your calendar.
Follow these steps to fill out a task:
Open the New Task window (see the previous bulleted list for all the methods you can use to display the window).
In the Task name line, type a title for the task.
As soon as you enter the text, the name appears in the New Task window's title bar.
Activate a check box option: Complete, Start date, Due date, and Reminder.
To specify a date, click the pop-up calendar or type a date, as shown in Figure 27.4.
Optionally, if setting a reminder, you also can specify a time for the reminder alert message.
Click the Priority pop-up menu to set a priority level for the task.
Click the Occurs pop-up menu, and specify how often the task occurs. Once Only is the default selection.
Click in the Notes field, and type any notes pertaining to the task.
Optionally, you can use the toolbar buttons to flag the task; assign a category, project, or link; delete the task; or print the details. If you flag a task using the To Do button, Entourage also adds the task to the To Do List.
Press
Entourage adds the task to the Tasks pane, as shown in Figure 27.5.

After you have a few tasks in your list, you can start working with them in various ways. You can check them off when they're completed, flag them with a priority level, add reminders, delete them, and more. You can change a task's details by using the toolbar buttons on the Standard toolbar or by reopening the Task window. The fastest way to edit a task is to select it in the list pane and click the appropriate toolbar button. Figure 27.6 shows the toolbar tools. Or, if applicable, you can edit the task directly in the list pane.
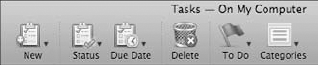
Figure 27.6. The Standard toolbar offers a variety of editing tools you can use to make changes to your tasks.
You can choose from the following toolbar actions and editing tips to manage your tasks:


You also can click the check box for the task to add or remove a check mark and change the task's status.


You also can delete a task by pressing Delete or by choosing Edit
To rename a task in the list, click to highlight the task name, then click again and type a new name, and press Return.
To change a start date, due date, or completed date you've assigned, click the field twice and make your change by typing a date directly in the list.
To change or add a category directly in the list, click the task's category field and make a choice from the pop-up menu.
To change a project assigned to the task, click the task's project field and choose a project from the pop-up menu.
You can access all these commands on the shortcut menu. Control+click a task, and choose an action from the pop-up menu that appears. Figure 27.7 shows an example of just such a context menu. You also can access To Do, Categories, and Projects commands using the Edit menu.

You can sort and filter your task list and change how the tasks are arranged. For example, you may need to see all the tasks due today or glance at all the tasks you've completed so far. Sorting is just the process of rearranging the task records, while filtering is showing just the task records you want to see. If you're familiar with sorting and filtering techniques in other programs, such as database programs or spreadsheet programs like Excel, the same principles are used when sorting and filtering Entourage tasks.
Notice the Tasks view's list box pane is divided into many columns, as shown in Figure 27.8. You can use the headings at the top of the columns to sort the list. At the far left end of the columns, the headings are just icons. If you pause your mouse pointer over an icon, a ScreenTip shows the name of the heading. To sort the list based on a particular heading, just click the column heading. For example, if you click the Status icon, the list is sorted to show the completed items at the top of the list. Every time you click a column heading the list is sorted based on that particular heading. By default, the first click you make sorts the list in ascending order based on the heading. Click the column heading again to sort by descending order.
You can open a task's window at any time by double-clicking the task. In addition to the actions available on the Standard toolbar, the Tasks window lets you change the assigned links and projects; set a different start date, due date, and reminder date; and add notes about the task. Using this window, you have access to all the settings you used to first create the task.
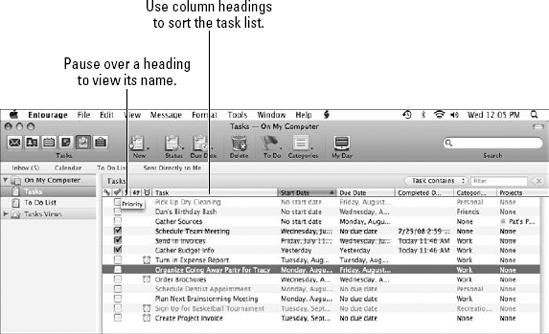
Table 27.1 defines each column, starting with the leftmost column and working across to the right. The column headings in Tasks view act as sort buttons when clicked, allowing you to rearrange your list in meaningful ways.
Table 27.1. Tasks Columns
Column Heading | Description |
|---|---|
Links | Denotes any links you have assigned to the task. |
Status | Denotes the task as completed with a check mark or uncompleted without a check mark. |
Priority | Denotes the priority level assigned, such as Today, Tomorrow, or Next Week. The priority level you set flags the task and places it in the To Do List, too. |
Recurring | Denotes the tasks as recurring or non-recurring. |
Reminder | Denotes any reminders assigned. |
Task Name | Lists assigned task names. |
Start Date | Shows the assigned start date. |
Due Date | Shows the assigned due date. |
Completed Date | Shows the assigned completion date. |
Categories | Displays assigned categories. |
Projects | Displays assigned projects. |
You also can find sorting and filtering options on the View menu. For example, choose View
If that wasn't enough sorting filtering options, you also can find more in the Folders List pane. The Tasks Views expand arrow (located to the left of the heading), when clicked, displays nine filtering categories: Changed in the Past 7 Days, Completed, Due Today, Family Category, High Priority, Incomplete, Overdue, Personal Category, and Work Category. Figure 27.9 shows the filters.
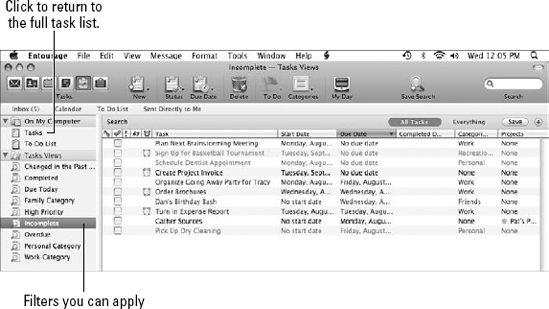
You can click the collapse arrow to hide the list again. To return to Tasks view, click the Tasks heading in the Folders List pane.
Just when you think you've exhausted all the possible sorts and filters you can apply to your tasks, there's one more feature I need to tell you about. You can use the filtering tools at the top of the Tasks view pane to perform more detailed filters on your list, as shown in Figure 27.10. You can click in the Filter field and type the text you want to use as a filter, such as a keyword from the note or task title, and then press Return, and Entourage filters the list based on your criteria. By default, the filter is set up to look through what the task contains. You can click the Task contains pop-up menu and filter by category or project, too.
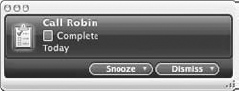
Reminders help you remember upcoming tasks. When you activate the Reminder check box option in the Task window and the reminder date becomes due, Entourage displays a pop-up alert box reminding you about the task. After a reminder prompt appears, as shown in Figure 27.11, you can tell it to go away or revisit you again in a few minutes. You also can use reminders as shortcuts to view details about the task.

You first learned about reminders in Chapter 26 when applying them to calendar events. As you learned then, reminders are part of the Microsoft Office Reminders program, a small add-on program you can use with events and tasks. When a task item is due, the Office Reminders program pops into the Mac OS X Dock, usually with a chiming noise, and then disappears when you've told it what to do. Reminders work even when you're not using Entourage.
You can use the Task window to assign reminders to your tasks. Just set one to check the Reminders check box in the Task window, and specify a date and time you want the reminder to sound off. After a reminder is assigned, a small alarm clock icon appears in the Reminders column in the task list.
To respond to the reminder when it appears on your screen, do any of these:
Click the Snooze button to make the reminder go away briefly, much like the snooze device on your alarm clock.
Click the Dismiss button to get rid of the reminder permanently.
Double-click the reminder to open the task window associated with the reminder.
Click the arrow end of the Snooze button to view a pop-up menu of times when you want to be reminded again.
If your reminder prompt displays more than one item, you can double-click any item to open it.
Tip
Not interested in reminders? You can turn off the Office Reminders program from within Entourage. Choose Entourage
As mentioned earlier in this chapter, any messages, contacts, or tasks you flag appear in a separate list called the To Do List, as shown in Figure 27.12. When in Tasks view, you can click the To Do List in the Folder List pane to view the flagged items.
Also like the Tasks pane view, the To Do List pane lists items in columnar format, with headings at the top of the pane. You can use the headings to sort the list. Pause your mouse pointer over a column heading icon to view a ScreenTip telling the name of the heading. To sort the list based on a particular heading, just click the column heading. Every time you click a column heading, the list is sorted based on the heading. One click sorts the list in ascending order, and a second click sorts by descending order. Table 27.2 defines each column heading, starting with the leftmost column heading.
Table 27.2. To Do List Columns
Column Heading | Description |
|---|---|
Item Type | Denotes a message, contact, or task. |
Status | Identifies the item as completed with a check mark or uncompleted without a check mark. |
Priority | Denotes the priority level assigned, such as Today, Tomorrow, or Next Week. The priority level you set flags the item and places it in the To Do List, too. |
Reminder | Denotes any reminders assigned to the item. |
Title | Displays the name of the item. |
Start Date | Shows the assigned start date. |
Due Date | Shows the assigned due date. |
Completed Date | Shows the assigned completion date. |
Folder | Shows the assigned folder. |
Categories | Displays any assigned categories. |
Projects | Displays assigned projects. |
You can use the Quick Filter field at the top of the pane to filter the list based on any criteria you enter. For example, you might filter the list by all the items using the name Bob. You can filter the list by what the items contain or by category or project. You also can find filters listed in the View menu and can filter the list by Incomplete Items, Completed Items, Due Today, or Due This Week. To see all the items again after applying a filter, choose View
Note
The Expand All and Collapse All commands in the View menu control the filters listed in the Folders List pane. Learn more about using the Folders List pane in Chapter 25.
You can edit the To Do List just like you edit the Tasks list. Select the item you want to edit, and use the buttons on the Standard toolbar to make changes. You also can Control+click a selected item to view a shortcut menu of commands, or you can double-click the item to open its respective window and make changes to the settings there. Like the Tasks list, you also can make edits directly on the list. See the preceding section to learn the various ways you can change items in the list.

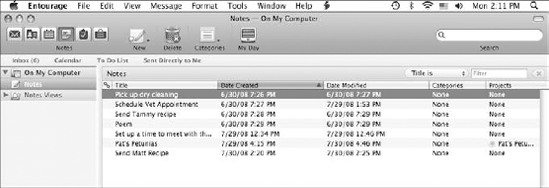
You can use Notes view in Entourage to add and organize notes. Notes can be anything you want to jot down. Notes can be ideas you have about an upcoming project, creative endeavors such as poems and verse, random thoughts, organizational notes, driving directions, grocery lists, phone call information, anything you might ordinarily write down on a piece of paper. Entourage keeps a running list of the notes you add and displays them in a list box pane, shown in Figure 27.13. As you can see, notes are organized by details in the form of columns. The Notes tool keeps track of any links you assign to your notes, note titles, the dates you created or changed the note, and any categories or projects assigned to the notes.
You can use the New Note window to create a note at any time. To open the window, use any of these methods:

Choose File
Press
Control+click a blank area on the Notes list, and click New Note.
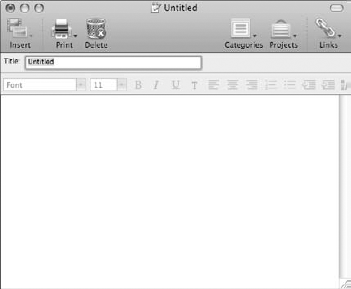
The New Note window, shown in Figure 27.14, looks very much like all the other windows you've used so far in Entourage to create messages, events, and tasks. The toolbar has a few buttons, a place to give the note a name, and a large open space to type your note or paste items. A formatting toolbar lets you format your note text, such as changing the font or font size.
Follow these steps to fill out a note:
Open the New Note window (see the previous bulleted list for all the methods you can use to display the window).
In the Title field, type a title for the note.
As soon as you enter the text, the name appears in the New Note window's title bar.
Click in the notes field, and type your note. You also can paste items from other sources, such as a snippet of text from a Word document or e-mail message.
Optionally, you can use the toolbar buttons to print or delete the note and assign a category, project, or link.
Optionally, you can use the formatting tools to format your note text.
If you click the Insert button, you can insert a picture, background picture, sound clip, or movie clip into your note.
Press
Entourage adds the note to the Notes pane.
After you have some notes added to your list, you can edit them as needed. You can choose from the following toolbar actions and editing tips to help you manage your notes:
Double-click any note item to reopen the Note window and make changes to the note's contents.
You also can select any note in the list and assign another category or project to the note.
To assign a category, click the Categories button and choose a category. You can assign more than one category to a note.
You also can delete a note by clicking the Delete button on the Standard toolbar, pressing Delete, or choosing Edit
To rename a note in the list, click to highlight the name, then click again and type a new name, and press Return.
To change or add a category directly in the list, click the note's category field and choose from the pop-up menu.
To change a project assigned to the task, click the note's project field and choose a project from the pop-up menu.
You can sort notes in the list using any of the column headings as filters. The Notes Views filters in the Folders List pane, shown in Figure 27.15, also has filters you can apply to the list: Changed in the Past 7 Days, Created in the Past 7 Days, Family Category, Personal Category, and Work Category. Click the Notes Views expand arrow button to expand the filter list, and click a filter. To return to the Notes pane, click Notes in the Folders List pane.

You can print your tasks and notes and take them with you. Using the Print dialog box, shown in Figure 27.16, you can control which tasks and notes print, and how they are displayed on the printed page. You can activate the Print command from an opened Task or Note window using the Print button on the toolbar, or you can choose File
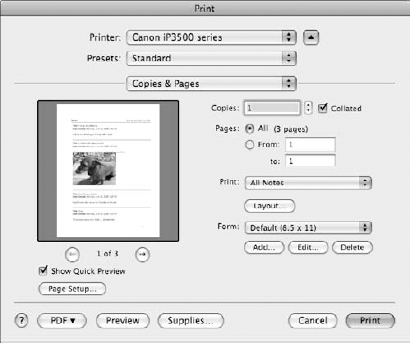
If you click the Layout button in the Print dialog box, the Print Layout dialog box opens, as shown in Figure 27.17. From here you can specify whether to print cut lines, page numbers, or pictures, and include any marks for holes if you're using a form and inserting it into a notebook planner system.
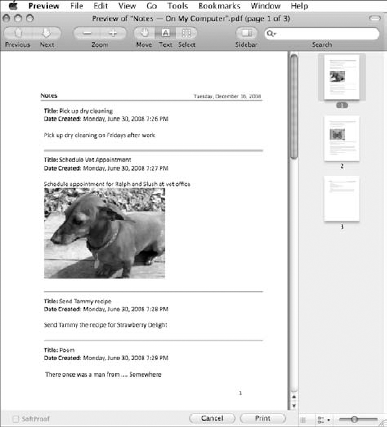
You can click the Preview button in the Print dialog box to open the Preview application, shown in Figure 27.18, and see what your notes or tasks will look like on the printed page. You can view different pages, zoom in, or zoom out. To exit Preview, choose Preview

One of the best tools in Entourage is the Project Center. Few people make use of this powerful tool, but as you'll soon see, it can be a real lifesaver when it comes to organizing. The Project Center, shown in Figure 27.19, helps you to manage projects of any size, tracking all the various components that make up a project. By placing all the related items together, you can easily find out where you are with accomplishing your goals and completing the project. The Project Center works by creating a watch folder in which you can store everything related to the project, including e-mails, tasks, notes, contacts, and files.
What's so remarkable about the Project Center? Ordinarily, when you work with projects on your computer, the components are located in all kinds of different places. All the document files may be in the same folder, but e-mail messages are located somewhere else, a schedule in your calendar program in another location, and photos in a photo folder in a completely different location. The beauty of the Project Center is that it lets you bring everything together in one spot so you don't have to go searching elsewhere or trying to remember where you saved a file. This seriously cuts down on time spent looking for files and the possibility of losing something important in your growing file collections.

You can use the New Project Wizard to create new projects for the Project Center. The Wizard walks you through all the necessary steps using four pages or screens. To start a new project, follow these steps:
Open the New Project Wizard by doing any of the following:

Choose File
Press
Control+click a blank area on the Projects area, and click New.
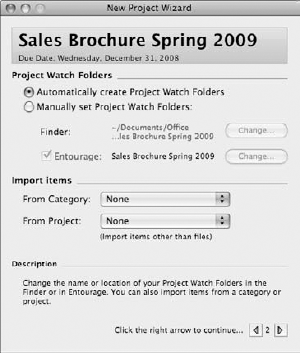
The New Project Wizard appears, as shown in Figure 27.20. You can use the first page of the Wizard to assign a name, due date, picture, or color to the project.
Type a name for the project in the Name field.
If the project has a due date, click the Due Date check box and use the pop-up calendar to set a date.
Optionally, you can drag a picture into the Picture field to add an image to the project.
Optionally, you can click the Color field and choose a color to associate with the project. A color can help you distinguish items in the project from other Project Center projects.
Tip
You can always revisit the properties you set in the Wizard dialog boxes and make changes later. To do so, just click the Properties button at the bottom of the selected project in the Project Center window. So if you decide to change a color later or add a picture, you can do so when you know what you want to assign.
Click the right arrow button to continue.
The second Wizard page appears, as shown in Figure 27.21, with options for controlling where the project's watch folder is stored and which type of items you want to include in the project.
Choose the type of watch folder you want to create.
To let Entourage create the folder, leave the Automatically create Project Watch Folders radio button selected. If you select this option, Entourage creates a folder based on the name you specified in Step 2. Watch folders that Entourage makes are stored in the Office Projects folder located in your Documents folder.
To use an existing folder you've already started for a project, click the Manually set Project Watch Folders radio button and navigate to the folder you want to use.
If you have an existing category or project you want to use for this new project, choose it from the Import items options.
Click the right arrow button to continue.
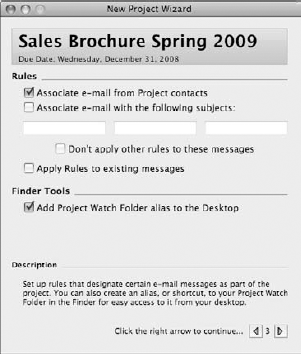
The third Wizard page appears, as shown in Figure 27.22, with options for setting message rules and adding the watch folder to your desktop.
Under the Rules section, specify any e-mail message rules you want to apply.
If contacts from your Address Book are important to the project, you can include their e-mail messages in the watch folder by selecting the Associate e-mail from Project contacts check box. All e-mail from the contacts then becomes associated with the project.
To associate any e-mail messages with subjects pertaining to your project, check the Associate e-mail with the following subjects check box and fill in the subject keywords.
Check the Don't apply other rules to these messages check box to disengage any rules you already have in effect for e-mail messages. When you activate this option, the rules don't apply to any e-mail associated with this project.
If you do want to keep your current rules in effect, check the Apply Rules to existing messages check box.
Click the right arrow button to continue.
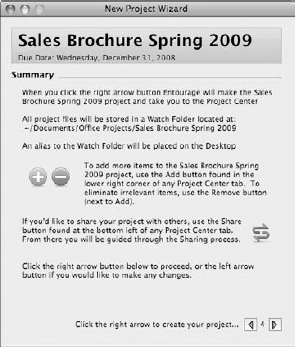
The last Wizard page appears, as shown in Figure 27.23, summarizing your choices.
Click the right arrow button to continue.
Entourage creates the new project and displays it in the Project Center, as shown in Figure 27.24.

Congratulations! Your first project is added to the Project Center window and an alias to the Watch Folder is placed on your desktop. You're on your way to true organizing success. You no longer have any excuses about misplacing crucial elements to any project. You can keep everything in one spot and impress everyone who doesn't already know your secret organizational powers.
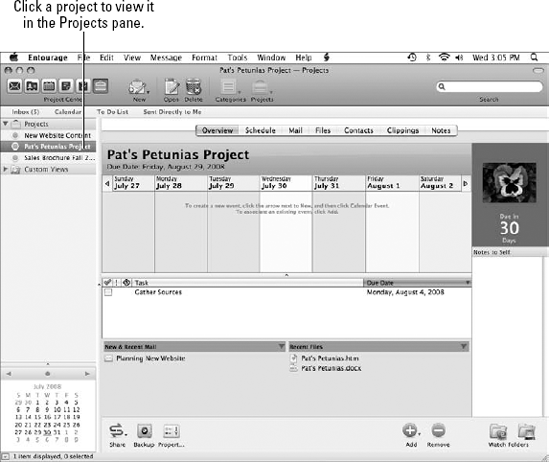
After you have a project in the Project Center window, you can use a variety of ways to look at the information you collect, find out how things are coming along, and add more items to the project When you open the Project Center window, two panes appear: the Folders List pane located on the left and the Projects pane located in the center. You can use the Folders List pane to change the view. To see all the projects you're working on, click the Projects folder heading on the Folders List pane or click the Expand Arrow icon to expand the list, as shown in Figure 27.25. When the Projects folder is highlighted, the Projects pane shows a list of every project you're tracking.

To view an individual project, click the project name in the Folders List pane or double-click the project name in the list box. As soon as you open the project, the Projects pane looks something like Figure 27.26. The title of the project appears at the top in the color you assigned during the New Project Wizard steps. Any picture you assigned appears as well. Every project has seven tabs: Overview, Schedule, Mail, Files, Contacts, Clippings, and Notes. You can click a tab to view its contents. The bottom-right corner of the pane displays icons for the Watch Folders you've created. You can drag and drop items into the Watch Folders as needed.
In some of the tab views, you can resize the panes to help you better see your project items. Move the mouse pointer over the border of a pane, and then click and drag to resize the pane.
Now let's look at what you can expect to find in each tab view of a project.
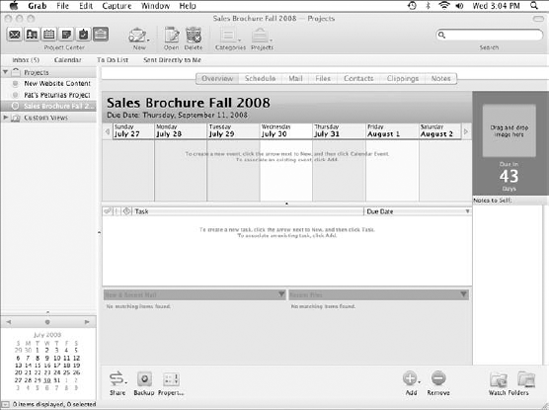
The Overview tab, shown in Figure 27.26, gives you a quick overall look at a project, showing a seven-day calendar, a list of tasks, new and recent e-mail messages, and recent files. The tab also displays any associated picture and due date. This tab, displayed by default when you open a project in the Projects pane, is useful for catching up on where things are with a project, what's on the schedule, what tasks are listed to do, and recent work that's been done on the project. The bottom of the Overview tab view offers five different buttons:
Several of these same buttons appear in the other six tabs. The Backup and Properties buttons are unique to the Overview tab.
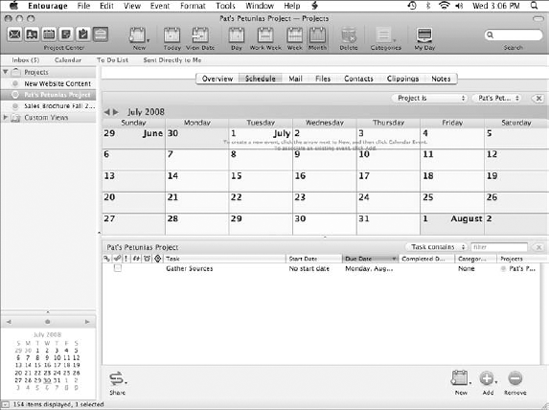
The Schedule tab, shown in Figure 27.27, shows a larger view of your schedule, and anything related to the project appears on the calendar. None of the non-project related events appear, just the ones associated with the project. The same is true in the Tasks list pane located below the calendar. All the tasks you need to do for the project are displayed in the Tasks pane.
The Calendar pane works just like the regular Calendar tool in Entourage, but it's focused on the current project. You can view different months, weeks, or days. You can double-click an event to open the Event window. The Same is true for tasks: Double-click the task to open the Task window. Both the Calendar and Tasks panes have Quick Filter pop-up menus at the tops of the panes that you can use to filter the items shown.

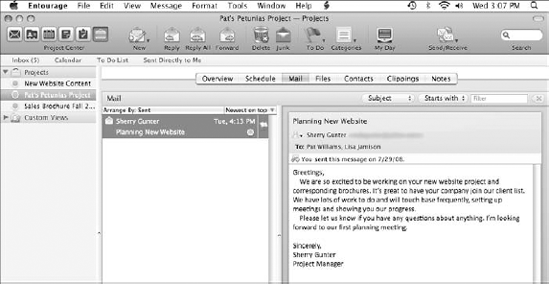
The Mail tab shows any e-mail messages associated with the project. To view a message, click it in the Mail pane, and the Preview pane shows you the contents. The Mail tab, shown in Figure 27.28, works like the regular Mail tool. You also can double-click a message to open the Message window. To sort the messages, use the column headings or filter the messages using the Quick Filter pop-up menus located at the top of the pane.

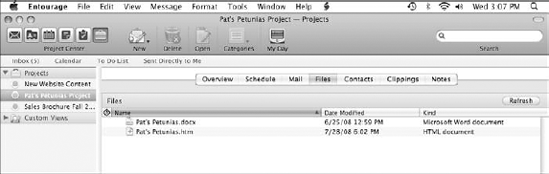
The Files tab, shown in Figure 27.29, keeps track of all the files you have associated with a project. Files can include documents, photographs, spreadsheets, and more. These are files stored in the Watch Folder for the project. You can include any type of file with a project, including other Office program files. When you created the project, an alias of the folder was added to your desktop. You can drag and drop files from your computer and place them in the desktop Watch Folder for the project.

The Contacts tab, shown in Figure 27.30, keeps track of any contacts associated with the project. If your project involves e-mailing the same people over and over again, add them to the Contacts tab for quick and easy access. You can associate contacts from your Address Book or add new contacts from scratch.


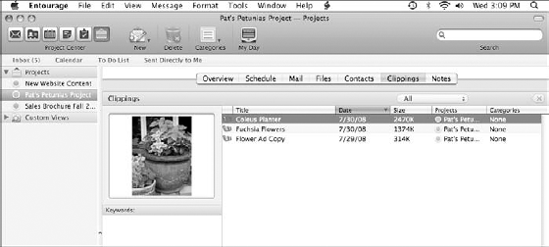

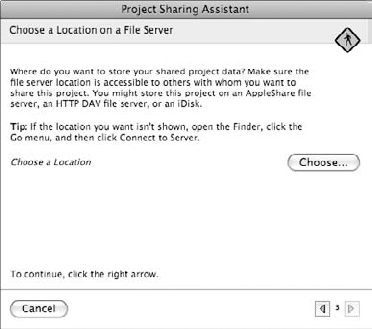
You can activate the Project Center's sharing feature and place the project on a server that others can access. This can make it really easy to collaborate on projects large and small. Sharing a project lets anyone involved view documents and notes, share e-mails, check the schedule, and more. You need a network server that everyone you're sharing the program with can access. You can use the Project Sharing Assistant, shown in Figure 27.33, to walk you through the setup using four screens. When you finish, Entourage moves all the elements associated with the project to the designated server.

Figure 27.33. The Project Sharing Assistant can walk you through the steps for setting up project sharing.
To share a project, follow these steps:

Click Start Sharing Project.
You also can choose File
The Project Sharing Assistant opens, as shown in Figure 27.33.
The first screen of the assistant tells you how to share projects. Click the right arrow button to continue.
The second assistant screen opens, as shown in Figure 27.34.
Specify a project to share, if necessary. Click the pop-up menu, and select the project. By default, the project you opened before starting Step 1 is displayed.
Click the right arrow button to continue.
The third assistant screen opens, as shown in Figure 27.35.
Click the Choose button, and navigate to a server location for the shared project.
You can share projects on an HTTP DAV server, an Appleshare file server, or an iDisk.
Click the right arrow button to continue.
The last assistant screen opens with a summary of the setup offering a few tips to read about.
Click the Close button to finish the setup.
Entourage adds a small sharing icon next to the project name in the Overview tab.
Note
If you choose to store the project on your computer, additional Project Sharing Assistant screens may appear. Fill in the information as requested.
Now that you've set up your project for sharing, you must alert your colleagues. You can click the Share button again and choose Invite people to join project. A prompt box appears asking if you want to create an e-mail. Click the Create E-Mail Invitation button. This opens a new Message window where you can invite others to join in the fun by entering e-mail addresses, typing a message, and sending out the invitation.
Note
If you choose to store the project on your computer, you cannot e-mail invitations to other users. Instead, they'll have to subscribe using their Entourage window by choosing File
To stop project sharing at any time, click the Share button and choose Stop Sharing Project. You also can select any item in the project and turn off sharing for that particular item. Click the Share button, and choose Do Not Share Item. To turn item-sharing back on again, click the Share button and choose Share Item.
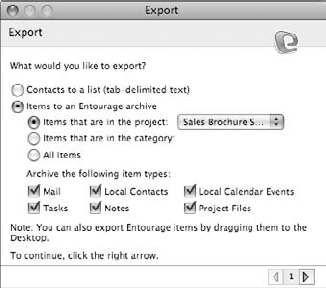
To help you keep your project data safe, Entourage offers you a backup feature. When you activate this feature, Entourage creates an archive file using the .rge file extension. You can choose to import all or just certain items from your project.
Follow these steps to create a backup archive:

The Export dialog box opens, as shown in Figure 27.36.
Choose which items you want to include in the backup.
Click the right arrow button to continue.
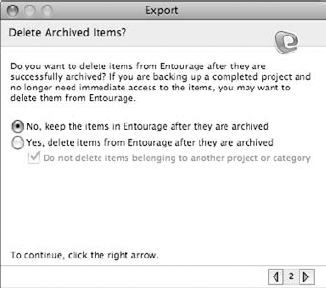
The second Export screen asks you how you want to handle deleted items, as shown in Figure 27.37.
Click the No, keep the items in Entourage after they are archived radio button.
If you want all the associated items removed from Entourage and kept only in the archive, you can select the Yes, delete items from Entourage after they are archived radio button.
Click the right arrow button to continue.
The Save dialog box appears, as shown in Figure 27.38.
Type a name for the archive if you want a different name than the project name, and choose a location for the file.
Click Save.
Entourage creates a backup archive file.

If you ever need to restore a project's backup file, just double-click the filename and follow the onscreen prompts.
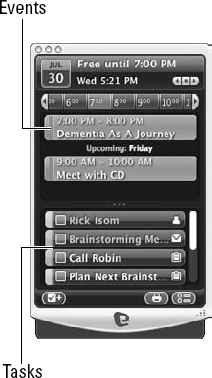
Have you ever wanted to check your tasks and appointments without having to open your personal information manager application? Well, now you can in Entourage 2008. The new My Day tool lets you look at your day's events and To Do List items without having to contend with the rest of your stuff. This lets you concentrate on what you need to attend to for the day without being distracted by e-mails, notes, and upcoming tasks and events. My Day is a mini-application, much like a widget, that works outside of Entourage, so you need not have Entourage open in order to view your current itinerary.
Here's what you can do with the My Day window:
To view an appointment's location, pause the mouse pointer over the event name.
To open an event or task, double-click the item.
To mark a To Do task as complete, click the check box in front of the task name.
To add a new task to the list, click the New Task button in the bottom-left corner of the My Day window.
To view another day's events and tasks, click the navigation arrow buttons at the top of the window. Click the left arrow to view the previous day, the right arrow to view the next day, and the middle button to view the current day.
Click the scroll arrow buttons on either side of the timeline to change your view of the appointed time commitments.
To set My Day preferences, such as showing the My Day window in the Dock, click the Preferences button located in the bottom-right corner of the window to open the General tab and change the settings as desired.
To print the My Day items, click the Print button located at the bottom of the window.
Use the window's Close, Minimize, and Zoom buttons to close, minimize, or enlarge the window.
In this chapter, you learned all about using tasks and notes in Entourage. You learned how to create new tasks and keep them organized in the Tasks pane, and you learned how to turn tasks into important To Do List items. The only difference between tasks and To Do List tasks is that anything in the To Do List has been flagged as requiring attention. Unlike the Tasks pane, which contains nothing but tasks, the To Do List can include tasks, contacts, and messages. You also learned how to utilize the Notes feature to keep track of random thoughts, creative outbursts, or just plain notes about something. You learned how to print your tasks and notes to take them with you.
This chapter also introduced you to the power of the Project Center, Entourage's secret weapon for keeping all your projects and their components together in one tidy location. Last, but not least, you learned how to use the new My Day tool to view your day's schedule and tasks at a glance.