
IN THIS CHAPTER
Adding clip art objects
Inserting pictures
Drawing shapes of all kinds
Adding WordArt objects
Inserting text boxes
Formatting graphic objects
Now for some graphic talk. Just to keep things simple, think of the term graphics as meaning anything related to visual elements you add to your Office files. As such, this opens a whole wide world of possibilities, everything from simple shapes you draw in a worksheet to pre-drawn artwork you add to a Word document. Historically, the term graphics pertains to the art of drawing and printmaking. In the electronic realm, graphic objects include clip art, photographs, pictures, shapes, diagrams, and even text boxes—specialized boxes for holding text.
Although we've covered adding graphics in several places throughout the book so far, this chapter pulls all the how-to information into one spot. The various graphics features are available across the Office applications, so after you learn how to use a feature in one program, you can easily apply the same steps and commands in another program. As you can probably guess, graphics are not quite so important to Entourage as they are to the other Office programs. However, you can use a few graphics features in Entourage to add photos to your e-mail messages, for example. By and large, you'll mostly find yourself using graphics in Word, Excel, and PowerPoint.
When you insert a graphic object, such as clip art or a shape, you can move it around, copy it, resize it, and edit it to suit your project. When you select a graphic object, it's surrounded by selection handles, or tiny boxes on the corners and along the border. You can use these handles to manipulate the graphic object. Graphics are a great way to add a visual dynamic to any project. The information in this chapter shows you how to add every type of graphic element to your Office files.
Clip art is simply pre-drawn artwork. PowerPoint installs with a clip art collection, and you can find it in the Clip Gallery or access it through the Object Palette in the Toolbox. Plus, if you have an online connection, you can access even more clip art from the Microsoft Web site. In addition to drawn artwork, the Clip Gallery can also include photographs, sound, and video clips.
You can use clip art in various Office programs to illustrate your work or give your documents visual impact. You also can add your own clip art collections to the mix.
To find your way to the Clip Gallery, you can employ any of these methods, depending on which Office program you're using:
Choose Insert

In PowerPoint, click the Picture button on the Standard toolbar and choose Clip Art.
If the Drawing toolbar is displayed, you can click the Clip Art button.
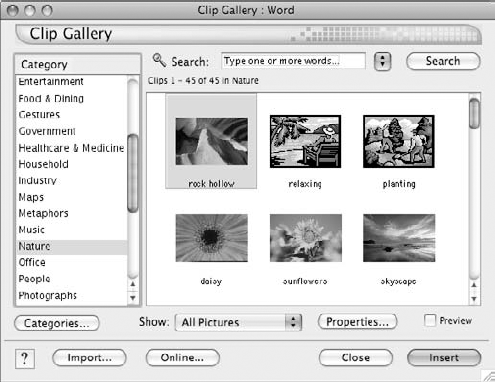
You can use the Clip Gallery, shown in Figure 30.1, to search for a particular type of clip art or browse through the various categories to find something you want to use. To browse, choose a category and look through the artwork displayed in the Clips list box. The Category list on the left side of the gallery displays a variety of categories, each holding a collection of clip art related to the category name. When you find something you want to use, click it in the Clips pane and then click the Insert button, and it's added to your document. You also can just double-click the clip art to insert it immediately.
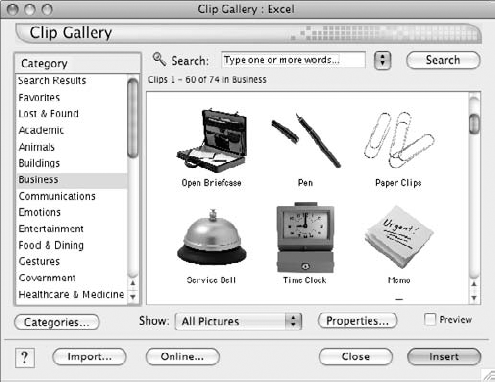
You can always preview clip art before inserting it. To do so, select it and click the Preview check box located just above the Insert button. When you activate this feature, it opens a larger preview window for getting a better view of the artwork, as shown in Figure 30.2. Deselect the check box again to close the Preview window.

Figure 30.2. Use the Preview window to check out the artwork before inserting it into an Office document.
If just browsing through clip art isn't producing what you want, you can conduct a search for a particular item by typing in a keyword or phrase in the Search field. As soon as you type in a keyword and press Return, the Clip Gallery displays any matching results. You can use the pop-up menu next to the Search field to return to previous searches you conducted.
The Show pop-up menu lets you control what types of clip art appear listed in the Gallery. For example, you may want to view all movie clips or all sound clips instead of pictures.
To check out detailed information about a piece of selected clip art, click the Properties button. The Properties dialog box opens, as shown in Figure 30.3. The Description tab gives you a description of the artwork and pertinent file information, such as size, dimensions, and location. You can use the Categories tab to assign the clip art to more than one category in the Gallery. You can use the Keywords tab to add or edit keywords associated with the artwork. The Preview button in the Properties dialog box works the same way as the Preview check box back in the Gallery. Click it to open a Preview window to better view the artwork.
You can change the categories listed in the Clip Gallery, add new ones, and delete ones you don't use. Simply click the Categories button to open the Categories dialog box, shown in Figure 30.4. To add a new category, such as a category for storing your own photographs, for example, click the New Category and type a name. To remove a category, select it and click the Delete button.

Figure 30.3. Look up detailed information about a piece of clip art using the Properties dialog box.

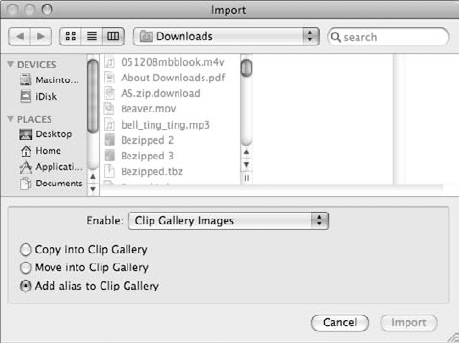
You can import a clip art collection from another source into the Clip Gallery. Just click on the Import button, to open the Import dialog box, shown in Figure 30.5. You can then navigate to the collection you want to use and choose to copy, move, or add an alias to the Clip Gallery.
You can look for more clip art online and download artwork into the Clip Gallery using the Online button. Make sure you're connected to the Internet, and then follow these steps:
Display the Clip Gallery.
Click the Online button, as shown in Figure 30.6
A prompt box appears, as shown in Figure 30.7, asking if it's okay to launch your default Web browser.
Click Yes.
Your default Web browser opens to the Microsoft Clip Art Web site.
In the Clip Art search box, type a keyword or phrase for the type of clip art you want to find and press Return or click the Search button. Figure 30.8 shows the results of a keyword search.
Any matching results appear on the page, as shown in Figure 30.9.
Browse through the artwork, and check the boxes of the items you want to download.
When you're ready to download, click the Download link at the top of the window, as shown in Figure 30.9.
The Download page appears, as shown in Figure 30.10.
Click the Download Now button.
Your selections are downloaded and added to the Downloads window, as shown in Figure 30.11.
Double-click the clip art file.
The artwork is added to the Favorites category in the Clip Gallery, as shown in Figure 30.12. You can now use the clip art wherever you like.


Tip
Did you insert the wrong artwork? No problem, just activate the Undo command by pressing


To control what types of clip art appear in the list, click the All Images pop-up menu and choose a category or type. To adjust the size of the display, drag the Thumbnail Size slider.
When you find a piece of artwork you want to use, drag it onto the document. After it's inserted, you can resize, move, and format it as needed.

Another way to illustrate your work is to insert pictures, such as photographs or artwork you've created in another program. For most users, the term "pictures" means photos. There are two ways to insert pictures: using the Choose a Picture dialog box and using the Object Palette on the Toolbox. The Object Palette lists photos found on your computer; the Choose a Picture dialog box lets you insert picture files of any type.
To insert a picture file, whether it's a photograph or another graphic file type, follow these steps:
Choose Insert
PictureFrom File.In PowerPoint, choose Insert
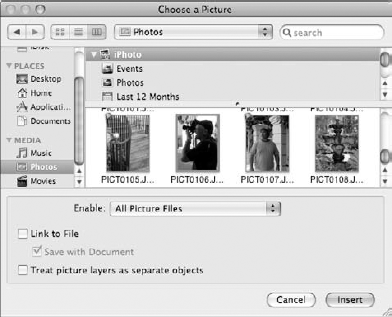
The Choose a Picture dialog box opens, as shown in Figure 30.14.
Navigate to the folder or drive containing the file you want to insert.
Optionally, you can click the Enable pop-up menu to choose what kind of picture file types to display.
Select the filename or thumbnail image.
You can click the Link to File check box to create a link between the source file and the document in which you are inserting the image. This way, any edits made to the original are reflected in the copy.
Click Insert.
The picture is added to the document. You can now resize, move, or edit it as needed.
Note
You can add a photograph or picture to an e-mail message in Entourage. Choose Message
You can use the Object Palette to view and insert pictures, specifically photographs from your Photos folder. Click the Toolbox button on the Standard toolbar to display the Toolbox, and then click the Object Palette button. You also can get there by choosing View
You can adjust the size of the display by dragging the Thumbnail Size slider. You also can search for a particular photo based on its name or any keywords you assigned to the image. Click in the Search field, and type a keyword. As soon as you press Return, the palette displays any matches.

New to Office 2008, SmartArt graphics are handy pre-drawn artwork you can use to diagram processes, cycles, workflows, hierarchies, and relationships. For example, do you need to create a diagram showing your corporate structure? Easy! Peruse the SmartArt graphics to find just the right layout. At its very heart, SmartArt is a visual way of presenting data, such as a concept or idea.
The makers of Office have made it very convenient to find the SmartArt graphics by adding the feature to the Elements Gallery. Click the SmartArt Graphics tab on the Elements Gallery to view a list of all kinds of SmartArt, as shown in Figure 30.16. In Word or PowerPoint, you can display the Gallery by choosing Insert

From the Gallery, click the artwork you want to insert. A Text Pane appears for you to enter the data to make the art, as shown in Figure 30.17, along with the layout you selected. You can type your text in the pane window or directly into the box. You can add more boxes, or shapes, to the layout by clicking the Add button in the Text Pane. To remove a shape, click the Remove button. You can reassign a selected shape by promoting or demoting it in the layout using the Promote or Demote buttons.
You can control the formatting of your SmartArt with a little help from the Formatting Palette. Located in the Toolbox, click the Formatting Palette, and then open the SmartArt Graphic Styles heading, as shown in Figure 30.18. You can experiment with the various controls to tailor your layout to suit your project.


Microsoft's WordArt feature has been around for a long time. You've probably seen it in previous versions of the Office programs. You'll be happy to know it's still around, featuring a few improvements. It's a handy little feature for turning text into artwork, which you can then manipulate like a graphic object.
You can find your way to the WordArt feature using the Elements Gallery in Word, PowerPoint, and Excel.
To add a WordArt object, follow these steps:
Click the WordArt tab on the Elements Gallery, as shown in Figure 30.19.
You also can choose Insert
Peruse the styles, and click the one you want to use.
A WordArt placeholder object appears in the document, as shown in Figure 30.20.
Double-click the WordArt object.
The Edit WordArt dialog box appears, as shown in Figure 30.21.
Type the text you want to use.
The placeholder text is replaced with whatever you type.
Optionally, you can change the font, size, and style:
Click the Font pop-up menu to choose a different font.
Click the Size pop-up menu to choose another font size.
Click the Bold or Italics button to change the text style.
Click OK.
The WordArt displays the new text, as shown in Figure 30.22.


You can move, resize, or change the WordArt object as needed. To return to the Edit WordArt dialog box at anytime, just double-click the object. You also can find formatting controls for editing your WordArt object in the WordArt pane located on the Formatting Palette in the Toolbox. You can use the tools in the WordArt pane to change the WordArt shape, change text height and position, and open the Format dialog box. You learn more about the Format dialog box later in this chapter.


In addition to clip art, SmartArt Graphics, and WordArt, you can draw shapes quite easily in your Office documents using Microsoft's AutoShapes. AutoShapes, like clip art and WordArt objects, are pre-drawn artwork that you can add and format as you like. For example, you can draw a perfect diamond shape or a starburst using AutoShapes.
You can use the Object Palette to view and insert AutoShapes. Click the Toolbox button on the Standard toolbar to display the Toolbox, and then click the Object Palette button. You also can get there by choosing View
You can adjust the size of the shapes display by dragging the Thumbnail Size slider. To control what types of shapes appear in the list, click the All Shapes pop-up menu and choose a category or type.
When you find a shape you like, click it. You can now draw it on the document page. Click and drag to create the shape, as shown in Figure 30.24.


After creating a shape, you can switch over to the Formatting Palette in the Toolbox to find options for formatting the shape's color, line style, or transparency level.
You may encounter occasions in which you'll need to place some text into some kind of "container" to keep it separate from other items in the document. For example, in Word, you might want to add a box of text in the middle of two columns to hold a quote. Text boxes allow you to add text and treat it as a separate element. Of course, in PowerPoint, text boxes are commonly used to hold slide text. In Word and Excel, however, they're not so commonplace.
To add a text box in Word or Excel, choose Insert

For additional text box controls, try the Text Box pane in the Formatting Palette in the Toolbox. Here you'll find text wrapping options, size options, and controls for setting the internal margins inside the text box. You also can find more formatting controls in the Format dialog box, which you learn about later in this chapter.
Word, Excel, and PowerPoint include a special toolbar full of tools for drawing and formatting your own shapes and artwork—the Drawing toolbar. To display this toolbar, choose View
Figure 30.26. The Drawing toolbar offers many of the same graphic object tools found elsewhere in your Office programs.
We've already covered how to add clip art, pictures, WordArt, AutoShapes, and text boxes, so let's look at how to draw lines and 3-D shapes.
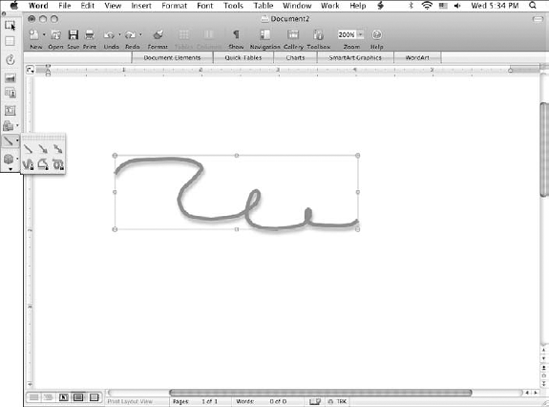
To draw a line, click the Lines tool on the Drawing toolbar, and then click and drag on the document to create the line. If you want to draw a special kind of line, click the button's arrow icon and choose your line style, such as Freeform, Scribble, or Double Arrow, as shown in Figure 30.27.
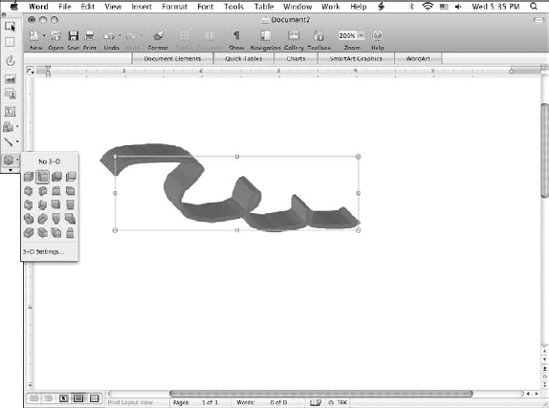
If it's 3-D elements you're after, click the 3-D button and choose a style. Whatever style you choose is applied to the selected object on the document page, as shown in Figure 30.28.
So, you've added a graphic object to your Office document. Now what? Is there anything else you can do with it? Yes, there's plenty. You can format it. Formatting can change the appearance of an object, whether it's a shape, clip art, photograph, text box, or WordArt object. For example, you may decide a piece of clip art needs a border around it, or perhaps a shape's color is not working with the rest of the project. You can make changes to the object's formatting attributes to edit its appearance, and as it turns out, the formatting options seem endless.

The following sections offer a run-down of the panes and the types of tools you can find in them. Keep in mind that the panes vary based on the object you've selected onscreen.
As you can tell by the title, this pane features tools for controlling the size of an object, rotation, and alignment of the object, and in the case of multiple objects, the order in which objects are stacked. Tools are grouped into two main categories: Size and Ordering. Among the Size tools are controls for height and width. As shown in Figure 30.30, the Height and Width boxes let you set a specific size for the object. You can lock the aspect ratio to keep the size aspect equal to the original height and width sizes.

You also can rotate an object. You can choose a quick rotation option by clicking the Rotate pop-up menu. For example, you can rotate an object to the left, flip it vertically or horizontally, or rotate it freely in whatever direction you want. If you select the Free Rotate tool, you can drag an object's selection handle to rotate it.
The Ordering group of tools allows you to align selected objects, distribute them evenly, arrange them in stacking order, or turn multiple objects into a single group.
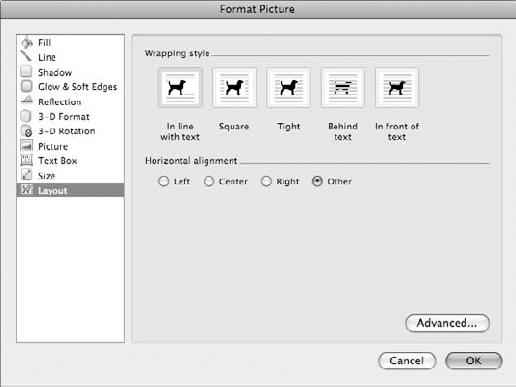
The Wrapping pane, shown in Figure 30.31, offers tools for controlling how text flows around the selected object. You can choose from the following settings:
In Line with Text: This option keeps the object on the same line as the text where it's placed. This is the default setting unless you specify otherwise.
Square: This option keeps a nice square edge around the object and text wraps around all sides.
Tight: This wraps text tightly to edge of object.
Behind Text: Text wraps behind the object when you use this option.
In Front of Text: Text wraps in front of the object with this option.
Top and Bottom: This option wraps text around the top and bottom only.
Through: This allows text to run through the object.
Edit Wrap Boundary: This lets you set your own wrap boundaries based on edit points you can drag to adjust.
You can use the Wrap to command to control which sides of the object are wrapped, while the Distance from text settings let you set a precise measurement between the text wrapping and the object.

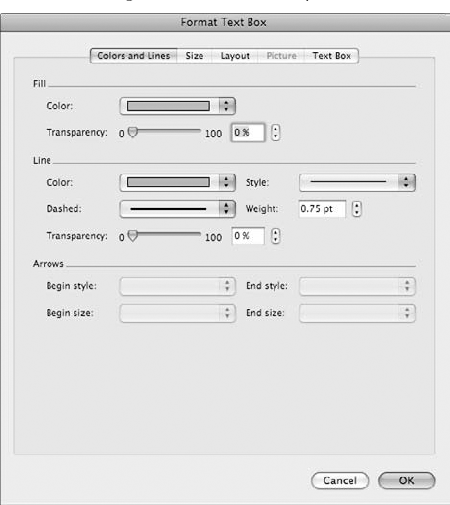
The Colors, Weights, and Fills pane, shown in Figure 30.32, offers tools for setting a fill color and transparency and a line color and style. If your object is an AutoShape, for example, you can change the inside color and the outer border surrounding the shape. If your object is a piece of clip art or a photo, you can use the Line settings to add a border.

Under the Fill group, you can click the Color button and display a pop-up palette of colors from which you can choose. You can drag the Transparency slider to make the object transparent or opaque. Under the Line group, you can click the Color button to choose a line color, click the Style button to choose a style (line thickness), click the Dashed button to choose a dash style, or set your own line thickness in the Weight box. Like the fill color, you can drag the Transparency slider to make the object transparent.
The Shadow pane, shown in Figure 30.33, has tools for setting shadow effects. For example, if you're working with a shape, you can add a shadow to give the object some depth. Click the Shadow check box, then use the Angle tool to establish an angle for the shadow effect. You can choose a style, select a color, set a distance from shadow to object, or create a blur or transparency effect.

If your object is a picture, you can use the Picture pane, shown in Figure 30.34, to apply formatting to the image. You can use the Recolor tool to change the coloring of the image, such as setting a sepia tone. You can crop out parts of the image using the Crop tool. Click the Crop button, and drag a crop handle on the image to crop it.
You can turn your image into an instant shape using the Shape tool. To remove parts of the image, use the Transparent Color tool. For example, if you want to keep the subject of the image only, you can click the Transparent Color tool on surrounding areas of the image to erase them, making the picture transparent in spots so you can see the background behind the picture.
Use the Brightness, Contrast, and Transparency sliders to adjust the image itself, such as changing its brightness level.
To replace the picture with another picture, click the Replace button. This opens the Choose a Picture dialog box, the same one you used to add the picture in the first place. The Effects and Format buttons open the Format dialog box, which contains more formatting controls for editing the picture.

If you don't like all the changes you made using the Picture tools, you can click the Reset button to restore the original image.
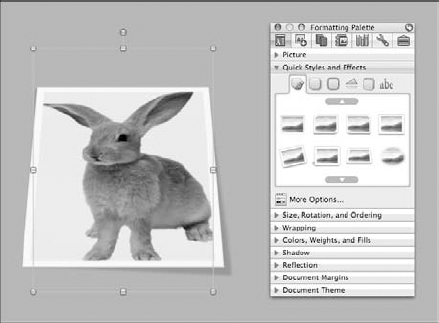
You can use the Quick Styles and Effects pane to add all kinds of preset styles, shadows, glows, reflections, 3-D effects, and text transformations to your objects. Arranged in tabbed groups, you can click each style and effect to view a list of choices. For example, you can find some interesting borders for your photographs in the Quick Styles tab or add a color glow around an AutoShape. The pane, shown in Figure 30.35, lets you scroll through the various items and view a thumbnail of each. Click the More Options button to open the Format dialog box, where you can find even more settings to tweak the style's or effect's appearance.
The Reflection pane, shown in Figure 30.36, creates the effect of a reflection for the selected object. This pane is available only for pictures and clip art. When the Reflection check box is selected, you can tweak the effect by adjusting the Transparency, Size, and Distance sliders.

You can use the object's associated Format dialog box to tailor the appearance of any object you place in a document. The dialog box offers additional tools not available in the Formatting Palette. To open the Format dialog box for any object, simply double-click the object. You also can select the object and choose Format
Note
In the case of WordArt objects, you must click the Format WordArt button in the WordArt pane or choose Format
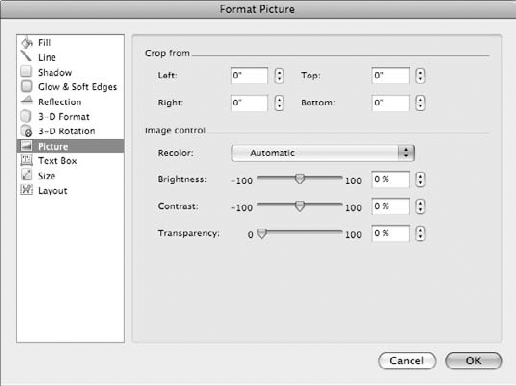
As you can see from the figure, the Format Picture dialog box is packed full of options. Organized into categories, you can click a category name to view associated options.
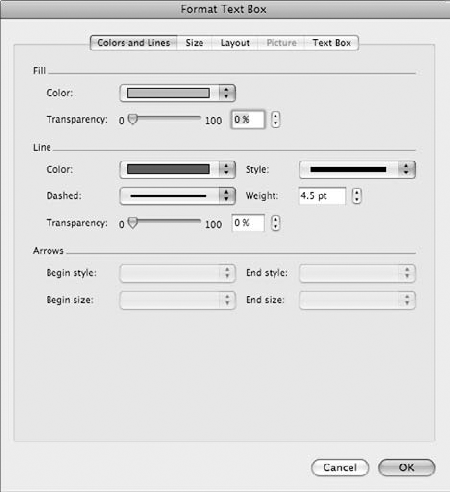
Now look at the Format Text Box dialog box shown in Figure 30.38. Instead of categories, the formatting options are arranged in tabs. The same is true of the Format AutoShape dialog box. Instead of clicking categories, you click a tab to view the associated options.
The Format dialog box for clip art and picture objects share all the same categories and tabs. Many of the categories contain settings that are repeated from the Formatting Palette panes. However, some of the categories offer something not found on the Formatting Palette, such as the Gradient and Texture settings. For example, the Gradient tab is available in both the Fill and Line categories. As you peruse the Format categories, shown in Figure 30.39, you'll quickly notice that some categories have additional tabs with more controls, while other categories require only a single screen.
Here's a run-down of the Format categories:
Fill: Find options for setting a fill color or using a gradient, picture, or texture as a fill.
Line: This category offers controls for setting line color, styles and line thickness, or using a gradient effect as a line color.
Shadow: Find options for setting shadow effects and controlling their style, color, size, blur, distance from the object, and transparency.
Glow & Soft Edges: Add a glow or soft edge using these options, including setting a glow color and thickness.
Reflection: Set a reflection effect with these settings, and control its transparency, size, and distance from the object.
3-D Format: Fine-tune your 3-D effect by adjusting the bevel, depth, and surface controls.
3-D Rotation: This category offers controls for rotating the 3-D effect.
Picture: Find options for cropping and editing the image, including changing the brightness, contrast, and transparency.
Text Box: Control the layout within a text box, including choosing alignment, setting internal margins, and fitting text within the text box shape.
Size: Set precise height and width measurements, scale measurements, and rotation measurements using these options.
Layout: Find wrapping controls and horizontal alignment settings in this category. For even more wrapping controls, click the Advanced button in this category to open the Advanced Layout dialog box containing more wrapping styles and settings.
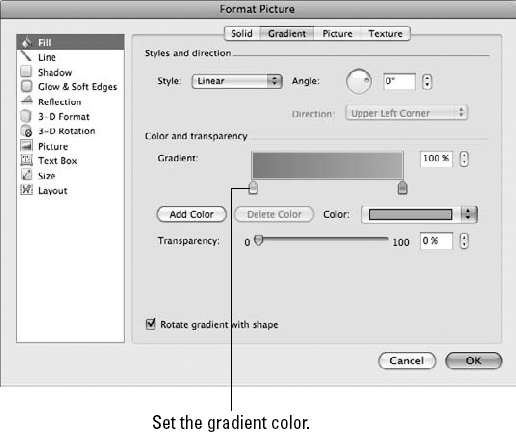
A gradient effect is a blending of two or more colors to create a graduated appearance. To set a gradient fill effect, follow these steps:
In the Format Picture dialog box, click the Fill category and then click the Gradient tab, as shown in Figure 30.40.
Click the Style pop-up menu, and choose a gradient: Linear, Radial, Rectangular, or Path.
Optionally, to adjust the angle of the blend, click the Angle option and drag it to a new setting or type a degree in the box; to adjust the gradient's direction, click the Direction pop-up menu and choose another direction.
By default, the gradient effect is set to the one color and white; to change the colors of both settings, click the tiny icon under the Gradient preview and choose another color from the Color pop-up menu. You can change the color of both icons.
Optionally, to add more icons and color, click the Add Color button and repeat this step.
Also optionally, you can change the transparency setting to make the effect more or less opaque.
Click OK to apply the effect.
Note
To undo a gradient effect, revisit the Format Picture dialog box and set the Style to None on the Gradient tab.
You can use the Texture tab to use a texture as a fill color. Shown in Figure 30.41, you can choose from a library of preset textures, and change the transparency setting to make the effect more or less opaque.

The formatting options for shapes, text boxes, and WordArt objects share all the same tabs in the Format dialog box, as shown in Figure 30.42. Like the Format Picture dialog box, many of the tab categories repeat settings found among the Formatting Palette panes. To view a tab, click it. Depending on the object you're currently working on, not all the tabs are available. For example, if you select a shape and open the Format AutoShape dialog box, the Picture and Text Box tabs are not available for selection.
Here's a run-down of the Format tabs:
Colors and Lines: Find options for setting a fill color and transparency, line color and style, and arrows for lines.
Size: This tab includes options for controlling the height, width, rotation, and scale of an object.
Layout: Find wrapping controls and horizontal alignment settings in this tab. For even more wrapping controls, click the Advanced button to open the Advanced Layout dialog box containing more wrapping styles and settings.
Picture: This tab has options for adding a picture as a background.
Text Box: Find options for setting internal margins for text boxes.
In this chapter, you learned how to use graphic elements in your Office documents. You learned how to insert clip art from the Clip Gallery and the Object Palette. You also learned how to find more clip art online. You learned how to insert photographs, draw your own shapes and lines, turn text into a graphic with WordArt, and add text boxes to act as graphic objects.
After you've added a graphic object, you can find oodles of tools for formatting it the way you want. The Formatting Palette is a handy way to apply formatting to clip art, photos, shapes, text boxes, and WordArt objects. Depending on the object you select to edit, the palette displays different panes suited to the object. In addition, you can open the Format dialog box, a one-stop shop for all the formatting options and a few extra.