
IN THIS CHAPTER
Navigating the window
Using view modes
Setting annotations
Filtering views
Importing media files
Not very long ago, when film cameras ruled the photography world, photographers had to keep photos and negatives organized somehow. For home photographers, that usually meant a shoebox or three with several years of photographs organized somewhat haphazardly. Negatives, if kept, were even less organized. Home movies (on super-8 film or VHS tape) would be stored in their own shoeboxes. The digital age has provided some relief for this problem, but introduced some new challenges, too. Digital cameras have allowed photographers the freedom to take pictures without having to worry about the expense of film or developing, and digital video has given millions of people the ability to become amateur filmmakers in their own rights. The problem of cataloging all this stuff is still there, with file folders, CDs, and DVDs replacing the old shoebox. In addition, photographers need to be able to translate between media formats, browse instantly, and cross-reference files. Expression Media was created to try to help with these things.
Expression Media is what is known as a Digital Access Management (DAM) program. It can help you manage your digital media, including photos, videos, and even documents by storing thumbnails and references to them in files catalogs. Catalogs can reference files that don't live on your computer full time, so if you have an external hard disk, or photos stored on CDs or DVDs, you can use Expression Media to keep track of them. You can add a single file to multiple catalogs and assign keywords to make searching for them easier. Expression Media even lets you to do some simple editing, which can be helpful if you don't happen to have a full-blown image-editing program like Photoshop. It is also Web-friendly, in that it allows you to import media files from the Web and generate contact sheets and Web galleries.
Although Expression Media is new to the Office suite, it's not really a newcomer to the digital photography world. Expression Media started out as a program called iView Media Pro, available on both Windows and Mac OS X platforms since the 1990s. Microsoft purchased the company that created this package, iView Multimedia, in 2006 and soon after released Expression Media to be part of the Expression Studio suite on Windows and as a standalone application for the Mac.
The newest version of Expression Media, 2.0, is now part of the Office 2008 Special Media Edition as well as available standalone. In this chapter, we give you an introduction to Expression Media 2. You learn about the features of the program window and panels. You also learn how to import data from a variety of places, including files and folders on the hard drive, camera memory cards, and even the Web.
Note
Microsoft has a 30-day trial version of Expression Media available for download at www.microsoft.com/expression/products/purchase.aspx?key=media.
Expression Media's lineage isn't originally as a part of the Office package. This explains the fact that it doesn't share the Office look and feel as closely as the core applications such as Word, Excel, and PowerPoint do, and it doesn't always feel like an integrated part of the suite. That said, it's still an easy application to learn and use, as you will see after reading these chapters.
The interface for Expression Media includes many of the same standard features that most Mac applications have, including a title and menu bar and a program window with a toolbar, Status bar, and main document editing area.
The document type that Expression Media works with is called a catalog. Catalogs contain references that point to media files on your computer (and even on removable media or on the Web). The program window for Expression Media is geared toward helping you create, organize, and work with catalogs of your media files and for editing and viewing the actual contents of those media files.
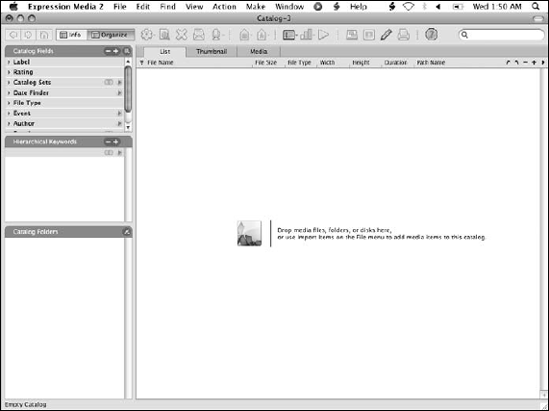
Figure 28.1 shows the main program window of Expression Media 2 with an empty catalog.
Expression Media, like most Mac programs, has a title and menu bar at the top of the screen. When the program is active, this bar shows the name of the program (Expression Media 2), along with items that make up the main menu categories. You can click any of the menu items to expand the menu to show related commands and submenus. Submenu items are identifiable by an arrow icon on the right, and selecting these items opens a new range of items. Menu items with ellipsis (three dots) at the end of the menu item open a dialog box when selected. Figure 28.2 shows the title and menu bar.
The program windows sit below the title and menu bar on the screen. A separate program window is displayed for each catalog that you have open. At the top of a program window are the program window controls and the catalog name. The program window controls, which are the three colored circle icons located at the far left side, allow you to close, minimize, and zoom the document window. (To learn more about how to use the program window controls, see Chapter 3.)
Below the program window controls is the Expression Media toolbar, shown in Figure 28.3. This toolbar displays a row of tool icons for common tasks to be performed on media. To activate a feature or command, just click the associated icon. Unlike other Office programs, Expression Media does not have other toolbars, and the standard one does not change depending on context.
The Expression Media toolbar has some unique features geared toward its media-centric nature. On the right side of the toolbar is the search box, which lets you quickly find media files that match a name or keyword. To the left of the search box are the toolbar buttons, which are used to perform various common tasks with media files or catalogs. Finally, on the left side of the toolbar are tabs that you can use to select from the three view modes. The next section describes these three modes.
The Expression Media program window can show three view modes: List view, Thumbnail view, and Media view. These three views let you switch among looking at the contents of the entire catalog, seeing thumbnail images of your media files, to viewing the media files themselves.
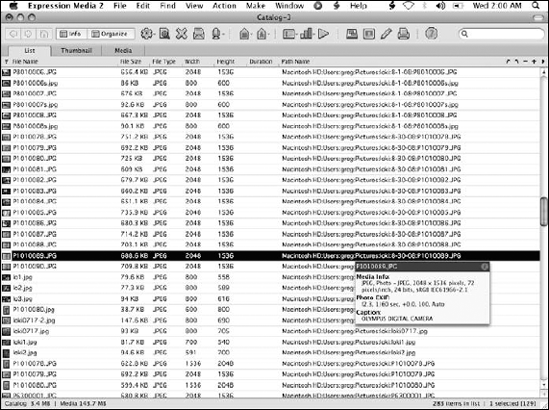
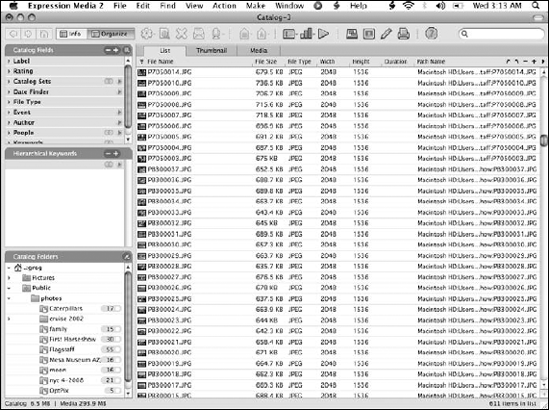
With List view, shown in Figure 28.4, you can see a hierarchical list of all the media files included in a catalog.
List view consists of a detailed listing of media files, arranged in a table form with columns giving you useful information about the files. Table 28.1 describes the columns shown in List view.

Figure 28.4. List view shows you a list of all the files in a catalog, along with useful information about them.
Table 28.1. List View Columns
Column Name | Description |
|---|---|
File Name | The name of the media file. |
File Size | The size of the file. This size is displayed in bytes, kilobytes (KB), megabytes (MB), or even gigabytes (GB), depending on the size. |
File Type | The type of file it is (JPEG, PDF, QuickTime Mo vie, and so on). |
Width | The width of the file. The default units are pixels; however, this can be changed in the Preferences dialog box to inches, centimeters, points, or picas. |
Height | The height of the file. The default units are pixels; however, this can be changed in the Preferences dialog box to inches, centimeters, points, or picas. |
Duration | The duration of play for movie files such as MPEGs, QuickTime MOV files, or even animated GIF images. |
Path Name | The path to the image file. The path either starts at the local hard disk root or at the name of a removable disk. |
You can sort the files in List view by the values in any of the columns. Simply click the column heading, and the files are automatically sorted. Click the column header again to reverse the direction of the sort. Sorts also can be done using the View
Note
You can rearrange files in the list manually by dragging them to a new position in the list with the mouse. Clicking a column heading sorts them again.
You can see more information about a particular file by pressing the Inspector key (by default, ?, although this can be changed in the Expression Media preferences on the General panel). You are shown a pop-up window that, depending on the type of file, gives you additional information, as shown in Figure 28.5. For example, video files such as MPEG or MOV files show the frame rate, running time, and information on the sound format. JPEG files show EXIF metadata, bit depth, the type of camera used to take the picture if this information is available.
Like List view, Thumbnail view shows you all your files at a glance. Click the Thumbnail tab to activate this view. Instead of displaying image information in columns, this view displays small thumbnail versions of your files. The thumbnail images are created when you add a media file to the catalog and are quite a bit smaller than the full-sized images and videos. This handy feature helps you keep track of your images, videos, and other files, even if they are on removable drives or optical disks, because the thumbnail images are stored with the catalog and not with the original file. Figure 28.6 shows Thumbnail view.
Thumbnail view is preferable over List view for browsing your files because you can see several images at a glance. This is useful if browsing over a large collection of images looking for just the right one.
Note
The Zoom In and Zoom Out functions help you switch between showing many thumbnails at once versus showing fewer, but larger views. Use the + and – buttons on the toolbar, choose View
You can sort the files displayed in Thumbnail view just as you can in List view, by using the View

While List view and Thumbnail view are useful for browsing the catalog contents, the actual meat and potatoes—viewing the full size content of your media files—is done in Media view, shown in Figure 28.7.
Media view is where Expression Media goes from being just a cataloging program to being a media viewing program as well. In Media view, you can see the full-sized photo, video, or even a representation of a document or HTML page from the catalog. You can activate Media view in several ways. Double-click a media file in List view or Thumbnail view to open the file in Media view, or simply select a file in one of the other views and click the Media button.
If the file is available on your system, it is loaded in Media view, where it can be manipulated (in the case of images) or played (in the case of audio/video files).

The Info panel, shown in Figure 28.8, provides a way to see at a glance all the information and metadata associated with a particular media file. On this panel, you can see the file size and dimensions, timestamps, keywords, color depth and resolution, encoding type, photo EXIF (EXchangeable Image file Format), and more, depending on the type of file it is. To activate the Info panel, click the Info button on the toolbar.
On the top of the Info panel, the window shows a categorized collection of information about the currently selected file, organized in groups. The bottom contains a Caption section, which by default is also pulled from the file's metadata if available. You can enter a value to override this if you like.
Table 28.2 describes the groups that are presented in the Info panel.

Table 28.2. Info Panel Groups
Note
The IPTC (International Press Telecommunications Council) defined a set of metadata values that make up part of the XMP Core metadata standard. You can find more information regarding the IPTC NewsCodes at www.iptc.org/NewsCodes.
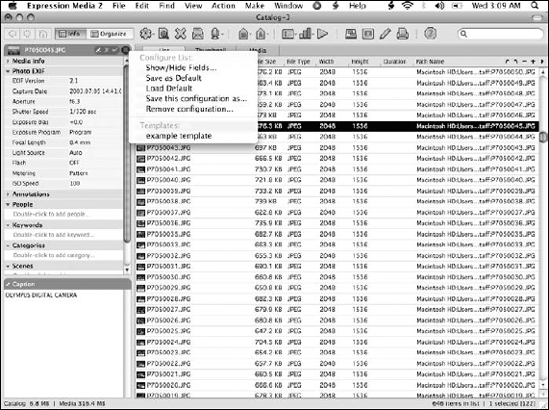
The Info panel lets you decide which fields and groups to display. Click the Configure List button at the top right of the Info panel to open a submenu with commands for setting the configuration. Follow these steps to customize your Info panel display:

The Configure List submenu opens, as shown in Figure 28.9.
Choose Show/Hide Fields.
The Info: Show/Hide Fields dialog box appears, as shown in Figure 28.10.
Uncheck the fields that you don't want shown on the Info panel.
Click the Close button on the dialog box's title bar.
Choose a save option from the Configure List submenu.
Save this configuration as... lets you specify a name for the configuration that you can reload later.
Save as Default makes this the default configuration.

You also can save default values for your metadata as a metadata template, using a feature called Autofill. This lets you choose fields with entered values to save, so they can easily and efficiently be applied to other media files. Follow these steps to create a metadata template from the metadata entered for the current file:

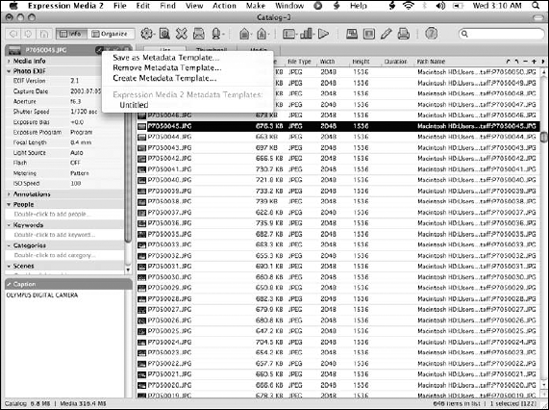
The Autofill submenu opens, as shown in Figure 28.11.
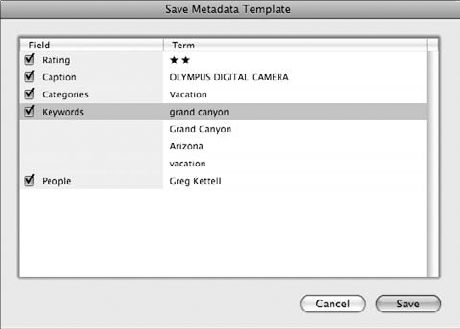
Choose Save Metadata Template.
The Save Metadata Template dialog box appears, as shown in Figure 28.12.
Uncheck the fields that you don't want to save as part of the template.
Click the Save button.
Enter a name for the template.
The template is saved and is now available as an option on the Autofill menu.
You can create a metadata template from scratch, as well. This allows you to enter values for all the fields that you want to include without needing to have these values already set for the current file. Follow these steps:
Click the Autofill button at the top of the Info panel.
The Autofill submenu opens.
Choose Create Metadata Template.
The Save Metadata Template dialog box appears, as shown in Figure 28.13. This time it includes all fields.
Double-click a field, and enter a value. Repeat for each value you want to add.
Click the Save button.
Enter a name for the template.
The template is saved and is now available as an option on the Autofill menu.

The Organize panel is arranged in three smaller panels: Catalog Fields, Hierarchical Keywords, and Catalog Folders. They are described here.
The Catalog Fields section lets you filter your catalog's List view or Thumbnail view using the metadata fields that you entered on the Info panel. This panel shows a list of metadata groups that are expandable to show the individual metadata fields in that group. Each field shows a count of the number of media files with that particular metadata attribute.
The primary use of the Catalog Fields panel is to filter the media files in the catalog. You can do this by expanding the groups and clicking individual fields to select them. Select multiple fields by holding down the Option key as you click the selection dot to the right of the field.
You can customize the Catalog Fields display by choosing which fields to include in the display. Follow these steps to show or hide fields:

Choose Show/Hide Fields from the drop-down menu.
The Organize: Show/Hide Fields dialog box is displayed, as shown in Figure 28.15.
Check or uncheck the fields you want to show or hide.
The panel automatically updates in real time as you check or uncheck fields.
Click the Close button at the top left of the dialog box.
If you want this to become the default view, choose Save as Default from the Configure List submenu.

You can add new terms to fields that allow for custom values. Follow these steps to add a term:

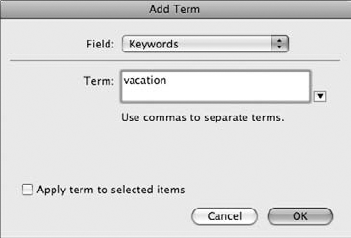
The Add Term dialog box opens, as shown in Figure 28.16.
Choose a field in the Field drop-down menu.
Fields that are hidden are not shown in this list.
Enter a new value for this field.
Check the box if you want to apply this new keyword to any media files that might be selected in the List or Thumbnail views.
Click OK to add the term.
You can use the Catalog Fields panel to apply fields to files en masse. Simply select all the files you want to assign a term to in List view or Thumbnail view, and drag them to the term that you would like to apply. You also can color-code your catalog files by dragging them to a color in the Label group.
The Hierarchical Keywords panel allows you not only to assign keywords to a file, but also to organize them into a nested hierarchy. For example, you could create a keyword called "vacation" for vacation photos, and add sub terms for your individual trips to "Europe," "Hawaii," and "Mexico," for example.
Do the following to add hierarchical keywords to your catalog:

The Add Keyword dialog box opens, as shown in Figure 28.17.
Type the name of the keyword.
Use the Within menu to choose a parent keyword for this one. Choose None if you want it to be at the top of the hierarchy. If this is the first keyword you are adding, None is the only option available.
Check the box to apply this keyword to any files that you have selected in either List view or Thumbnail view.
Click OK to add the keyword.

To apply keywords to media files, simply drag them to the keyword that you want to apply. All keywords higher than that one in the hierarchy are automatically applied to the file as well.
There are two options for filtering based on selected keywords. You can filter based on a union of selected keywords, which shows all files matching all selected keywords. Alternatively, you can choose to display an intersection of selected keywords, which shows only files matching all the selected keywords. Follow these steps to choose a filtering option:

The submenu shown in Figure 28.18 appears.
Choose the filtering option that you want:
Union of selected keywords filters the catalog to show media files that match any of the selected keywords.
Intersection of selected keywords filters the catalog to show media files that match all the selected keywords.
Select multiple keywords by clicking them while holding down the Option key.
Right-click and choose Show Media Items. All selected keywords show a green dot on the right to indicate that they are selected, and List view or Thumbnail view shows the filtered files.

The Catalog Folders panel shows you all the folders that are included in the current catalog. This is displayed as a tree. If a folder contains subfolders, you can expand the list to show them as well, as shown in Figure 28.19.

If a folder contains cataloged media files, you see a count of the number of files on the right. You can click the dot in the oval surrounding this value to filter the display of the catalog to show only files in this particular folder.
You can enable catalog-wide folder watching to monitor folders that contain media in your catalog. You can either set up Expression Media to watch any number of folders and alert you when new media items appear in them, or have Expression Media automatically import any new items into your catalog.
Right-click a folder to display more options for a folder. Some of the more useful ones are described here:
Show Media Files filters the List view display to show only files in this folder.
Select Media Items selects all the media files in List view. You can then perform an action on all the files together.
Update Folder Now automatically adds or removes files from the catalog that have been added or removed from the folder.
Switch Auto-Update On instructs Expression Media to watch this folder for new or removed files and automatically updates the catalog accordingly.
Choose a setting for Update Folders: Never, Every Minute, or Every 5 Minutes. This affects how often the Auto-Update option checks for changes.
Check the Union of Folder Hierarchies item to have the file number displayed for each folder also include the files in subfolders and allow you to filter based on this.
Check the Trim Folder Hierarchy item to filter the folder list to include only those folders currently in the catalog. This is the default setting. Uncheck this item to show all folders on the computer.
The Status bar is located at the bottom of the program window. This bar, shown in Figure 28.20, shows you some important statistical information about the catalog.
On the left of the Status bar, the size of the catalog file (including thumbnails) is shown. To the right of that, the total size of all the media files included in the catalog is displayed.
The right side of the Status bar shows you information on the number of files shown. If you have any files filtered using a metadata filter or a search filter, the number of hidden files is shown. The number of files that are currently visible follows. If you have any files selected, that number is displayed as well, with the file's position in the catalog list displayed if only a single file is selected.

Naturally, an important part of organizing media into catalogs is letting the program know about the files to begin with. Expression Media's powerful media import facility helps you easily get the files you want into the catalog. You can import in a variety of ways, and you can choose from several different device types. This section explores these options.
Perhaps the most common place to import files from is your computer's hard drive. Expression Media gives you the flexibility to bring single files or entire folders into a catalog. Follow these steps to import a file or folder:
Choose File
Import Items From Files/Folders.
The Choose a media file or folder dialog box opens, as shown in Figure 28.21.
Browse for the media file or folder that you want to import, and click it to select it.
Select multiple files or folders by holding down the Command key as you click.
You can specify import criteria such as partial filename, size, or time last used.
Click the Choose button to begin importing the file or folder.

Another way to import files and folders into a catalog is to simply drag and drop them from the Finder onto the Expression Media Window.
You can import directly from another Expression Media catalog. This automatically adds every file in a catalog to the current catalog, with the exception of files that are already common to both catalogs. This can be a great way to combine catalogs into a single one. Follow these steps to import a catalog:
Choose File
Import ItemsFrom Catalog File.The Choose a catalog file dialog box opens, as shown in Figure 28.22.
Browse for the catalog file (with an .ivc extension) that you want to import, and select it.
Click the Open button to begin importing the files.

OS X has a powerful search capability built in called Spotlight that makes it easy to find files on your hard drive, based on their filenames or their contents. Expression Media has the ability to harness Spotlight to find files to import. To import from a spotlight search, do the following:
Choose File
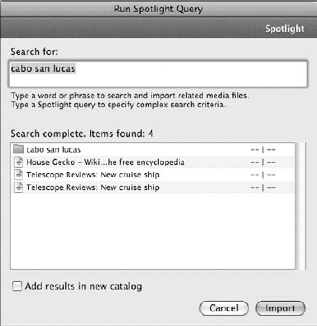
Import ItemsFrom Spotlight Query.The Run Spotlight Query dialog box opens, as shown in Figure 28.23.
Type a word or phrase to search the hard drive.
Spotlight automatically finds files as you are typing, matching both filename and contents.
Check the Add results to new catalog button to have Expression Media create a new catalog from the query.
Click the Import button to begin importing the files into the catalog.
Note
When you import using a Spotlight query, you have to import all the files that it finds. You cannot select individual files from the list.
Expression Media not only knows how to retrieve files from your computer's hard drive, it also is adept at retrieving files from external media such as digital cameras, removable disks, or flash memory sticks and cards. To import from a removable disk or flash memory card, do the following:
Attach the device to your computer.
Choose File
Import ItemsFrom Disk.The Download from Disk dialog box opens, as shown in Figure 28.24.
Choose a source device from the Source list.
Click the Download list to open a tree view of the device's file system.
Locate and click the files or folders to select them for import. Select multiple files or folders by holding down the Option button as you click.
Click the Options button to set options for the import.
Choose a destination folder. You can choose a folder using the following options:
Download folder: This places the file in the Expression Media 2 folder, located in your Documents folder.
Today's folder: Similar to the Download folder, this option lets Expression Media create another folder named after today's date in which to place the file.
Original folder hierarchy: The folders are copied directly from the source disk and placed in the download folder.
Rename the file, if you like. If you are importing multiple files, a sequential number is appended to the end of this filename.
Choose an action to perform by checking one of the boxes. Actions include skipping the importation of files with the same name, locking downloaded files, and deleting original files from the source device after downloading.
Choose an annotation option. You can use an annotation template to automatically assign metadata values to the file in the catalog.
Click the Download button to begin downloading and importing the file.

Importing from a camera is very similar to importing from a disk; however, you have some additional options:
The Download button shows thumbnails of the photos on the camera as opposed to the folder tree shown with a disk.
An Action is available that lets you have the downloaded photos use the capture date as provided by the camera for the file creation date.
If your camera supports a "burst mode" to rapidly take many pictures, you can have these bursts of files grouped automatically. Enter a time in seconds to determine whether pictures were captures using burst mode.
You aren't limited to your own devices as a source for media files. In fact, there are no limits, because Expression Media can download media files directly from Web sites. There is one caveat, however; you can't just enter a URL for a Web site and have Expression Media download files from it. When using the Web import feature, you must specify a URL to the image file itself. Follow these steps to download and import media files from the Internet:
Choose File
Import ItemsFrom URL.The Download from URL dialog box opens, as shown in Figure 28.25.
Click the Download button.
Type the complete URL for an image that you want to download. The URL for an image can be obtained from a Web browser.
If you use Safari, you can right-click an image and choose Copy Image Address.
If you use Firefox, right-click the image and choose Copy Image Location.
Click the Options button to set options for the import.
Choose a destination folder. You can choose a folder using the following options:
Download folder: This places the file in the Expression Media 2 folder, located in your Documents folder.
Today's folder: This is similar to the Download folder, but Expression Media creates another folder named after today's date to place the file in.
Original folder hierarchy: Folders are created in the download folder to match the structure of the folders from the original Web site.
Rename the file, if you like. If you are importing multiple files, a sequential number is appended to the end of this filename.
Choose an action to perform by checking one of the boxes. Two actions can be performed on Web imported images: You can skip the importation of files with the same name, and you can lock downloaded files.
Choose an annotation option. You can use an annotation template to automatically assign metadata values to the file in the catalog.
Click the Download button to begin downloading and importing the file.

Another way to import files from the Web is, in fact, the simplest. You can simply drag the file from the Web page onto the catalog you want to import it into, and the Download from URL dialog box opens automatically to let you specify the import options just as if you entered the URL by hand.
In this chapter, you were introduced to the newest member of the Office 2008 suite. You learned that Expression Media is a Digital Access Management (DAM) program that can be used to catalog and organize the media files on your computer. Expression Media isn't limited to cataloging images; in fact, it is more than capable of recognizing a huge assortment of different file types, including images, PDF files, documents, audio and video files, HTML files, and more.
You learned that Expression Media lets you create catalogs, which are files that contain information about media files on your computer. Expression Media provides three different views for catalogs, ranging from the List view, which shows a listing of files in the catalog, to Thumbnail view, which shows small image representations of these files, and finally to Media view, which lets you view the media file in its full form.
You were shown how to annotate media files, by adding keywords and other identifying information. You saw how to control the display of files in the catalog by filtering based on folder, partial filename, and annotation terms. Finally, you learned about the various ways that Expression Media can import media files into catalogs, including downloading them from other devices such as a camera or the Internet.