
IN THIS CHAPTER
Introducing AppleScript
Viewing the Script Editor window
Using Office scripts
Working with Automator
Using Office workflows
AppleScript is a scripting language built into Mac OS X to help users create instructions to tell the computer what to do without needing to use a mouse or keyboard. Granted, you're already doing that through commands, menus, clicking and dragging, and so on, but scripting is writing specific instructions tailor-made for your needs. For example, perhaps you have a folder filled with files you need to convert to another format. You can write a script that automatically converts the file formats for you, thus saving you oodles of time and effort ordinarily spent doing the task yourself, opening each file, going through the steps of saving them under another file format, and so on. That's just one tiny example of how you might use AppleScript. You can come up with literally hundreds of scripts to help make your own computer work easier.
If scripting isn't your thing, then you can skip all the programming language and use the Automator tool to whip up workflows for repetitive tasks. By using built-in actions, Automator lets you assemble a workflow step-by-step to instruct an Office program to handle tedious tasks while AppleScript works in the background.
In this chapter, you learn how to tap into the beauty of AppleScript by running some simple scripts in Office. You also learn how to use sample workflows and the Automator tool. In case you're keeping track, this is the last chapter—rejoice!
AppleScript's been around awhile now, starting way back with a project called HyperCard. HyperCard made use of an English language-based scripting language known as HyperTalk. Apple engineers then utilized the scripting language in other applications and began placing it in System 7 in 1993 as an end-user language for controlling applications and automating workflows. One of the very first major software applications to utilize AppleScript was QuarkXPress. This is worth mentioning because QuarkXPress is an extremely popular page-layout program used by large and small publishing companies to produce complex magazine and catalog layouts and other printed materials. Because QuarkXPress is one of the major forces in the worldwide publishing field, and therefore used by a vast number of Mac users, its support of AppleScript was a considerable endorsement. In turn, AppleScript became widely adopted within the publishing industry, particularly in the Apple market, which continues to be the computer of choice in the creative marketplace today. With the move to Mac OS X, AppleScript continues to be a powerful tool for making your computer tasks more productive.
Most people never consider using scripts to control their computers. Because scripting is a programming language, most users think it's difficult and time-consuming and requires a certain level of knowledge. However, it's not as hard as it sounds, and you can use scripts to automate repetitive tasks, create shortcuts, or even build your own custom applications. Truth be told, much of what you do in the Microsoft Office programs is really AppleScript scripts at work behind the scenes. Individuals, professionals, businesses, and developers can find lots to like about AppleScript. For end users, AppleScript can help make easy work of seemingly daunting tasks like naming files or resetting preferences. For professionals and businesses, AppleScript can speed up data retrieval, schedule updates, manage files from remote servers, and more. AppleScript workflows provide accuracy, consistency, and speed, three overarching qualities for good business practices. For developers, AppleScript offers easy-to-use automation tools for creating applets, applications, and Automator actions. Since its introduction, AppleScript has been growing in popularity and usage, and with Mac OS X, numerous applications make use of its efficiency and effectiveness. Microsoft Office 2008 for Mac is no exception, and since Microsoft Office 2008 did away with VBA—Visual Basic for Applications—AppleScript is the only way to go now.
What's so interesting about AppleScript's scripts? The scripting language closely resembles English, and it's based on sentences and statements. When the computer's operating system reads these saved sentences and statements, which is called a script, it converts the instructions into Apple Event messages (messages sent from one Mac application to another) that tell the applications what to do. They call them scripts because, like a movie script or a script from a play, they are performed in the order in which they are written.
Messages and events are the underlying pillars of AppleScript. Applications perform tasks based on responses to events. The messages that applications send to each other are called Apple events. When an application receives a message about an event, it takes action based on the event. Actions can be anything from manipulating data to menu commands, and so forth. Every application you use on the Mac, from Finder to Office programs, responds to three basic Apple events: Open Application, Open Documents, and Quit Application. Most applications go far, far beyond just these three basics.
AppleScripts come in two flavors: applets or scripts. Applets, also called droplets, are by definition, small components that run in the context of a larger program, sort of like mini-programs within the major program. An applet becomes a droplet if users have to drag-and-drop files into it for launching.
Look at the following script:
activate application "Finder"
When activated, this line of script opens up the Finder window. That's all. No button pressing, no pulling down of menus and selecting commands. The Finder window just immediately opens. Let's see another one:
tell application "Finder" to open trash
This script tells Finder to open the Trash folder. As you can see, the scripting language is pretty straightforward. A single statement like the one above performs a simple task. Most tasks, however, require much longer statements than this one. Here's an example of a longer script:
tell application "Finder"
  if folder "Applications" of startup disk exists then
         return count files in folder "Applications" of startup disk
  else
         return 0
  end if
end tell
If you were to compile and execute this script, it returns the number of files—just the files, not the folders—found in the Applications folder on the current system disk. If it cannot find the folder, the script is instructed to return a count of zero. This script causes an Apple event to be sent to Finder, which in turn locates the Applications folder on the startup disk, counts the number of files it finds there, and returns the value. Pretty cool, eh?
You can use Mac's Script Editor, shown in Figure 35.1, for writing, editing, compiling, and running scripts. The Script Editor is part of your Mac OS X operating system. You can find it in the Applications folder located in the AppleScript application folder. To open Script Editor, double-click its name in the AppleScript folder window. When you first open the program, a blank script window appears. You can write only one script at a time in the Script Editor.
As you can see in Figure 35.1, the Script Editor window has a very simple interface with a large area for writing scripts. The top empty area is where you type scripts. The bottom area is the script description/result/event log area depending on what you're doing. Notice that the toolbar has only five buttons, and only four are active: Record, Stop, Run, and Compile are the active buttons you can use for building and editing your scripts.

To get your feet wet in the pool of AppleScript, let's try typing a few scripts and see what they do. This will give you a little taste of programming and maybe inspire you to think of other things you can do with AppleScript. Follow these steps:
Open the Script Editor; choose Applications
AppleScript Script Editor.
This opens the Script Editor window (refer to Figure 35.1).
In the blank area, type the following line of text, being sure to include all the punctuation you see, as shown in Figure 35.1:
say "this is a spoken sentence."
Click the Run button on the toolbar.
If your volume is up a bit, you should hear your computer utter the line "this is a spoken sentence."
To try another voice, add the following to the existing script, shown in Figure 35.3:
say "this is a spoken sentence." using "Fred"
Click Run.
This time the computer speaks the same sentence using another voice, which you defined as Fred. You also can try the voices Victoria, Cellos, or Zarvox.


One of the most used commands in AppleScript is "tell." This command lets you tell a specific application what to do. If you wanted to open Microsoft Excel in a script, for example, you'd type the following code:
tell application "Microsoft Excel" to activate
You can try this code in the Script Editor window, but be sure to erase the previous code you wrote. When you click the Run button after typing the activate Excel instruction code, the Microsoft Excel program opens. If you wanted the Excel window to close, you'd substitute "close" for "activate" in the script example above. As you can tell by the coding structure, AppleScript is very much like the English language. When writing scripts, you must act much like a boss or general, telling who is to perform a task and which task to perform. Here's another example of a script using Finder:
tell application "Finder"
  empty the trash
end tell
This script tells Finder to empty the trash. Notice the "end tell" instruction. Without this little code, Finder would keep emptying the trash.
You can activate the Compile command to let the Script Editor check your script for any problems. Just click the Compile button. If you're using a laptop Mac, you can press Enter to the right of the spacebar, or the Enter key on the numerical keypad (Mac desktops) to compile a line of text while starting a new line of text in the script window. Although you do not have to compile a script before running it, the Script Editor does that as soon as you click the Run button, so it is best to compile your script often to check for errors. However, if you click the Compile button and you've written your script properly, the Script Editor formats your script in nice colors. Uncompiled text shows up in orange in the script window. If your script contains a mistake, an error message appears alerting you.
Here's one more fun little script example for you to try:
tell application "Finder"
  empty the trash
  say "I emptied the trash for you"
end tell
This script tells Finder to empty the trash folder and speak the statement. Anything between the tell and end tell parts of the script are called a tell block. All the instructions for the same application are coded within the tell block for that application.
After you create a script you want to keep, you can save it using the Save dialog box shown in Figure 35.4. From the Script Editor window, choose File

When you finish using the Script Editor window, close the window just like any other program window on your computer. Click the Close button, or choose Script Editor
So how do you know if you have any scripts in Office 2008 for Mac? Easy. Look on the program window's menu bar. At the far right end, just after the Help menu, you'll notice a funny-looking scroll icon. That's the Script menu, as shown in Figure 35.5. Word, Excel, PowerPoint, and Entourage all have such a menu. When you click it, the menu lists any available AppleScript scripts. The only Office program that actually has any scripts installed is Entourage.
You should be aware that the Script menu lists Automator workflows. Like AppleScript scripts, Apple Automator is used to create workflows for repetitive tasks, such as turning Word text to audio and sending it to your iPod. Every Office for Mac program features some sample Automator workflows you can explore. Learn more about these later in this chapter.

Figure 35.5. You can use the Script menu to view available AppleScript scripts in Word, Excel, PowerPoint, and Entourage.
Of course, you can add your own scripts to the Script menu at any time. Simply copy the script to the application's folder. For example, if you have a Word script you want to add, copy it to the /Document/Microsoft User Data/Word Script Menu Items/folder. This technique works only for compiled scripts, not applets.
Tip
Looking for more scripts? Go online! Type the keywords AppleScript Word or AppleScript Excel in your favorite search engine, such as Google or Yahoo!, and see what you can find. You also can find hundreds more online at sites that offer scripts, such as MacScripter (macscripter.net) or Apple's own AppleScript site (www.apple.com/applescript).
After you add a script, you can assign a keyboard shortcut that you can use to quickly activate the script. Use Finder to locate the script, and add a backslash () followed by one or more modifier keys and a single character. For example, myscriptcf or myscriptmsf. Use caution when assigning keyboard shortcuts. The Office programs do not check your keystrokes against the existing database of keyboard shortcuts already found within the programs (such as
Table 35.1 explains each modifier you can use with keyboard shortcut keys:
Because Entourage is the only Office program that comes with some existing scripts, let's find out how to use one. Entourage includes three scripts you can use to turn messages into events, notes, or tasks. Another script inserts a text file. One script opens an e-mail folder, and the last script saves the current selection as a document. For example, a colleague might e-mail you about an important trade show event coming up. You can turn the e-mail into an event on your calendar using a script. Or perhaps you want to save a block of selected text from an e-mail as a new document file for use later. You can turn the selection into a file using a script.
You can choose from the following scripts in Entourage:
Create Event from Message
Create Note from Message
Create Task from Message
Insert Text File
Open E-mail Folder
Save Selection
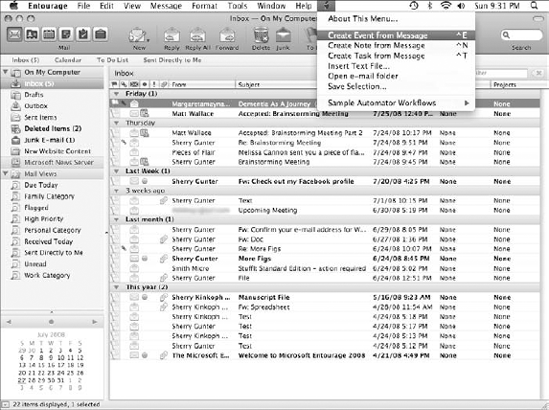
To practice using a script, let's perform the first one in the menu, turning a message into an event on your calendar. Follow these steps:
Select the message in your Inbox or another e-mail folder that you want to turn into an event.
Choose Script
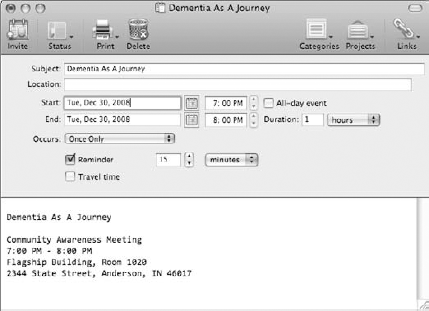
Create Event from Message, as shown in Figure 35.6.Entourage opens the New Event window with the e-mail message's title in the Subject line and message body in the notes area, as shown in Figure 35.7.
Fill out the remainder of the event form as needed, including location, start and end dates, reminders, and so on.
Save the event and exit the window.
Entourage adds the event to your calendar.
Now you can see how helpful it can be to come up with your own scripts to manage all kinds of tasks you perform not only in Entourage, but in all the Office programs.
Apple's Automator tool can help you create workflows for repetitive tasks you do using the Office programs. For example, you might use Automator to manipulate a large group of files, create a directory using contacts from your Address Book, collect your favorite images to send to iPhoto, and so on. Automator utilizes the power of AppleScript to give you a streamlined drag-and-drop (also called point-and-click) work platform for creating series of tasks without needing complex programming. As you learned previously, writing AppleScript involves typing statements that tell the computer what to do. Rather than having to build the script statements yourself, you can skip all the scripting and programming language and let Automator handle all the details. Automator works by letting you drag and drop commands, called actions, into a workflow that, when saved, tells programs what you want them to do.
Actions are the building blocks of workflows, and Automator comes with a library of preset actions and workflows you can use. Actions are any items that perform a single task, and each action is the equivalent of a single step in the process you're trying to create. You can combine actions in a series to create a workflow. Some actions are pretty straightforward, such as stopping an application, while others require user input or more information. When this is the case, a simple interface pops up for the user to enter information. The interface can be pop-up menus, check boxes, or buttons, just to name a few ways to collect user input. When you combine all these action steps, you're creating a workflow that executes each action in the order it was placed. After you've made a workflow, you can save it, reuse it, and share it with others. Any saved workflows you create can be run in the Automator window. You also can save workflows as standalone applications that can run on their own when activated. Quite simply, workflows are document files, and their entire goal is to help you accomplish a task.
All the action—pun intended—surrounding Automator happens in the Automator program window. To find your way to Automator, go to the Applications folder and double-click Automator. When you first open Automator, you can start creating workflows right away using the Starting Points steps, shown in Figure 35.8. The Starting Points window walks you through the process of creating a workflow based on whatever type of goal you're trying to accomplish. Choose from Custom, Files & Folders, Music & Audio, Photos & Images, or Text. After you pick a type, you can specify the location of the content you want to use. After you make your selection and click the Choose button, you're off and running.

The Automator window, shown in Figure 35.8, is divided into sections. The far left has a paned section where you can select applications and actions. The larger main area is where you drag actions and order them for execution. This is where you create your workflow. The workflow shown in Figure 35.9 is one of Automator's sample workflows. The workflow is used to find a set of photographs, copy them, apply the Quartz Composition filter, and then preview the photo effects. As you can see in the figure, each step of the overall task is its own little box in the workflow. You can edit these action steps individually or reorder them depending on the workflow you're trying to create. To quit Automator at any time, click the Close button or choose Automator
Sadly, we can't possibly cover everything you need to know about using Automator in this book. It's a vastly powerful tool, and it really requires its own book. However, you'll find plenty of help for using Automator in the program window's own Help files, as well as numerous sources online.
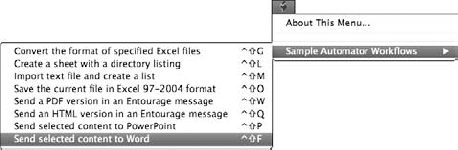
You'll be happy to know Microsoft Office 2008 for Mac comes with several Automator workflows you can try. Each Office program includes several workflows, and you can find them listed on the Script menu, as shown in Figure 35.9. The Script menu is the tiny scroll-shaped icon next to the Help menu on the menu bar. To activate a workflow and see how easy Automator is, let's try one of the sample workflows on some Excel data. You need to open Excel and select some data, and then you need to open Word. When you're ready, follow these steps:
Select some data to copy in the Excel window.
Choose Script
Sample Automator WorkflowsSend selected content to Word, as shown in Figure 35.10.The selected data is immediately copied, Word opens to a blank document, and the data is pasted inside, as shown in Figure 35.11.

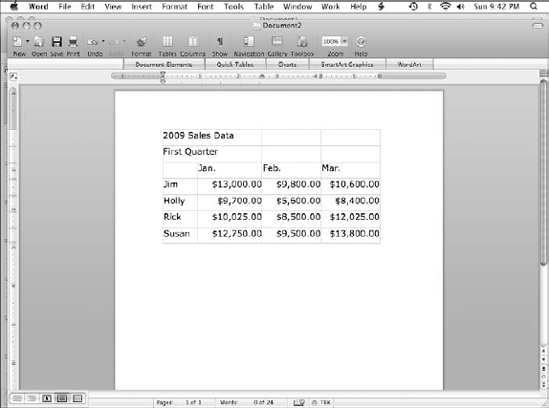
By skipping the normal copy-and-paste routine, this workflow has sped up the process of copying data. You can begin to see what enormous time-saving measures Automator workflows can achieve. You can open a sample Office workflow in the Automator window to view the actions that went into creating it, as shown in Figure 35.12. The sample workflows are found in the folder path Users
For more information about Automator and workflows, be sure to check out the Automator Help files. You also can venture online and find help at the following sites:
Automator-Leopard (
www.automator.us/leopard/index.html): This site features training movies, podcasts, links, and more.MacScripter (
http://automatoractions.com/): This site includes discussions and forums about Automator and actions, links, and lots of shared scripts.Automator World (
http://automatorworld.com/): Find news and information about Automator on this site, plus hints and tips, and plenty of shared workflow documents.

In this chapter, we explored a little bit about the wide world of scripting. Scripting is a way of writing instructions that tell the computer what to do. You learned the basics about AppleScript and how to utilize the Script Editor window to write your own scripts. You also learned how to tap into several of the sample scripts that installed with Entourage.
You also were introduced to the world of workflows and automating repetitive tasks using Automator. The Automator tool is ideal for making quick work out of mind-numbing computer tasks, and each Microsoft Office program installs with a few workflows you can try.
Now that we've arrived at the last chapter, pat yourself on the back. You've thoroughly expanded your knowledge of the Microsoft Office 2008 programs, and we hope you've gained enough experience to move forward with mastering the ins and outs of one of the most popular software suites in the world. Good luck with all your Office projects now and in the future!