
IN THIS CHAPTER
Using program Preferences to customize Office
Customizing toolbars
Customizing menus
Reassigning keyboard shortcut keys
You can customize Microsoft Office 2008 for Mac to suit the way you work. Whether you're using Office at home, at work, or on the road, you can tailor the program settings to help you work more smoothly and efficiently. Most Office users never take advantage of the customizing options available and end up never discovering the hidden facets of tailoring the programs to make the most of their power and features. Lucky you, this chapter is about to show you how you can find all the options and settings you need to make Office work for you rather than you working with Office.
In this chapter, you learn about each program's preferences and see exactly what's available. You also learn how to customize toolbars and menus, and how to create your own toolbars and menus to use. We also briefly cover how to reassign the keyboard shortcut keys.
Within each Office program, there's a behind-the-scenes command center for controlling how the program behaves. That command center is the Preferences dialog box. Depending on the program, the contents of the Preferences dialog box vary in options and appearance. For example, in Word, you find preferences for setting how you want data saved or how you want the spelling and grammar checker to behave. In Excel, you find settings for controlling the number of sheets in a workbook or how you want ToolTips displayed. The Preferences dialog box looks very similar in both Word and Excel, yet very different in PowerPoint and Entourage. Regardless of the varied options, the Preferences dialog box always works quietly in the background, as the bastion for program settings, and the path to reach it is the same in every program.
As far as knowing what settings to change, that's really up to you and what you need. The possibilities are vast, and it really depends on what you want to customize. No book can possibly tell you what preferences to set because they really are based on personal preference. Not every program feature has exhaustive settings you can fiddle with; many of the preferences categories feature only two or three settings you can change. Many of the settings are presented as check boxes or radio buttons you can click to turn the feature on or off. The good thing about the Preferences dialog box, however, is if you need help with identifying a preference setting, you can select it to reveal a description of the preference at the bottom of the dialog box. To help you a bit, however, we cover a few essentials, like how to set a different default file location, how to turn off onscreen elements, and a few of the other features.
To open the Preferences dialog box in Word, choose Word
Authoring and Proofing Tools: You'll find five distinct categories under this group: General, View, Edit, Spelling and Grammar, and AutoCorrect. These categories have settings pertaining to how you add and edit text in Word.
Output and Sharing: This group includes categories related to producing output with your Word files. Categories include Save, Print, Compatibility, Track Changes, and Audio Notes.
Personal Settings: Five more categories lurk under the umbrella of personal settings, which include options for specifying security settings and file locations. The categories include User Information, Security, Feedback, File Locations, and Gallery.

The toolbar at the top of the Preferences dialog box has navigation buttons for moving back and forth among the categories. Click the Back button to move to the previous screen you were viewing in the Preferences dialog box, or click the Forward button to move forward again after just pressing the Back button. Anytime you want to return to the main view of all the groupings, just click the Show All button.
You can use the Spotlight search tool to search for a specific feature in the Preferences dialog box, such as scroll bar or password. When you type a keyword in the Spotlight box, the location of the feature is literally spotlighted in the Preferences dialog box, and related matches appear below the Spotlight box, as shown in Figure 34.2.

After making any changes to the preferences, you can click OK to exit the dialog box and apply the new settings. To exit without saving your changes, just click Cancel instead.
Now let's look at what kind of settings you can find within each category, starting with the Authoring and Proofing group.
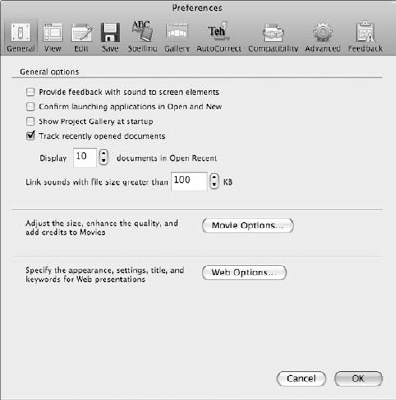
The General category, shown in Figure 34.3, offers a mishmash of options, many of them seemingly unrelated. For example, you can find settings in this group to control how many files appear listed on the Open Recent menu, whether you want to display the Project Gallery at startup, or what measurement units you want to use in the program. For example, if you want the Project Gallery window to pop up when you start Word, make sure this option is selected.
The View category centers around things you view onscreen, such as the Status bar or scroll bars, or things like non-printing characters. You can turn elements on or off by checking or unchecking the check boxes. The Show group of elements includes settings for viewing comments or highlights. The Nonprinting group of elements includes settings for viewing paragraph marks, tab characters, and so on. The Window group of elements includes settings for viewing scroll bars, Status bar, or vertical ruler. For example, if you never look at the Status bar, you can turn it off and free up onscreen space in the work window. The same is true for scroll bars. Other features, such as Live Word Count, can secretly consume lots of CPU power in laptop computers, so turning it off can be a good thing.

The Edit settings include options related to entering data, such as click-and-type or drag-and-drop editing. Most of these options are turned on by default. You can enable or disable them using their check boxes. For example, if you don't want to be able to click anywhere in a document and start typing, you can turn off the click-and-type option.
You can use the Spelling and Grammar preferences to turn the spell-check or grammar-check on or off, or control how the features work in Word. You can set both spelling and grammar features, change the associated dictionaries, and choose to check one without the other. You've probably already encountered Word's automatic spell-checking as you typed a document. It's turned on by default and checks your work as you type, underlining any misspellings. To turn off spell-checking, simply deselect the Check spelling as you type check box. To turn off grammar-checking, deselect the Check grammar as you type check box. You can always turn them back on later and check your document for errors. To learn more about Word's spelling and grammar features, see Chapter 11.
You can use the AutoCorrect preferences to change how the AutoCorrect feature works in Word. As you may recall from Chapter 6, AutoCorrect automatically fixes your mistakes as you type. Some users think this is handy, but others don't like it at all. If you fall into the latter category, you can turn the feature off in the Preferences dialog box. Deselect the Automatically check spelling and formatting as you type check box. To learn more about using AutoCorrect, see Chapter 6.
You'll find options for controlling how documents are saved in Word in the Save category of preferences. For example, you specify how often the AutoSave feature saves your data for recovery, specify a specific format for all your saved files, or choose whether to create backup copies every time. If you know you're always going to want to save your documents in another file format, say to pass along to people using older versions of Word, you can choose a different format in the preference settings. By default, Word is set up to save all your documents as .docx files whenever you open the Save As dialog box. This is the default Word 2008 file format. To change this file format in your preferences, click the Save Word files as pop-up menu and choose another file format. To learn more about how to save in Word, including how to use the AutoRecovery feature, see Chapter 5.
You can control some of the items printed with your documents with the settings in the Print category. You can choose to print drawing objects or hidden text. To learn more about printing in Word, see Chapter 11.
When you are saving your documents into other formats, particularly earlier versions of Word, it's nice to be able to see what formatting or features you've included in your document that may not be read by earlier versions of Word. You can use the Compatibility tab to view recommended options for the format of your choice. This tab, in conjunction with the Compatibility feature found in the Save As dialog box, lets you view problem areas and make adjustments as needed. To learn more about using the Compatibility-checking feature, see Chapter 5.
Back in Chapter 10, you learned how to track changes when a document is passed between two or more users for edits. You can use the Track Changes preferences to control the colors of edits made by each person. You can change the color of inserted text, deleted text, formatted text, changed lines, or comments. In other words, you can determine which color is associated with each person editing the document and how his or her edit marks appear. You also can control whether balloons are added or whether the author, time, and date stamp are included. To learn more about the Track Changes tool, see Chapter 10.
If you're using Notebook Layout view to add audio notes to a document, you can visit this category in the Preferences dialog box to control audio type, channels, sampling, and quality. Several audio options are available. To learn more about creating documents in Notebook Layout view, see Chapter 6.
Word includes basic user information in the document properties for a file. You can change the user information and add additional, more detailed information to your properties. Using this category of preferences, you can set your name, company, address, phone number, and e-mail address. Keep in mind that this information is saved along with every file you create, which means it can be read by anyone viewing the file's properties. The information also is saved in your address book.
Security preferences allow you to assign a password to a document and remove any personal information associated with the file upon saving. To learn more about using passwords, see Chapter 5.
Here's an interesting category of preferences—this one's designed especially to collect information from you as a Microsoft customer. You had the option of okaying this data-collection program during installation and setup. If you opted out, you can opt back in. Or if you change your mind, you can opt out again. You can click the link in this screen to log onto the Microsoft Web site and learn more about the Customer Experience Improvement Program.
Whenever you open the Open and Save As dialog boxes, they automatically display default storage locations and search paths for documents, templates, and other projects you create in Word. You can change these default locations to other folders you use more frequently. For example, if you continually open a specific work folder every day to edit files, why not save yourself some steps and make it the default folder location for your files? You can adjust the location paths for documents, templates, clip art collections, and more using the settings in this category. To make a change, double-click the Location field or click the Modify button to navigate to a specific folder or file.
The last preferences tab in Word is the Gallery category. Use these settings to adjust how the Elements Gallery appears in Word. For example, you can change its color scheme and how it is displayed. To learn more about Word's Elements Gallery, see Chapter 5.
Excel's Preferences dialog box looks much like Word's Preferences dialog box. Preferences are grouped into sections, as shown in Figure 34.4. You can click an icon to open the related settings. To display the Preferences dialog box in Excel, choose Excel
Authoring: This group includes six distinct categories: General, View, Edit, AutoCorrect, Chart, and Color. These categories have settings pertaining to how you add and edit data in Excel and how you view elements in the program window.
Formulas and Lists: This group lists categories for controlling how Excel performs functions, formulas, error-checking, and listing tasks. Categories include Calculation, Error Checking, Custom Lists, and AutoComplete.
Sharing and Privacy: The five categories within this group include options for specifying security settings, compatibility settings, and how Excel saves data. The categories include Save, Compatibility, Security, Feedback, and Gallery.

Just like the toolbar you learned about in the Word preferences, the toolbar at the top of the Excel Preferences dialog box has navigation buttons for moving back and forth among the categories. Click the Back button to move to the previous screen you were viewing in the Preferences dialog box, or click the Forward button to move forward again after just pressing the Back button. Anytime you want to return to the main view of all the groupings, click the Show All button.
To search for a specific feature in the Preferences dialog box, such as scroll bar or password, use the Spotlight search field. When you type a keyword in the Spotlight box, the location of the feature is literally spotlighted in the Preferences dialog box, and related matches appear below the Spotlight box.
When you finish adjusting your program settings, you can click OK to close the dialog box and apply the new settings. The next sections show you what you can expect to find in each Preferences category.
The General category, shown in Figure 35.5, offers a mixed bag of options. For example, you can find settings to set up a specific file to open every time you start Excel. If you find yourself using the same workbook over and over again, why not make it your default file so it's always ready to go when you are? Look for the At startup, open all files in: field, and click the Select button. Navigate to the file you want to use as the default file and click Choose. Back in the Preferences dialog box, the file path appears in the field.
You can speed up your file-saving technique by establishing a default folder or drive that always appears listed first in the Save As dialog box. Click the Select button next to the Preferred file location: field, and choose another folder or drive. The next time you encounter the Save As dialog box, the new default folder location appears.
Another handy thing to look for in the General category is the Standard font and size settings. If you don't like the default font and size Excel assigns for every new workbook you create, change them to something more to your liking. Personally, I prefer a much larger font size so I can read my cell data more easily. To change the font, click the Standard font pop-up menu and choose another. To change the size, click the Size pop-up menu and choose another.

The General options also include settings for specifying ruler units, controlling the number of files listed in the Open Recent menu, and whether the Project Gallery opens at startup.
Everything related to the appearance of program elements appears in the View category. You can turn program elements on or off by selecting or deselecting their check boxes. For example, you can turn the Formula bar or Status bar off or choose not to display comments or placeholders. You can turn off scroll bars, ScreenTips, row and columns headings, and so on.
The Edit settings include options related to entering data into your worksheets. Here you find settings for controlling things like double-click editing, drag-and-drop editing, which direction to go when you press Return, and so on.
Excel's AutoCorrect feature is turned on by default for automatically fixing typing errors. You can use the AutoCorrect preferences to change how the AutoCorrect feature works in Excel. You can turn the feature off entirely by deselecting the Replace text as you type check box. To learn more about using AutoCorrect in Excel, see Chapter 13.
In The Chart category of preferences you can control how empty cells are plotted in a chart and turn off chart ScreenTips and data marker values.
You can change the color palette for your Excel workbooks using the settings found in the Color category.
The Calculation preferences let you control how Excel calculates your data. By default, Excel is set up to calculate your formulas and functions as soon as you enter them. You can set up Excel to calculate your data only upon your command. This can save some computer processing power. This category also offers options for calculating goal seeking or handling circular references.
You can specify how you want Excel to conduct error-checking tasks using the preferences shown in the Error Checking category. You can check or uncheck which rules you want to apply, reset them when needed, and even specify which color is used when errors are flagged.
Excel's AutoFill feature, is handy for automatically filling in repetitive or sequential data, as you learned in Chapter 13. You can customize how this works using the options available in the Custom Lists category. The Custom lists box displays some default lists for entering days of the week and months of the year. You can add your own customized lists to the feature, such as Quarter 1, Quarter 2, and so on. You also can import a list from another source.
In Chapter 13, you learned about Excel's AutoComplete to help you fill in data more quickly as you type. You can control how this feature works using the settings in the AutoComplete preferences category. You also can turn the feature off entirely by deselecting the Enable AutoComplete for cell values check box.
The Save preferences allow you to save a preview picture of the workbook and set up AutoRecover to automatically save copies of your workbook as an AutoRecover file every few minutes. In case you experience a power outage or computer glitch of some sort, you can access the last AutoRecover file and recover your data.
You can find settings for controlling compatibility issues in Excel under the Compatibility category. When you are saving your documents into other formats, particularly earlier versions of Excel, you can find out what formatting or features you've included in your document that may not be read by earlier versions of Excel. The Compatibility Report feature works inside the Save As dialog box to help you make sure your workbooks are compatible for other users.
Security preferences allow you to assign a password to a workbook to prevent unauthorized use or to prevent anyone from changing the workbook. You can choose to protect a single sheet in the workbook or the entire workbook.
The Feedback preferences are geared toward collecting information about your computer usage. If you opted not to disclose feedback, you can choose to participate again through this category. Click the link in the Feedback screen to log onto the Microsoft Web site and learn more about this program.
The PowerPoint Preferences dialog box looks a bit different than the same dialog boxes in Word and Excel. Instead of icons listed as groups, the preferences categories are listed as icons at the top of the dialog box, as shown in Figure 34.6. Simply click the icon to reveal the related preferences.
When you finish adjusting your program settings, you can click OK to close the dialog box and apply the new settings. The next sections show you what you can expect to find in each Preferences category.
The General category offers a variety of options that do not fit into other categories. The General options also include settings for setting Web and movie options, controlling the number of files listed in the Open Recent menu, and whether the Project Gallery opens at startup.
The View preferences let you change a few ways in which PowerPoint displays the ruler, the default view for when you start presentations, and slide show navigation tools.
The Edit settings include options related to entering text into your slides. Here you find preferences for cutting and pasting, text selection and editing, and how the Undo command tracks undos.
You find save options listed under the Save category. You can set up AutoRecover to automatically save copies of your presentation as an AutoRecover file every few minutes in case you experience a computer glitch. You also can set a default file format for presentations in conjunction with the Save As dialog box. You can find options for resolution settings when saving your slides as graphic files.
You can use the Spelling preferences to turn the spell-check on or off and control how the feature works in PowerPoint. The spell-check feature is turned on by default and checks your work as you type. To turn off spell-checking, simply deselect the Check spelling as you type check box.
Click the Gallery icon to view preferences for using the Elements Gallery in PowerPoint. The category offers the very same options as the Gallery category in Word and Excel.
The AutoCorrect feature is turned on by default, which means it's always at work fixing common spelling mistakes as you type. You can control how the feature works using the Preferences dialog box. Click the AutoCorrect icon to view the options. To learn more about AutoCorrect, read about it in the Word section, in Chapter 6. The feature works the same in all the Office programs.
The Compatibility Report tool, which appears in the Save As dialog box, can be controlled through the Preferences dialog box. Simply click the Compatibility icon to reveal the Compatibility preferences. As you're saving your presentations into other formats, such as earlier versions of PowerPoint, you can find out what formatting or features you've included in your presentation that may not be compatible with other versions of the program.
Although the Advanced preferences sound intimidating, the options within are not. Here you can set default locations for presentation files and associated files, and find fields for entering your name and initials to include as personal information.
So far, we've examined the Word, Excel, and PowerPoint preferences. The Word and Excel preferences are presented in the same format. The PowerPoint preferences used a similar look and feel. The Entourage Preferences dialog box, shown in Figure 34.7, shows an entirely different presentation of options. Instead of icons or tabs, the preference categories are arranged as a list box on the left that you can click to view individual categories of settings.
When you finish adjusting your program settings, you can click OK to close the dialog box and apply the new settings. The next sections show you what's available among the Entourage settings.
In Entourage, the General category of preferences, shown in Figure 34.7, includes an option for setting Entourage as your default e-mail client, settings for keyboard shortcuts, and the WYSIWYG (What You See Is What You Get) font menu. You can turn these various options on or off as needed.

Display the Address Book preferences to change the default address or phone number formats and whether Entourage links contacts with messages. For example, you may want to list a default area code for all new contacts you create so that the number is already filled in for you whenever you start a new contact. Many countries use different addressing formats for mail. If your contacts are all from the United Kingdom, for example, you can set that country as your default address format style.
Edit the To Do List preferences by choosing a different due date or a default snooze time.
You can use the Calendar preferences to set the first day of the week, control which days constitute a work week, set work hours, set a default time zone, and control how reminders occur.
Use the Fonts preferences to set default fonts for list items, HTML messages, plain text messages, and printed items.
Like the other Office programs, Entourage includes a built-in spell-check feature that's turned on by default. You can specify how you want the feature to work using the Spelling category. You can use the Spelling preferences to turn spell-check on or off and control how the feature works. To turn off spell-checking, deselect the Check spelling as you type check box.
Use the Notification preferences to change how Entourage alerts you to new message arrivals. You can set up Entourage to display alerts or set sounds for the various notification tasks.
You can use the Security category of the Preferences dialog box to set a few security options, such as warning before allowing external applications to send mail or access your address book, or HTML options, such as downloading pictures.
Display the Sync Services preferences to synchronize Entourage with other features and applications, such as synchronizing Entourage events with iCal.
The Spotlight Services category offers a few options for controlling how the Spotlight search tool works in Entourage.
The Feedback preferences let you turn the Customer Experience Improvement Program on or off. This tool gathers information from your computer about the way in which you use hardware, software, and services. You may or may not want Microsoft to collect this information. You can turn the feature on or off if you'd like.
You can find preferences for controlling how messages are read in Entourage using the Read category. You can choose what to do with messages upon reading them, determine how to mark them as read, and set a default character set.
The Compose preferences help you set options for how you compose your messages, including attachments. You can find options for saving copies of sent messages, setting a default mail and news format, and applying any encoding or file compression.
The Reply & Forward preferences include options for controlling whether the original message text is included in the reply, setting an attribution line at the top of the reply or forward, or using the default account to reply.
One of the easiest ways to customize an Office program is to tweak its toolbars and menus. Each program comes with a default set of commands. The Microsoft designers and programmers tried to anticipate the ways in which most users would use the various commands and tools. As such, they've placed the most commonly used commands on toolbars and menus. These may or may not be the tools you prefer to access the most, or their arrangement may not particularly suit the way you work. For example, you may want a specialized menu with completely unrelated commands that you frequently use, or you may prefer an entirely different toolbar composition than what's available. Don't sweat it; change it! It's easy, and this section shows you how.
Every toolbar in the Office programs is customizable. You can move buttons around to change their order, delete buttons from a toolbar that you have no need for, or add buttons you do need but don't currently see anywhere else. You also can create an entirely new toolbar featuring just the tools you want to use, all conveniently located on one toolbar. For example, if you use lots of styles, why not place your favorites on a toolbar so you can access them with a single click? Your customization actions for toolbars and menus are done when you switch to Edit mode. This is accomplished through the Customize Toolbars and Menus dialog box. When you open this dialog box, your Office program makes all the toolbars and menus editable. This means you can make changes to them directly, or add new toolbars and menus. As soon as you close the Customize Toolbars and Menus dialog box, the customizing is over. You're back to the normal program screen.
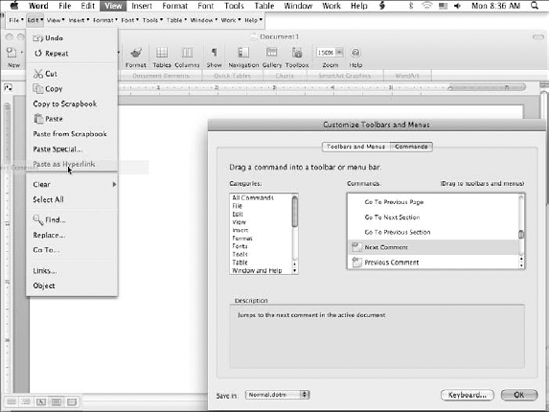
When customizing toolbars, you can summon any existing toolbar and make changes to its buttons, or you can create a new toolbar and populate it with commands you use most frequently. The Customize Toolbars and Menus dialog box is divided into two tabs: Tools and Menus, and Commands. The Tools and Menus tab, shown in Figure 34.8, lists all the toolbars and menus found in the program. The Commands tab, shown in Figure 34.9, lists all the available commands found in the program.
Viewing Toolbars
The Standard toolbar is a permanent part of your Office programs, but if you haven't already figured this out, you can use plenty of other toolbars to perform various tasks and activate commands. Depending on the task at hand, some toolbars pop up immediately as you're working. Other toolbars must be activated manually. The other toolbars can be turned on or off using the View menu. Choose View

Figure 34.8. Use the Tools and Menus tab in the Customize Toolbars and Menus dialog box to view a list of all the toolbars and menus offered in the program.

To move or delete a button from a toolbar, follow these steps:
Choose View
Customize Toolbars and Menus.
The Customize Toolbars and Menus dialog box appears (refer to Figure 34.8).
Click the Toolbars and Menus tab.
Click the check box for the toolbar you want to edit.
A check mark in front of the toolbar name means the toolbar is displayed; no check mark means the toolbar is not displayed.
If your toolbar already appears onscreen, such as the Standard toolbar, you do not need to turn it on; it's ready to edit now.
To move a button, click and drag the button and drop it into a new location on the toolbar.
To delete a button, simply drag it off the toolbar or drag it onto another toolbar.
When you finish moving or deleting buttons, click the OK button to exit the dialog box and exit Edit mode.
If you don't like all the changes you've made to a toolbar, you can restore it to its original appearance. Reopen the Customize Toolbars and Menus dialog box, and click the Toolbars and Menus tab. Next, click the toolbar you want to restore, and then click the Reset button. This restores it to the original Office settings.
To add a button to a toolbar, follow these steps:
Choose View
Customize Toolbars and Menus.The Customize Toolbars and Menus dialog box opens.
Click the Toolbars and Menus tab.
Select the toolbar you want to edit, if the toolbar isn't already displayed.
Click the Commands tab (refer to Figure 34.9).
A list of command categories appears, with commands grouped by menu, and the commands are listed on the right for each menu category.
Peruse the commands until you find the one you want; select the command you want to add to the toolbar.
Click and drag the command from the dialog box, and drop it onto the toolbar where you want it to appear.
You can continue adding more buttons as needed.
When you finish adding buttons, click the OK to exit the dialog box and exit Edit mode.
If customizing existing toolbars isn't floating your boat, you can design your own toolbar and fill it with the commands of your choice. For example, you might want a toolbar filled with buttons for copying and pasting data or inserting the current date and time. As the designer, you control exactly which buttons appear on the toolbar, and you can edit whenever you need to change it to suit your work needs.
To create a new toolbar populated with commands you use the most, follow these steps:
Choose View
Customize Toolbars and Menus.The Customize Toolbars and Menus dialog box opens.
Click the Toolbars and Menus tab.
Click the New button.
The Add a Toolbar dialog box appears, as shown in Figure 34.10.
Type a name for the new toolbar.
Click OK.
Click the Commands tab.
Locate the command you want to add to the toolbar, and then click and drag the command from the dialog box and drop it onto the toolbar where you want it to appear.
You can continue adding more buttons as needed, as shown in Figure 34.11.
When you are finished building the new toolbar, click the OK to exit the dialog box and exit Edit mode.


The new toolbar is added to the program's toolbar collection. To activate it at any time, visit the View menu and select it from the list of available toolbars.
Like the toolbars you learned about above, every menu in the Office programs is customizable. You can move menus around on the main menu bar, and you can move commands around, remove commands you never use, and add commands you want to use more often. You can use the Customize Toolbars and Menus dialog box to edit menus. The Tools and Menus tab in the dialog box lists all the toolbars and menus the program contains, and the Commands tab lists all the commands available. The commands are grouped by menu name.
To remove a command from any menu, follow these steps:
Choose View
Customize Toolbars and Menus.The Customize Toolbars and Menus dialog box opens, and an odd-looking menu bar appears at the top of the screen. This is a duplicate of the main menu bar, and any menu name you click opens to reveal a list of associated menu commands.
To remove a command, drag it off its respective menu.
When you finish removing commands, click the OK button to exit the dialog box and exit Edit mode.
You also can remove a menu. Just drag it off the duplicate menu bar.
If you ever need to restore your menus to their default state, open the Customize Toolbars and Menus dialog box, click the Toolbars and Menus tab, click Menu Bar, and then click the Reset button. This restores it to the original Office settings.
To add a command to a menu, follow these steps:
Choose View
Customize Toolbars and Menus.The Customize Toolbars and Menus dialog box opens.
Click the Commands tab, shown in Figure 34.12.
Locate and select the command you want to add.
Click and drag the command from the dialog box, and drag it over the menu where you want to insert it.
The menu opens (refer to Figure 34.12).
Drop the command onto the menu where you want it to appear.
You can continue adding more commands as needed.
When you finish editing menus, click the OK to exit the dialog box and exit Edit mode.
While you have the Customize Toolbars and Menus open, you can change the order in which the menus appear on the menu bar. Simply drag a menu to a new location on the bar.
To create a brand new menu and add it to the main menu bar, follow these steps:
Choose View
Customize Toolbars and Menus.The Customize Toolbars and Menus dialog box appears.
Click the Commands tab.
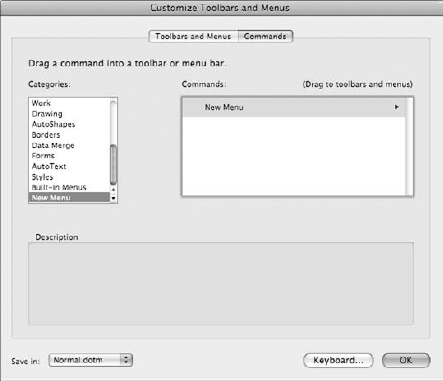
Scroll to the bottom of the Categories list to select the New Menu command, as shown in Figure 34.13.
Drag the command up to the duplicate menu, and place it where you want it to appear on the menu bar.
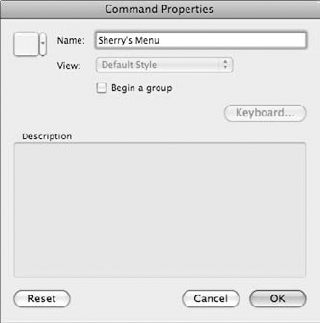
Control+click the new menu, and choose Properties, or just double-click the new menu.
The Command Properties dialog box opens, as shown in Figure 34.14.
Type a name for the new menu in the Name field.
You can now populate the menu with the commands you want. Using the Commands tab, you can drag commands onto the new menu.
When you finish building the new menu, click the OK to exit the dialog box and exit Edit mode.
Each Office program has keyboard shortcuts coded into the application for accessing common commands using the keyboard. Many users prefer to keep their fingers flying on the keyboard rather than clicking mouse buttons and moving the mouse around on a pad. If keyboard shortcut keys are your preferred method of assigning commands, you'll be delighted to know you can customize how they work in the Office programs. You can do this by reassigning the keys Microsoft has already assigned. In fact, sometimes the pre-assigned keyboard shortcut keys don't make much sense, and you may prefer another combination. You can reassign keys to your favorite commands easily. Now for the bad news—you can only do this in Word and Excel. You can customize keyboard shortcut keys for PowerPoint and Entourage; however, you have to go outside of the programs to do so—through System Preferences.
To reassign keyboard combinations in Word or Excel, start by opening the Customize Keyboard dialog box, shown in Figure 34.15, by choosing Tools

In this chapter, you did a visual walk-through of all the preference settings for Word, Excel, PowerPoint, and Entourage. You also learned how to customize toolbars and menus to show only the commands you want by adding or subtracting commands. If adding or subtracting commands isn't enough, you were shown how to create a brand new toolbar and menu and populate it with commands you use the most. Lastly, you learned how to quickly reassign a keyboard shortcut key.