
IN THIS CHAPTER
Adding another e-mail account with Setup Assistant
Learning your way around the Inbox
Receiving and sending e-mail
Managing messages and file attachments
Adding contacts to your Address Book
Working with newsgroups
You can use Entourage to communicate electronically with the world at large, whether your world is a group of friends and family, a corporate network of colleagues, underlings, and bosses, or just the Internet as a whole. If you're like most computer users today, e-mailing is an essential, nay, a crucial part of your daily technology experience. For many of us, a day without e-mail is like a day without sunshine, or a day without breathing, or a day without... well, you get the picture. For many of us, e-mail is vitally important.
You can use the e-mail feature in Entourage to send and receive e-mail and file attachments, read newsgroups, organize contacts, and more. In this chapter, you learn how to set up an e-mail account, send and receive messages, build your contacts list in the form of an Address Book, filter out junk e-mail, juggle attachments, and view newsgroups. As you can see, lots of components are packed into Entourage, so let's not waste any more time out here in the chapter lobby. Let's start e-mailing!
As you discovered in Chapter 24, the very first time you use Entourage, a Setup Assistant appears to help you set up your e-mail accounts. If you have already stepped through the process, you probably already have an e-mail account set up to use. If not, you can start a new one. You also can add other accounts as needed. For example, you may have one e-mail account at work and a free account for personal use. You can configure Entourage to manage all your accounts in one convenient spot.
You can use the same Account Setup Assistant you learned about in Chapter 24 to add new e-mail accounts to Entourage. To set up another e-mail account, follow these steps:
Choose Entourage

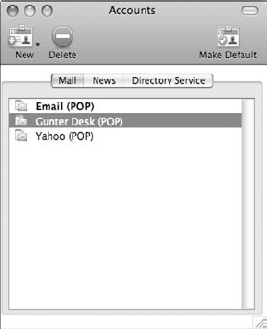
Entourage opens the Accounts window, as shown in Figure 25.1
Click the New button.
The Account Setup Assistant appears, as shown in Figure 25.1
Type the account's e-mail address in the text box.
If you're using an account on an Exchange server, you need to check with your network administrator for additional setup information.
Click the right arrow button to continue.
Setup Assistant tests the configuration settings and shows the results, as shown in Figure 25.3. Click the right arrow button to continue.
If Entourage does not recognize your e-mail server, the Setup Assistant window says "Automatic Configuration Failed." You need to manually insert the required information in the next window.
Next, the Verify and Complete Settings window appears, as shown in Figure 25.4, offering fields for filling in and verifying your e-mail account information.
Fill out the fields as required by your e-mail service.
Click the right arrow button to continue.
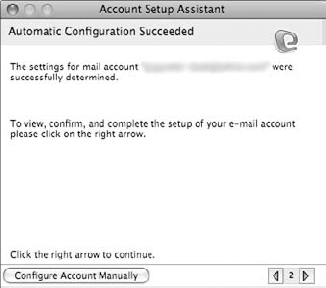
Figure 25.3. Setup Assistant tests your mail account settings and tells you how it went in the Automatic Configuration Succeeded window.
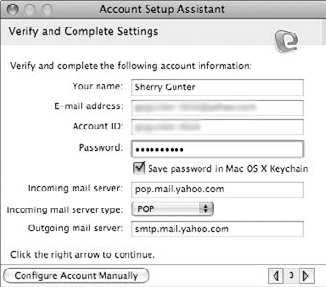
Figure 25.4. Fill in your e-mail account information in the Verify and Complete Settings window, including your account ID, password, and mail server addresses.
Note
If you don't know your account info, check with your e-mail provider to learn more. If you're using another e-mail program, you might also glean this information from the program's account settings.
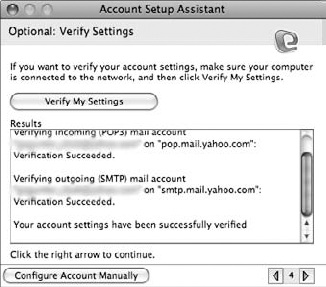
The Verify Settings window appears, as shown in Figure 25.5.
Click the Verify My Settings button.
Setup Assistant checks your information to see if it's all valid and displays the results. If you've missed something, you'll need to return to the previous window and correct any errors.
If everything checks out, click the right arrow button to continue.
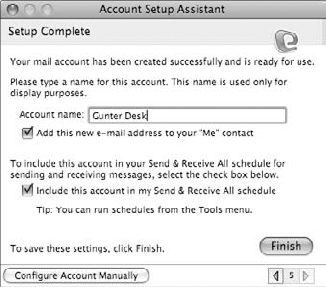
The Setup Complete window appears, as shown in Figure 25.6.
Assign a name to your account as it will appear in Entourage.
Leave the Include this account in my Send & Receive All schedule check box activated if you want this account checked automatically when sending and receiving e-mail.
Click Finish to exit the Setup Assistant.
Entourage adds the new account to the list of existing accounts in the Accounts window, as shown in Figure 25.7. You can return to this window at any time to edit an account or remove it entirely.


To edit an account, select it in the Accounts window and choose File
To remove an account, select it in the Accounts window and click the Delete button.

As you learned in Chapter 24, Entourage is comprised of six main tools, one of which is Mail. All the e-mailing you do with Entourage takes place using Mail. As it turns out, Mail is often considered the real workhorse among the Entourage tools. You can use Mail to send and receive messages, file attachments, and newsgroup postings. You can use the various features in Mail to filter your messages, manage messages, set up message rules, schedule e-mailing tasks, and more. In this first section, you learn how to open and view the Mail window.
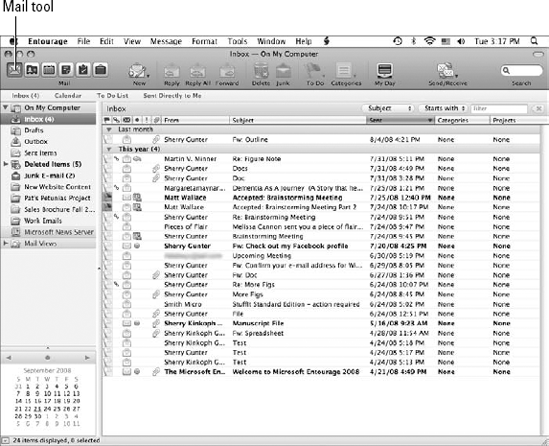
The main Mail view displays three panes: the Folders List pane, the mini calendar pane, and the main list pane for viewing messages. Messages you receive are shown in the Inbox, a special folder in Entourage (refer to Figure 25.9). The Inbox folder displays by default when you click the Mail button. To view a different folder, such as the Outbox, just click the folder name in the Folders List pane. To return to the default Inbox view again, click the Inbox folder name. You also can change the various ways you view messages using Mail Views, which you learn about coming up shortly.
Here's a rundown of the main Mail folders:
Inbox: Displays your e-mail messages.
Drafts: Lists any e-mail messages you are currently composing.
Outbox: Displays messages waiting to be sent.
Sent Items: Lists all the e-mail messages you have previously sent.
Deleted Items: Lists deleted messages.
Junk E-mail: Lists junk e-mail and spam messages.
Checking E-mail on Online Accounts
Two common types of e-mail accounts are POP and IMAP. An IMAP account typically keeps e-mail messages on a server rather than downloading them onto your computer like a POP account. Entourage lets you treat a POP account like an IMAP account and keep your messages on the server. This is handy if you're planning a trip and want to check your messages at a glance without wanting to download everything. It does this by downloading only the header information. This Entourage feature is called online access. To set up an account in this way, choose Tools
In addition to folders, the Folders List pane displays any Office project folders you are working on; to learn more about using projects, see Chapter 27. The Folders List pane has main headings you can expand or collapse to view sublists of folders, or views. For example, you can expand or collapse the top heading, My Computer, to view or hide the Mail folders.
You can find the Mail Views in the Folders List pane, located in the far-left pane in the program window. You can expand and collapse various headings in the Folders List pane to view different aspects of the Mail feature. The Mail Views themselves are useful for filtering out messages you don't want to see and concentrating on those you do want to view. You can use the Folders List pane to view filtered lists of e-mails in any of your mail folders, such as viewing all the flagged or high-priority messages. To display the filtered Mail Views in the Folders List, click the Expand arrow next to the Mail Views heading, as shown in Figure 25.10. To see a particular filtered list, click the view name, such as Unread or Received Today. You can choose from the following filtered list views:
Due Today: Displays all the e-mail items associated with a due date.
Family Category: Displays only messages assigned to the Family category.
Flagged: Displays any flagged e-mail messages.
High Priority: Displays all the high-priority messages.
Personal Category: Displays all the messages to which the Personal category is assigned.
Received Today: Displays only the messages you received today.
Sent Directly to Me: Displays messages addressed only to you and no one else.
Unread: Displays all the unread messages.
Work Category: Displays all the messages to which the Work category is assigned.

To return to the regular Inbox view, click the Inbox folder in the Folders List pane.
As you start receiving messages, different icons appear in the columns in the list pane, helping you to quickly ascertain pertinent information about the messages. The Inbox folder divides the list pane into columns. The columns display the message sender, the subject line, the date it was sent, and any categories or projects assigned to the message. Table 25.1 explains the columns and what type of icons you can expect to see.
Table 25.1. Inbox Columns
Column | Description |
|---|---|
To Do Flag Status | This column displays messages requiring action. Gray by default, the icon in this column changes to red to indicate that this message requires action, and Entourage adds it to your To Do list. When the item is completed, you can click the icon again to make it green, indicating it's completed. |
Links | This column indicates whether the message is linked to another message, a calendar event, a task, or a note. |
Online Status | This column shows the online server status of your IMAP messages. Different icons appear to indicate if a message has been only partially received, deleted from the server, or fully downloaded the next time you contact the server. |
Status | This column shows the message status. Several different icons may appear in this column to indicate whether the message has been read, answered, redirected, or forwarded. |
Priority | This column indicates the message priority: Highest, High, Low, Lowest, or Normal. |
Attachments | An icon in this column indicates that one or more files are attached. |
Digital Signing | A padlock icon in this column indicates the message is digitally signed, meaning it's tamper-proof. |
When you start and setup Entourage, your Inbox shows one e-mail already received. This is actually the welcome message from Microsoft, and it's built into the program. In case you were excited about receiving your first e-mail in Entourage, it didn't come via e-mail. It's preprogrammed to be in the Inbox. Don't let that get you down, however, because your Inbox is sure to be full of messages soon enough.
To check for new messages, use any of these methods:

Choose Tools
Press

If you have more than one account, you can check for messages on a specific account; choose Tools
Anytime you activate the Send & Receive command, Entourage checks the mail server for any incoming messages and sends any outgoing messages you have waiting in the Outbox. This includes downloading or uploading any file attachments.
Tip
You can restrict the download size of your e-mail messages, which is handy if you have a slow dial-up connection. Choose Tools
There are two ways to read a message you receive in the Inbox. You can open the message in its own message window, or you can use the Preview Pane.
To read an e-mail message in its own window, simply double-click the message in the Inbox. This opens the message, as shown in Figure 25.11. From the message window, you can choose to reply to the sender of the message, reply to everyone on the message list, or forward the message to someone else. The toolbar at the top of the window also includes commands for deleting the message, moving it to the Junk e-mail folder, printing the message, or assigning the message a priority status, category, or project.
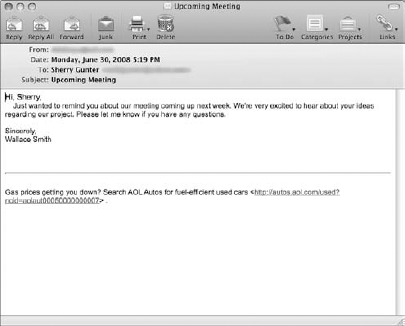
After you've read the message, you can decide what to do with it then and there, or just close the message window. To close the window, simply click the window's Close button.
You also can set up Entourage to include a Preview Pane, which shows the selected e-mail message in the main Mail window in its own pane, as shown in Figure 25.12. To turn on the feature, choose View
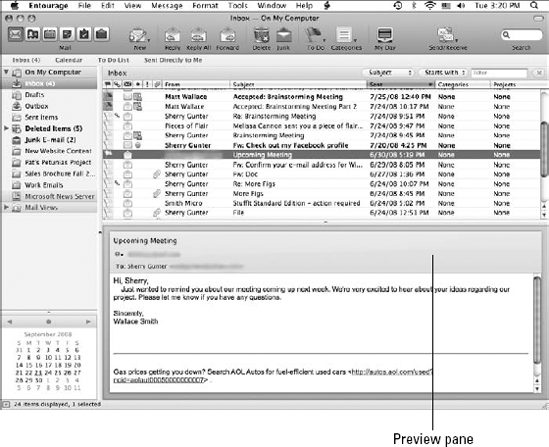
You can move through messages in the Inbox Preview Pane by clicking the ↓ or ↑ key. You also can use the View menu to move to the next or previous message.
When you're ready to create a new e-mail message, Entourage opens a blank message window and a pop-up window for addressing the message. You can use the Tab key to move from field to field or just click in the field box to fill in the appropriate data. The pop-up window, shown in Figure 25.13, offers four buttons and three text fields for entering e-mail addresses. Each text field has a specific purpose:
To: This field is the place to enter e-mail addresses of the primary people to whom you want to send a message. If the address you start typing already exists in your Entourage Address Book, Entourage automatically tries to fill in the rest for you. If you enter more than one address, be sure to separate them with commas. Any address you enter in this field appears at the top of the message for anyone to see.
Cc: Standing for 'carbon copy," this field is for addressing secondary recipients. Like the To field, any address you enter in the Cc field appears at the top of the message for anyone to see.
Bcc: Meaning 'blind carbon copy," use this field to send the message to a secondary recipient without the primary recipient knowing about the secondary recipient. This field is very handy for sending a message to lots of people without including everybody's e-mail addresses in the message itself, thus avoiding the potential for spammers to see your e-mail address.

Tip
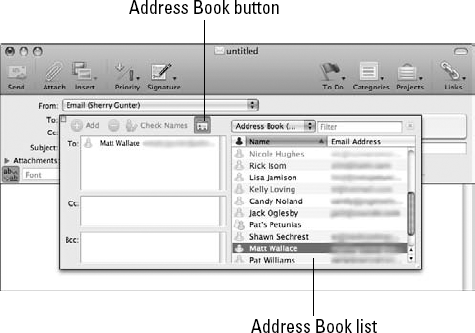
You can access your Address Book contacts using the Address pop-up window. Click the Address Book button to view your list of contacts. To add a name to your current e-mail, double-click a name from the list. Click the Address Book button again to toggle the list display off.
After addressing the e-mail, you can fill out the Subject line with a subject title, as shown in Figure 25.14. This title information lets the recipient know about the nature of your e-mail message. You should always include a brief subject line in your messages. Some e-mail programs filter out unmarked subject messages as spam or junk mail.

You can use the large text box area in the message window, shown in Figure 25.14, to compose your e-mail. You type your message just as you would type a letter in Word. E-mail formatting typically falls into two categories: plain text and HTML. With plain text, you can't format with special formatting, such as bold or color. With HTML formatting turned on, you can. You can toggle between the two types using the Use HTML button. If you opt for HTML formatting, the toolbar at the top of the text box includes commands for controlling the font, size, style, alignments, and other simply formatting features. Most e-mail client programs can read HTML today, but the process is not always successful. In other words, don't spend lots of time trying to format your message to look pretty. There's no guarantee the recipient will see the message the same way in which you formatted it. For best results, keep the formatting simple or plain.
Note
The spell-check feature is turned on by default, so you may see Entourage correcting misspellings as you type. To turn the feature off, choose Entourage
To create a new e-mail, follow these steps:

An untitled Mail message window opens along with a pop-up window, called the Address pop-up window, for addressing the message.
In the pop-up window, type the e-mail address or addresses in the appropriate fields, as shown in Figure 25.15.
Optionally, you can click the Address Book button to view contacts in your Address Book and double-click names to add them to the message. The Address Book button toggles the Address Book on or off in the pop-up window.
Click anywhere outside the pop-up window or just keep pressing Tab until the window closes.
Click in the Subject line, and type a subject header, as shown in Figure 25.16.
Click in the message text box, and compose your e-mail message.

If you're connected to the Internet, Entourage sends your message.

If you prefer to send the message at a later time, choose Message
The toolbar at the top of the message window includes several buttons for prioritizing, flagging, or categorizing a message. For example, you may want to flag the message as High priority, alerting the recipient that the message requires attention. You also can assign a category to a message, such as Family or Personal, or add the message to the To Do list. These options can help you keep track of your Entourage information. You can flag, prioritize, and categorize any message you send, as well as messages you receive. Figure 25.17 shows the buttons found in a typical message window.
Figure 25.17. You can use the Priority, To Do, Categories, and Projects buttons to organize and keep track of your e-mail messages.
Here's how you can use the message window's toolbar buttons to flag, prioritize, or categorize:
Priority: Use this button to set a message priority level: Highest, High, Normal, Low, or Lowest. By default, all messages are set to Normal priority unless you specify otherwise.
To Do: You can flag a message with a due date using this button, helping you to keep track of when a message needs to be completed. When you activate a flag, Entourage adds a flag icon to the Inbox column and adds the message to your To Do list. You can choose from the following denotations: Today, Tomorrow, This Week, Next Week, No Due Date, Choose Date, Add a Reminder, Mark as Complete, or Clear To Do Flag.
Categories: Organize your messages by categories, such as Family or Work. Categories are simply labels to help you keep track of your Inbox information.
Projects: If a message pertains to an Office project you're working on, you can use the Projects button to assign the message to a project. This can help you keep all the related project items grouped together.
In addition to finding these buttons on the message window's toolbar, you also can access the settings through the Message and Edit menus.
You can insert a picture, background picture, sound, or movie clip into your e-mail message. To do so, click the Insert button and choose the type of media you want to insert. Or you can choose Message

If you change your mind, you can Control+click the photo or clip and choose Cut. This deletes it from the message.
You also can send files as attachments. Learn more about this option coming up later in this chapter. To learn more about working with graphics in Office, such as photos, see Chapter 30.

Figure 25.19. When you reply to a message, Entourage reuses the sender's e-mail address and subject line.
By default, Entourage also includes the original message text in the text box field (refer to Figure 25.18). You can type your response above the original message text or in the original text, or you can remove the original text entirely. When you're ready to send the e-mail, click the Send button or choose Message
Note
If you prefer to reply to messages without including the original message text, you can stop Entourage from placing it in the message box each time. To do so, choose Entourage
Entourage opens the message in a new message window and the pop-up Address window. Fill in the recipient's e-mail address, and click anywhere outside the Address window. As shown in Figure 25.20, the Subject field is already filled in, this time with the letters 'FW:" preceding the header. 'FW" stands for 'forward." You can add your own message text to the existing message. By default, Entourage also includes the original message text in the text box field (refer to Figure 25.19). When you're ready to send the e-mail, click the Send button or choose Message
To forward an e-mail as an attachment rather than a message, click the message in the Inbox and choose Message
You can redirect a message rather than forward it. Redirecting sends the original message without adding any information from you in the message. With a redirected message, the recipient sees only the sender's name as the sender, not your name. This is handy if you don't want to be included in any e-mail exchanges between the two people. To redirect a message, choose Message


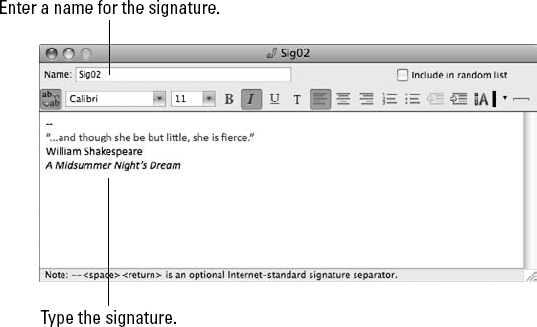
Many users often include signatures at the bottom of their messages, typically containing contact information and a company logo, or in the case of personal e-mails, a popular saying, quote, or personal statement. A signature is simply preset text you add to the bottom of an e-mail message saving you the trouble of typing the information each time. You can create as many signatures as you like or edit the default Standard signature. To create your own signatures in Entourage, follow these steps:
Choose Tools
Entourage opens the Signatures window, as shown in Figure 25.22.
Click the New button.
An untitled signature form opens, as shown in Figure 25.23.
Type a unique name for the signature, such as My Work Sig or Personal Sig01.
Type your signature text, and format it the way you want it to appear in your e-mail messages.
You can use the toolbar buttons to apply formatting to the signature text.
Press
Close the signature form window.
Entourage adds the signature to the list box.
Close the Signatures window.

Tip
If you have a library of different signatures, you can instruct Entourage to include a random signature in an e-mail message. Click the Include in random list check box in the signature form window while creating a new signature or editing an existing signature.
To use a signature in a message, simply click the Signature button on the message window's toolbar and select the signature you want to apply. You also can choose Message
Cleaning Up Messages
Every time you forward a message, more quoting brackets are added to the original message. After a couple hundred forwards to a message, the brackets can make the original message downright illegible. Entourage features a handy tool you can use to clean up heavily forwarded message text, and you can apply it before sending the e-mail to someone else. Simply choose Edit

Figure 25.24. Signatures are a great way to insert contact information or personal statements into your e-mail messages.
You can return to the Signatures window at any time to create new signatures, delete ones you no longer want, or edit existing signatures.
By default, Entourage is set up to check for new messages whenever you start the program, every 10 minutes while you're using the program, and when you close the program. You can turn the feature off or set a different schedule. For example, you may only want to check for messages manually or set a longer length of time between checking the server for messages. You can do all this through the Schedules and Edit Schedules feature. The Schedules window, shown in Figure 25.25, keeps track of all the scheduled items you set in Entourage. You can access the window by choosing Tools

Figure 25.25. Use the Schedules window to schedule when Entourage checks e-mail, deletes mail, and performs other functions.
Automatic Signatures
You can tell Entourage to add the same signature to every e-mail message you send. You can do this through the Accounts window. Choose Tools
Entourage includes three default schedules already set in the Schedules window:
Empty Deleted Items Folder: This item deletes messages from the Deleted Items folder. By default, this scheduled item takes place manually, which means it's up to you to delete messages.
Send & Receive All: This item sends and receives messages as a repeating schedule every 10 minutes while you're using Entourage.
Send All: Set to manual, this action sends all messages waiting in the Outbox without checking for incoming messages.
You can edit these existing schedules, remove them entirely, and add your own schedules to the list. For example, you may want to schedule when Entourage removes messages from the Deleted Mail folder. When setting a scheduled item, you can define its name, when it happens, and what happens. The 'when" options let you determine when a schedule runs. When defining a scheduled item, you can choose from the following 'when" actions:
Manually: A scheduled item with this designation does not really run until you tell it to by choosing Tools
At Startup: This item runs as soon as Entourage opens.
On Quit: This item runs when Entourage closes.
Timed Schedule: You can specify your own time settings when you want this item to run.
Repeating Schedule: You can set a schedule to run at regular intervals using this designation.
Recurring: You can set a schedule to run in a recurring pattern over the course of time you define.
The 'what happens" options, called the Action options in the Edit Schedule window, let you determine what happens when a schedule runs. You can choose from these actions:
Receive Mail: Receives e-mail messages from your server.
Receive News: Receives the latest newsgroup postings.
Send All: Sends all mail waiting in the Outbox.
Run AppleScript: Runs a specified AppleScript.
Delete Mail: Sends any mail in the Deleted Items folder to the Trash.
Delete Junk Mail: Empties the Junk E-mail folder.
Launch Alias: Opens an alias to any document or program on your computer.
Excel Auto Web Publish: Works with Excel's Save As Web Page feature to keep a workbook current on the Web.
When you define the 'when" and 'what" of a scheduled item, you typically must define a few more parameters to set the scheduled item into play. For example, if you set up a schedule to delete mail at startup, you can specify a folder to delete and an age of the messages within the folder such as removing any messages older than 14 days. You also can add more When and Action items to a schedule using the Add Occurrence and Add Action buttons. You can add up to three items to a scheduled item using the Add Occurrence button under the When options. You can add dozens of actions using the Add Action button under the Action settings. You also can remove occurrences and actions you no longer want to associate with the scheduled item.
To add a scheduled item, follow these steps:
Choose Tools
The Schedules window opens, as shown in Figure 25.25.
Click the New button.
The Edit Schedule dialog box opens, as shown in Figure 25.26.
Type a name for the scheduled item in the Name text box.
Under the When options, choose when you want to run the schedule.
You can click the When pop-up menu and choose Manually, At Startup, On Quit, Timed Schedule, Repeating Schedule, or Recurring.
If the item includes parameters, such as setting a time or date, fill in the parameters as needed.
Optionally, you can check the Only if connected check box to perform the action only when connected to your Internet Service Provider.
Under the Action options, click the pop-up menu and choose an action.
If the item includes parameters, such as setting a time or date, fill in the parameters as needed.
Click OK.
Entourage adds the item to the schedule.
Click the Schedule window's Close button to exit the window.

After you've scheduled an item, you can do the following:
To run a scheduled item, choose Tools
To turn off a scheduled item, just deselect its check box in the list. When you deactivate a scheduled item, Entourage no longer follows its schedule.
To edit an item, double-click it and make changes to the settings.
Tip
Do you want to read your messages offline? You can. Choose Entourage
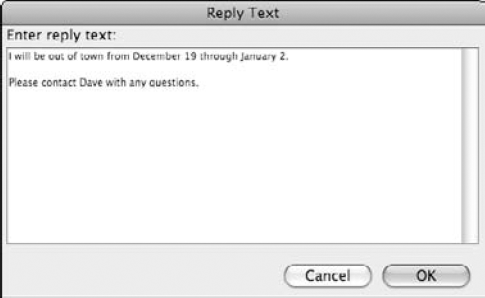
You can create an automatic e-mail reply to any messages you receive. This scenario is ideal if you need to be away from the office for awhile or if you're going on vacation. You can create an automatic response that states when you'll be back and who the sender might contact in the meantime. One way to create an automatic response is to set up a message rule. The catch to using this method is that Entourage has to be running while you're away.
When setting up a message rule, you give the rule a unique name and control the 'ifs" and 'thens" of the scenario. In this case, the 'if" is if you receive a message, and the 'then" is then Entourage sends a response.
To set up a message rule, use these steps:
Click Tools
The Rules window opens, as shown in Figure 25.27.
Click the New button.
The Edit Rule dialog box opens, as shown in Figure 25.28.
Type a name for the rule in the Rule name field, such as Vacation Response.
Optionally, you can change the All message pop-up menu to narrow down which messages to respond to, such as sending an automatic response only to certain people.
Under the Then options, just below the Add Action button, click the pop-up menu and change the Change status to Reply.
Click the Reply Text button.
Entourage opens a Reply Text dialog box, as shown in Figure 25.29.
Type the reply you want Entourage to send.
Click OK.
Notice that the Enabled check box is enabled by default. Leave this check box selected.
Click OK again to exit the Edit Rule window.
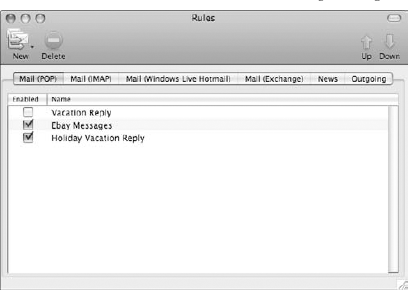
Entourage adds the rule to the list box, as shown in Figure 25.30. Leave the Enabled check box selected to turn the automatic response on now, or deselect the check box to turn the rule off until you need it later.
Close the Rule window when finished.


You learn more about setting other types of message rules in the next section.
If you're using a Microsoft Exchange account, you can use the Out of Office Assistant to generate an automatic response. Unlike a message rule that requires Entourage to be running to create an e-mail response, the Out of Office Assistant works with the mail server running Microsoft Exchange to create your reply. To activate this feature, click the Microsoft Exchange account in the Folders List pane, choose Tools
After you start accumulating messages in your Inbox, you'll need to figure out what you want to do with them all. Entourage makes it easy to manage your messages using all kinds of tools and features. For example, you can delete old messages, archive messages, print them, and so on. Like the other Office programs, message files are stored in folders on your computer after you download them. By default, messages are directed into the Inbox folder when you first receive them. You can move them into other folders, create new folders for organizing messages, or delete messages you no longer want to keep. This section shows you the various tools for keeping your messages organized and managing the growing pile of e-mails.
You can delete messages you no longer need to see in your Inbox. When you delete a message from the Inbox or other mail folders, Entourage moves the message to the Deleted Items folder. To permanently remove the message, you must then delete it from the Deleted Items folder.
To delete a message, use any of these methods:

Choose Edit
Select the message in the Inbox, and press Del.
Control+click a message in the Inbox, and choose Delete Message.
In the message window, click the Delete button in the toolbar.
To remove more than one message from the Inbox, you can select multiple messages and apply a deletion method. Simply click the first message in the group you want to delete, press and hold the Shift key, and click the last message in the group. Entourage highlights the messages. To select non-contiguous messages, press and hold
To permanently delete messages from the Deleted Items folder, use any of these methods:
Control+click the Deleted Items folder name in the Folders List pane, and choose Empty Deleted Items from the pop-up menu.
Choose Tools
Open the Deleted Items folder, select the message you want to delete, and click the Delete button. Entourage asks you to confirm the deletion.
You can quickly print any message you receive. To do so, select the message in the Inbox and choose File
If you're viewing a message in its message window you can activate the Print button and print the message directly without opening the Print dialog box. Just click the Print button on the window's toolbar. If you do want to open the Print dialog box, click the Print button's arrow icon and choose Print.
You can organize your messages by filing them away. You can do this by storing them in unique folders. By default, all incoming messages are stored in the Inbox folder until you do something else with the messages. Also by default, Entourage is set up with two preset folders you can use for messages you don't want to keep or messages you don't want to look at right away: the Deleted Items folder and the Junk E-mail folder. In addition to these folders, you can add other folders and subfolders to help you manage your e-mail. To create a new folder, choose File

Use any of these methods to file your messages:
You can quickly drag a message from the Inbox and drop it into any folder in the Folders List pane.
Select the message in the Inbox, and choose Message
Control+click a message, choose Move To
To make a copy of the message and place the copy in a folder, press and hold Option while dragging the message. The original message stays where you found it, and a copy of the message appears in the folder where you dropped it.
You can add and delete folders as needed, as well as any messages within the folders.
You can turn on Entourage's Junk Mail Filter to help you reduce the amount of junk e-mail—also known as spam—you receive in your Inbox. This feature scans incoming messages for material typically associated with spam. Any violators it finds are processed into the Junk E-mail folder. You can examine the messages later and decide whether they're worth reading. It also blocks embedded pictures.
To turn on the Junk Mail Filter, choose Tools
None: This option provides no junk e-mail protection.
Low: This option catches only the most obvious spam e-mails.
High: This option catches most spam, but sometimes legitimate messages are caught as well.
Exclusive: This option delivers messages only from people in your Address Book, safe domains listed in the Safe Domains list, or addresses from the Mailing List Manager. All other messages are routed to the Junk E-Mail folder.

By default, the Junk filter is set to Low protection. You can choose to set a higher level of protection or turn the feature off entirely.
The Safe Domains tab, shown in Figure 25.33, lets you list all the domain names you trust for e-mail, such as your company's Web site, your banking institution, and so on. The domain name is always the part of an e-mail address that follows the @ sign. Just type in the domain name in the Safe Domains list box, and if you're adding more than one, separate them with commas.
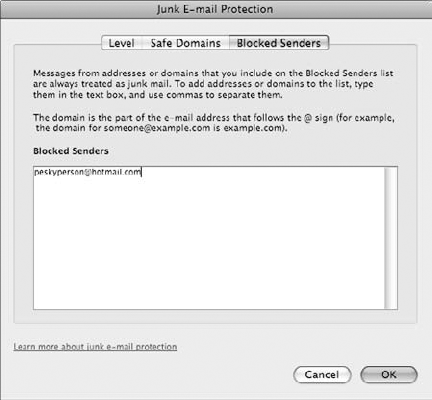
The Blocked Senders tab, shown in Figure 25.34, lets you block e-mail messages. You can compile and maintain a list of specific addresses you do not want to receive e-mails from and make sure they are filtered into the Junk E-mail folder instead of the Inbox. As in the Safe Domains list box, just type the e-mail address. When adding more than one, be sure to separate them with commas.
You also can block a sender from the Inbox. Select the message you want to block from future e-mails, and choose Message

You can mark your messages in the Inbox as read, unread, or junk. The marking tools are helpful in keeping track of which messages you've dealt with already and which ones you need to revisit again. Figure 25.35 shows a typical Inbox with both read and unread messages. You can label a message as junk and send it to the Junk E-mail folder. To mark a message, use any of these methods:
To mark a message as read, choose Message
To mark a message as unread, choose Message
To mark all messages as read, choose Message

To mark a message in the Junk E-mail folder as non-junk, choose Message

You can set up message rules to help you govern your e-mail messages. Message rules are simply filters you can apply to help sort and deal with your e-mails. For example, as you learned in the preceding section, you can set up a message rule to create an automatic response to any e-mail message you receive. By their very nature, rules or filters help you to file, answer, or remove e-mail messages based on their contents, subjects, senders, or sizes. Entourage's message rules are like having a personal secretary to sort through your mail. Message rules sort through your e-mails to organize them just the way you want, whether that means tossing out unwanted e-mail or filing company messages in a particular folder.
You can set up rules for any of your e-mail accounts and newsgroups. To set up a message rule, follow these steps:
Click Tools
The Rules window opens, as shown in Figure 25.36.
If you're setting a specific type of rule based on a message, select the message first before opening the window. This fills in some pertinent information for you.
Click the account type tab to which you want to write a rule.
Click the New button.
The Edit Rule dialog box opens, as shown in Figure 25.37.
Type a name for the rule in the Rule name field.
Under the If settings, specify how you want Entourage to select messages to process.
For example, if you want Entourage to filter out messages from a particular person or company, click the Criterion button and use the From and Contains pop-up fields to specify an e-mail address.
You can change the All messages pop-up field to specify another message aspect, such as content in the message body or e-mail size.
Under the Then settings, specify how you want Entourage to proceed when a message meets your If criteria.
For example, if you want Entourage to move messages from your financial firm to a special folder, you can click the Change status pop-up field and choose Move message, and then in the second pop-up field, specify where you want the messages placed, such as a different folder.
Click OK to exit the Edit Rule window.
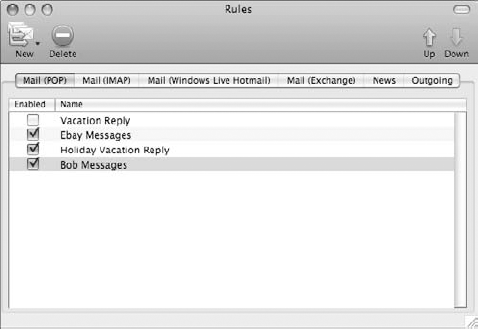
Entourage adds the rule to the list box, as shown in Figure 25.38. Leave the Enabled check box selected to turn the rule on now, or deselect the check box to turn the rule off until you need it later.
Close the Rule window when finished.

Entourage processes message rules based on their order in the Rules window list box. You can change the order around, if needed, using the Up and Down buttons in the upper-right corner of the window. You also can delete rules you no longer need; select the rule, and click the Delete button.
You can link your Entourage e-mail messages to other Entourage features, such as a calendar event or a note. If you link to a calendar event, for example, Entourage adds a link in the calendar day that, when clicked, takes you to the related e-mail message. Entourage actually does linking automatically for some tasks, such as linking a message replay to the original message to provide a message history.
You can link messages in three ways:
Open Links: This command opens the Links window, and you can create or remove links to new items or existing items, as well as open the item at the other end of the link.
Link to Existing: This command creates a link to an existing Entourage item.
Link to New: This command creates a link to a new Entourage item.

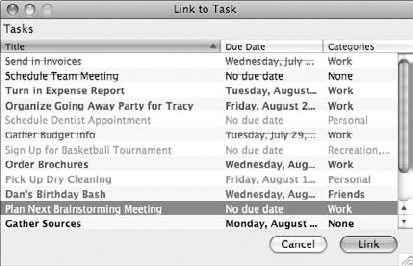
To link a message to an existing item directly, select the message in the Inbox, choose Tools
To link a message to a new item entirely, select the message in the Inbox, choose Tools
File attachments are files that come with e-mail messages. When you attach a file to an outgoing message, the file is uploaded to the server along with your e-mail. If someone sends you an attachment, you can download it onto your computer along with the message. File attachments are useful for sending along any kind of data that won't fit into an ordinary e-mail message. For example, you can send documents, spreadsheets, photographs, or sound files as attachments. File attachments take much longer to download. That's because they're usually much larger in size than the e-mail message itself.
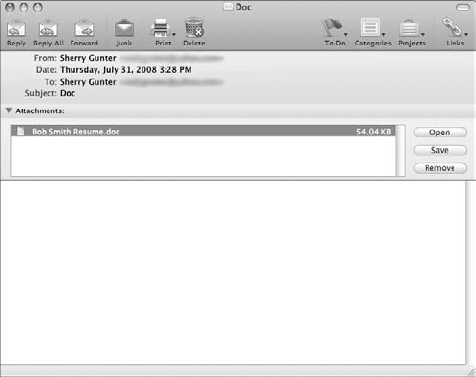
In your Inbox, messages including file attachments are marked with a tiny paper clip icon. When you open a message window that includes an attachment, the attachment appears in its own field, as shown in Figure 25.41.
You can select the attachment and perform one of these actions:
Open: This command opens the attachment. If there's a corresponding program on your computer to view the file, it opens the file. You also can activate this option by simply double-clicking the file attachment name.
Save: This command saves the attachment to a designated folder or drive.
Remove: This command detaches the file and discards it.
You also can drag an attached file from the message window and drop it on the desktop or into another folder. From the Inbox view, Control+click a message with an attachment and choose Save Attachment from the pop-up menu. In addition, the Message menu offers a few attachment-related commands you can apply to a selected message in your Inbox: Save All Attachments, Remove All Attachments, or Remove Unsafe Attachments.
It's incredibly easy to attach a file to an e-mail message. Follow these steps to do so:

This opens the Choose Attachment dialog box, as shown in Figure 25.42.
Navigate to the file (or files) you want to attach, and select the filename.
Click Open.
Entourage adds the file to your message, as shown in Figure 25.43.
Finish composing your message and send it on its way.


You can use Entourage's Address Book feature to keep track of your contacts. A contact is usually a person, but sometimes a company. Acting like an electronic Rolodex, the Address Book lets you enter contact information such as names, phone numbers, addresses, and e-mail. After you've entered a contact, that person's information is always at your fingertips. For example, if you start a new e-mail message and type the first few letters of the person's name or e-mail address, Entourage pops open a tiny window of possible matches from your Address Book, and you can make your selection without needing to type the whole thing. This section explains how to add contacts and use the Address Book features.
As shown in Figure 25.44, the Address Book's appearance closely resembles the Mail feature. Contacts appear in a list. Each column in the Address Book's main list pane tells something about the contact. The field headings at the top of the list describe each field in the contact entry.
To switch to the Address Book, you can use any of these methods:

The main Address Book view displays three main panes: the Folders List pane, the mini calendar pane, and the main list pane for viewing contacts. The Address Book folder displays by default when you click the Address Book button. When you select a contact, the Preview Pane opens. This lower portion of the Address Book displays a detailed view of the contact's information, as shown in Figure 25.45.
The little icons next to the groups of information can do some pretty interesting things. Which icons appear in the Preview Pane depend on what information you've entered about the contact. For example, if you click the icon next to address information, a pop-up menu appears with options for showing the address on a map, gathering driving directions from home or work, or copying the name and address to the Clipboard so you can insert it somewhere else, like in a Word letter.

Here's a run-down of what each icon can do:
Address Actions: Displays a pop-up menu with options for finding the address on a map, getting driving directions, or copying the info to the Clipboard.
Open Web Page: Opens the associated Web page you entered for the contact.
Magnify Phone Number: Displays a special magnified view box of the phone number, which is helpful if you're ready to make a call to the contact.
Send Mail: Creates a new e-mail message addressed to the contact.
Add to Calendar: Creates a new calendar event based on the contact's birthday or anniversary.
You can toggle the Preview Pane off or on by choosing View
You can easily add contacts using the Create Contact form, a special dialog box with all kinds of fields for potential contact information, such as name and e-mail data, phone numbers, address, and more. The Create Contact form is an abbreviated form. You also can open the full-blown Contact window and find even more data fields you can fill in, such as birthday or anniversary dates, hobbies and interests, or even a field to add a photo of the contact. The Contact window offers seven different tabs full of data fields. Here's what you can find in each tab:
Summary: Displays all the information about a contact.
Name & E-mail: Displays fields for entering name and e-mail information, including multiple e-mails addresses, titles, nicknames, and so on. If a contact has multiple e-mail addresses, you can pick one to use as the default address.
Home: Displays fields for entering a home address, telephone information, and Web page information.
Work: Displays fields for entering a work address, telephone information, and Web page information.
Personal: Displays fields for entering personal information, such as birth date, anniversary, spouse and children names, even a photo.
Other: Displays a large field for entering note information about the contact.
Certificates: Displays any encryption certificates for the contact.
Many of the tabs in the Contact window include customizing fields for storing additional information about the contact. The toolbar at the top of the window includes buttons for e-mailing, inviting, and chatting with the contact using Microsoft Messenger. The toolbar also has buttons for flagging a contact or assigning a category, project, or link.
To add a contact to your Address Book, follow these steps:

The Create Contact form opens, as shown in Figure 25.46.
Fill in the pertinent contact fields as needed.
Optionally, you can assign the contact to a category or project using the Categories or Projects buttons.
Click the More button.
Entourage opens the full Contact window, as shown in Figure 25.47.
Click the tab you want to view, and fill in any additional information as needed.
Press
Close the window to return to the Address Book.
Entourage adds the contact to your Address Book list.


After you start adding contacts to your Address Book, you can work with them in various ways. Use any of these techniques:
To make changes to an existing contact, double-click the contact name in the Address Book list pane to open the Contact window.
You also can Control+click a contact and choose Open Contact.
To remove a contact you no longer need, select it in the list pane and click the Delete button on the toolbar or press Delete. Entourage displays a warning box asking if you really want to delete the contact; click Delete.
To e-mail a contact, select the name and click the E-mail button on the Standard toolbar to open a message window with the contact's e-mail address already filled in and ready to go.
To send a contact an instant message, select the contact name and click the Chat button.
To flag a contact and create a To Do list item, select the contact, click the To Do button, and choose a flag. Entourage immediately adds the contact to your To Do list.
To print a contact, select it and choose File
To view your Address Book while creating a new e-mail message, just click the Address Book button, as shown in Figure 25.48. From the Address pop-up window, double-click the name to add it to the To: field.

You can use groups to manage related contacts in your Address Book. For example, you may group family members into one group and work associates into another. This makes it easy to send a group e-mail message to everyone in the group without having to enter each e-mail address individually. You can create as many groups as you like in the Address Book, and your contacts can appear in more than one group.
To create a group of related contacts, follow these steps:
Select the contacts you want to group; to select multiple contacts, press and hold the
Choose File
Entourage opens the Group window, as shown in Figure 25.49.
Type a name for the group in the Group name box.
Optionally, you can click the Add button to add more names to the group or click the Remove button to remove a name from the list.
You also can add names to the group list by dragging them from the Address Book list pane and dropping them in the Group window.
Press
Close the window to return to the Address Book.
Entourage adds the group to the list pane.

To address an e-mail message to a group, click the Address Book button in the Address pop-up window that appears when you create a new e-mail message. Navigate to the group name, and select it to add it to the To: field.
You can import your contacts database from other sources to use in Entourage, as well as import any vCards people send you. vCards are the electronic version of a business card, containing pertinent information about the person. Some users include vCards with their e-mail messages. If you receive such a file attachment, you can add it to your Address Book. Entourage turns the information into a contact.
One way to import contacts is to use the Import Assistant. Choose File
You also can export your Address Book to another program or archive file. Choose File
Newsgroups are Internet bulletin boards you can subscribe to and read the messages posted on the group. You can read these messages just like e-mail messages using Entourage Mail. Dating back to the 80s, newsgroups have been around a long time, and there's a group for every possible topic under the sun, from the weird to the mundane. Today, newsgroups don't always have a great reputation. Many of the groups, specifically groups in the ALT category, are known for distributing pirated software, music, and video files, as well as other disreputable things. Many Web servers won't let you connect to newsgroups for this reason. You'll need to check with your Internet Service Provider to find out what's allowed and what's not. The good news is that lots of useful information can be found in newsgroups, including tons of information about computers and programs.
In order to access newsgroups, you need a news account. Your ISP may already offer such services. If not, you might try finding a news service on the Web. To set up a news account in Entourage, follow these steps:
Choose Tools
Entourage opens the Accounts window, shown in Figure 25.50.
Click the New arrow button, and choose News from the pop-up menu.
The Account Setup Assistant opens, as shown in Figure 25.51.
Click the Mail account pop-up menu, and select which account you want to use to post your newsgroup messages.
Optionally, type your organization in the Organization box.
Click the right arrow button to continue.
Type the address of the news server, as shown in Figure 25.52. You may need to check with your ISP to find out this information.
Optionally, if the account requires an ID and password, click the My news server requires me to log on check box and fill in the appropriate information.
Click the right arrow button to continue.
Type a name for the account in the Account name box, as shown in Figure 25.53.
Click the Finish button.
Entourage adds the new account to the Accounts window in the News tab.


You can access your news account through the Folders List pane in the Mail window. Simply click the newsgroup name. The first time you do, a prompt box appears, as shown in Figure 25.54, asking if you want to receive a list of newsgroups from the selected server. Click the Receive button, and then stand back and wait for the list of newsgroups to download. This process may take a few moments.
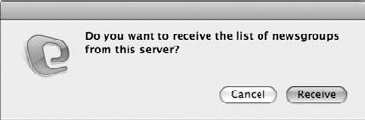
Figure 25.54. When you first open your news server, Entourage asks if you want to download the newsgroups.
When the download is complete, the Mail window shows a list of newsgroups, as shown in Figure 25.55. In this example, the newsgroups are all dedicated to the subject of Microsoft. You can scroll through the list of newsgroups until you find one that interests you.
You may have so many newsgroups to choose from that it's overwhelming. To help you narrow your search, type a keyword in the Display newsgroups containing text box, located in the upper-right corner of the list pane, as shown in Figure 25.56. In this figure, I'm narrowing down the newsgroups to show only those related to Entourage. As soon as you type the keyword, the list is sorted, and any matches appear.
When you find a newsgroup you'd like to investigate, double-click the newsgroup name. Entourage then displays the individual messages in the group in a separate window.


To view any message in the group, simply double-click the message. Entourage opens the message in its own message window, just like your e-mail messages. Figure 25.57 shows an example. Like e-mail messages, you can choose to reply to the message, forward the message, print it out, and so forth. Also like e-mail messages, after you download messages from a group, you need to decide what to do with them. This is where your deletion skills really come in handy. You can use the same deletion techniques for deleting e-mail to delete newsgroup messages. You can close the newsgroup list pane to return to the main Mail window.

Meanwhile, back in the Mail window, here are a few tasks you can perform with your newsgroups list:
You can choose to subscribe to a newsgroup to get regular updated messages downloaded into your list pane. To do so, click the newsgroup name and click the Subscribe button.
You can easily unsubscribe again using the Unsubscribe button.
Anytime you want to update the newsgroup listings, click the Refresh button.
To return to your regular Inbox view, click the Inbox folder in the Folders List pane.
In this chapter, you learned how to use both the Mail and Address Book tools in Entourage. I showed you how to create a new e-mail account using the same Setup Assistant you learned about in Chapter 24. You also learned the ins and outs of using e-mail. You learned how to send and receive e-mails, view and flag messages, set up automatic replies, and forward and reply to messages. You saw how easy it is to manage your messages by deleting and filing messages and sorting out junk e-mail. You also learned how to add signatures to your messages and work with file attachments.
This chapter also showed you how to use the Address Book to keep track of contacts in your personal and work life. You learned how to build a list of people and contact information and then use that same information to create e-mails, calendar events, and To Do tasks.
Lastly, you learned how to use the Mail tool to subscribe to Internet newsgroups, specialized groups focusing on a specific topic.