
IN THIS CHAPTER
Understanding HTML
Previewing Web content
Turning Office data into Web pages
Adding hyperlinks
The vast World Wide Web is a growing source of information—and sometimes misinformation. The amount of content available on the Web today is staggering, with more being added each day. For serious Web design, you need a specialized program, such as Dreamweaver or iWeb. However, for some simple Web content, you can turn any Microsoft Office document, spreadsheet, presentation, or calendar into a Web page that can be posted online.
In this chapter, you learn how to create simple Web pages and sites.
Before you start creating Web pages, you might as well know what they're made of. HTML, which stands for Hypertext Markup Language, is the language you use to create documents comprised of text and coding that instruct a Web browser, such as Safari or Firefox, how to display the data. HTML documents are easily identified by their .html or.htm file extension. Because any browser can read an HTML document, you do not need a special platform to view the information. As a scripting language, HTML coding consists of tags, which are the individual instructions to the browser. Tags are surrounded by angle brackets, < >. HTML rules, called syntax, govern the way in which code is written. The most recent version of HTML is 4.01. This version allows for separate formatting instructions called cascading style sheets (CSS) and other presentation controls. By moving all the formatting controls to style sheets, HTML 4.01 frees up the Web developer to assign formatting not only to paragraphs of text, but also to the entire page or every page on a Web site. Moving all the formatting coding to a separate style sheet lets you more easily maintain other coding on the HTML document.
The World Wide Web Consortium, or W3C for short, is the governing body for setting HTML standards. This international group consists of the Web's founders and industry leaders, including companies like Microsoft. Web developers look to the W3C to establish standards and introduce new Web technologies. The W3C is responsible for maintaining and guiding all HTML standards. Not long ago, the W3C saw the need to an additional structure for HTML documents, so it introduced XML (Extensible Markup Language). XML is a meta-markup language for creating other languages; however, it is not as lenient as HTML, so the W3C rewrote HTML in XML and called it XHTML. XHTML has all the features of HTML but gains XML's power and flexibility. Although XHTML is technically an XML application, it closely copies much of HTML, so much so that many people view XHTML as a stricter version of HTML. With XHTML, the syntax is much stricter and the order of tags is strictly enforced. The XHMTL coding also requires all lowercase letters. The future of HTML lies in XHTML, but because so many pages are written in HTML and browser support is more common for HTML, HTML documents are not likely to go away for quite some time. If you do learn how to script in HTML, transitioning to XHTML is relatively easy, requiring only a dedication to detail when writing well-formed code.
Well, that was probably more than you wanted to know about HTML. What you really want to know is how to turn your Office documents into Web pages. The good news is that you don't have to know how to write HTML to make Web pages. For example, if you save a Word file as a Web page, Word takes care of the conversion process to turn your text into HTML. However, if you've created a complex document, the results may not turn out the way you want. Word tries to match the formatting with the closest equivalent Web formatting, but some text effects do not translate well. If your document is fairly simple in formatting and layout, the transition should be painless.
Of all the Office programs, Word is the most likely choice for creating Web pages, mainly because Web pages are content-based, which usually means text. So if you're just interested in whipping out a few content pages for the Web, you can use Word without many problems. You also can turn Excel data, PowerPoint slides, or an Entourage calendar into a Web page. Just remember, most Web developers will turn up their noses at your Office-content-turned-into-Web-pages. Why? When you convert an Office file into a Web page, gobs of behind-the-scenes coding and unnecessary computer instructions are included in the file. Why is this a problem, you might ask? Because it makes the pages slower to download into a browser window. In addition, the layout and formatting often don't translate well. As you know, the Internet is all about speed, so when you slow things down, it's frowned upon. If, however, you need to create a simple page, Office 2008 has the technology to do so.
If you get really serious about creating Web pages, your best bet is a proper Web-authoring program, such as Dreamweaver, GoLive, or RapidWeaver. But I'll leave that for another book to explain to you.
If you're creating a Web page from scratch, Word is the best application for the job. You can utilize a variety of Web page templates and themes or create your own from scratch. You also can turn an Excel worksheet into a Web page. This might be useful if you've got some important data or a chart you want to include on the company Web site, for example. You can do the same with a slide from a PowerPoint presentation. The only feature in Entourage that makes a good Web page is the Calendar tool. You can turn any day, week, or month into a Web page for posting. You might do this to share your schedule on the Web if you're doing a tour or traveling exhibition, or something along those lines. Remarkably, the process for turning any Office material into a Web page is the same in each program. You also can use the same previewing feature before committing your content into HTML format. The remaining sections show you how.
You can preview your HTML content before saving it to a file. Previewing can help you catch anything that needs to be changed first, especially before uploading the file to a server for Web display. Plus, if you've slaved over the process of creating a document that's Web-worthy, you most certainly want to preview how it will look in a browser before saving the file.
If you're using Word to create a Web page, you can use Word's Web Layout view to see what your page looks like. None of the other Office programs have a Web Layout view, just Word. Web Layout view is not one of the regular view buttons in the bottom-left corner. To access the feature, you must use the View menu; choose View
If you'd rather use the real thing, you can activate the program's Web Page Preview command to get a quick peek at your work in your default Web browser. The Web Page Preview command is available in all the Office programs. To preview a document, choose File
Now that you've previewed the file, are you ready to turn it into a Web page? The process is as easy as saving any other Office file. In fact, the steps are the same in any program. Simply open the document, workbook, or presentation you want to turn into a Web page, or in the case of Entourage, the calendar view you want to turn into an HTML document. When you turn your Office content into a Web page, any pages in the file become Web pages. So if a slide show is ten slides long, the Save As Web Page command generates ten HTML pages, one for each slide. With this in mind, you definitely want to add some hyperlinks to link the pages and allow users to move back and forth between the content. Learn about adding hyperlinks later in this chapter.
Follow these steps to save your Office content as a Web page:
Choose File
Save as Web Page.
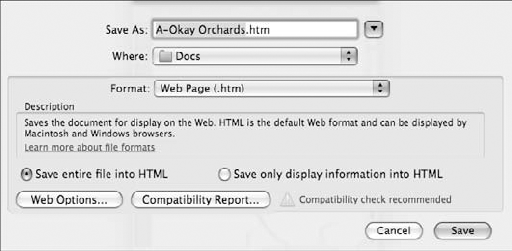
The Save As Web Page dialog box opens, as shown in Figure 31.2.
Type a name for the page in the Save As text box.
The .htm file extension is automatically added for you.
Optionally, use the Where pop-up menu to save the file in another folder or drive.
Click the Save entire file into HTML radio button.
This option stores the file information for display on the Web and for display in Word. In the case of Word, this means that all the word processor elements, like headers and footers or page numbers, reappear when you open the document file in the Word program window again.
If you select the Save only display information into HTML radio button, only the attributes viewable in a Web page are saved with the file. Word processor elements, like headers and footers, are not saved with the file. This option is good if you want a more compact file for downloading on the Web.
Optionally, you can run the Compatibility Report feature if you're going to share the file with other users. It's not really necessary for creating a Web page.
Click Save.
The file is saved as a Web page.
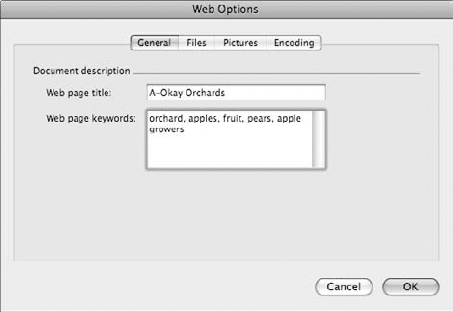
If you click the Options button in the Save As Web Page dialog box, the Web Options dialog box opens, as shown in Figure 31.3. This dialog box has four tabs of options: General, Files, Pictures, and Encoding. You can find fields for setting a page title and search engine keywords in the General tab. The Files tab has options for saving, which are essentially the same as the two radio buttons in the Save As Web Page dialog box. The Pictures tab has options for enabling PNG as the output format for your document's pictures. PNG is a universal Web page format for image files. The Pictures tab also has an option for setting the target monitor's screen size. Most users have their screens set to 1024×768, so this size is the default setting unless you choose another. Lastly, the Encoding tab lets you save the file in a foreign language browser format.
After you've created a Web page, you need to upload it to a hosting server so others can view your content. If you already have a Web site up and running, you probably know how to do this. If you're new to Web servers and hosts, you need to do some more research to find a site that will let you have some space to store your page and give it a URL others can find. Your Internet Service Provider (ISP) might offer such space, or you can sometimes find free hosting servers online. For a fee of $100 a year, you can have 10GB of Web storage space on your iDisk; see www.mac.com for more details.
Hyperlinks, called links for short, are the links that allow you to jump from one HTML document to another. Links also can take you to movie clips, audio clips, and downloading activities. You also can link to e-mail addresses. Hyperlinks also have a use outside of Web pages. For example, you might use a hyperlink in a long document to jump to the end of the same document, or you might include a hyperlink that takes you to another file or folder on your computer. For the sake of this chapter's discussion, we're talking about links that help users navigate Web pages.
Hyperlinks are typically text and appear as blue underlined words or phrases on a Web page. Hyperlinks also can be graphical elements, such as buttons, shapes, icons, clip art, photos, or anything else that can be clicked in a Web page.
To add a hyperlink to a document, worksheet, or slide, use the Insert Hyperlink dialog box, shown in Figure 31.4. This dialog box features three tabs for each type of hyperlink you can create: Web Page, Document, and E-mail Address. For this task, we're focusing on the Web Page tab. When this tab is displayed, the very top of the dialog box shows fields for specifying the link's URL and the text to use for the link. If you've selected existing text to use as a hyperlink, it appears in the Display field. You can type different text, if desired. The Link to field is where you type the full URL for the Web page you want to link to. You don't need to type the http://prefix; the Office program inserts that automatically for you.
URL stands for Uniform Resource Locator, in case you were wondering. Basically, it's an exact address or "resource" of a page on the Internet. Every page on the Web has an address. A URL typically contains a domain name or host name, which is the name of the server on which the resource is located. The name also may include a filename or other anchor reference to help identify a specific location for the file.

Follow these steps to insert a Web page hyperlink into a document, worksheet cell, or slide:
Choose Insert
The Insert Hyperlink dialog box opens (refer to Figure 31.4).
Click the Web Page tab if it's not displayed already.
Click in the Link to field, and type in the URL for the Web page to which you want to link.
Click in the Display field, and type the text you want to use as your link text.
If you select the text in the document, worksheet cell, or slide before opening the dialog box, the Display field shows the selected text.
Optionally, if you want the link to include a ScreenTip identifying it when the user moves the mouse pointer over the link, click the ScreenTip button and type some identifying text.
Click OK.
The hyperlink is created in your document, worksheet cell, or slide. Figure 31.5 shows an example of a hyperlink in a Word document.
Note
The Insert Hyperlink dialog box also has a setting for specifying an anchor point within a Web page to link to. The page must have HTML anchor tags or bookmarks in order for this feature to work.
If you can't remember the exact URL you want to link to, you can always drag it into your document, worksheet cell, or slide. Just open your browser, navigate to the page, select the URL, and drag it into the document, worksheet, or slide. This creates an instant link.

In this chapter, you learned a little about how HTML documents work and how you can use Office to create your own Web page content. If you ever wanted to create Web pages, Word's the way to go to fully utilize all the text-based tools for creating content. You won't find the same features in Excel, PowerPoint, or Entourage. Obviously, it's far better to use a proper Web page design program for making Web pages, but Word can be a handy substitute for creating simple pages.
If you create any content for the Web, whether it's a document, worksheet, slide, or calendar, you should always preview it first and make sure it looks okay. You can use the Web Page Preview feature to quickly view your work in the default Web browser window. You also learned how to add hyperlinks to other Web pages in your documents, worksheet cells, or slides.