
IN THIS CHAPTER
Setting up Messenger
Adding contacts
Sending messages
Sending files
E-mailing others
Microsoft Messenger is a communications resource you can use for instant messaging, file transfers, e-mailing, and more. As a counterpart to Windows Live Messenger, Microsoft Messenger for Mac lets you chat instantly with other users across platforms. You can chat with people using other messaging services, such as Yahoo! Messenger, AOL Instant Messenger, and iChat. Messenger is the perfect tool to connect live with friends, family, and coworkers in a variety of ways.
Connecting people live is a boon for companies, and it's great for personal use as well. For example, your office can conduct a live video conference with another office across the country, or your project team can talk live with each other from spots around the globe while you all examine the same document. Not only can you chat live, you can also use Messenger to swap Office documents, including Word reports, Excel charts, and PowerPoint slide shows.
In this chapter, you learn how to get started with Messenger by jumping through the setup steps to create an account. After you've established an account, you learn how to add contacts, send instant messages, send files, e-mail contacts, and tweak the preferences a bit to customize the program. This chapter focuses on using Messenger for personal messaging rather than corporate messaging; however, the techniques are the same in either setup.
The Microsoft Messenger application comes with the Microsoft Office 2008 for Mac suite, regardless of which version you purchased. You probably installed it when you installed the other programs. If you didn't, you can go back and install it now that you need it. Revisit Chapter 2 to learn more about installing programs. Before you start using Messenger, you need to walk through the program's setup feature.
Messenger offers two types of accounts: personal and corporate. You can create one or both. If you choose a personal account, you need to establish a Windows Live ID. The personal account works with the Windows Live Messenger service, connecting you to friends and family in your contacts list. You can sign up for a free Windows Live ID account. All you need is your e-mail address and a password. You can use a personal account to participate in instant message conversations with other users who also have instant messaging services.
If you choose a corporate account, it uses the Microsoft Office Live Communications Server service. You can use the corporate account to connect with colleagues in the same company or with associates in other locations. Like the personal account, you can chat instantly with users who have instant messaging services. When creating this type of account, you need to enter a User ID and password supplied by your network administrator.
In either case, you also need an Internet connection in order to connect with the outside world via Microsoft Messenger.
Follow these steps to walk through the setup process the first time you use Messenger:
Open Messenger.
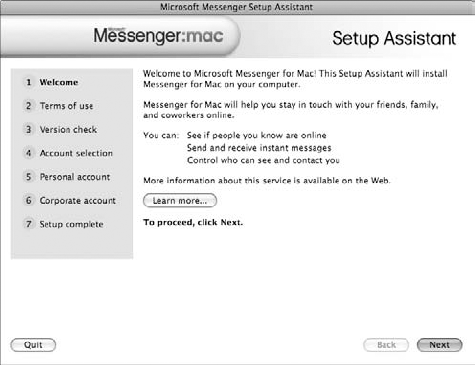
You can open Messenger from the Dock or use Finder to navigate to the program among the Microsoft Office applications. The Microsoft Messenger Setup Assistant opens, as shown in Figure 32.1.
Click the Next button to continue.
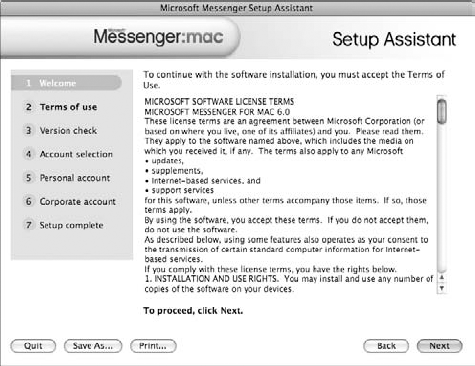
The next screen, shown in Figure 32.2, lists the Terms of Use. Click Next to continue.
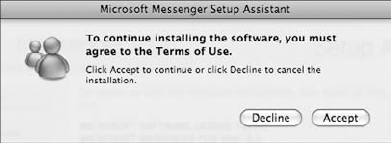
In the prompt box that appears, as shown in Figure 32.3, click Accept to accept the Terms of Use and continue.
Next, the Version Check screen appears, as shown in Figure 32.4, and the Setup Assistant searches for any previous versions of the software.
Click Next when Setup is done searching.
The Account Selection screen appears, as shown in Figure 32.5.
Choose which type of account you want to create: Personal or Corporate.
Click Next to continue.
Depending on which account type you selected, either the Personal Account or Corporate Account screen appears, as shown in Figure 32.6.
For a personal account, type your e-mail and password if you already have a Windows Live ID. If not, click the Create a Windows Live ID account button and follow the onscreen instructions.
Note
If you sign up for a new Windows Live ID account, keep in mind that extended characters, such as non-English characters, are not allowed for sign-in names or passwords.
Click Next to continue.
The last screen, shown in Figure 32.7, is the Setup Complete screen. This means you're at the end of the setup process.
Choose whether you want to include Messenger in the Dock or have it appear at startup.
Click Finish.


When you finish using Setup Assistant, the Messenger application opens, and you're ready to sign on and start communicating.
Note
You can have more than one account with Messenger. For example, you may want both a personal and corporate account, or you might need an account for friends and another for family. If you have more than one account, you need to choose which one to use when you log in using Messenger. To create a new account, choose Messenger
Whenever you're ready to start using Messenger, just open the program and log in using your Windows Live ID. After you install Messenger, an icon for the program is added to the Dock (if you selected that option when you stepped through Messenger's Setup Assistant). You also can launch Messenger using Finder; choose Finder
Regardless of how you launch the program, you always arrive at a Contacts window of some sort. The Personal Contacts window is the starting point if you have a personal account. If you set up a corporate account instead, the Corporate Contacts window is the starting point. Figure 32.8 shows the Personal Contacts window. If the Personal Contacts window does not appear automatically for you when you open Messenger, just choose View

Figure 32.8. The Personal Contacts or Corporate Contacts window is the default starting point for your Messenger session.
From the Personal Contacts or Corporate Contacts window, you can click the Sign In button to sign in; this opens the Microsoft Messenger sign in window, as shown in Figure 32.9. If you want to sign in using another account, click the Sign in with a different account or change your status online link.
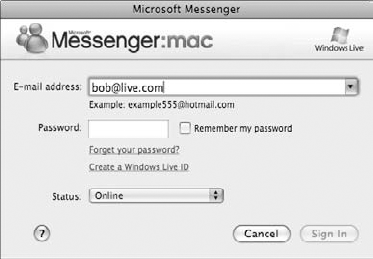
In the sign in window, type your e-mail address and the password you used to create your Windows Live ID account. If you check the Remember my password check box, you don't need to retype your password each time and can skip this dialog box entirely for your next session.
After you're logged in, the Personal Contacts window shows your status as Online next to your ID, as shown in Figure 32.10. The area below your ID info lists two categories: Online and Not Online. As you add friends, family, and coworkers to your contacts, the list shows who is online at the same time as you and who is not available.

Figure 32.10. When you're logged on, your Windows Live ID appears in the Personal Contacts or Corporate Contacts window.
Note
If for any reason you run into trouble signing in or need any assistance with Messenger, be sure to check out the Help files; choose Help
To sign out when you finish using Messenger, choose Network
You can visit Messenger's Preferences dialog box and change any of your start up options, including whether you want Messenger to start up as soon as you start your computer. To find your way to preferences, choose Messenger

You also can use the Preferences dialog box to add a new account; choose Messenger
After you log in with Messenger, you're ready to start communicating. As mentioned earlier, the Personal Contacts or Corporate Contacts window (depending on which type of account you're using) is the jumping off point for your online session. From this little window, you can communicate with the outside world via your computer.
The Personal Contacts window (and the Corporate Contacts window as well) has a toolbar of buttons at the top and a list pane in the middle detailing who is online and who is not. Between the two areas sits a place with your name, online status, display picture, and personal message. The name is your display name, which is what other people see when you chat with them. To change the name, simply double-click the name and type another. To add a personal message, click the area where it says "Type a personal message," and type a message. You learn about changing your display picture and online status later in this chapter. For now, let's get right to those toolbar buttons you're dying to know about.
The buttons at the top of the window are the stalwart commands for communicating with Messenger. Table 32.1 explains what you can do with each button.
Table 32.1. Contacts Window Buttons
Button | Name | Description |
|---|---|---|
Add | Click this button to add a contact. | |
Send | Click this button to start chatting with someone from your contacts list online. | |
Send File | Click this button to send a file to a contact. | |
Page | Set up a pager address using this command, and send messages to mobile devices. | |
Check your Windows Live Hotmail account using this command, and send and receive e-mail messages. |
Now that you know what the buttons do, you're probably ready to start communicating, right? Before you do, you need to establish who you're going to communicate with, and you do that by adding some contacts. The next section shows you how.
It's easy to add a contact to your Personal Contacts window. All you need is the person's e-mail address. Naturally, she needs to use an instant messaging service, too, such as AOL Instant Messenger (AIM), Yahoo! Messenger, or iChat. The nice thing about adding a contact is that you can invite her to sign up for instant messaging, if she doesn't have a service already.
To add a contact to Messenger, follow these steps:

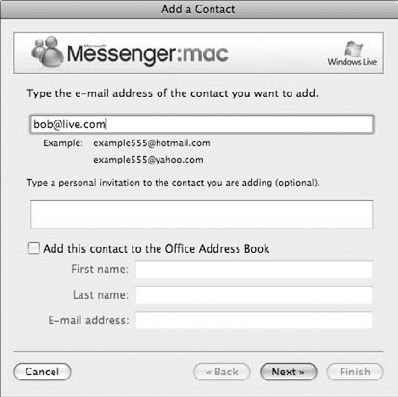
The Add a Contact dialog box opens, as shown in Figure 32.12.
Start by typing the person's e-mail address.
If you need to invite this person to join you on Messenger, you can type a brief invitation. This is optional, of course.
If you want to include the person in your Entourage Address Book, click the check box and fill out the person's name and e-mail address. When prompted, allow Entourage to start in order to complete the task of creating the contact.
Click Next to continue.
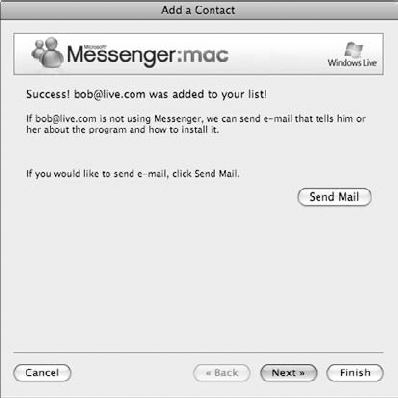
Messenger adds the person to your contacts list and offers to e-mail her, as shown in Figure 32.13.
Optionally, you can click the Send Mail button to fire off an e-mail telling her how to download MSN Messenger.
If you're not e-mailing, just click Next to continue.
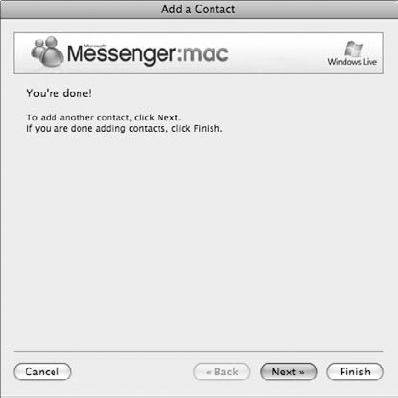
The last Add a Contact screen appears, as shown in Figure 32.14.
Click Finish if you're finished; to keep adding contacts, click Next and repeat the steps again.
When you finish adding a contact, the contact appears in the Personal Contacts or Corporate Contacts window. If you want to remove a contact from the list, click the name and press Delete, or choose Contact
Note
If you want to stop someone from contacting you through Messenger, you need to block him; choose Contact
You can organize your contacts into groups in Messenger. For example, you may want to show family members together in one group, friends in another, and coworkers in yet another group. You can create your own groups to appear in the Personal Contacts or Corporate Contacts windows. To create a group, choose Contact
Messenger assigns a default picture to your profile, which you can view in the Personal Contacts or Corporate Contacts window or in the Conversation window when you're sending messages to others. You can change the default picture to something else. You can choose from a library of preset pictures or use one of your own pictures. Follow these steps:
Choose Messenger
Preferences.
The Preferences dialog box opens.
Click the Appearance icon.
The Appearance settings appear, as shown in Figure 32.15.
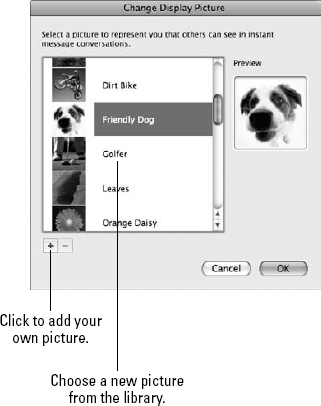
Under the Display Picture area, click the Change button.
The Change Display Picture dialog box appears, as shown in Figure 32.16.
Click the image you want to use.
To add your own, click the plus icon and choose a file.
Click OK.
You're back in the Preferences dialog box.
Optionally, you can turn off the picture display by deselecting the Allow others to see my display picture check box.
While chatting in an instant message window, Messenger puts the display picture in the window as well as in a drawer that slides out from the side of the window that shows larger versions of the image. To turn off the display, deselect the Show display pictures inside conversations check box. To turn off large pictures from others, deselect the Show large display pictures from others in a drawer check box.
Click OK again to exit the Preferences dialog box.

You can control your visibility online. Visibility is how others see you or don't see you in their Messenger windows. You also can change your status temporarily to show you're stepping away from the computer or going offline. To change the status, choose Network
Online
Busy
Be Right Back
Away
On the Phone
Out to Lunch
Appear Offline
You also can click the display picture in the Personal Contacts or Corporate Contacts window and choose a status setting from the pop-up menu, as shown in Figure 32.17.
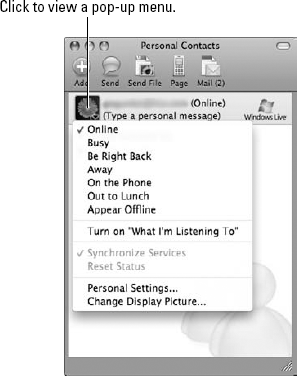
Whatever setting you choose is what others will see regarding your online status. The current status appears next to your username in the Personal Contacts or Corporate Contacts window, as well as any Conversation windows you have open.
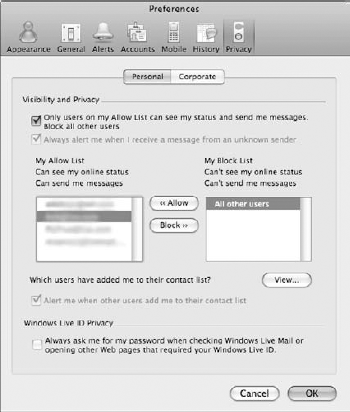
To change your visibility and privacy settings, you can use the Preferences dialog box. The privacy settings keep track of who you allow to see you online and who you've blocked. These people are managed on an Allow List and a Block List. By default, only users on your Allow list can see your status and communicate with you. Anyone on your blocked list can't see your status or send you messages. To view the lists and change settings, follow these steps:
Choose Messenger
Preferences.The Preferences dialog box opens.
Click the Privacy icon.
The Privacy settings appear, as shown in Figure 32.18.
Under the Visibility and Privacy area, choose how you want others to view your status:
To block a user, select his name and click the Block button. Messenger adds him to the My Block List.
To unblock a person, select his name and click the Allow button.
To see who has added you to his contact list, click the View button.
Click OK to exit the dialog box and save any changes you've made.
As you're looking at your Personal Contacts window or your Corporate Contacts window, you can quickly see who's online and who's not. You can expand and collapse the Online and Not Online headings to view more or less of your contacts list. Click the arrow button in front of the heading to expand or collapse the list. To send an instant message to anyone on the list, follow these steps:

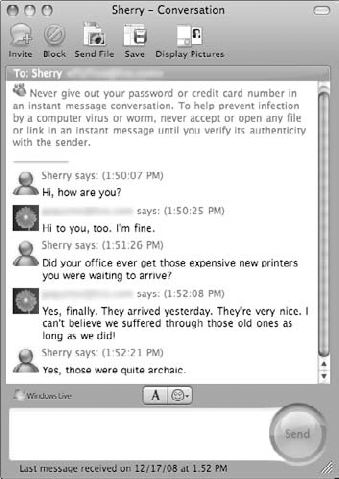
Click the name of the person to whom you want to send a message. You also can double-click the person's name.
Messenger opens a Conversation window, as shown in Figure 32.19.
The top of the window displays some important information about keeping you safe online, and the conversation takes place in the middle scrollable area.
To converse, type your text in the bottom field (refer to Figure 32.19).
Optionally, you can click the Font button to change the font used in your text.
Optionally, you also can click the Emoticon button to add emoticons to your text to express emotions.
Click Send.
The conversation appears in the scrollable pane, as shown in Figure 32.20.
What happens next is much like a tennis match, with conversation bouncing back and forth between both parties, each taking a turn to type and read, and type and read, and so forth.
When your conversation is over, click the window's Close button.

You also can change your status to show that you're stepping away from the computer or going offline. To change the status, choose Network


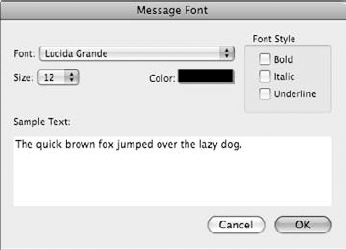
To set the text size in your conversation window, click the Font pop-up menu and choose another font size from the Message Font dialog box that appears, shown in Figure 32.21. You also can set a font, color, bold or italic, and see a preview of the font and size.
Click the Emoticon button to view a pop-up menu of emoticons you can insert into your conversation text, as shown in Figure 32.22. To view more emoticons, click the Show more emoticons ellipsis at the bottom of the pop-up menu. This opens the Emoticon dialog box, and you can add more from the list.

Microsoft Messenger automatically checks your spelling as you type. To ignore a misspelling, press Control+click the word and select Ignore Spelling. To add the word to the dictionary, select Learn Spelling. To turn off the feature entirely, choose Edit

To view a saved conversation, choose View


You can send a file to share with the person you're exchanging messages with. For example, if you're chatting with your mom, you can share the latest photo of her grandson, or if you're chatting with a colleague, you can send a document file. File size is always a concern when transferring data across the Internet. The bigger the file, the longer it takes. Photo files are notoriously large, so you might want to compress it as much as you can before ever attempting to send it. When you send a file, Messenger prompts each user about the transfer. The person receiving it must accept the transfer. After she does, the transfer commences in earnest. Sadly, you can't keep chatting while transferring; you just have to be patient and wait till it's done. After the transfer is complete, you can start chatting again.
To send a file, follow these steps:
Click the Send File button in the Personal Contacts or Corporate Contacts window, or click the Send File button in the Conversation window.
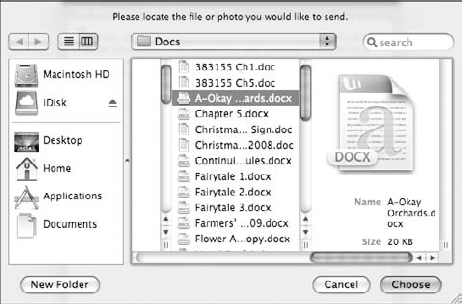
The Send File dialog box opens, as shown in Figure 32.23.
Navigate to the file you want to transfer, and click the filename.
Click Choose. You also can double-click the filename.
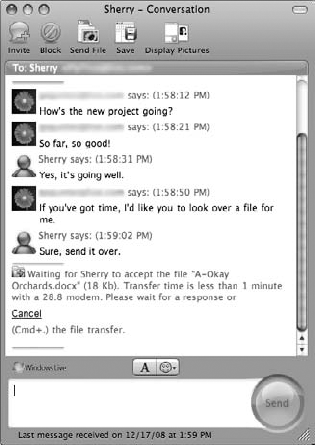
Messenger displays a message about the transfer, as shown in Figure 32.24.
As soon as the recipient accepts the transfer, the transfer begins. After the transfer is complete, Messenger lets both parties know, as shown in Figure 32.25.
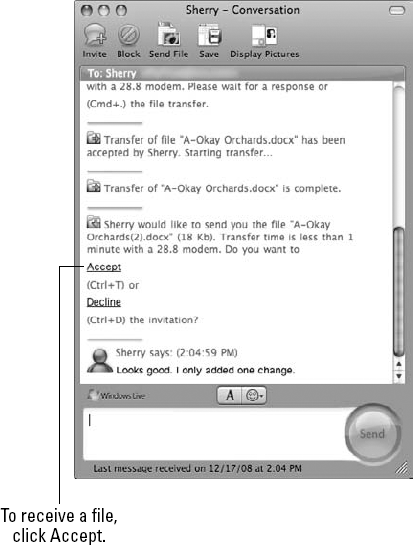
To receive a file, follow these steps:
When someone wants to send you a file, your conversation window looks like Figure 32.26. Click Accept to start the transfer.
A prompt box opens, as shown in Figure 32.27.
Click OK if you trust the source of the file. It's always a good idea to scan it with virus-protection software before opening the file.
The file is transferred. Depending on the size, it may take awhile.


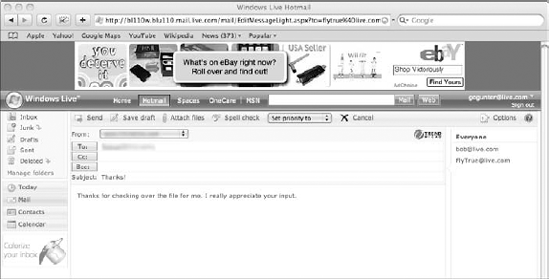
Ideally, Entourage is the way to go when it comes to managing e-mail. However, Messenger and Windows Live can help you e-mail, too. You can use MSN Hotmail on Windows Live to e-mail your contacts from Messenger. To turn any contact into an instant e-mail, simply click the contact name in the Personal Contacts or Corporate Contacts window. Next, choose Contact
To check your Hotmail e-mail account at any time, click the Mail button on the Personal Contacts or Corporate Contacts window. This takes you to the Web site again to check your inbox.
In this chapter, you learned how to set up Microsoft Messenger so you can start sending instant messages your friends, family, and colleagues. The setup procedure walks you through each step for creating account using Windows Live. You can create a free Windows Live ID to use with any of the Windows Live services, including Messenger. Armed with an e-mail address and a password, you're ready to go. You can create a free e-mail address to use through Windows Live.
After you jumped through the hoops for setting up the program, you learned how to add contacts to Messenger and chat live using a conversation window. You also learned how to swap files using the transfer feature and even send e-mail through the MSN Hotmail site. You also learned how to customize various aspects of Messenger to change how others view you online.