
CHAPTER 8
Indications of Speed and Directing Attention
Richard Lapidus
Rule: There is a change of direction when a force meets the character
Rule: Change up the speed of an action to give it more attention
After Completing This Chapter, You Will be Able To:
• Load motions onto a biped using Motion Mixer.
• Add and edit clips.
• Create transitions.
• Mix motion down onto a biped.
In traditional cell animation, there are two basic modes—straight ahead and pose to pose. One of the main concepts that I try to get across to my students when were working with a system like a biped, and this goes for any type of system including your own custom animated rig, is that there are certain limitations to how far you can animate your system without running into problems. The biggest one being that there are built-in dynamics and curves that control the movement and rotation of parts of your structure that will start working against you when you try to do too much with it. Here’s a good example of where someone might get into trouble with straight ahead animating a camera at the beginning of the process of creating their animation. I’ll see someone spend weeks creating a scene and animating it without any consideration of how it will be viewed through the camera. The person will finally place a camera in the scene and then, typical to straight ahead animation, will go and start moving it through the scene to catch all of the vital parts from start to finish. This is why in Chapter 1 I introduced you to the concept of the trajectory, so that you do start to think about how your objects are moving. In most animations, when you try to animate the camera all the way through the scene, flying around will create a number of positions where the camera moves too fast or too slow and you don’t really have good control over trying to display the action that is happening within your scene. If you’ve never had the opportunity to work on a production set, in your mind you may think a production is produced seamlessly. You may not be noticing that there are multiple shots and multiple cameras being edited together. Take a look at special features on your favorite DVD at home or go to one of the places that will now rent them or let you download them online, and you can really start to enjoy seeing the process of how a production is put together. The director will have the actors work through setting up the scene and run through the scene several times to figure out how to get the best position for the camera and the actors in the right place. They also have to consider the special effects, whether they’re done on site when the production is made or as is typical these days in postproduction with a software like 3ds MAX. It’s not that there’s anything wrong with straight ahead animation, it’s just that you have to be very proficient in anticipating how everything’s going to be moving in concert together to have it seamlessly flow together properly.
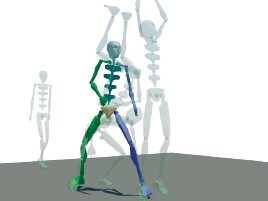
FIG 8.1
In the pose-to-pose animation process, the animator has a starting position that can be drawn from and an ending position to be drawn to. Effectively, the whole sequence of action has already been broken down into small pieces and in the pose to pose they’re basically now carving those small pieces that will then be edited together. Effectively what you want to be doing is breaking down your animation into those small pieces, animating those small segments, and saving amounts, so that then you can edit them back together.
The purpose of Motion Flow or Motion Mixer is basically to allow you to take your small animated sequences and edit them together. As we saw with the Motion Flow, this editing feature allows you to basically script out which bip files you want to have occur in a certain sequence and then also easily edit the transition between those sequences. The mixer basically does the same job except it shows you the information in a little bit different manner as we will see with bar graphs overlapping in time; but the mixer should go a little bit further in being able to apply additional parts of one animation within another and also being able to slow down or speed up the timing of your bip files with a time warp.
The thing to remember, which most new users to editing motion files find the most frustrating, is that the motion file remembers the position and rotation in 3d space that the files were created in. As I’m going to show you in this chapter, it’s very easy to reposition and also change the orientation of your biped files when doing your editing. As we saw in the first biped chapter, the size of your biped doesn’t really matter because the motion is targeted relative to the size of the biped that you’re adding it to.
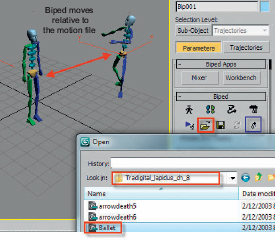
FIG 8.2
1. Create a biped and add a bip file to it. For this exercise, the two biped files that I’m going to use are the ballet and one of the arrows of death which ship with 3ds MAX. The arrows of death files were created by Red Eye Studio in Schaumburg, Illinois. These files are included with 3ds MAX when you do the full installation. You will find a wide variety of motion files in the Autodesk3dsmax 2011SamplesBip folder.
2. Load the Ballet.bip file onto your biped.
3. Scrub the timeline and you’ll notice that the biped takes a bow from about frame 114 to around 157 and then continues dancing up off. As you scrub the timeline, you’re going to notice that the character is on both feet at about frame 182. This is about where I want the next sequence to cut in.
Note
When loading motion files, the X, Y, and Z positions and rotation are saved in the bip file. Use the Move All Mode button as indicated in Fig. 8.2 by the Blue Rectangle outline box to open the Dialog.
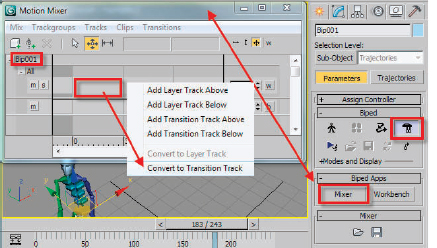
FIG 8.3
4. Enable the Motion Mixer in the Motion Panel for the biped and then also open the Motion Mixer Graphic Editor.
5. Notice how the Bip001 is already loaded into the Motion Mixer Dialog.
6. Right click the layer track and choose Convert to Transition Track.
Note
You’re not going to see that ballet bip file automatically in the track. I had you loaded up so that you could scrub through and pick up where you would want to have the transition happen and how much of the action you want from this file. Just because there’s animation in the file, it doesn’t mean you have to use the whole thing. There’s a nice little animation preview window in the Load File Dialog, which lets you scrub through your files to see the basic animation that’s in there, but I find it’s a little tough to really take your time and examine the file. If you forget to convert this to a transition track, only one file will show when you load and you’ll be missing the ability to load in another file to create a transition to.
7. Right click the track again and choose new clips from files. Add the ballet bip file.
8. Repeat and load a second biped file. In this case, I’ll use Arrow of death 3.bip. There is a nice preview window in the Load Dialog, which lets you scrub the file before loading.
9. This is probably a good point to save your file and also do edit hold.
Notice that the active time segment only fits the original bip file and not both of them. You will need to extend the active time segment, so that the mixing of these two files is viewable. There is a button in the Motion Mixer Editor to do this for you.

FIGS 8.4 and 8.4a
10. Click the set range button to extend the active time in the interface to match both clips.
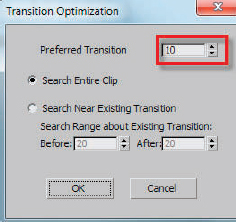
FIG 8.5
11. Right click the transition track and choose Optimize all Transitions. By default, the program will create an overlap transition of 20 frames from the end of the first clip and 20 frames from the beginning of the second. This may not necessarily be the best place to transition between the two motions clips. Unlike video, which can be faded, wiped, or cut between, the biped system is driven to move the objects based on the parts. As we will see in the next several steps, you may choose to transition not based on time, but based on position of the body parts, so that there is a smooth transition of the biped through the motions.
You need to choose targets you want to program to help hard-hit the biped to match when doing the transition from one biped file to another. We’re going to try and keep the feet from slipping around too much, so you’re probably going to want to change how the program is going to look at these two files to cut and edit them to match them up. Scrub the timeline again to see how the programs done in matching these up. When I have to go back in and adjust the editing of the transition, the default won’t be trying to match both the feet, but to match the COM Object stored. Once you’ve done this several times, it becomes much easier and you start to really look at where you want to be cutting these together and getting the action to show the way you want. Before optimizing the transitions, you may notice that the biped slides forward and falls at the start of the bow. Not quite what we want.
12. Save the file as trad_ch8_before_optimize.
13. Right click the transition track and choose optimize.

FIG 8.6
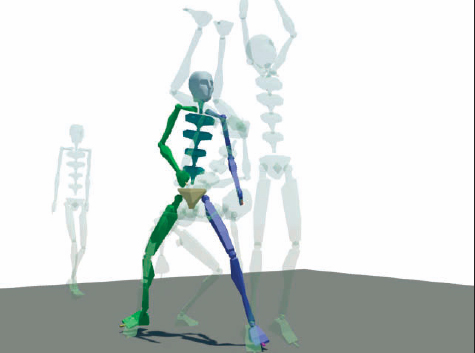
The program when it optimizes is actually looking to cut the two sets of actions together based on a logical transition of part of the biped’s position in time. In Fig. 8.8, I have created a few snapshots of the biped in time to show you the start and end of the transition. There is also a Dummy Object linked to the Biped001 COM Object to show you the trajectory of the main control through time. Notice how smoothly the hips seem to move from frames 168 to 186. There is very little bounce shown in the trajectory. As you scrub the timeline, you may also see that the right foot slides between frames 175 and 186. This is not very realistic motion. The weight of the biped was actually moving onto that foot into frame 168. What is happening here?
The program will automatically look to focus the transition based on one foot, both feet, and the COM Object to transition the tracks. The Cool thing is that you can view the transitions in other views and then go back to edit the transitions if a problem is detected. Make sure you have the trajectory enabled within the Motion Panel for the biped. All objects may have the trajectory enabled within the object properties, but the biped has a button specifically for this in the Motion Panel. Changing the focus will often times be useful in keeping your character from having sliding feet or even flying unintentionally all together. Right below the focus drop-down is the angle spinner and also preserve height. So if you’re not happy with the direction of movement that’s inherent in your biped files, you can always change it here within the transition and have your biped go anyway you want.
In the default state, when the program analysis the clips and creates the transitions, it will cut 20 frames from the start and end of a clip. In optimization, it automatically looks to cut the transition down to 10 frames, which may or may not be what you want. That’s why it’s important to keep scrubbing your animation to try and figure out what part you want to keep and how you want that to be cut together.
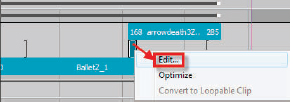
FIG 8.7
14. Right click the transition track and now choose Edit.
What I want to have happen is for the biped to dance across the screen, reach up before the bow portion of this first clip, and then fall backward using the arrow of death. The first time you play this through, the program will search to find the best transition based on using 10 frames and one of the body part(s) mentioned before. There is an easy workaround for this once you scrub the timeline and you figure out what’s the best part of the body to focus on. Remember, you can always easily fix the upper body parts by using layers if needed. Let’s focus on the feet. I know where I want to end the first clip, so I just basically search the second clip to figure out if it is the right direction and how much of it I want.
When looking at the second clip, I’ve also noticed that it has a direction that the characters fall into. Let’s look at a way to control that as well as we finish up this project. What I want to do is change the direction of the fall, so the are characters actually going to end up moving backward in a different direction.

FIG 8.8
Once you determine the ends of your clips and the beginnings, we will go back into the transition and reoptimize it. From Fig. 8.8, please note a few areas that we will be adjusting. The focus drop-down will be set to both feet. The start of the Source Clip will be changed as well as the angle for the Destination Clip.
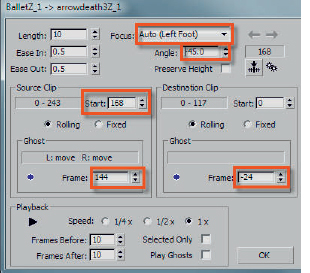
FIG 8.9
15. Right click the transition track and now choose Edit.
16. Set the focus to the left foot. That seems to be the best to have the objects match up.
17. Set the Start transition to 168 for the Source Clip and 0 for the Destination Clip.
18. Bring the angle to −45. This will give your biped a little change of direction from the fall in the A.O.D file.
19. Hit OK and play the animation.
20. If you also adjust the Ghost Frames, part of the Source Clip will show up in yellow wireframe and the Destination Clip in red.
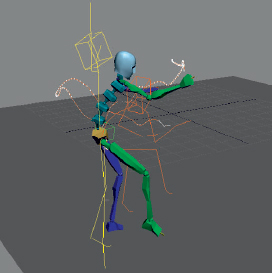
FIG 8.9a
Because the Motion Mixer is just an editor, the clips do not become permanent until the time that they are mixed back down onto the biped. Try turning the Mixer on and off. You will notice that when turned off, the original animation loaded onto the biped is still there. Make sure you have it enabled and now we will look at mixing it onto the biped.
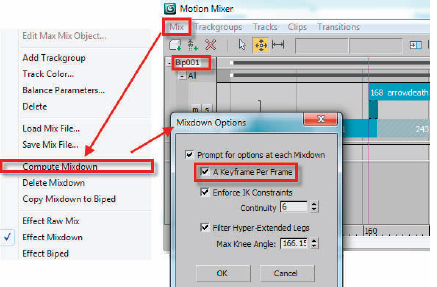
FIG 8.10
21. Select the name of the biped; Bip001in the upper right hand corner of the Motion Mixer Dialog. If it is not selected with a white background, the Mix Menu items we need will not be available.
22. Choose Compute Mixdown from the Mix Menu.
23. Enable a Keyframe Per Frame because these bip files are mocap and have a keyframe for every frame.
24. Hit OK.
25. Go back to the Mix Menu and Copy Mixdown to bip.
26. Exit the Motion Mixer Graphic Editor and turn off Mixer in the Motion Panel.
Let’s try another trick with adjusting the timing of a motion on the biped. This time we are going to have a biped take a few steps and then do a back flip. You could use Motion Flow to do the previous exercise as well as the following one. However, I want the biped to slow down the motion of the clip, so that it seems to float a little while longer. This can be accomplished by adding a time warp to the clip, something that can only be done with Motion Mixer.
27. Load the file called walk_flip_start.max or create a new biped and enter the Mixer again.
28. Change the Layer track to a Transition track.
29. Add your favorite walk file.
30. Add a Backflip file.
31. Select the Backflip Clip and right click it.

FIG 8.11
32. Choose Add Time Warp.
33. Enable the time warp with the Editable Time Warp icon.
34. Choose the Select and Move Tool and then click on the clip at around frame 120 and 132. This is the time that the biped leaves the ground and is flipping in the air.
35. Move the top half of the left line that appears on the clip to around frame 160.
36. Now drag the end of the clip to around frame 178.
37. Click the Set Range button to set the active time segment to match the new length of both clips.
Result
The biped will now walk at a normal pace and then flip through the air real slow. I’ve seen this type of slow motion a number of times in the movies or Sunday morning cartoons. The character can defy the laws of physics. Think about.