
CHAPTER 14

Animating with the Morph Modifier
Richard Lapidus
Rule: The use of overlapping action
Rule: Weight and drag
After Completing This Chapter, You Will be Able To:
• Use the three states of animation: anticipation, action, and reaction.
• Add weight to a character.
• Animate with the Morph Modifier.
Of all the tutorials that I’ve written, this one was most designed to solve a lot of problems in teaching 3ds MAX. One of the most intrinsic benefits to working with 3ds Max is the versatility of what you can do with the Modify Panel. After teaching this program for a number of years and collaborating with other instructors, it became apparent that a lot of people were not using the full range of modifiers. The other thing that I’ve noticed in looking at a variety of resource materials is that there has always been very little application of animation in the traditional sense as applied to learning a software program. The approach that I took with this tutorial was to give my students a look at 17 different modifiers that could be used to enhance the fluidity possible when creating motion, weight, and timing of their animations.
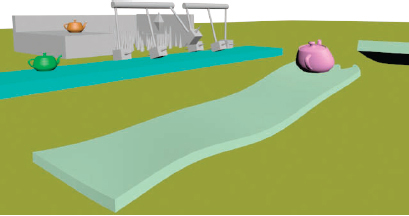
FIG 14.1
For professionals, the choice of a tool is very often driven by ROI and for students, it’s how quickly the tool can enhance the quality of their creative process. Unfortunately, when there is such a steep learning curve for the new user, it sometimes becomes frustrating to see them end up focusing more on learning the tools than on how to effectively utilize them. The concept of morphing dates back to the original DOS version of this program. Although the tools have changed, you still have the basic concepts of having an object change based upon the position of the vertices of the target objects. My first morph was to have a basketball net swish as the ball went through it. By today’s terms, it was very primitive relative to using space warps or a dynamic simulation using soft bodies. Regardless of how sophisticated your tools are your animation can still be effective if you take the time to study some real motion and figure out how much you can use. What we want to accomplish with this exercise is for you to use as many of these modifiers as possible to create the illusion of some life in this sheet and that it is cognizant of the surrounding.
There are a few rules that you need to be aware of when working with the Morpher Modifier. The first rule is that all morph targets must have the same number of vertices as the object of the Morpher Modifier on it. The basic starting point for this is to use a static pose for your Morpher object and then create clone copies of it to adjust. As long as you are adding or changing the basic topology of the object, your morph targets should work as well.
The basic click through on my morphing teapot tutorial ended up being too long to include as part of this chapter. We will start out this project with the finished morph targets. The three_obstacles.max is the one my students use for animating. It allows them to choose from three types of hazards to maneuver through. Good news. You will find a PDF version of the basic set up and an explanation of the 17 modifiers on the website (www.tradigital3dsmax.com). In the second phase of this tutorial, we will be exploring timing ways and motion involved in creating the illusion that this teapot is in a dangerous and precarious set of circumstances. Keeping in mind that I’m approaching this type of animation from a problem solving standpoint. The second half of this tutorial, which you will be working through in this chapter, shows how to maneuver your object through one of three obstacles.
When I originally wrote up the tutorial using these 17 different modifiers to create the morph targets, I didn’t have in the back of my mind what the teapot would be doing. What I mean is that I had not contemplated how the teapot would actually move. A lot of my students will click through the tutorial and then pick one of the three obstacles in animating it without adjusting how the morph targets move or are animated. This is just something to keep in the back of your mind. If you like the idea of creating an animated object, then please feel free to take creative license with how you use these modifiers. Where this tutorial has always fallen short is in having the majority of my students rarely explore using morph targets and the timing involved in keying these objects to create a more realistic animated character. So that’s where we are going to focus in this chapter. I will, however, point out a few of the key parameters for some of the different modifiers so that you can understand a little bit better the infinite variety possible when adjusting objects.
1. Load the file morph_3_obstacles_morph_targets.max.
2. Drag the Time Slider or click the Play button.
When viewing the scene through more teapots, you will notice that there are three obstacles available for you to choose from. There are also three basic cameras already in place for each one of the obstacles. The camera called “cam morph teapots” should be active when the scene loads so that you’re getting a good view of several of the modifiers that happen to be animated, as well as the swinging spikes in the gauntlet portion of the scene. The goal is to give you the opportunity to work through having your object jump over an obstacle, maneuver through moving objects, or simply over a surface after avoiding a piece of missing range to continue on the other side.
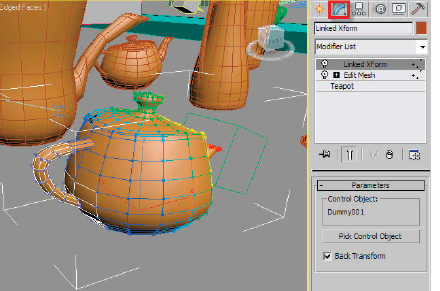
FIG 14.2
3. Hit the “H” Key and select the teapot named a “linked xform”.
There is an Edit Mesh Modifier with a soft selection of vertices being passed up the modifier stack to the linked Xform Modifier that has a control object of an animated dummy. As you play the animation, you will notice that the dummy is actually rotating back and forth on a curve. This was accomplished by moving the pivot of the dummy somewhere inside the teapot. This gives the spout wiggle a more realistic and curved motion. Here’s something else you could try if you like the idea of controlling just part of the object. How about a nervous shake to just the lid? This could easily be accomplished by adding a noise float in the Motion Panel to the control object. Since there are three Euler XYZ tracks by default, you could control each axis a little differently. Your Ramp in and Ramp out parameters within the Noise Float work just like limits.
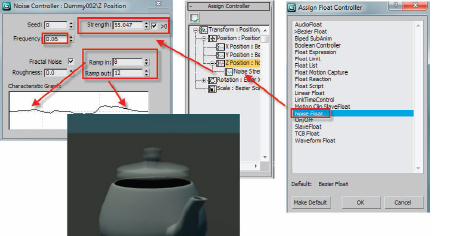
FIG 14.3
4. Select a teapot named squeeze.
Notice in the Modify Panel that there is a limit effect parameter that allows you to control the upper and lower extents of the modifier on the whole object. If you hit the “+” indicator next to the Squeeze Modifier, the basic two sub-object components are gizmo and center. By default, the gizmo covers the entire extent of the object, and the center controls the focal point of the modifier. The Center will always be aligned to the object’s axis when added to the stack. We looked at this in chapter 2, Working with Kays and the Dope Sheet. By changing the position of the gizmo, you’re adjusting the projection of the modify. If the direction for one of the morph targets is not to your liking, try going into the sub-object of the modifier and rotating the gizmo 180 degrees. There are literally unlimited variations of the changes you can make to these objects.
5. Select the object name “Morph object”.
6. Increase the length for the active timeline with a CTL+ALT+right mouse drag so that you have 300 frames.
7. Drag the timeline and notice that a few of the objects continue moving beyond frame 100. Some of the objects have an out of range parameter repeat added to modifiers.
FIG 14.4
8. In the Modify Panel, you will notice that the “Morph Object” already has the Morpher Modifier added. You will add these to the other morph objects in the obstacle courses. Drag the percent spinner for the FFD and the Stretch targets to 100%. Notice how the object will interpolate through itself. You have to be careful in using multiple morph targets so that the positioning of vertices doesn’t add up to moving through the object.
Note
Right clicking on the spinner will “Zero Out” the spinner. Click up once and down once with the Auto Key button on; this will set a value at current state. Since the Key Tangent Type is set to “Linear” in the file, you will not get over interpolation with the keying of these spinners. After testing out animating a variety of percentages of Morph Weights, you may want to change this to the default or another tangent type to your liking.
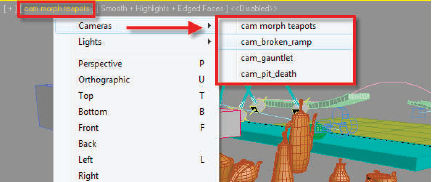
FIG 14.5
9. Change the camera view and select the “cam_broken_ramp” camera.
10. Select the teapot sitting on the ramp called “broken_ramp_teapot_morph”. Assign a Morpher Modifier to it.
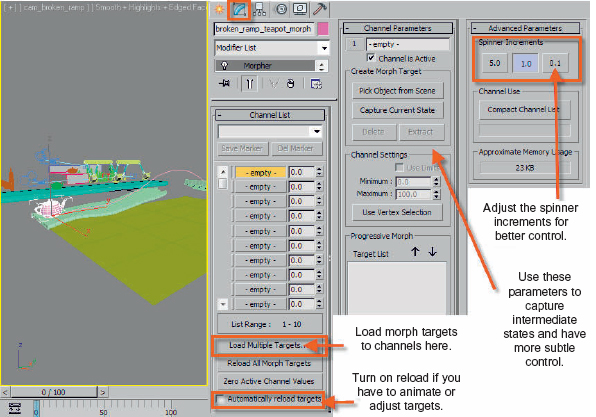
FIG 14.6
11. Click the “Load Multiple Targets” button and select all the teapots in the Select by name list. Do not include the “Morph Object”.
12. In the Advanced Parameters, you may want to change to 0.1 for the Spinner Increments for more subtle control.
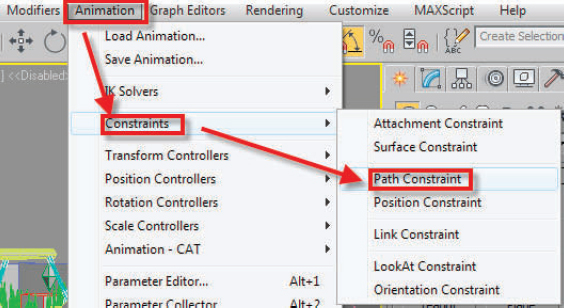
FIG 14.7
13. Create a dummy and align it pivot to pivot to the “broken_ramp_teapot_ morph” object.
14. Link the teapot to the dummy and then with the select tool, reselect the dummy.
15. Go to the Animation Menu>Constraints>Path Constraint and select the spline that is near the dummy object.
16. Save your file incrementally. There is a copy called morph_3-obstacles_ ramp_dummy.max saved at this point for you.
There is a trap in moving an object directly to a path without a buffer like a dummy object. The object will now move with the dummy as its parent as you animate the path percentage along the path in the Motion Panel. The other option is to add a list controller as we will see in the next chapter so that you can have addition Move Transform control. We will look at those options later on. Take a moment to drag the Time Slider and notice how the object moves smoothly from beginning to end of the active segment. This is nice control, but not how something that is living might maneuver in the real world jumping over a broken ramp. Special note to the guys who wrote the plug-in called “Glue”. You can find it at www.itoosoft.com. After building this ramp, I had a few students who wanted the object to smoothly move over it. Glue will allow you to project a spline onto the surface of an object. Nice free plug-in along with several others you will find on their site.
17. Let’s first animate the teapot over the jump by keyframing the dummy’s percentage along the path, then add and mix the morph channels. Go to the Motion Panel and then drag to about frame 50.
18. Turn on Follow and Bank. The dummy will rotate 90° but follow the path more smoothly.
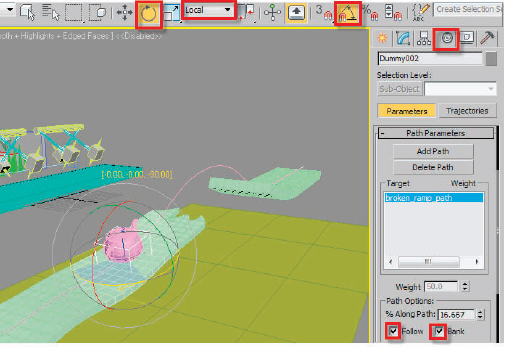
FIG 14.8
19. Enable Angle Snap with the “A” Key, select the Rotate Transform, and change the reference coordinate system to Local. Now rotate the dummy −90°.
20. Enable the Auto Key button and then click the “% Along Path” button in the same area indicated in Fig. 14.8 by up and down one click. This will set the position of the teapot at around 16.6% along the path.
21. Now move to frame 82 and drag the percentage to 10% along the path. The teapot will move out from the start, go up the ramp a bit, and then move back.
22. Drag the Time Slider to around frame 115 and note the percentage along the path. Mine reads around 24. Move to around frame 150 and the teapot should be in mid-air above the gap in the jump.
23. Let’s drag the percentage to 24 at frame 150. The teapot will now move slowly toward the ramp from 82 to 150.
24. At frame 200, drag the percentage to around 20%.
25. Drag the timeline again to pick the percentage along the path so that the dummy will be in mid-air above the jump. Mine is reading about 40%.
26. Move to frame 250 and set the percentage to 40%.
27. Select the keyframe at frame 300 that represents the end of the path. When it highlights “white”, meaning that it is selected, delete it.
Looks like we have run out of time to have this teapot come to the realization that it is not going to make it and will fall. I love killing teapots. You can either add more keys or compress what you already have to make it work faster.

FIG 14.9
28. Drag a marquee around all the keys, right click the timeline, and enable Show Selection Range in the Configure Menu.
29. Move the cursor over the right side of the Range Bar for selected keys so that there is one arrow. Now drag the right end of the range to frame 200. This will make all the action happen a bit faster.
30. Select the teapot and right click the Time Slider at frame 200. When the Create Key Dialog appears, hit OK to set Position, Rotation, and Scale Keys at frame 200.
31. Move to frame 225 and rotate the teapot on the “Z” axis about −150°.
32. Move to about frame 214 and rotate it up about 15° on the “Y” axis.
33. At frame 250, rotate it down on the “Y” axis about 45°.
34. At frame 300, move it down on the “Z” axis below the plane.
Wait … it is falling too soon without realizing it is in peril. All objects in the cartoon world are not affected by gravity until they are aware of their situation.
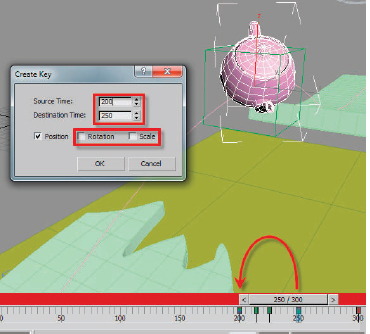
FIG 14.10
35. Move back to frame 250 and right click the Time Slider. Disable rotation and scale. Set the Source Time to frame 200 and Destination Time to frame 250.
Play the animation and you will see the object does two chugging moves to get up the ramp and then finally hangs in space before falling. Please feel free to add additional rotation keys or more time to your liking to animate this object moving through the obstacle. Oh noooooooooo! Something is wrong. If you haven’t gone exploring around the scene, the mistake I built into the file may not show up until rendering time. The path for the dummy object does not fit the ramp properly. That’s not the only problem … but it’s the first I want you to fix.
36. Switch to the top viewport and marquee select the teapot with ramp portion of the scene. Now right click and enter Isolation mode.
37. Switch to the left viewport and zoom in on the ramp. The teapot is floating.
This is a common mistake that might not show up until rendering time. It looked good from the camera view, but if you don’t get into the habit of viewing your scene from different views, these kinds of mistakes can go hidden until after the scene is rendered.
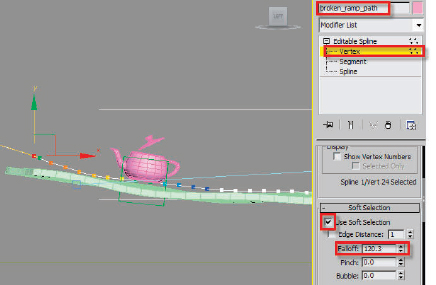
FIG 14.11
38. Select the spline called “broken_ramp_path” and enter the Vertex Sub-object level in the Modify Panel.
39. Select the vertex near the end of the ramp, enable Use Soft Selection, and set the Falloff to around 120.
40. Move this vertex down until most of the vertices are near the ramp. It won’t be perfect, but we will fix that. Exit sub-object.
Using paths for modeling and animation is a great way for objects to fit neatly together. In the intro levels of my classes, we use a tutorial called “Creating a Rollercoaster.” It was written for a class years ago to cover lofting, path constraints, and snapshots. By using the same path in different functions, my students start to develop a sense of the correlation between modeling and animating. In this case, they like to use it, but something still seems a bit off. Given an object without legs or wheels, how should it maneuver a ramp and fly through space? You could adjust some of the morph targets and animate the lower half of the object. The limits or passing a sub-object soft selection would work very well for this. Let’s see if possibly a little animation could be used to fix the problem. Without adding a list controller to the dummy, its position is controlled by the path. The buffer of using a link would allow for moving the teapot, but that could cause some problems if you decide to start changing the animation at a later time. Let’s try something new so you can get a sense of different possibilities with the program. With a link, any changes to the parent’s transforms are passed to the child in the tree. What if we blocked some of what was being passed down the chain? If we scale the dummy, the teapot will scale. In a scale function, the transform gizmo moves in addition to changes in the size of the objects. What if we block inheriting the scaling? The transform gizmo for the teapot will move, but its size will remain the same. I came up with this idea over 10 years ago when animating logos flying in on nice soft curved trajectories.
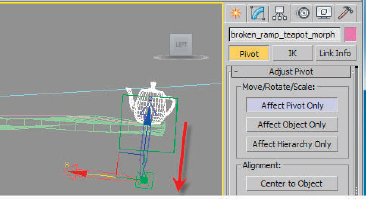
FIG 14.12
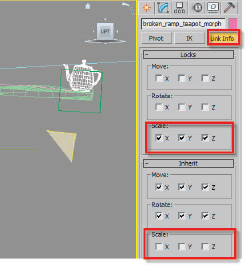
FIG 14.13
41. Select the teapot and go into the Hierarchy Panel.
42. In the Pivot selection, enable Affect Pivot Only, and move the pivot down below the teapot so that it isn’t lined up with the dummy.
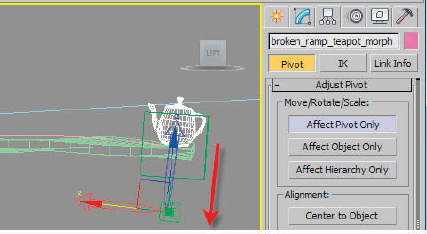
FIG 14.14
43. Turn off Affect Pivot Only when you have to move it below the object.
44. Go to the Link Info Panel and in the Locks area, turn on Scale X, Y, and Z, and turn off Inherit Scale X, Y, and Z.
To make this a little easier to navigate and animate, let’s show you how to create a Slider to control the scale of the dummy object. Sliders can basically be “wired” to any object parameter to give the current viewport a floating control. When finished working with it, you can easily hide it in the Modify Panel or hide it as a helper in the Display Panel.
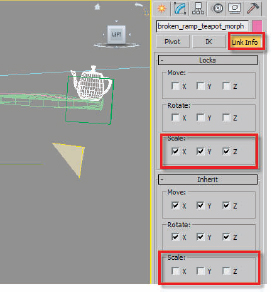
FIG 14.15
45. Go to the Create Menu>Helpers>Manipulators and choose Slider.
46. In the Modify Panel, call it “Scale Dummy Z”.
47. Set the Minimum Value to −0.5 and the Maximum Value to 2.0.
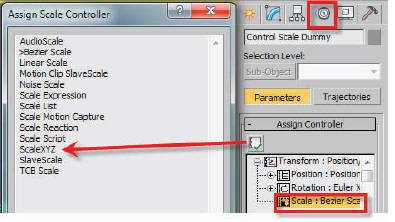
FIG 14.16
48. Reselect the Dummy Object and go into the Motion Panel.
49. In the Motion Panel, select the Scale Transform and click the Assign Controller button.
50. When the Dialog appears, choose Scale XYZ. This will split the scale track into three separate tracks.
51. Right click the Slider in the view and choose Wiring from the Quad Menu.
52. Choose Value in for the Object and when a marquee line appears, left click the dummy.
53. Drag across from Transform to Scale to “Z” axis. The Wiring parameters will appear. If you choose the wrong one, it can be fixed easily right now. See
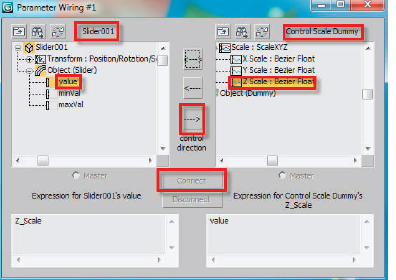
FIG. 14.17.
54. Make sure the Slider has Value selected on one side, and the “Z” axis for the Control Scale Dummy is on the other.
55. Click the direction of flow arrow to point from the Slider to the Dummy.
56. Click the Connect button and minimize the Dialog. Don’t close it until you see it is working properly.
57. Enable Select and manipulate in the Toolbar.

FIG 14.18
58. Now drag the Slider arrow back and forth. The teapot moves by scaling the dummy.
59. Move to frame 0 and turn on the Auto Key.
60. Right click the timeline and set the filters to Object. This way the keys you make to the Sliders parameters will show up in the timeline.
61. Drag the Slider so that the teapot is sitting on the ramp.
62. Scrub time and look for places where you want the teapot to be floating in the air. This usually happens on the far side of a bump in the path.
Animating by hand in the traditional sense with a 3d program requires a little bit of investigation by the animator on a number of levels. Like a cell animator, we have to study our subject as to how it moves, carries its weight, and reacts to its surroundings. We then take it further by taking some area and exaggerating it so that we get the response that we want from our view. Typically in the 3d scene, we might find ourselves limited in trying to get the exact details and scales of objects and not really think about how it might function. In this situation of this scene, I provided you with three dangerous elements for an inanimate object to navigate. Although we’ve only looked at one of them in this chapter, I want to use your imagination as to how you will get an object to jump over something dangerous like a spiked pit or maneuver through swinging obstacles. Instead of just keyframing your object to go from point A to B, you want to think about how to make the object look like it’s responding to the scene that it is in.
When starting to animate the teapot through its next obstacle, think about possibly having it wander around a little bit at the starting point. By giving your animation sometime to set itself up, you are providing that stage of animation called anticipation. How might we do that? Well, with the pit scene, imagine you’re standing at the edge of the Grand Canyon. Would you walk straight up to the edge or might you stop short an inch your way up slowly. With a change in the timing and rhythm of the motion, you can develop a more organic feel to the movement of your objects. In the third portion of the scene, which happens to be one of my favorites, you might have your objects stop short and then start to sway back and forth trying to pick up the timing of one of the pendulums as he gets ready to maneuver that portion of the obstacle. I’ve had some of most interesting solutions to these problems solved by my students over the years.