
CHAPTER 6
Using Ragdoll with Biped
Richard Lapidus
After Completing This Chapter, You Will be Able To:
• Create a shortcut to enable Ragdoll script and set up restrictions on Ragdoll character or biped.
• Animate a biped and use layers to control the exaggerated motion of a fall.
• Control the geometry for mass and simulation.
• Create and save your own custom animated .bip files for mixing.
At some point in time, most of us learn that a person can’t fly without wings, and if you fall very hard, something is bound to break. Notice that I skipped the part about using powered vehicles to land you directly with the consequences. Having grown up in the outback wilderness, which is now commonly known as modern Suburbia America, we had a firm belief that gravity could be avoided with the right set of tools or circumstances. It’s in our culture for little kids to believe in magic and all the possibilities of a little pixie dust or a magic wand. With the right tools, the effects of that invisible force, which keeps us from soaring in the air, may be counteracted. In my case, it was the “Acme Rocket” and the “Bat Utility Belt” which were to blame … on separate occasions of course.
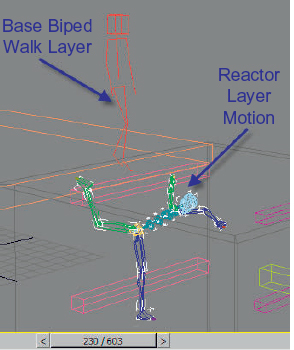
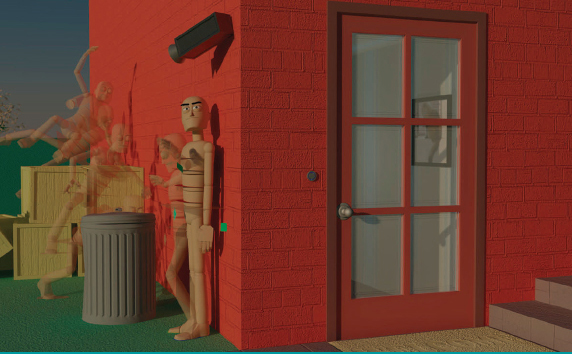
FIG 6.1
Yes, unfortunately things do tend to break because of gravity. Actually, there is something else missing. There is a unique state of animation that is necessary to give meaning to a set of actions and reactions. The time when we let the audience know that something is going to happen and get their attention is known as anticipation. After grabbing a viewer’s attention, they either have to believe in a theory or agree that it is plausible. Anyone who wants to argue that point can try to rationalize how millions of viewers can believe in the possibility of Death Star with a killer laser beam like the one in Star Wars. With the right amount of planning, and inclusion of details, anything is possible … right?
Take the case of new software upgrades or plug-ins as being a potential trap. We forget the lessons of our childhood, but also the belief that things don’t have to happen in a certain way. All we really need to have is that perfect tool or magical element to make things happen the way we want them to. As a professional working in the field of animation, we tend to be enticed by that shiny new upgrade without paying attention to fact that it’s not the plane that flies, but the pilot! The plane moves but is controlled by a living being. It’s just a tool, but we have to have something extraordinary kicking around in the back of our minds that we want to create, not the magical combination of controls. We need to let our imaginations run free again.
With a series of commands in the Motion Panel, you can easily create a walk cycle with a biped. This motion will appear a little stiff and inflexible at first.
Not to worry, bipeds have a built-in Layer feature that allows you to build on the base layer motion. We will be using the Rag Doll Utility to constrain the biped so it can be acted on by gravity with the Havok Physics Engine. Normally, bipeds resist anything but sticking to their own footsteps when in Footstep mode. This can be a little problematic when trying to add additional motion, which would require positioning and rotating the structure in unusual positions. This is where layering will be very handy. Think of this chapter as an introduction to creating different parts of an animation.
In the next chapter, we will explore adding a subtle, but necessary detail by layering the motions as separate clips. Instead of having the character fall right down the shaft, a little bit of exaggeration will be added to bring this motion into the realm of animation. I have always liked the cartoon character that can float in mid-air until he realizes his situation. Then the fall comes. Action and reaction without a little anticipation is not only too abrupt but also defies good traditional animation technique. In the next chapter, we will explore in more depth how to control layers, mix, and adjust the timing of these motions to make the scene more believable as an animation piece. When you start to think about capturing what is going to happen and the effects of these movements, something magical will occur. You will be moving out of the realm of simple motion and into that glorious state called animation. Your audience will be drawn in and start to believe.
1. Open the file called “Falling_down_old_shaft.max’”.
2. Make sure your unit set up is set to US Standard Feet with fractional inches. (This is located in the Customize Menu under Unit Set Up.)
3. Go to Systems and create a biped. Make sure the height is around 5'7" so your project will have similar dimensions as we progress.
In the Biped Rollout, there are four basic icons. The first icon looks like a person and the second a pair of footsteps. We will be using both of these and explore the others later on. Figure mode allows us to change the structure of the character and also set a default position for the starting point of an animation segment. It is also used for setting a pose for skinning a character.
Bipeds are fully rigged systems that allow us to control the movement of two-legged characters in a variety of methods. For our purposes, we are going to use the footstep method in this chapter to immerse you in the process and then refine it in later chapters. Keep in mind that our goal is to utilize just two distinctive motions at this point in time: walking and falling. (Something many of us with two left feet have mastered to the nth degree.) Neither one of these sets of motions can be created with a click or two and look realistic. A good base layer of programming is provided that will simulate the proper positioning of a character but falls short of true animation. Some layering will be added to give a pause in the middle of the sequence, but we will look at layering in more detail in the next chapter. For now, be amazed at the marvel of a programmed walk cycle.
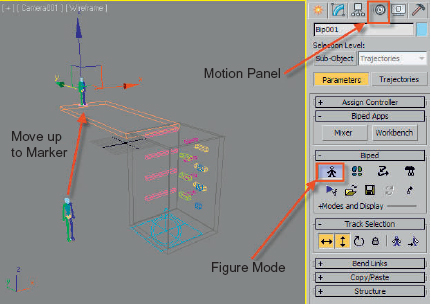
FIG 6.2
4. Go to the Motion Panel and enable the Figure mode.
5. Move the biped relative to the “X” marker on the second floor box object.
6. Move the biped up so that it is standing just a little above the object called second floor.
7. Turn off Figure mode when you have it in position.
You will only need a small space so that the program does not view the feet and floor object as interpenetrating. There is an “X” spot showing you a good place to start positioning it. Normally, the position of the feet tangent to another surface is not a concern. Bipeds are built from the ground up relative to the construction plane and always oriented along the world axis “Z” space. Try creating one in the front or left view. The program will not allow you to build it starting sideways. That’s one of the features of the “system”. As you play around with this a little more, you may notice that the feet always want to stay parallel to the ground. This can be annoying, which is why we will be using Ragdoll and reactor to create the free fall in this chapter.
There are a number of great scripts built into 3ds MAX that can be accessed to basically help the animator in quickly performing a series of recorded commands. This can be a real timesaver. If you have ever played around with a biped before, you know that there is no built-in restriction on the joints. Arms, legs, and even heads can all be made to do a 360 spin. Although this seems like a funny move depending on how you rotate the parts, it typically will give you undesirable or unbelievable results. In the next step, we will create a custom toolbar with a command to automatically set up all the constraints on your biped at one time. This could take you 30–45 minutes to add a constraint to each joint and set the proper limits.

FIG 6.3
8. Go to the Customize Menu and choose Customize User Interface.
9. Enable the Toolbars Tab and click New to create a new toolbar.
10. Call the toolbar Ragdoll.
11. In the Keyboard Tab, Choose Reactor from the All Commands Category, and then drag the Rag Doll Utility into the new toolbar.
Note
There are also Rag Doll Constraints in the Reactor Category and the Reactor Toolbar. These are for creating individual constraints.
12. Click the new utility and the Ragdoll Script will launch.
The script you just ran will create a new floating panel for you to make a selection and apply constraints to all of the biped objects automatically. Any bipeds already in the scene will display in the Humanoids Selection Window. The program looks for biped objects and will list Biped01 in the Dialog.
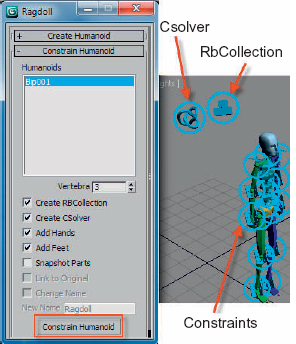
FIG 6.4
13. Make sure the Bip001 has a blue background and then click the Constrain Humanoid button at the bottom of the floating panel.
14. Close the Ragdoll Dialog.
15. Hit the F9 Key and render the front view.
Note
This will create constraints automatically on the joints, which are part of a CSolver and RBCollection. There are now gizmos aligned to every joint of the biped, and two larger ones floating off to the side slightly. Although you can see them in the viewports, they are nonrenderable helpers. The larger gizmos are special helper objects called collections. To have the reactor physics engine control the falling and interaction of the biped, objects in the scene must be part of a collection. This is how 3ds MAX parses out the scene object to be calculated in the Havok Physics Engine.
16. Select the rigid body collection and go to the Modify Panel.
17. Click the Add button.
18. A Select Rigid Bodies List Dialog appears.
19. In the Select Menu of this dialog, enable Select Children or do a CTL+C.
20. Using the Control Key, select the following objects: plane001 object, shaft, 2nd floor, and boxes, which are linked to the shaft into the rigid body collection.
21. Click the Select button at the lower left corner of the Dialog.
The plane001 object is a reactor helper, which I already located in the bottom of the shaft. You may want to rename it so that if you add a geometric plane to your scene, you don’t confuse the two.
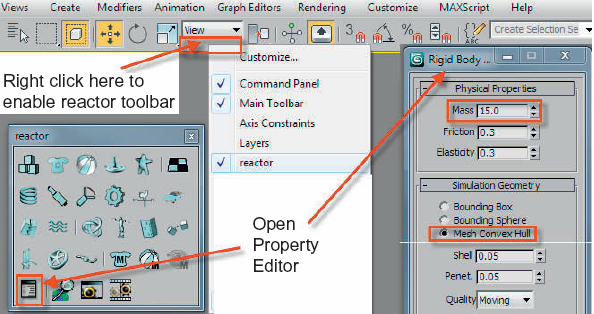
FIG 6.5
22. Hit the “H” Key to select by name and choose all the biped parts.
23. Open the Reactor Toolbar and choose Object Properties. Increase the weight of the object to 15 and set the Simulation Geometry to Mesh Convex Hull.
If you skipped the chapter on Rigid Bodies setup, right click the Main Toolbar below one of the name selection drop downs and click Reactor to show the Reactor Toolbar. After you have set the weight for all of them, leave the Dialog open so another selection of these objects can be made heavier. I like to give all the objects a base weight to start because they will not move with a mass of zero in a reaction.
24. Hit the “H” Key again.
25. Go to the Select Menu and disable Select Children.
26. Click the BIP001 object to select it.
27. Go to the Display Menu and Expand All.
28. Choose just the pelvis, legs, and spine objects.
29. In the object properties dialog, give these objects a weight of 50.
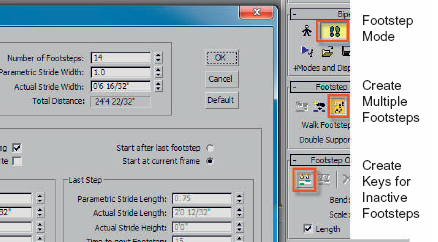
FIG 6.6
30. Select the Bip01 object and go back to the Motion Panel.
31. Turn off the Figure mode and turn on Footstep mode.
32. Under the Footstep Creation Rollout, enable Create Multiple Footsteps.
33. Enter 14–16 footsteps and click okay. If your biped is not 5'7", you will need a larger or smaller number.
Note
Don’t worry about all the extra buttons and numbers in the Create Multiple Footsteps Dialog. This is a parametrically programmed system to control the speed and distance a character can walk based upon the height. Your numbers will appear slightly different from the one shown in Fig. 6.6 based upon the height of your character. Since there is no need at this time to increase or decrease the speed of the movement, leave the numbers as they are. If you want to experiment with them, do and edit hold first. You can create some rather painful looking limbo walks by exaggerating some of these parameters.
34. Look at your character’s footsteps before you activate them. They should all appear “white” meaning that the footsteps are selected.
35. If there are not enough steps to have the last few hanging in mid-air above the shaft, do a CTL+Z to undo the last create command and then increase decrease the number of footsteps. If you have extras, that is okay.
36. Make sure you are at frame 0 before doing the next step. Footsteps will be activated at the frame you are on.
37. In Footstep Operations Rollout, click the Create Keys for Inactive Steps button.
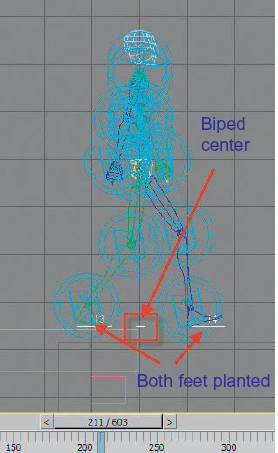
FIG 6.7
38. Enable the left viewport and scrub the timeline. Make a mental note when the last two footsteps are hanging in the air over the shaft.

FIG 6.8
39. Hold the CTL+ALT Keys and then drag on the timeline while holding the right mouse button to increase the active segment by about another 200–300 frames.
40. Go to the Display Panel and in the Hide by Category Panel, check on helpers. This will hide all of the constraints while we set up and check the simulation.
41. Go to the Utilities Panel and activate the Reactor Panel command.
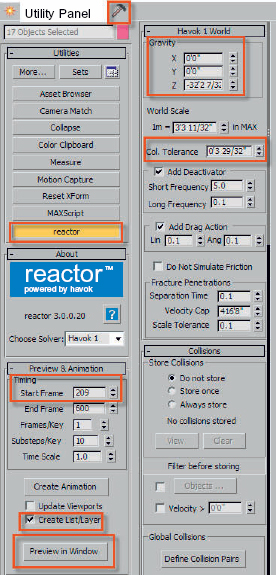
FIG 6.9
42. Open the Preview & Animation Rollout.
43. Set the start time in the Reactor Panel to around the time that you want to create the start of the free fall into the well. I used a start frame of 209. Your start frame may be different based upon how many steps it takes your biped to get over the shaft and do some viewing of what isisn’t below its feet. Make sure that Create List/Layer is active below the Create Animation button. You will want to have the falling motion added to the bipeds in a unique layer. This layer is like the last one you created for the look around, but is created by the program animating the Ragdoll constraints during the fall.
44. Do a FileSave and incrementally save your file. Also do an Edit Menuhold at this time. Created keys can’t be easily undone.
45. Click Preview in Window.
46. When the reactor Real-Time Preview window appears, hit “P” to play and “R” to reset.
47. We have a problem … the biped does not fall down the well. The beams may also not be falling either.
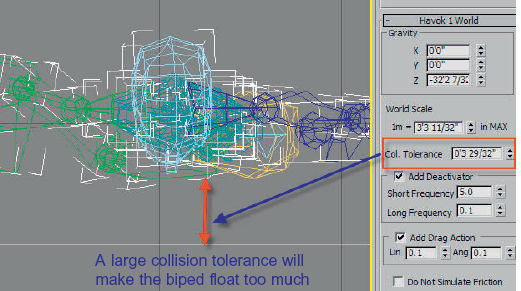
FIG 6.10
48. Select the shaft object.
49. Go to the Object Properties Dialog and check the Simulation Geometry Panel.
50. It is set to Mesh Convex Hull. This object is more like a bucket or a cave. Change it to be a Concave Mesh. Enable Unyielding so it will not move.
51. Select all the beam objects and give them a weight of 60. Set these to an Inactive State in the Object Properties as well. This will keep them from being affected by gravity until another object hits them or comes within the range of the collision tolerance.
52. Open the Havok 1 World Panel and check the value for the Col. Tolerance.
53. Bring the value down to less than an inch. If your tolerance is too high, the biped will float up off the second floor before falling and will never really hit the bottom of the shaft.
54. Click the Create Animation button.
55. Scrub the timeline and notice that the base walking motion becomes apparent as a red-stick figure.
The movement of a free fall now appears for the biped after the time you set up for the start of the simulation. Left of the top of the shaft is a red-stick figure in mid-step. This motion can be saved out as a separate file and blended whenever you like.
56. Select any of the biped parts and go into the Motion Panel.
57. Open the Layers Rollout.
58. There will be a new layer created called “Reactor Layer #1” as the current active layer. Layers will blend new motions on top of previously created sets of keys.
59. Click the black arrow to go to the original layer. The biped will now walk 14–16 steps and appear to stop above the shaft.
60. Click the Next Layer arrow and return to the reactor layer.
61. In the Layers Rollout, click the Save button and enable Save Segment at Current Position.
62. Name your layer and save it in the motions folder in the 3ds user’s folder in My Documents.