
CHAPTER 7

Use of Overlapping Action, Weight, and Drag
Richard Lapidus
Rule: Use of overlapping action
Rule: Weight and drag
After Completing This Chapter, You Will be Able To:
• Set up a biped using the footstep method of animation.
• Use layers to control the biped subtle motion of character.
• Set Keys.
• Utilize Weight.
In this introductory tutorial for starting to animate a biped with footsteps, first you need to create a biped. This is a fully rigged structure used for animating characters. There are several other products that you can use but the one that has been around the longest for 3ds MAX is the biped. Bipeds are created in the Systems Panel of the Create Panel, and then they are controlled and animated in the Motion Panel.

FIG 7.1
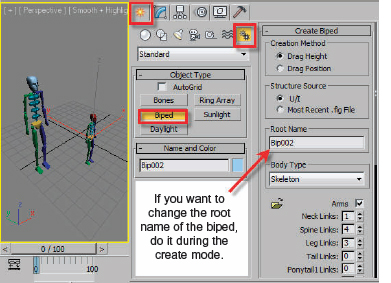
FIG 7.2
1. Go to the systems portion of the Command Panel, select biped, drag up a biped of any height, it is called biped 01.
2. Drag out a second biped but a quarter the size, this is called biped 02 and right click to exit Create mode.
3. Select the first biped 01, you may click on any part of it, and then enable the Motion Panel.
All changes to the biped as far as its structure and animating it is typically done in the Motion Panel. There are several other modules like Motion Mixer and parts of the Track Editor, which may be used for animating the bipeds. Unlike most other 3d objects, because it is a “system,” it will be controlled in the Motion Panel.

FIG 7.3
If you hit the “H” Key on your keyboard, you’ll notice that the biped structure has many joint parts. If you go to the display menu and display the children, they are indented one for every step for which they are linked in the hierarchy. The main COM Object for the control is called BIP 001.
4. Hit the “H” Key and select Bip001. In the Name Selection drop-down box, type in Biped COM01 and hit Enter. You must hit the Enter Key to make it a Selection Set.
You have just created a named Selection Set for that part of the biped. When animating this structure, it is often easier to select it by dragging on the Name Selection to reselect an object. You can also unhide or unfreeze parts of your objects or scenes by reselecting a set and following the prompts. I will often set up a Name Selection for the hand, feet, and spine objects.
5. Repeat this for each hand and foot separately if you like.
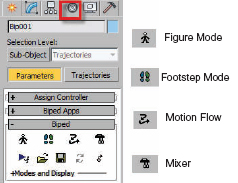
FIG 7.4
6. Select the first biped 01, you may click on any part of it, and then enable the Motion Panel.
Hint
In Hierarchy structures like this, you may also use the Page Up and Down Keys to move a selection to the associated parent or child of the bone.
Notice by looking in the Main Biped Panel that there are four basic methods available to animate a biped. Those are Figure mode, Footstep mode, Motion Flow mode, and also the Motion Mixer. The basic Figure mode allows you restructure your biped to fit to the skin of a character. In creating animation for your character, the size of the biped does not really matter as we are going to see very soon. The software does a great job in retargeting the motion to match whatever scale your biped is. Right now we’re just going to take a look at animating it with footsteps and then we’re going to layer it to give it some more unique motion and give it some weight for Footstep mode. Here are a couple of rules to keep you out of trouble when working with this system:
• Figure mode is for structuring and not animating the biped.
• If you move the starting position of the biped when out of Figure mode and then reenter Figure mode, the biped will move back a position to the last position you left it in when in Figure mode.
• Save your max and biped files often.
• When animating with footsteps, you can only animate when there are active footsteps.
• If your character will be going through a lot of complex motions, try to break these down into small sets of actions and save to compose with Motion Flow or Motion Mixer later on.
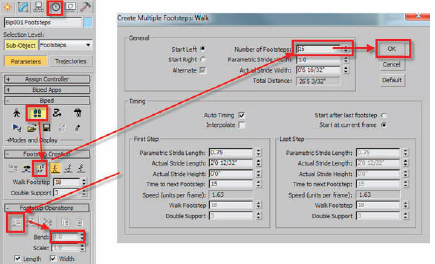
FIG 7.5
7. Enable Footstep mode and examine the new panels that appear. Some of the buttons are grayed out. Refer to Fig. 7.5 for the next several steps. We will be adding multiple footsteps and then having the biped walk around in a circle.
As you look down the panel, only the next logical step of buttons are enabled, and many of them have a yellow asterisks indicating CreateAssign modes for footsteps. When you enable one of the four modes for controlling the structure of the biped or animating it, the tools you need will become available. There are radial buttons with an image of a stick figure doing a run, walk, and jump. The default is set to walk. Leave it as is for now. With further investigation of this module, you will very quickly be able to create the mechanics of a human walk. Following the flow of the diagram in Fig. 7.5, we will create multiple footsteps, set the size, enable the footsteps, and then bend the active footsteps around into a circle. Just follow the buttons down the panel as they become active.
8. Click the Create Multiple Footstep button and the Create Multiple Footsteps: Walk Dialog will appear. Set the number to 15 and hit OK.
The dialog for creating multiple footsteps takes into account the height of your biped and number of steps to calculate how far it could parametrically walk. This happens automatically when you leave the Auto Timing checked. With this interface, you are using a setup that used the biomechanics of a typical walk. Part of this involves the amount of time that both feet are planted on the ground, time to lift and plant each foot. At the beginning of every animation class, I have the tallest guy stand next to me in the center of the room and take 8 footsteps forward to prove this point.
9. In the panel below, Footstep Operations, click the Assign Inactive Footsteps button, which is now active, and the biped will appear to move a little. What has happened is that the feet are locked into those footsteps, and some subtle counterbalancing animation to the arms, for example, is now keyed as well.
Hint
If you deselect the footsteps before activating, they will not be active to assign to the biped. Make sure you do not click the screen until after the next step as well. If the footsteps are not white, they are not selected.
Play the animation. Notice how the number of active frames has also increased to take into account the timing relative to the number of footsteps you activated. There is a little bit of movement of the arm swing back and forth counterbalancing the legs. The hips aren’t really moving that much and the whole chest that is made up of four spine objects is actually stiff.
That’s where we come in with needing to create layers to add more weight and overlapping movement to the footsteps. Before that let’s have a little fun with the bipeds and explore working with the basic footstep motion.
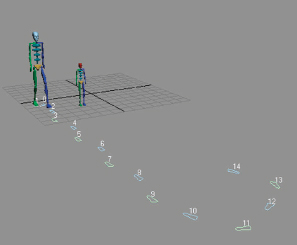
FIG 7.6
10. Go to the Edit Menu and do an Edit Hold.
11. Zoom out your perspective view, so that you can see all the footsteps.
12. Select footsteps 10–14.
13. Drag the bend spinner or type 45 for the degrees and hit Enter. The biped walks and then turns around. Nothing exciting yet!
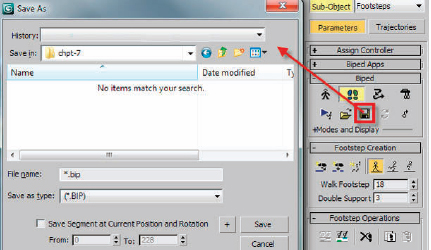
FIG 7.7
14. Click the Save button and call the file biped_walk_turn.bip. This will be loaded onto the other biped. If you enable Save Segment in the Dialog, the footsteps are removed and all objects are keyed. Leave it unchecked for now.
Now that you have saved this six step with eight step loop around as a BIP motion file, it will be loaded onto the smaller biped. You will notice that the smaller biped uses the same number of steps, but relative to it’s own size. It will also move to the original starting point of the other biped. It will use the same motion, but relative to its structure. This can create some interesting effects for you later on. As a first step into understanding Biped Motion, I want you to realize that motion can be saved, edited and applied as you want it. Since all character don’t start from the same position, we will also use the Move All Mode to position and even set the new file.
15. Turn off the Footstep mode and select the other biped.
16. Select any part of the shorter biped. Now click the Bip File Load button.
17. Navigate to where you saved the first file and load it on the smaller biped. Notice how it moves to the same starting point as the other biped.
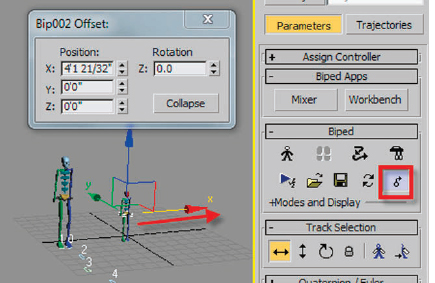
FIG 7.8
18. Turn on the Move all Mode and reposition the biped.
Hint
It’s a little easier to use select and move while this is active instead of trying to drag the spinner. There is also a Collapse function in the Move All Mode Dialog. This will offset spinners. If you resave this bip file, it will use the new position instead of the one from the original biped.
19. Play the animation. Both walk 7 steps forward and then loop around in a circle.
The “Move All Mode” also allows you to collapse the changes made to position and rotation. This will remove all the footsteps and generate a keyframe for all the Biped’s parts. If you are going to enhance the animation with layers and no longer need the footsteps, this is a good choice. It’s very hard to get good looking motion without editing the basic walk/run/jump parametric footsteps.
Re-save this Biped file again with a different name. I use a naming convention of adding “small” to the end of the name. Something like: biped_walk_turn_ small.bip works.
If you have done an edit hold, try collapsing the motion in move all mode. After saving the new biped file, turn on footstep mode and delete all the steps. Then turn figure mode on and off to reset the BIP to the original position it was in when created. If you load the collapsed biped file back onto this character, it will have the motion in the place you saved it, but without the footsteps. This is a good technique to use when you are creating animation keys that are not relative to the final placement in space. The motion can be re-positioned when you want and later on we will explore editing separate sequences together as well. The goal is to be able to create your own library of motions if you don’t have access to a motion capture system or enough biped files that suit your needs.
There are several rules that you will want to keep in mind when you’re working with the biped. Never try to animate the entire sequence of actions from start to finish in one file. It’s almost impossible to do a full animation start to finish with your character doing a whole bunch of different ranges of motions. What I mean is if you take a look at the way that they film movies for example, the action is shot several time from different positions and then edited together. I’m always asking my students to take a look at the bonus features on their favorite movies on DVD at home. There is a wealth of resources which these professionals share relative to their craft. When you start to think about each breaking down every major motion into separate pieces of action, and creating separate files for them, the process will be a lot easier. Instead of trying to act out a scene from start to finish perfectly, you will be blending together better segments.
If you think about the editing process of filmvideo, the concept of leaving some time before and after the action will make more sense. When using footsteps with bipeds, always add a few extra footsteps that you won’t be using at the end. The character has a interpolates like any other 3d object and tends to have extra motion beyond the last step which look jerky. It also give you the opportunity to allow time for blending actions together. We will explore this later on when using motion flow and mixer.
20. Save the file and call it ch7_tall_short_walking.max. Then do a reset.
21. Create a new biped and go to the Motion Panel. I’ve made mine about 5’7”.
22. Enter Footstep mode, click Create Multiple Footsteps, enter 10 for the number of footsteps, hit OK.
23. Activate the inactive footsteps.
24. From the Graphic Editors Menu, choose Dope Sheet.
25. Click the “+” button next to BIP 001 footsteps.

FIG 7.9
You’ll now see that your biped has 10 footsteps. The first two being lined up because your biped is starting out from a standing position. Notice how the other footsteps are offset and spaced across the timeline. The spaces inbetween footsteps represents the time that the foot is actually up in the air until the time that it plants. This is how the program interpolates a walk. Footstep lifts, moves through space, touches down, and then plants. The other leg counterbalances and is offset in time. Let’s see if we can get our biped to stop walking and then jump in the air. Once this is done, adding a layer to give the biped more of a sense of weight will be easier with an exaggerated motion.
26. Highlight steps 5 through 9 by dragging a marquee around and move those footsteps about 50 keys offset to the right. Based on the height of my biped, the left side of footstep 5 had a value of keyframe 75, so I dragged it to frame 125.
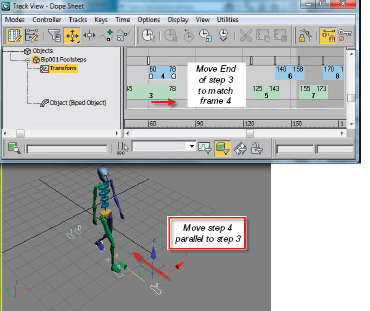
FIG 7.10
27. Move the end of footstep 3 to match the end of footstep 4. This will keep both feet planted together until the biped flies into the air. Because we want the biped to eventually jump into the air with both feet together, you will also have to adjust the placement of the footstep.
28. In the viewport, move keyframe 4 parallel to keyframe 3. The biped will now stop with both feet together. Moving footsteps does not affect timing, just the placement.
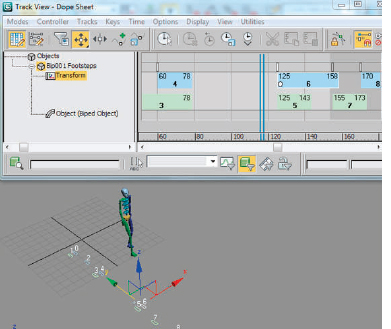
FIG 7.11
29. Repeat these steps for frames 5 and 6. Move 5 to line up with 6 in the viewport and adjust the start of 6 to line up with 5 in the Dope Sheet.
30. Save your file as ch7-freeform-area.max. If you load my file at this point, remember that you must select the biped and enter Footstep mode to see the footsteps in the Dope Sheet.

FIG 7.12
31. Right click in that large space between steps 3 and 45 and the biped 001 Footstep Mode Dialog appears showing that you’re in an edit Footstep mode. There is also a radio button to change to edit free-form, no physics.
When no physics is enabled, the biped is essentially not affected by being positioned in space relative to its footsteps. Notice how it floats way up into space. Part of this is also due to how the program is interpolating a large area of space between the keyframe of the Biped COM Object with a large distance of new uninterpolated space. When activated, you may grab your biped and make it fly through space without it being pulled into the next set of footsteps.
32. Click the Edit Free Form button and then close the Dialog.
33. Click the yellow outline box in the Dope Sheet, so it turns into a solid yellow line.
34. Minimize the Dope Sheet.
35. Play the animation and notice how the biped seems to float off its feet between frames 78 and 125.
36. Move to frame 78 and turn off Footstep mode.
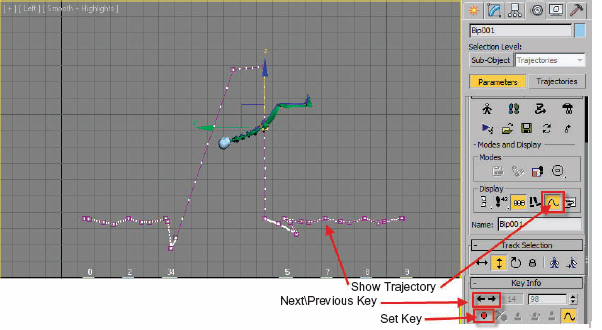
FIG 7.13
37. Open the Key Info Panel and make sure that Bip001 is selected.
38. Turn on Show Trajectory in the Display Area.
39. Move the biped down into a crouch at frame 78 and then hit the Set Key button.
40. Using the arrows for previous keys, move back to the previous Bip001 Com Key. It should be at frame 70. Move the biped into another crouch and then hit the Set Key button.
41. Click the right-hand “next” key until you reach about frame 90. Move the biped up in the air higher and also to the right but not exactly over the footsteps at frame 125. Make sure you hit Set Key after ever change or the keys will not be recorded.
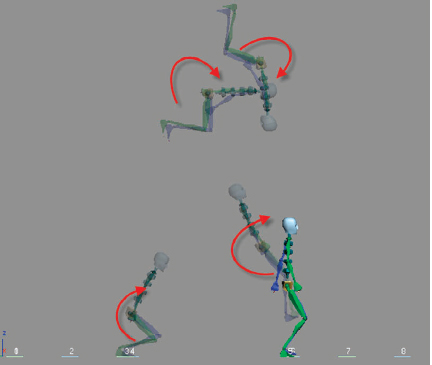
FIG 7.14
42. If you want to have your biped do a flip, you will have to create three to four incremental rotation keys instead of one 360° spin before landing. I added three rotation keys at frames 86, 92, and 105.
Notice how when you play the animation, the biped basically will float up in the air and come down. If you’re a fan of any superhero that flies, you may remember that they don’t just take off without some kind of characteristic motion prior to lift off. Sometimes it’s a pose, a wind-up, or a crouch. In the movies, your favorite actor or actress was probably hooked up to guide wires and then pulled through space. One of the pitfalls of working with a 3d system is that it doesn’t have a make me fly like a superhero button.
This is the point that it makes sense to start using Layers in every motion. Real living things not only move curves, but also have a tendency to pose with curves. Here is an example: For a person to jump, there is typically a coiling up of the body before they spring out into space. Unless of course, that is a really cool fact except what we want to do is really take a look at how to control and utilize a little bit more weight in our biped and also how to get this character to look like there’s some decent movement on it.

FIG 7.15
When a biped’s motion is created by hand, with mocap files or with footsteps as we have seen above, there are keys created for many objects which might not be exactly what you are looking for. Instead of deleting these unwanted keys or creating new ones on top of the existing keys, we can use layers to blend on top of the existing motion. In Fig. 7.15 above, you will notice a red stick figure standing more erect over the crouching biped. This represents base level animation created with footsteps before the freeform area of animation. For our character to jump up high in the air from a standing position, it would need to crouch down and compress like a spring before expanding and flying up into the air. We are going to create a series of layers for the spine to start with. The cool thing about layers is that you can create as many as you want for separate objects and turn them on or off if the motion created is not quite what you want.
43. Hit the “H” Key and select all the spine objects, neck, and head. Create a named selection set called spine-head.
44. Repeat this and create separate sets for the hands.
45. Select the spine-head set of parts and then expand the Layers Panel in the Motion Tab.
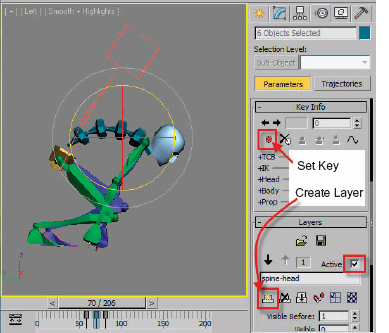
FIG 7.16
46. Create a new selection set called spine-head.
47. Scrub the timeline to around frame 58 where the biped is still standing before the jump.
48. In the Key Info Rollout, click the Set Key button to set a key on this layer for those objects.
49. Scrub to around frame 70 and then rotate the spine and head objects to curl the biped.
50. Hit the Set Key button again.
51. Scrub to frame 80 and rotate the biped parts to uncurl it. Remember to hit the Set Key button after each transform to record the keyframe.
52. Scrub the timeline and notice how the biped will crouch down and then stretch into the jump.
53. Create a new layer and really exaggerate the swinging of the arms back behind the biped and then forward through this action. Make sure that you do not key it exactly on the same keyframes as the other layers. By offsetting the timing of these body part actions, you will get a more natural looking motion.
The feet are held in place by the footsteps outside of the freeform area by the footsteps you originally placed. If you were to try to grab the Bip001 COM Object and move it down in a layer as if you wanted the biped to squat, the entire structure would lower as well in a layer. If you need to reposition the hips down lower at some point in time, it is very simple to de-activate a layer and key in changes to the Bip001 Com on the original layer. You could also leave the layers active and use the up or down arrow keys in the Layers Rollout to make changes to the base layer.