
CHAPTER 11
Camera as an Integral Part of the Scene
Richard Lapidus
Rule: Camera as the integral part of a scene
After Completing This Chapter, You Will be Able To:
• Smoothly move a camera in your scene with path constraints.
• Use depth of field for more realism.
• Consider the line of action when using multiple cameras.
• Use a background image.
Part of the learning curve in creating a 3d scene that draws the attention of a viewer and immerses them within the world you are creating is based on a number of factors. The most important being the aspect of how you use your camera. Whenever working with a professional client, one of the first questions I’ll ask them is relative to their camera moves. When viewing a poorly animated scene, typically you might see that the animator hasn’t thought about the action within the scene and will simply animate the camera from start to finish trying to follow the action or show every important detail. The worst-case scenario is linking the camera to a moving object and following it through the entire scene. This leads to what I call a virtual freeze. That’s where one element is stuck in the dead center of the frame and doesn’t appear to move that much if at all. Not only does it kill the realism of the scene but it also is very poor composition.
The camera, like most other 3d objects, is maneuverable through space and has unique parameters. The majority of them have the same basic problem to start with, that being a very shaky and poorly moving view of their environment. A set of keyframes are easy to adjust, the problem is that if you haven’t visualized in your mind how the camera is the integral link for your viewer to become immersed in the scene, it becomes more than a badly animated object.
I like to think of creating good animation from the aspect of how a person might go about creating a good photograph. There are the elements of good composition, which you can study by taking a class or doing a search on the Internet for the rule of thirds or good composition. Beyond the rules you have to be a good hunter. Here is an example of two really great photographers whom you may want to take a cue from. Those are Ansel Adams and Brassai. Each had very completely different subject matters but was masterful with their artwork because they were familiar with the environment in which they were working. Adams for example would go back to the same places year after year knowing that if he was there at the right time, the environment which he had no control over might provide him with the spectacular shot he was looking for. Brassai would wander the streets of Paris becoming familiar with the atmosphere and the people who just hung out in the streets late at night. In some respects, you have to be a hunter … waiting for the right moment. The similarity is that they have already taken time to be completely immersed in their environments and were waiting for the moment to converge. If you are not viewing your scene from the moment you start building it, you’re going to lose an awareness of the 3d space in your mind. In addition, you will probably be chasing after a moving object or trying to display part of the scene that you spent a lot of time working on instead of focusing on the key point. What you’re looking for is how the action moves through the scene or the message that you’re trying to get across to your viewer. It’s key that you maneuver your camera around through the scene and develop in your mind where things are moving around and why.
This purpose of this tutorial is to show you how to animate a camera through a scene smoothly, so that you can start to develop an awareness of the 3d scenes that you will be creating. There are other ways to animate your camera, but I like using a targeted camera controlled by two-path constraints as an exercise in seeing a scene and also a clearly defined line of action. In addition to this controlled camera we will create several other cameras which you might consider switching between in a final rendered project. One of the other great resources for developing an understanding of why you should use more than one camera to define the scene is probably sitting right in your living room. The next time you watch one of your favorite DVDs see if there aren’t any extras which talk about how the movie was produced. Very quickly find that most scenes are shots with multiple views and then edited together. It’s very seldom that you’ll find a production that was shot start to end with just one camera. We will start with loading an old project file that I produced of a school campus. It’s not a very good example of modeling by today’s standards because the entire scene was created with loft objects. As a resource for discussing cameras, it provides a very nice setting for maneuvering.
1. Load the file called chpt_12_school_campus_load.max.
2. Hit the F3 Key to enter wireframe mode.
3. Create a camera anywhere in the foreground and call it 360 spin camera.
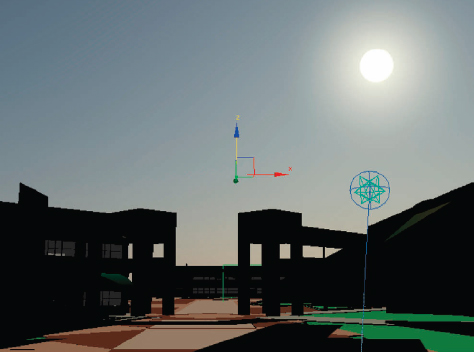
4. Hit the F9 Key and render a simple view. It doesn’t need to be the same position as the one in figure below. I just wanted you to explore around a bit and get used to moving the camera up with the Pan, Dolly, and Orbit Tools.
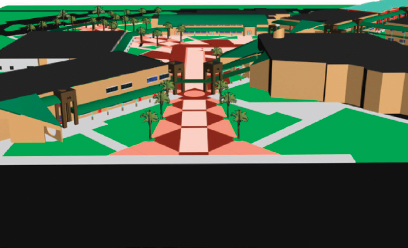
FIG 11.1
5. Hit the “H Key” or the select by name icon to find the “360 spin camera. target object”.
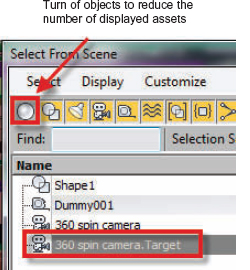
FIG 11.2
6. Drag out the Align Tool to Quick Align per Fig. 11.3 and then use the H Key to select the Dummy001 object by name. This will align camera target to the dummy, which is in the center of an interesting part of the campus.

FIG 11.3
7. Switch to the top viewport and select the 360 spin camera object.
8. Link it to Dummy001. We are going to do a pull in and spin around the campus.
9. Save your file. If you like I have incrementally saved the project and called it chpt_12_school_campus_load01.max if you want to have the same exact view as mine through the chapter.
10. Make sure the Select Tool is active and select the Dummy001.
11. Lock the selection with the space bar.
12. Increase the active number of frames to 200 and move the Time Slider to frame 200.
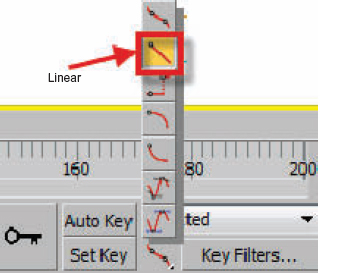
FIG 11.4
13. Change the key tangent type to linear per Fig. 11.4.
14. Turn on the Auto Key, angle snap (“S” Key), and rotate the dummy 360° on the “Z” axis.
15. Select the Camera and right click the Time Slider at frame 200.
16. Create a keyframe at frame 200 from its current position.
17. Play the animation and you see a perfect 360 looping spin, “BORING”.
18. Move to frame 0 and dolly the camera out until most of the scene is in the view.
19. Select the dummy001 object and move its rotation key from frame 0 to 100.
20. Play the animation.
This is one version of the million dollar camera dolly. Not the most pleasing of camera motions on the face of the planet. I used to see this a lot in the early days of animation when someone wanted to fly into the front of a large scene they had built from a long establishing shot and then do a 360 spin around the scene. This is not very pleasing to the eyes. More importantly, it indicates a substantial problem in theory of good cinematic production. Motion does not occur without a reason. I’ve seen students and professionals spend weeks or months modeling a scene and then animate the camera at the last moment. The tools for helping them kill their animation are the walk-through assistant, path controlled space cameras, linking to a moving object, or even haphazardly moving the camera through the scene. Essentially the focus isn’t on good composition and how you move a camera through the scene but just moving the camera, which is an animation at all, it’s just motion. The other problem that arises is the fact that your focus is essentially centered in the view even though the camera happens to be moving in this instance. Without the spin to move the camera around, a straight dolly and toward the camera target would essentially be a move without changing the focus of your scene. If you have a moving object and link the camera to it, you will create what’s called a “visual freeze.” The best example of this was first done by one of my students who built the nose of a dog and linked the camera to it. He animated the nose all over the scene as if it were a dog maneuvering around the way a dog would. What you end up seeing for several hundred frames is a dog’s nose frozen in the center of the image. Try this at home and see if it doesn’t become very apparent.
Hint
If you must use the walk-through assistant or animate your camera on a path with path constraints, always bring the interpolation of the path from the default of 6 steps to 100 steps. I’m so annoyed with the concept of teaching people how to make it look good with a controlled path that I decided to exclude it from print forever. Previous copies are available if you want to go down this path. Please excuse the pun.
21. Reload the file called chpt_12_school_campus_load01.max.
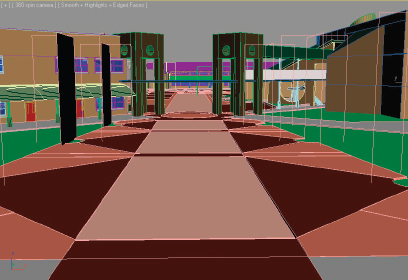
FIG 11.5
22. Dolly, pan, and orbit the camera, so that you’re looking down the main campus entrance. Please feel free to use Fig. 11.5 as a reference.
23. Because this is the setting for an architectural walk-through or backdrop for some animation let’s take a look at the mechanics of controlling the camera and some of the elements for setting a scene.
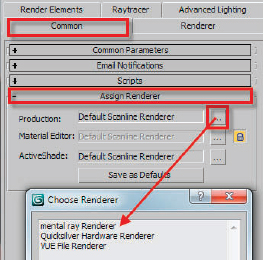
FIG 11.6
24. Hit F10 and at the bottom of the Common Panel, change the rendering type to mental Ray. This will give us a better rendering engine and also a background based on global position and time of day. Those in the next couple steps that we will put together.
25. In the Create Panel, choose the systems radio button.
26. Select daylight and drag out a compass in your scene. This will create a system that will allow you to access accurate global position relative to the sun during some part of the year. This system includes a direct light like any SkyDome, which will do a very nice job of creating outdoor lighting.
27. Click the Modify Panel and change the sunlight to mr Sun and the skylight to mr Sky.
28. When you change the skylight to the mr Sky, you will be prompted to use the mr Physical Sky in the environment map.
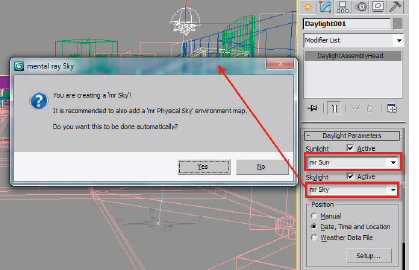
FIG 11.7
29. Hit the eight key on your keyboard to open the environment settings.
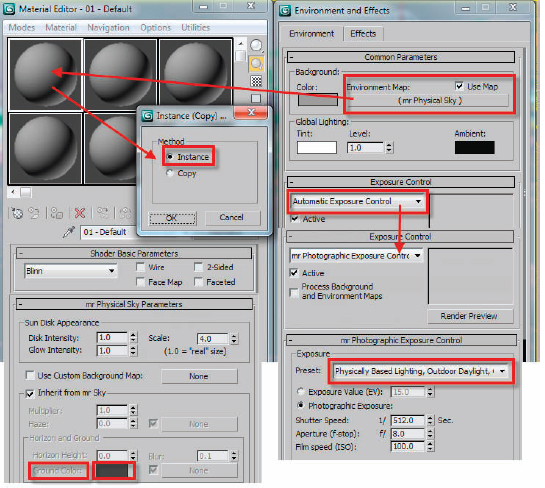
FIG 11.8
30. Please refer to Fig. 11.8 for the following steps.
31. Open a Material Editor and change to Compact mode.
32. Drag the new Environment Map mr Physical Sky into an open Material Editor slot and choose Instance as the method. Any changes you need to make to the environment background can be done in the Material Editor. You can change the size of the disk, the color of the sky, and the color of the ground for example.
33. In the environment settings, change the exposure control from Automatic Exposure Control to mr Photographic Exposure Control.
34. Choose the Physically Based Lighting, Outdoor Daylight, Clear from the Drop-Down.
35. Close both of these dialogues for now.
36. Hit F4 and enable Smooth + Highlights for the Shading mode of the camera viewport.
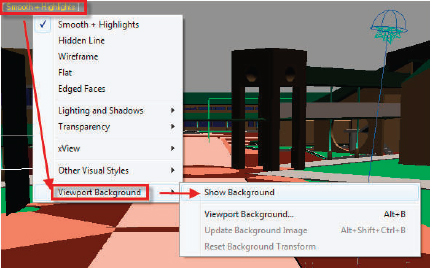
FIG 11.9
37. Left click on Smooth + Highlights and drag down the Viewport Background to enable Show Background and choose Viewport Background per Fig. 11.9.
38. Click the keyboard shortcut ALT + B to open the Viewport Background Dialogue. This can also be dragged out in the same procedure above as seen in Fig. 11.9. Enable Environment Background and Display Background. Click OK to close the Dialog.

FIG 11.10
FIGS 11.11 and 11.11a
39. Render the view and you should see something like Fig. 11.11A.
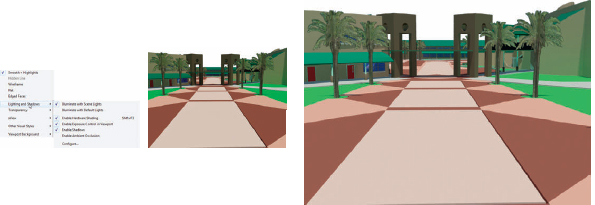
40. The last thing we want to do is click the viewports Shading mode, drag across from Lighting and Shadows. Enable Hardware Shading, Exposure and Shadows in the viewport.

FIG 11.12
Your viewport should now look like Fig. 11.12 with the sky and shadows showing in the viewport. Notice how I’ve rotated the daylight systems North direction to about 296°. This allows you to maneuver the disk of the sun from the mr Physical Sky to be seen in the viewport. I’ve also sets the hours to about 7 AM and the month to July 21.
41. Hit the Key and select the Camera Target. Notice how it appears in the viewport in Fig. 11.12 when you enable select and move. Drag it up on the “Z” axis until you see the sun’s disk. Hardware shaders are very cool.
Part of the process of creating an effective camera move through a scene is making sure that it’s lit properly and that you are getting contrast where you need it. If you simply animate the camera through and hope that the lighting is right, the odds are against you that it will work effectively. Thinking back to the example of America’s great outdoor photographer, Ansel Adams, he would go back to the same place waiting to catch the right atmosphere to take the amazing shots that he produced. If you haven’t had the opportunity to view his work you owe it to yourself to investigate the amazing atmospherics and types of compositions that he put together.
The question always arises as to whether to use free or target camera in a scene. The natural choice would be a free camera because there’s only one element to place in the scene and rotate into the view. I’ve always preferred targeting cameras because it allows me more subtle control of movements in my scene. Think about it for a second, a free camera can only orbit and rotate about its own pivot. Rotations are delineated by even numbers. Moving the targets or the camera gives you more subtle control than a rotation. A really good example of this is to create a very small scene and try to maneuver a free camera. Another way to look at it would be of a viewer wandering around through a scene, the targets can be moved back and forth as if the eyes were wandering as you move through the view.
42. Create a new targets camera in this entryway and also a dummy object.
43. Link the camera and its target to the dummy.
44. Now animate the dummy across the scene.
45. Scrub the timeline and imagine several areas that you may want to show up in the view.
46. Go back in and animate the camera target maneuvering left or right in the viewports. You can actually drag the X or Y spinner in the status line to not have to keep reselecting it and trying to grab the transform gizmo axis.
47. Another way to animate the camera that creates a very smooth move is to go in and set the target on the opposite side of the scene. Create a dummy object near the starting point of the camera and link the camera to the dummy.

FIG 11.13
48. Move through time and then Dolly the camera toward the target. That would be the top Dolly fly out.
49. Now select the dummy object and move it back and forth in the top viewport as you scrub through time. Notice in Fig. 11.14 how smooth the trajectory appears for the camera. For that image, I selected the camera went into the object properties and turn on the trajectory. You can get that smooth of a motion by setting keys and you also run into sort of the same problem using a path constraint. Think of the dummy as of force pushing the camera back and forth. You can even use this concept by animating an object across your screen and then using some movement or rotation on a linked dummy to create nice subtle control.
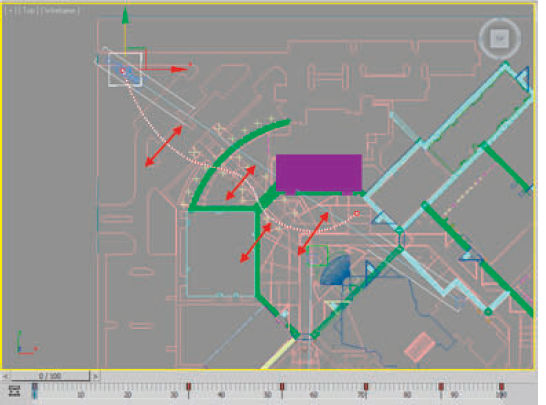
FIG 11.14
Just a few extra hints that you may want to think about while setting up and animating a camera in your scene. The first is to enable the horizon in the Modify Panel for the camera. In terms of good composition, you typically want to keep the horizon somewhere in the lower third of your composition. I can’t tell you how many animations I’ve seen ruined where there was a still background image used with the nonmoving camera. So many people like using the nice backgrounds that ship as part of the program’s maps. We’ve all seen them, these great images of sky with clouds. The problem is that these were shot by someone tilting the camera up into the sky in order not to catch whatever might be in the foreground or on the horizon. Subtly when I see that it feels like something’s off. If you use the camera horizon as a reference, this will help you to make adjustments with the background image. You can put an instance of that image into the Material Editor from the environment background and then offset the “V” coordinates. The line of the horizon can be used, so that you can see where the image would tile and repeat in the background environments.