
Kathryn Goodman & Ray Kent |
Maskmaking 101 |
This article details a method for designing and building sturdy and attractive masks using ATL75, a plastic-impregnated felt. These lightweight, water-resistant, tough masks are custom fit to the actor’s face providing maximum comfort, visibility, and breathability, as proven by Southern Illinois University’s production of The Good Woman of Setzuan. The set was fraught with actor traps including heights of over twenty feet and numerous obstacles navigated by masked actors frantically running around the stage. The several steps involved in building such successful masks takes careful preparation and requires approximately 40 hours of work. A list of the tools and materials used appears at the end of this article.
CREATING THE MOLD AND THE CASTING
Building a casting like that shown in Figure 1 requires creating a negative mold that duplicates the contours of the actor’s face. To make them, we used dental alginate, mixed according to the instructions on the package. With the actor leaning back or lying face up, apply a ¼″-thick layer of alginate over the entire face with plastic spatulas. In covering the nostrils, have the actor first take a deep breath to be held until after the nose is completely covered. Then have the actor exhale quickly through the nose. The resulting holes will be filled later. After the dental alginate has dried, reinforce the nose area with 1″ × 6″ strips of plaster bandage extending from the forehead downward. Next, apply a layer of horizontal strips over the entire face, overlapping the strips by about ¼″. Follow this layer with a layer of vertical strips, again covering the face completely. After the bandage layers have dried, gently release the mold. Any tears or cracks that occur in the mold can be fxed by applying small amounts of dental alginate with an artist’s brush. Complete the mold, sealing the nostrils with plaster bandages and building up the perimeter so that the mold forms a sort of bowl for the plaster of Paris. Line a sturdy box with loosely wadded newspaper and lay the mold face down in the box.

FIGURE 1: THE CASTING
Mix enough plaster of Paris to make the casting in one pour. Insert a loop of mechanic’s wire into the back of the wet casting so that it can be hung later for storage. Allow the casting to harden for at least twenty-four hours.
CREATING THE MASK
Creating the mask takes time and patience: there is a learning curve involved, but creating a second and subsequent masks should move progressively faster. The complexity of the design will also dictate how much time it will take, and the scale of facial detail is important. Exaggerated features read better on stage and are more easily built.
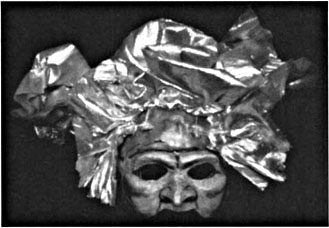
Carefully pull the casting from the mold and prop it up on a table or hang it at a comfortable working height by its embedded wire loop. Next, apply modeling clay to the casting and sculpt it into the desired features. (This took us approximately three hours per mask.) After sculpting the desired features, cover any prominent protrusions, such as horns or exaggerated noses, with appropriately sized pieces of aluminum foil. With a spoon or similar tool, rub the foil into the clay and burnish it until smooth. Next, cover the entire face with a single piece of aluminum foil. Smooth and burnish this final foil layer. This last layer of aluminum foil serves as a sacrificial release agent, and yet provides a base that the mask material can cling to. Do not spray any release agents on the foil.
Applying the mask material, ATL75®, to the aluminum foil is the most time-consuming part of the process — approximately thirty hours per mask. It also involves a health hazard since it uses methyl ethyl ketone (MEK) as a solvent. Always work in a well-ventilated room and wear chemical-resistant gloves and splash goggles while using it. Cut the fabric into ¼″-wide strips more than long enough to cover the face from crown to neck. Working one strip at a time, soak the fabric in a glass bowl of MEK until it is limp. Starting along the centerline of the nose, apply the strips, using wooden spoons as necessary to push the fabric snugly into hollows under the nose and lips. Because the ATL75® will want to stick to the spoons, you will need to dip the spoons in the MEK repeatedly as you work. The strips of fabric need to be applied quickly because the ATL75® sets up as the MEK evaporates. You cannot re-soak a strip after you start to apply it.

FIGURE 2: BURNISHED MASK
Working from the first strip, apply adjoining strips, tightly butting their edges together like wallpaper without overlapping them. Leave the occasional gaps that occur for patching later. Continue with the vertical strips until the mask is completely covered. Fill any gaps in the layer with custom cuts of the fabric. After the layer of vertical strips is complete, apply a layer of horizontal strips. After both layers are completely dry (about 24 hours), pull the hardened fabric off the plaster casting and peel any scraps of aluminum foil off the mask.
Trim the edges of the fabric and bind the perimeter of the mask with mechanic’s wire to prevent fraying and splitting of the edges and to strengthen the mask. Cut the mechanic’s wire and a 1″ strip of the fabric 2″ longer than would be enough to go around the edge of the mask completely. Bend the wire to conform to the mask’s edge and cover it with the MEK-soaked fabric strip, leaving ½″ of fabric on either side of the wire. Let this dry.
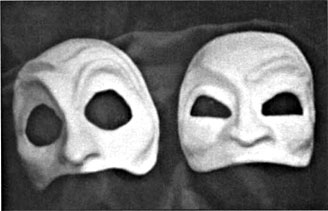
FIGURE 3: MASKS WITH PRIMER COAT
Next, cut out the desired eye shape with an Exacto knife, making sure the eye holes are large enough to accommodate the actor’s peripheral vision. Then drill out the nostrils with a regular twist bit. Drill two additional but smaller holes just above each ear to attach elastic bands. Rub vinyl spackle into the fabric with your finger to create a smooth, durable, and paintable surface. Sand the dried spackle smooth, starting with 80-grit and working up to 400-grit sandpaper. Finally, rinse the spackle dust off the mask with cold water, dry the mask, and apply a primer coat to both sides. See Figure 3. It is better to paint and clear coat the mask before adding hair or appliques of jewels or fabric. if hair is required, drill small holes in the mask, feed the hair through to the inside of the mask and secure it with hot glue. This allows for a more natural lay of the hair and gives a better overall appearance.
This type of mask has many advantages. Because the mold is taken right from the actor’s face, it provides maximum comfort. Its light weight reduces the number of complaints from actors, and its strength and durability ensure that it can also take quite a lot of hard use with little or no damage. Enjoy and be creative!
TOOLS AND MATERIALS
Caution: While using ATL75 and MEK, work in a well-ventilated area, and wear chemical-resistant gloves, a respirator, and splash goggles.
| For the Mold | for the Casting |
| Plaster bandages (any medical supply store) | 5 lbs. figurine-grade plaster of Paris |
| Dental alginate | 2″ loop of mechanics’; wire |
| Mixing containers | Newspaper |
| Plastic spatulas | 1 box large enough to hold the casting |
| For Building the Mask | For Finishing the Mask |
| Modeling clay | Mechanics’ wire |
| Aluminum Foil | Vinyl spackle |
| ATL750®-impregnated fabric | Sandpaper (80–400 grit) |
| methyl ethyl ketone | Primer |
| Wooden spoons | Latex enamel paint |
| Glass bowl | Clear coat polyurethane |