
Pater Liao |
A Durable, Rough Texture Coating for Scenery and Props |
There’s no shortage of information about the ingredients used in texture coatings for scenery and props. Every stagecraft text offers detailed recipes, nearly every shop has a favorite “house blend,” and of course there’s always the wisdom of the Internet. Nevertheless, many of the texture coatings used in theatre suffer from two shortcomings: they can’t easily be built up into rich relief; and they tend to be fairly fragile. This article addresses those problems.
THE PROBLEM AND SOLUTION
The “Shadow Dance” segment of California State University-Pomona’s 1993 production Bends in the Road was set in a five-thousand-year-old tomb. The challenge was to give the wagon-mounted unit an inexpensive coating that looked like rough stone and that would not break or chip during scene changes.
Figure 1 illustrates the texture we achieved by using mixtures of three readily available materials: vermiculite, joint compound, and white glue. The vermiculite provided the actor-friendly and realistically rough surface texture we wanted. The joint compound gave the mixture substantial body, letting us build up the depth of the coating. Ordinary white glue provided enough adhesive strength to keep the texture in place on our tomb’s walls.
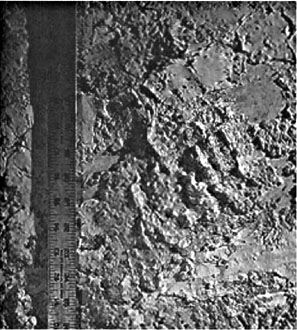
FIGURE 1
PREPARATION AND APPLICATION
We built standard Hollywood flats for the tomb’s basic structure. But rather than apply the texture material directly to the flats’ lauan skins, we first applied a single layer of theatrical gauze. We rolled white glue onto the flats as they lay on the floor and then “wallpapered” them with the gauze, which we smoothed into the glue as evenly as possible. We immediately top-coated the gauze with another roller application of glue and then let the flats dry overnight.
Covering the flats with gauze served two very useful purposes: it gave the lauan a useful amount of tooth, increasing the chances that our texture coat would stay in place, and it gave us an effective means of hiding any holidays in the texture coatings.
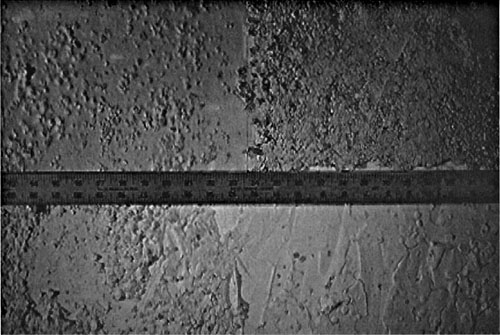
Merely combining the joint compound, glue, and vermiculite in four different proportions yielded the rich texture we needed. The individual possibilities are shown on the next page. The texture at the upper left in Figure 2 results from a 1:1:1 blend (joint compound:glue:vermiculite). Doubling the amount of joint compound in the mix for a 2:1:1 blend yields the chunkier texture shown at the lower left, which is largely responsible for giving the finished product its impressive depth. The pancake-batter-like texture at the lower right is produced by doubling the glue (1:2:1); and the contrasting granular texture in the upper right corner is produced by doubling the vermiculite (1:1:2).
We troweled all four mixtures onto the flats simultaneously, aiming more for visual effect than for even coverage. We let the coating dry overnight and then used brushes and sponges in painting the hard, deeply textured surface.
FINAL NOTES
This combination of materials becomes quite rigid and is probably suitable for use on continuous and sturdy surfaces only. We have not tested whether the addition of a plasticizer or the use of a flexible glue would allow application directly over hardware cloth, window screening, or other similarly “open” armatures, but it seems an interesting possibility.
Certainly, other texture materials such as sawdust or sand can be used instead of vermiculite. Vermiculite, however, has the advantage of being cleaner than sawdust, less abrasive than sand, and lighter than either of them.