
Configuring the Operations Console to Use SSL to Connect to a Reporting Server
</objective> <objective></objective> <objective></objective> <objective></objective> </feature>This chapter examines different aspects of securing Operations Manager (OpsMgr) 2007. We discuss user roles, Run As Profiles and Run As Accounts, and service accounts used by OpsMgr 2007. We also consider how security for OpsMgr works across multiple domains, how Operations Manager uses the Gateway Server Component to monitor non-trusted domains, procedures for monitoring agents in workgroups, ACS security, using OpsMgr in an environment with firewalls, and securing communications.
The Operations console includes access to over 150 available operations, which fall under the following categories:
Monitoring—. These operations include opening views, resolving alerts, executing tasks, and overriding monitors.
Authoring—. Authoring includes creating and modifying management packs.
Reporting—. Reporting operations consist of using and designing reports and managing report security.
Administration—. Administrative operations include configuring security; importing, exporting, and removing management packs; changing global settings; discovering computers and devices; configuring notification; and installing agents.
As Operations Manager can monitor many types of applications potentially administered by multiple teams, using role-based security gives an administrator the ability to limit privileges that users have for various aspects of OpsMgr. User roles determine the level of functionality a user will have. Roles can also limit the scope of views and tasks that are available to each user.
Role-based security has been evolving on the Windows platform since Windows NT 3.1. You will find user roles in SQL Server and Exchange; role-based security is part of Windows Server 2003. Operations Manager 2007 uses roles to determine whether a process (an instance of an executing program) is privileged by checking the security context for a particular user or group.
User roles do more than limit console access in Operations Manager. OpsMgr’s role-based security also controls access to any operation that utilizes the SDK (Software Development Kit). Because nearly everything written in Operations Manager 2007 uses the SDK, this means that security at the SDK level encompasses anything that uses the OpsMgr class libraries to connect to the SDK service. As you can see in Figure 11.1, the SDK is responsible for communications between the client and the management service and accessing the Operations database, isolating the risk associated with remoting. Think of the SDK service as the gatekeeper for all access.
Figure 11.1 also shows the integration of Windows Communication Foundation (WCF) technology in SDK communications throughout Operations Manager. The initial authentication attempt uses the user’s credentials and the Kerberos protocol. If Kerberos does not work, another attempt is made by using NTLM. If authentication still fails, the user is prompted to provide credentials. After authentication takes place, the data stream is encrypted as a function of either the Kerberos protocol or Secure Sockets Layer (SSL) with NTLM. Additional information about WCF is available at http://go.microsoft.com/fwlink/?LinkId=87429.
In Operations Manager, when a console is launched, it connects to the SDK service on the Root Management Server (RMS). The SDK service then connects to the Operations database. Because user roles go through the SDK, they impact not only what one can do at the console but also with PowerShell cmdlets and custom clients.
Roles specify the types of operations a user can perform and the scope of these operations:
[User] has [Role] is allowed to execute [Tasks] made up of [Operations]
As examples, a user role that grants authoring rights may limit its scope to a particular list of classes, whereas a user role that grants monitoring rights may limit that scope to a list of monitoring groups and views. This is diametrically different from MOM 2005, where the only way to limit a user’s scope was to build a customized view as a client-side filter (which has limited results both then and now, as views do not actually limit security access) or create a separate management group—a configuration often implemented for security administrators. OpsMgr 2007 has security scoping, which directly limits access to the objects.
When discussing roles, one should also be aware of profiles and scopes:
Profiles—. Operations or tasks such as resolving alerts, executing tasks, overriding monitors, creating user roles, viewing alerts, viewing events, and so on, are grouped into profiles.
Scopes—. A scope defines the entity groups, object types, tasks, or views a profile is restricted to. Scopes do not apply to all profiles.
A role is a combination of a profile (capabilities) and a scope (the breadth of data and objects one is able to access). A role assignment is an association of Windows security groups and/or users to Operations Manager roles. Typically, AD security groups are assigned to roles, with individual user accounts assigned to those security groups. This again differs from MOM 2005, where each management server used local security groups to restrict access, without limiting access to scope. Role assignments also allow OpsMgr to authorize a user based on the union of his or her roles.
Table 11.1 lists the roles provided by Operations Manager out-of-the-box with their associated profiles and scope.
Table 11.1. OpsMgr-Provided Role Definitions
Role Name | Profile Type | Profile Description | Role Scope |
|---|---|---|---|
Operations Manager Administrators—Created at setup time, cannot be deleted, must contain one or more security groups. OpsMgr Administrators control who has access to the different areas of the console. | Administrator | The Administrator profile includes full privileges to Operations Manager, and cannot be scoped (similar to MOM Administrators in MOM 2005). | Full access to all Operations Manager data, services, administrative, and authoring tools. |
Operations Manager Advanced Operators—Created at setup, is globally scoped, cannot be deleted. | Advanced Operator | Limited change access to Operations Manager configuration; ability to create overrides to rules and monitors for targets or groups of targets within the configured scope. | All groups, views, and tasks currently present and those imported in the future. |
Operations Manager Authors—Created at setup time, is globally scoped, cannot be deleted. | Author | Ability to create, edit, and delete tasks, rules, monitors, and views within configured scope (similar to MOM Authors in MOM 2005). | All groups, views, and tasks currently present and those imported in the future. |
Members of the Author User profile have access to credentials for only the items they have the rights to author. | |||
Operations Manager Operators—Created at setup time, is globally scoped, cannot be deleted. | Operator | Ability to interact with alerts, execute tasks, and access views according to configured scope (similar to MOM Users in MOM 2005). | All groups, views, and tasks currently present and those imported in the future. |
Operations Manager Read-Only Operator—Created at setup, is globally scoped, cannot be deleted. Users who are members of the Read-Only Operator role cannot view or run any tasks. For this reason, no tasks appear in a task status view opened by a Read-Only Operator. | Read-Only Operator | Ability to view alerts and access views according to configured scope. | All groups and views currently present and those imported in the future. |
Operations Manager Report Operator—Created at setup, is globally scoped. Users must be a member of the Report Operator Users role to run reports. When a report runs, it uses the OpsMgr SDK to ask what the report membership is of the user running the report. What is actually being checked is the role of the user. The OpsMgr SDK returns a GUID and the report itself has a GUID; if these match, access is allowed. | Report Operator | Grants members the ability to view reports according to configured scope. | Globally scoped. |
Operations Manager Report Security Administrators—Integrates SQL Reporting Services security with OpsMgr user roles, gives Operations Manager Administrators the ability to control access to reports, and cannot be scoped. Users assigned to this role have access to all report data in the Data Warehouse database. | Report Security Administrator | Enables integration of SQL Reporting Services security with Operations Manager Roles. | No scope. |
You may note from Table 11.1 that the built-in roles do not limit scope, meaning they have access to all groups, views, and tasks (with the exception of the Report Security Administrators). To narrow scope, you can create your own custom roles based on the Operator, Read-Only Operator, Author, and Advanced Operator profiles. There is no limit to the number of user roles you can implement.
Caution: Security Alert
Adding a machine account to a user role allows those services running in the Local System or Network Service context on the computer to have Software Development Kit (SDK) access.
The Administrator profile is not customizable, meaning you cannot create additional user roles based on the Administrator profile, or modify the built-in Operations Manager Administrator’s role. An administrator can do anything; all you can do is limit membership to this role.
By default, the Operations Manager Administrator is the only account with the right to view and act on monitoring data. All other users must first have a user role assigned in order to view or act on monitoring data.
You can add AD security groups or individual accounts to any of the predefined user roles. When creating a role, you have the option to narrow the scope of the groups, tasks, and views that it can access. If you create a user role based on either the Author or Advanced Operator profiles, those users will need access to the Operations console to perform the tasks those profiles allow.
If a user does not have the right to view a monitored object or perform an action, that object or action does not appear or it will be grayed out in the Operations console. (By contrast, the Web console is best for users with a user role based on the Operator or Read-Only Operator profiles; only the Monitoring and the My Workspace panes are available in the Web console, which is used to view monitoring data, run tasks, and resolve alerts.)
Let’s step through the process of creating a new Author user role. Authors are able to create, edit, and delete tasks, rules, monitors, and views within their scope. Navigate to the Administration space in the Operations console and perform the following steps:
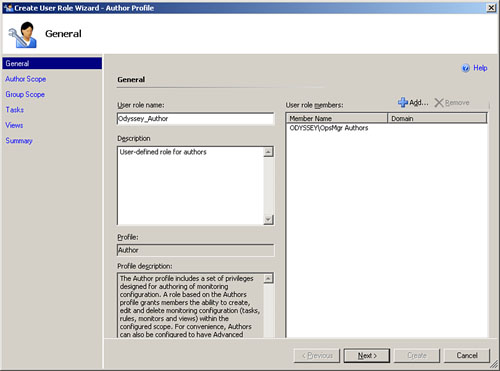
In the Administration pane, select Security. Right-click on User Roles, select New User Role, and then select the Author profile as displayed in Figure 11.2 to initiate the Create User Role Wizard.
In the General page of the wizard, enter a name for the User role name, and then click Add. (We typed Odyssey_Author.)
On the Select User or Groups dialog box, specify the Active Directory users or groups to add to this role and click OK.
As a best practice, you will add groups rather than individual users to a role. On the General page, add an optional description. Figure 11.3 shows this page completed with the User role name, Description, and User role members fields populated. Click Next.
The Author Scope page asks you to Approve Targets. Members of this user role can create or edit monitors, rules, tasks, or views for approved targets.
To narrow the scope, specify the option that Only targets explicitly added to the “Approved targets” grid are approved, and click the + Add icon to bring up the Scope Management Pack Objects by target(s) dialog. We will select the Agent and Windows Computer as targets (meaning that members of this role can create or edit monitors, rules, tasks, or views only for the Agent and Window Computer objects), and then click OK to return to the Author Scope pane, displayed in Figure 11.4. Click Next.
The Group Scope page allows you to restrict this role to setting overrides and monitoring objects in specific computer groups. The default scope is the entire management group. For this example, we will take the default. Click Next.
The next two pages enable you to limit the tasks and views for members of this role. Click Next on each page to permit all tasks and views.
The Summary page displays all selected properties. Click Create to create the role and complete the wizard.


This was a fairly simple illustration of creating a role. We can further narrow the scope of this authoring role for setting overrides, restricting access to particular computer groups, or limiting its tasks and views. The actions you can restrict will vary based on the profile associated with any particular role.
Groups, like other OpsMgr objects, are defined in management packs. Your Operations Manager installation created a number of groups from the management packs (MPs) imported during that process. If your existing groups do not contain the monitored objects you need for a scope (you can check group membership using the EnumerateGroupsAndMembers PowerShell script introduced in Chapter 8, “Configuring and Using Operations Manager 2007”), create a group that does. To do this, exit the Create User Role Wizard, switch to the Authoring space, and use the Create Group Wizard (Authoring -> Groups, right-click on Groups to select Create a New Group, which initiates the wizard) to create a group that better suits your needs.
How do permissions work when your user account belongs to multiple roles? Similar to how security group privileges work with the Windows file system, the accesses given to the roles are combined so your access is the combination of the accesses granted to all those roles. If any one role gives you access, you will have access. One difference here from security group permissions is there is no concept of “no access.” There is no way to “deny access” via a role.
Tip: Monitoring Security Access
Review your role memberships on a regular basis to ensure that only the necessary user accounts and groups have access to the appropriate functionality.
We can also use PowerShell to administer roles. The next sections of this chapter look at PowerShell cmdlets for adding a user to a user role, and creating a Report Operator role.
Currently, there is no cmdlet for adding a user to a user role, but Boris Yanushpolsky of Microsoft has provided the following technique to assist by combining the Get-UserRole cmdlet with the SDK.
The following code snippet adds the ADOperators group to the Operations Manager Operators user role:
$operatorsUserRole = Get-UserRole | where {$_.DisplayName -eq "Operations Manager Operators"}
$operatorsUserRole.Users.Add("odysseyAdOperators")
$operatorsUserRole.Update()
The next snippet removes the ADOperators group from a user role. It is very similar; you just call the Remove method rather than Add, as follows:
$operatorsUserRole = Get-UserRole | where {$_.DisplayName -eq "Operations Manager Operators"}
$operatorsUserRole.Users.Remove("odysseyAdOperators")
$operatorsUserRole.Update()
Be sure to call the Update method (the last line of code in the snippet) on the user role object to save your changes.
This information is also available at http://blogs.msdn.com/boris_yanushpolsky/archive/2007/08/13/adding-users-to-a-user-role.aspx.
Let’s say you need to create a role that only grants the users who belong to that role the ability to run Audit reports. However, the Operations console does not include the capability of creating the Report Operator role. Once again, the PowerShell Command Shell comes to the rescue! The following script is provided by Eugene Bykov of Microsoft to create an object called Test Report Operator Role:
$mg = (get-item .).ManagementGroup
$reportOperator = $mg.GetMonitoringProfiles() | where {$_.Name -eq "ReportOperator"}
$obj = new-object Microsoft.EnterpriseManagement.Monitoring.Security.MonitoringUserRole
$obj.Name = "TestReportOperatorRole"
$obj.DisplayName = "Test Report Operator Role"
$obj.Description = "Test Report Operator Role"
$obj.MonitoringProfile = $reportOperator
$mg.InsertMonitoringUserRole($obj)
After you execute this script, “Test Report Operator Role” appears in the console, and you will be able to add users to it.
The SystemCenterForum folks have modified Eugene’s script to make it parameter-driven. The modified script accepts the parameters listed in Table 11.2.
A sample command-line execution would look like this:
PowerShell ./AddReportingUserRole.ps1 rootMS.server.local DBTestRole 'Test DB Role' 'A test role created by PowerShell'
The PowerShell script follows:
param($rootMS,$roleUserName,$roleDisplayName,$roleDescription)
#Initializing the Ops Mgr 2007 Powershell provider
     add-pssnapin "Microsoft.EnterpriseManagement.OperationsManager.Client" -ErrorVariable errSnapin;
     set-location "OperationsManagerMonitoring::" -ErrorVariable errSnapin;
     new-managementGroupConnection -ConnectionString:$rootMS -ErrorVariable errSnapin;
     set-location $rootMS -ErrorVariable errSnapin;
#Checks to see if it failed or succeeded in loading the provider
     if ($errSnapin.count -eq 0){
        Write-host ''nOpsMgr 2007 PSSnapin initialized!'n';
     }
     else{
        Write-host ''nOpsMgr 2007 PSSnapin failed initialize!'nPlease verify you
are running this script on a Ops Mgr 2007 Management Server";
        Write-Host;
     }
$mg = (get-item .).ManagementGroup
$reportOperator = $mg.GetMonitoringProfiles() | where {$_.Name -eq "ReportOperator"}
$obj = new-object Microsoft.EnterpriseManagement.Monitoring.Security. MonitoringUserRole
$obj.Name = $roleUserName
$obj.DisplayName = $roleDisplayName
$obj.Description = $roleDescription
$obj.MonitoringProfile = $reportOperator
$mg.InsertMonitoringUserRole($obj)After user roles are created and scoped to specific tasks, the associated data is stored in %ProgramFiles%System Center Operations Manager 2007SDK Service StateMomAuth.xml. You can view the contents of this file using the AzMan.msc Microsoft Management Console (MMC) snap-in. To run AzMan (Authorization Manager), perform the following steps:
From Start -> Run, type MMC, and click OK.
When the MMC console comes up, click File –> Add/Remove Snap-in..., then the Add... button.
Select Authorization Manager and click Add, Close, and then OK.
In the MMC, right-click on Authorization Manager.
Select Open Authorization Store....
Browse to the MomAuth.xml file (located on the RMS at %ProgramFiles%System Center Operations Manager 2007SDK Service State) and click OK.
This process allows an administrator to browse the different rights and operations that are loaded into Authorization Manager, and is useful when rights are not working as expected. As an example, Figure 11.5 shows the mapping for the Odyssey_Author user role we just defined (see the “Creating User Roles” section of this chapter) to the AD OpsMgr Authors group.

During setup, you assigned a security group to the Operations Manager 2007 Administrators role (associated with the Ops Admins group in Active Directory). By default, the BUILTINAdministrators group on the RMS in assigned to this role, and the local Administrators group is the only member of the Operations Manager Administrators role. If you plan to use the Active Directory-based agent assignment feature discussed in Chapter 9, “Installing and Configuring Agents,” this role should contain a domain global or universal group.
If an incorrect group is configured for the Administration role, you will be unable to open the Operations console. Normally you could use the console to change the group associated with a role, but in this case you are not able to start the console! To reset this group, you will need to stop the SDK Service, edit the MOMAuth.xml file, and update the data field in the AuthorizationStore database table. The specific steps are listed next.
To stop the Operations Manager SDK Service, perform the following steps:
Logon to the RMS using an account with Administrator privileges.
Select Start -> Run.
In the Run dialog box, type services.msc, then click OK.
At the Services console, right-click OpsMgr SDK Service, and then click Stop.
To edit the MOMAuth.xml file, perform the following procedure. Be sure to back up the xml file before performing any edits:
At the Windows desktop, right-click Start -> Explore.
Navigate to %ProgramFiles%System Center Operations Manager 2007SDK Service State, right-click the MOMAuth.xml file, select Open With..., and then click Notepad.
In the MOMAuth.xml file, search for the following string:
<LINELENGTH>90</LINELENGTH>Description="OperationsManagerAdministrators"
Verify that you have found the AzRole Guid tag.
The following SIDS are listed as members:
S-1-5-18 (Local System)
The SID for the Administrators group that was entered during setup
Replace the Administrators group SID with the desired SID (the SID for BUILTINAdministrators is S-1-5-32-544).
Save the file. (In Notepad, click File, and then click Save.) Remember to make a backup of the original file first!
Next, copy MOMAuth.xml into the clipboard and replace the contents of the data field in the AuthorizationStore table in the Operations database:
In Notepad, select Format, and verify that Word Wrap is not enabled.
Select Edit, and then click Select All.
Select Edit, and click Copy. Close Notepad.
On the Windows desktop, select Start -> Programs -> Microsoft SQL Server 2005 -> SQL Server Management Studio.
In the Connect to Server dialog box, click Connect.
In the Object Explorer pane, expand Databases, right-click OperationsManager (or the name you assigned to the Operations database if different), and then click New Query.
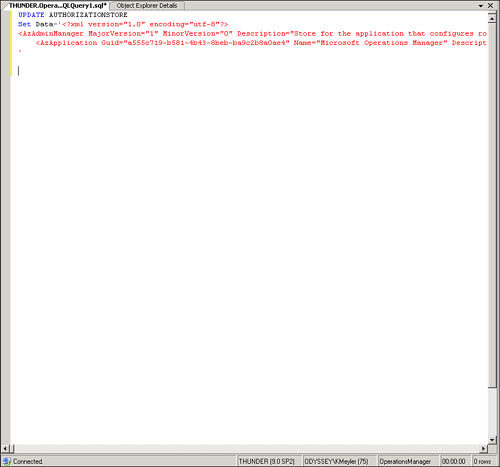
In the query pane, type update authorizationstore and then press Enter.
Type set Data = ’.
Paste the contents of the MOMAuth.xml file by pressing CTRL+V.
Type ’ (single quote), and then click Execute. Figure 11.6 shows the query pane.
Now exit SQL Management Studio (click File, and then Exit).
Last, you need to restart the OpsMgr SDK Service:
If the Services console is not open, at the Windows desktop, select Start -> Run. Type services.msc in the Run dialog box and click OK.
In the Services dialog box, right-click OpsMgr SDK Service and then click Start.
Exit the console (File, and then click Exit).
These steps update the group assigned to the Administration role. You should now be able to open the console.
Tip: Adding Groups to the Operations Manager Administrators User Role
If you try to add groups to the OpsMgr Administrators User role, you may notice that the graphical user interface will only let you search on domain groups. The BUILTINAdministrators is a special case; it is the only local group allowed to be a member of the Operations Manager Administrators role.
Management pack components such as rules, monitors, tasks, and discoveries require credentials to run on the targeted computer. By default, these run using the Management Server Action account.
A Run As Profile allows a management pack author to associate an identity other than the default Action account with a particular module so that it can run using the credentials of that identity. At a minimum, the account used needs to have logon locally rights.
Run As Profiles take a Windows user account (which can be a local or domain account) and apply it to a specified profile in Operations Manager. For example, the Exchange management pack has a profile; you can assign a user to it so it will run using the credentials of that user. A Run As Account is the user account assigned to a Run As Profile. (We discuss Run As Accounts in more detail in the “Run As Accounts” section of the chapter.) Similar to Run As Accounts in Windows, privileges are elevated only while the action targeted by the Run As Profile is running.
Operations Manager automatically creates five Run As Profiles during setup:
Default Action Account—. The Operations Manager Default Action account is the default Windows account the Operations Manager processes run under. The account needs sufficient privileges to gather data from providers (modules that gather performance counter information and events). The minimum required permissions are Log On Locally, Performance Monitor Users, and a member of the Users group.
Data Warehouse Action Account—. If specified, this account will run all Data Warehouse collection and synchronization rules, rather than the regular Action account. If not overridden by the Data Warehouse SQL Authentication Action account during your OpsMgr Reporting setup, this account is also used by collection and synchronization rules to connect to the data warehouse database using Windows integrated authentication.
Tip: Bug in OpsMgr OpsMgr Code When Using the Data Warehouse Action Account
The released version of OpsMgr 2007 has a bug causing the Management Server Action account to be used as the Default Data Warehouse Action account, rather than the Data Warehouse Action account you specified. This is fixed in Service Pack 1 (SP 1).
As a workaround, you can create a Run As Account (type Simple), set the username and password to a single space, and in the same-name profile, associate this account with all your management servers, including the RMS. You will also want to verify that the Data Warehouse Action account profile is correctly associated with an account for all management servers to use as the Windows authentication account.
Data Warehouse SQL Authentication Action Account—. If specified, this login name and password is used by collection and synchronization rules to connect to the data warehouse database using SQL authentication.
Notification Action Account—. This is a Windows account used by Notification Rules. Its email address is used as the email and instant message “From” address.
Privileged Monitoring Profile—. Unlike all other profiles, this profile defaults to Local System, but it can be changed to use another privileged user if necessary. All tasks and workflows requiring system level access should use this profile; typically, this would be discovery workflows. Do not use the Privileged Monitoring Profile just to guarantee access to resources—this adds unnecessary risk to your installation.
A Run As Account typically maps to an Active Directory user account, although SQL credentials, forms authorization credentials, binary credentials (certificate authorization), HTTP basic authorization, HTTP digest authorization, and Simple Network Management Protocol (SNMP) community strings are also supported. The Run As Account represents an identity that can be associated with a Run As Profile. The profile maps the Run As Account to a specific computer. Rather than assigning additional rights to the Action account, using Run As Accounts and Run As Profiles provide the ability to run a task, rule, or monitor with an account that has the necessary rights.
There are also single use accounts—these are accounts that you enter to run a single task. The Operations console allows you to use the default account or a specified account. These accounts use the same infrastructure as Run As Accounts, except that the credentials are not kept. They are encrypted in memory and then discarded after use.
When configuring Run As Accounts, consider the rights the Action account needs and choose a user account with those privileges. Generally speaking, using a Domain Admin account is not a good choice! Using a highly privileged account ensures that all management pack features will work, but this introduces risks associated with using high-privileged accounts that have more than the required permissions to do the job, and will make your auditors unhappy.
Tip: Check Credentials When Creating Run As Accounts
The Create Run As Account Wizard does not actually verify the credentials you specify when creating the Run As Account. If you enter incorrect credentials, the account you create will not successfully run its assigned monitor, rule, or task. The Wizard does not verify the credentials—because the account might exist in another forest or individual computer’s (member or workgroup computer) SAM. Since there is no check, Windows accounts are not verified either.
Of course, when OpsMgr tries to use that “bad” account, you will get an alert! As a best practice, you should verify that the account exists and its credentials are adequate before using it as a Run As Account.
You can associate multiple Run As Accounts with a single Run As Profile. This is useful in cases where you are using a Run As Profile on different machines and each machine requires different credentials. Let’s say there is a task that a person has rights to run on Odyssey’s Hurricane server but someone else has rights to run it on Argonaut, our Exchange front-end server. We would configure separate Run As Accounts for each server, and associate both individuals with a single Run As Profile. You would make this assignment on each computer.
OpsMgr uses a number of service and action accounts on the OpsMgr server components and managed computers. The RMS requires two accounts to communicate with other Operations Manager 2007 components, as follows:
The Management Server Action account
The SDK and Config Service account
You must specify credentials for these two accounts when installing the RMS.
When pushing out an agent, you can provide credentials for several accounts:
The Computer Discovery account
The Agent Action account
The Agent Installation account
The default is to specify the Management Server Action account; all other accounts default to using either Local System or the default Action account (the Management Server Action account).
Each management server and agent runs an instance of the OpsMgr Health service, which has an associated Health service account. The service monitors the health of the computer and potentially the health of other computers. The Health service uses Local System; this should not be changed.
If you install the Operations Manager 2007 Reporting component, you need to specify credentials for two additional accounts, as follows:
The Data Warehouse Write Action account
The Data Reader account
Table 11.3 lists the accounts used during installation. If you are using domain accounts and your domain Group Policy Object (GPO) allows passwords to expire, you either must change the passwords on the service accounts according to your password expiration policy, override the settings for these accounts so the passwords will not expire, or use low maintenance system accounts. Password information entered for accounts is stored, encrypted, in the Operations database.
Table 11.3. Service Accounts Required for OpsMgr 2007 Installation
Account Name | When Used | Used For | Use for Low Maintenance | Use for High Security |
|---|---|---|---|---|
Management Server Action account | Management Server setup. | Collects data from providers, runs responses, writes to Operations database. | Local System | Domain account |
SDK and Configuration Service account | Management Server setup. | Writes to Operations database, runs services. | Local System | Domain account |
(Windows) Administrator account | Discovery and push agent install. | Installing agents. | Domain or local administrator account | Domain or local administrator account |
Agent Action account | Discovery and push agent install, manual installations. For AD integration, this account is set to Local System, but can be modified later. | Gathers information and runs responses on managed computers. | Local System | Low-privilege domain account |
Data Warehouse Write Action account | Reporting Server setup. | Writes to the Data Warehouse database. | Low-privilege domain account | Low-privilege domain account |
Data Reader account | Reporting Server setup. | Query SQL Reporting Services database; also used for the SQL Reporting Services (SRS) Internet Information Services (IIS) Application Pool account to connect to the RMS. | Low-privilege domain account | Low-privilege domain account |
Tip: Advantages of Using Built-in Accounts
Consider using built-in accounts where it is practical. The operating system maintains these accounts, and they are not affected by password expiration policies. In addition, the passwords to these accounts are not exposed.
We discuss the accounts in Table 11.3 in the following sections.
Every management server and agent requires an Action account.
The Action account gathers information about, and runs responses on, management servers or any computer with an installed agent. You can use the default Action account (located under Administration -> Security -> Run As Profiles), or specify a different account for the Action account. Unless an action has been associated with a Run As Profile, the credentials used to perform the action will be those defined for the Action account.
Tip: Changing the Action Account on Groups of Computers
The OpsMgr 2007 Resource Kit includes a PowerShell script that allows you to set the Action account on groups of computers with a single command. You can download the Action Account Tool directly from Microsoft’s download center at http://www.microsoft.com/downloads/details.aspx?familyid=1D9A8D81-0E42-4076-88A9-8E6C08993054&displaylang=en (or go through the System Center Operations Manager 2007 Tools and Utilities page at http://go.microsoft.com/fwlink/?LinkId=94593 to access this link). The zip file includes a PowerShell script, set-ActionAccount.ps1. Using the Operations console, you can use this utility to set the Action account on multiple computers in a computer group you create, or on multiple computers using discovered inventory. Be sure to include the domain (or computer) of which the Action account is a member when you specify the account.
Actions performed by the Action account or a specific Run As Account (Run As Accounts are discussed in the “Run As Accounts” section of this chapter) are run by the MonitoringHost.exe process. Each account has its own instance of MonitoringHost.exe, so there may be many MonitoringHost.exe processes running under many identities, at any given time.
The MonitoringHost.exe process manages workflows. These workflows perform actions such as the following:
Monitoring and collecting Windows NT Event log data
Monitoring and collecting Windows performance counter data
Monitoring and collecting Windows Management Instrumentation (WMI) data
Running actions such as scripts or batches
Monitoring and collecting application-specific log data, such as IIS logs
Running a managed code module
Executing tasks, performing discovery, and other useful actions
It is not unusual for more than one data provider, or more than one response, to run simultaneously. OpsMgr runs each provider or response in a separate MonitoringHost instance to protect other instances of MonitoringHost.exe in the event of a failure. Workflows are merged under the same identity in the same MonitoringHost, unless a workflow has specifically requested to be isolated in the workflows definition in the management pack. Typically workflows are not isolated, as creating multiple processes becomes expensive in terms of system resources.
The Management Server Action account is specified during your Operations Manager 2007 installation. You have the option to choose either the Local System account or a Domain or Local user account.
Each management server has its own Action account; with multiple management servers, you can specify the same Action account or use different accounts. The account is granted write access to the Operations and Data Warehouse databases. The Management Server Action account needs at least the following privileges:
Member of the local Users group
Read access to the Windows NT Event logs
Member of the Performance Monitor Users group
Granted the Allow Log on Locally permission
For Windows 2000 and Windows XP systems, the Agent Action account must have administrator-level rights.
In most instances, when running Windows Server 2003 and Windows Vista, you can use a low-privileged account for the Action account. This is the preferred approach, as you can use Run As Profiles for anything that requires a higher level of access. When using a low-privileged account, the account must have the following minimum privileges:
Member of the local Users group
Member of the local Performance Monitor Users group
“Allow log on locally” permission (SetInteractiveLogonRight)
These privileges are the lowest privileges OpsMgr supports for the Action account. Other Run As Accounts can have lower privileges.
When specifying a domain account for the Action account, you may need to add privileges to the account for various management packs to function properly. Table 11.4 lists these privileges.
Table 11.4. Permissions Used by the Action Account
Resource | |
|---|---|
Read | Read access to the Windows NT Event Logs. |
Read | Read access to the Windows Performance Counters. |
Performance Monitor Users | The Action account must be a member of the Performance Monitor Users security group. |
Read | Read access to application-specific log files. |
Read | If other log files or directories are monitored, the Action account must have Read access to the specific log file or directory. |
The actual privileges needed for the Action account and the Run As Accounts vary depending on which management packs are running on the computer and how they are configured.
Note: Customizing the Action Account for Specific Management Packs
Different management packs may have different requirements for minimum privileges for the Action account, although a well-written management pack will not force the Action account to have higher privileges (with the possible exception of access to a particular logfile, and so on). Read the related management pack guide to determine the necessary privileges on the managed agent.
As an example, if the agent for which you are configuring the Action account is an Exchange server and a domain controller, you will need to combine the privileges necessary for each management pack to make sure that the Action account has the appropriate rights to support all of the management packs that apply to it. Each management pack has its own profile. Rights and privileges for each profile are added together, giving the effective rights.
There are several other caveats to using low-privileged accounts:
You cannot enable Agentless Exception Monitoring (AEM) on a management server with a low-privileged Action account, although Microsoft is investigating how to address this.
If a management pack will be reading an event in the Security Event log, you must assign the Action account the Manage Auditing and Security log privilege by using either a Local or a Global policy.
Note that Microsoft recommends using Audit Collection Services (ACS) for managing Security Event log data, unless that will not deliver the required functionality.
If the RMS and Operations database are on separate computers and you select the option to use a Domain or Local account during installation, the Action account must be a domain account—a local user account on the RMS will not be able to access the database, and the setup process will fail.
Tip: Check Domain Policies
If you use domain accounts, password updating will have to be consistent with your organization’s password policies. Otherwise, you will have to override those settings on an individual basis by either setting the passwords to not expire, or changing the passwords on the service accounts according to the schedule (or using system accounts that are not affected).
On systems running Windows 2000 and Windows XP, the Action account must be a member of the local Administrators security group or run with the credentials of Local System. The Local System account has high privilege levels on the local system; it is part of the Administrators security group. On a domain controller, the Local System account privileges give it the equivalent to Domain Admin-level privileges.
Windows Server 2003 and Vista have additional built-in accounts. The built-in Network Service account has fewer access privileges on the system than the Local System account, but the Network Service account is still able to interact throughout the network with the credentials of the computer account.
Note: Why Not the Local Service Account?
For those in the know, a built-in account with lower privileges than the Local System account is the Local Service account. This has the same local privileges as the Network Service account and a smaller attack surface due to its inability to communicate outside the local computer.
However, the requirement to communicate with the management server prevents the Local Service account from being used, as it has no rights to communicate outside the local computer. The Network Service account has that right—although in OpsMgr 2007, all communication uses the Health service, which always runs as Local System. With MOM 2005, you could use the Local Service account, but at this time, that account is not supported for the OpsMgr 2007 Health service.
If the Action account uses a password that expires, Operations Manager generates an alert 14 days before its expiration. Change the password in Active Directory, and then update the credentials in OpsMgr. Perform the following steps:
Open the Administration space in the Operations console.
In the Administration pane, select Administration -> Security -> Run As Accounts.
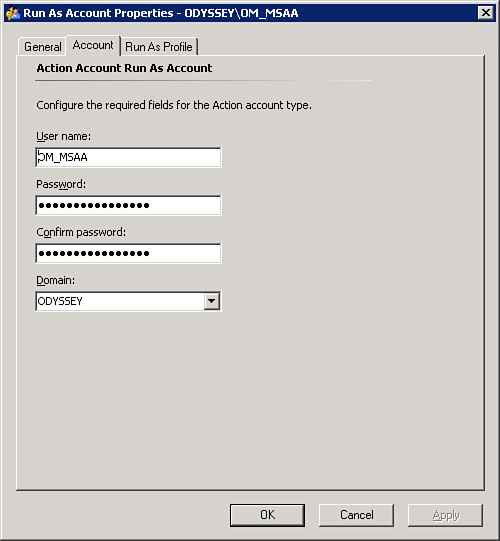
In the Run As Accounts pane, under Type: Action Account, right-click the account (domainusername) you want to change, and click Properties.
Click the Account tab in the Run As Account Properties dialog box (see Figure 11.7).
Enter the user credentials for the new Action account, and click OK.
The Run As Account view provides a single spot to update all accounts.
Both the SDK service and the Config service use the SDK and Config Service account to update information in the Operations database. (Although the only management server running these services is the RMS, this does not mean the databases are only updated from the RMS, as OpsMgr uses Run As Profiles to grant appropriate rights. See the “Database Security” section in this chapter for additional information.)
Credentials used for this account are assigned to the sdk_user role in the database. Note that data from managed entities written into the database may be of a security-related nature. Several options are available with this account:
Run it as Local System
Specify a user account
Using a local user account is not supported. Microsoft recommends the credentials assigned to this account are from a high-privileged account but not the same ones used for the Management Server Action account. The account must have Local Administrator privileges.
If you install the Operational database on a server other from the RMS and select Local System for the SDK and Configuration Service account, the computer account for the management server is assigned to the sdk_user role in the Operations database. You cannot use a local user account when the database and RMS are on separate computers.
To change the credentials for this account, perform the following steps on the RMS:
Ensure that the domain account is already created in Active Directory.
Start the Services console by clicking Start -> Run, typing services.msc, and then clicking OK.
Stop the OpsMgr SDK service and the OpsMgr Config service by right-clicking on each of them in the Details pane and selecting Stop.
Right-click the OpsMgr SDK service, select Properties, click the Log On tab, and click the This account option button.
Type a domain account name in the This account box; then type in its password in the Password box. Confirm the password and click OK.
Perform steps 4 and 5 for the OpsMgr Config service. Be sure to use the same account for both services!
Minimize the Services MMC.
Start SQL Server Management Studio (Start -> All Programs -> Microsoft SQL Server 2005 -> SQL Server Management Studio).
Connect to the server name and instance where the Operational database is installed.
Expand the console tree to open the Database node, right-click the Operational database, and select New Query.
Type and execute the following statement:
<LINELENGTH>90</LINELENGTH>EXEC p_SetupCreateLogin '<Domain><Username>', 'sdk_users'
Now, type and execute the next statement:
<LINELENGTH>90</LINELENGTH>EXEC p_SetupCreateLogin '<Domain><Username>', 'configsvc_users'
Finally, run this procedure for dbmodule_users:
<LINELENGTH>90</LINELENGTH>EXEC p_SetupCreateLogin '<Domain><Username>', 'dbmodule_users'
Reopen the Services console and right-click both the OpsMgr SDK service and OpsMgr Config service to start each service.
You can confirm that the services started correctly by opening the Event Viewer (Start -> Run, type Eventvwr.msc, then OK) and checking the Operations Manager Event log for errors.
The steps to change the SDK and Config Service account to use Local System are similar to the procedure to change it to use a domain account.
Using Local System requires the RMS and Operational database on the same server. Specifying Local System when installing OpsMgr Reporting can cause issues (return value 3). This can be resolved by using a domain account for the OpsMgr SDK service during the installation. After the installation is complete, you can configure the OpsMgr SDK service to use the Local System account. Perform the following steps:
Open the Services console and stop both services.
Now select each service, click Properties, and on the Log On tab, click the Local System account option button. Click OK.
Open the SQL Server Management Studio, connect to the server name and instance where the Operations database is located, select the database, and start a query.
Type and execute each of the following statements:
<LINELENGTH>90</LINELENGTH>EXEC p_SetupCreateLogin 'NT AUTHORITYSYSTEM', 'sdk_users' EXEC p_SetupCreateLogin 'NT AUTHORITYSYSTEM', 'configsvc_users' EXEC p_SetupCreateLogin 'NT AUTHORITYSYSTEM', 'dbmodule_users'
Check the Operations Manager Event log for any errors.
Tip: Check the Related KB Article
Check the most recent version of the Microsoft Knowledgebase article for changing credentials for the OpsMgr service accounts, at http://support.microsoft.com/kb/936220.
The account used for computer discovery is either the Management Server Action account or an account with administrative privileges on the targeted computer(s). If you specify a local user account rather than a domain account to limit your security exposure, the Management Server Action account will perform discovery.
If you use discovery-based agent deployment, you are asked to specify an account with Administrator privileges. OpsMgr uses the Management Server Action account by default. As this account installs the agent on the targeted computers, it must have local Administrator rights on all the systems the agents are deployed to. If the Management Server Action account does not have Administrator rights, you must specify an account with those rights. Information for this account is not stored; it is encrypted before it is used and then discarded.
The Notification Action account is not required during setup; it is used when creating and sending notifications. This account will need to have sufficient rights for the Simple Mail Transfer Protocol (SMTP) server, instant messaging server, or Session Initiation Protocol (SIP) server that you will use for notifications.
OpsMgr Reporting uses the Data Warehouse Write Action account to insert and update information in the Data Warehouse database. This account writes data from the management server(s) to the data warehouse and reads data from the Operations database. The credentials used for the account are assigned to the OpsMgr Writer role in the Data Warehouse database, and the dwsynch_users role in the Operations database.
This account must be a domain account.
The Data Reader account runs and manages reports. The credentials used for the Data Reader account are assigned to the OpsMgr Reader role in the Data Warehouse database, and added to the Operations Manager Report Security Administrators user role. This account becomes the identity for the Report Server application pool in IIS. The account also must be a domain user account.
If you change the password in Active Directory for the Data Reader account, you must also change it in the Reporting Services Configuration Manager. To change the password associated with this account in the Configuration Manager, perform the following steps:
On the Reporting server, select Start -> All Programs -> Microsoft SQL Server 2005 -> Configuration Tools -> Reporting Services Configuration.
Click Connect in the Reporting Server Installation Instance Selection dialog box.
In the left pane of the Reporting Services Configuration Manager, select Execution Account.
In the Execution Account pane, enter the new password for the account (see Figure 11.8).
Select Apply, then click Exit to close the Reporting Services Configuration Manager.

The OpsMgr Health service must run using the credentials of Local System. The Health service registers SPNs (Service Principal Names); using any other account results in duplicate SPNs. Agents will not be able to contact their management server when there are duplicate SPNs. Microsoft does not support running the Health service account under any credentials other than Local System.
Note: And a SPN Is...
SPNs are used by clients to uniquely identify an instance of a service. If, as in the case of OpsMgr, you install multiple instances of a service on computers throughout an Active Directory forest, each of those instances must have a unique SPN.
The Health service process is separated from the single and multiple uses of the MonitoringHost process. This separation means if a script running on the computer stalls or fails, the functionality of the OpsMgr Service or other responses on that computer is not affected. As we discuss in Chapter 3, “Looking Inside OpsMgr,” there is only one Health service, although it has two implementations:
The Agent Health service runs on monitored computers and executes tasks, collects performance data, and so on.
The other implementation runs on a management server.
The service’s functionality is defined by the setup, binaries, and installed management packs.
If you install a gateway server, you must provide credentials for an Action account. In reality, this is a Management Server Action account for the gateway server. As each gateway server by definition is in a different domain, each will need its own unique Action account. This account functions as a Run As Account for that domain, and allows you to monitor other servers in that external domain such as a DMZ (demilitarized zone).
The Gateway Action account can run using the credentials of Local System or a domain/local account. It is a best practice to use a low-privilege account. On systems running Windows Server 2003 and Windows Vista, be sure the account has the following privileges:
Member of the local Users group
Member of local Performance Monitor Users group
Granted the Allow Log on Locally permission
Using a domain account enables the gateway server to have the permissions required to install agents and perform necessary actions.
Operations Manager 2007 uses two SQL Server databases: the Operations database and the Data Warehouse database. OpsMgr-specific logins are added to the Master database on each database server, with corresponding users and database roles to the user databases.
ACS has a separate database and is installed separately from the other OpsMgr components. We discuss ACS in the “ACS Security” section of this chapter.
During installation, the setup process adds SQL logins for the RMS’s Action account and the SDK and Config Service account. Setup then adds these logins as Operations database users and grants them the Connect permission for the database. Operations Manager Setup also creates several database roles in the Operations database:
configsvc_users
dbmodule_users
dwsynch_users
sdk_users
The RMS’s Action account becomes a member of the dbmodule_users role, which is granted Execute permission for the database. The SDK and Config Service account becomes a member of the configsvc_users and sdk_users database roles. The configsvc_users role is granted the Execute database permission, and the sdk_users role is granted Execute and Subscribe query notifications permissions. The RMS’s Action account, the SDK and Config Service account, and the four special database roles become members of the db_datareader and db_datawriter roles. These are default user roles, which come from the Model database.
The Reporting Setup adds SQL logins for the Data Warehouse Write Action account and Data Reader account. Setup then adds these logins as database users to the Data Warehouse database. The Operations Manager Reporting Setup also creates two database roles in the Data Warehouse database:
OpsMgr Reader
OpsMgr Writer
The Data Warehouse Write Action account becomes a member of the OpsMgr Writer role, and the Data Reader account becomes a member of the OpsMgr Reader role. The OpsMgr Writer is granted specific permissions to required database tables. For example, the role is granted Select and Update permissions for the AlertStage table.
If you have multiple management servers, each server requires sufficient rights to write data to both the Operations database and the Data Warehouse database. To verify that your servers have the appropriate rights, check the following:
Open the Run As Profile tab for the Data Warehouse SQL Server Authentication account Run As Account and verify that there is an entry for each computer that is a management server.
Open the Run As Profile tab for the Reporting SDK SQL Server Authentication account Run As Account and verify that there is an entry for each computer that is a management server.
If there is a missing entry, perform the following steps to enter the Fully Qualified Domain Name (FQDN) for the management server(s) into the appropriate Run As Profile:
Logged on as an Operations Manager Administrator, click the Administration button in the Operations console.
Navigate to Administration -> Security -> Run As Profiles.
Right-click either the Data Warehouse SQL Server Authentication account or the Reporting SDK SQL Server Authentication account, and select Properties.
In the Run As Profiles Properties dialog box, select the Run As Accounts tab, and click New.
At the Run As Account menu, select the appropriate Run As Account.
Under Matching Computers, select the computer(s) that host an OpsMgr management server, and click OK.
At the Run As Profiles Properties dialog box, click OK.
An agent and management server will use Windows (Kerberos v5) or Certificates authentication to mutually authenticate before the management server will accept data from the agent.
Because OpsMgr 2007 requires mutual authentication, the agents and management server must belong to an Active Directory domain. If these components are in separate domains, there must be a forest trust between the domains. With the trust in place, after mutual authentication occurs, the data channel between the agent and management server is encrypted. These actions take place automatically. The next sections discuss communications between the management server and agent when these components are not in domains with trust relationships.
Due to DMZs and mergers (or other situations), companies may have domains that are in separate forests. Without a trust, agents in one domain cannot authenticate with a management server in the other domain. In this situation, mutual authentication takes place with certificates. Once mutual authentication occurs, data is encrypted using a public/private key pair, which we discussed in Chapter 3.
You can use the Gateway Server Component as a communication mechanism between two domains. Think of the gateway server as a proxy server; it forwards monitoring information between two environments that otherwise could not communicate between each other using Kerberos. Using a gateway server offers the following advantages:
Simplicity—. When monitoring an untrusted domain, only two certificates need to be installed and updated (on the gateway server and a management server).
Isolation—. There is no direct communication between the gateway server and the operational database server or RMS.
Certificate Support—. Standard support for Certificate Authority (CA)-issued certificates or third-party certificates. You can assign a certificate to the gateway server rather than each agent in the DMZ, which reduces the amount of configuration effort required.
In our environment, Odyssey is the domain containing the RMS and other OpsMgr server components, and our Continent domain is in our DMZ where we want to monitor agents. We will install a gateway server in the DMZ, in the Continent domain. Mutual authentication between OpsMgr components in the Odyssey domain takes place with Kerberos, and mutual authentication between the gateway server and the agents in the Continent domain uses Kerberos.
Because there is no trust between the two domains, we can install a certificate on the gateway server and the management server to provide mutual authentication and data encryption. The advantage of using a gateway is that we only need one certificate in the second domain (Continent) and one port (5723) opened through the firewall, as shown in Figure 11.9.

The process of sending data from the agent in an untrusted domain to the RMS is as follows:
Because the gateway and the agent are in the same domain, Kerberos is used between the agent and the gateway server to encrypt the data.
The information is decrypted by the gateway, and then re-encrypted using certificates for the management server.
When the management server assigned to the gateway server receives the data, it decrypts the message.
When the management server communicates with the RMS, the management server re-encrypts the information using the Kerberos protocol and sends it to the RMS, where it is again decrypted.
Data sent from the RMS to the agent may include user credential information such as confirmation data and tasks. When an agent is deployed, it automatically generates a public/private key pair, sending the public key to the RMS. Anytime the RMS will send user credential information to the agent, it uses that public key for an additional layer of encryption. As we discuss in Chapter 3, the public/private key pair is generated automatically on startup, when the keys expire, or by a request from the SDK.
Note: About Using the Gateway Server
You should use a gateway server when a firewall separates agents from management servers, if you have deployed agents and management servers in separate domains without a forest trust. You can also use a gateway server when you have a requirement to monitor agents in a workgroup.
After deploying the gateway server, agents connect directly to the gateway server and the gateway server connects to the management server. With a gateway server, you only need to open one port in the firewall—for the gateway server—rather than opening a port for each agent. This improves security.
In addition, when deployed in an Active Directory environment, using a gateway server reduces the number of certificates because the gateway and agent in the same Active Directory forest mutually authenticate by using the Kerberos protocol! Traffic with the management server is also reduced as the gateway server will install the agent software and collects information from the agents to send to its management server.
Although agents in a workgroup environment can use a gateway server, you will need to install certificates for communication between the agents and the gateway server. These certificates are in addition to the certificate installed on the gateway itself to communicate with the management server.
As an alternative to installing a gateway server in a workgroup environment, you can configure the agents to use certificate-based authentication directly with a management server. This can be feasible when there are a small number of agents to monitor in the workgroup. The basic configuration is as follows:
Ensure the management server has a copy of the trusted root CA in the computer certificate store, and that it was imported into the local computer certificate store. The subject name should match the FQDN of the management server with the private key.
Run MOMCertImport.exe on the management server.
Be sure the agent has a copy of the trusted root CA, and that there is a certificate with a subject name matching the NetBIOS name of the agent in the local certificate store; then run MOMCertImport.exe.
Instructions for configuring the certificate and running MOMCertImport are in the “Using a Standalone CA” and “Configuring Operations Manager 2007 to Use Certificates” sections of this chapter. There are also a number of articles available dealing with different aspects of this topic. You can find a discussion on using agents on workgroup computers at Clive Eastwood’s blog at http://blogs.technet.com/cliveeastwood/archive/2007/05/02/using-certificates-with-opsmgr07-agents-and-workgroup-computers.aspx. Duncan McAlynn has some tips on installing agents in a workgroup, at http://www.mcalynn.com/2007/08/certificate-based-agents-are-a-no-brainer-better-think-again. Walter Eikenboom has an article that ties it all together; you can download it from http://weblog.stranger.nl/files/DMZ_server_monitoring_with_SCOM_2007.pdf.
As pictures can be worth many words, we will illustrate the process with some screenshots, as follows:
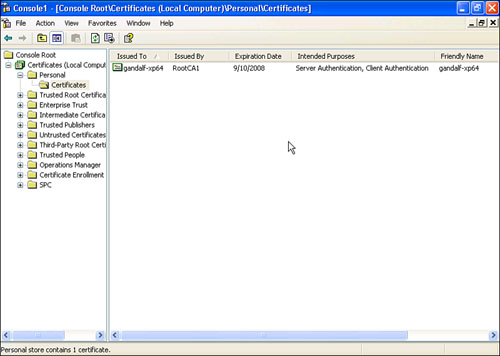
Figure 11.10 shows our workgroup computer (Gandalf-Xp64) in the workgroup, with a certificate issued by RootCA1. This figure shows the certificate listed in the personal store.
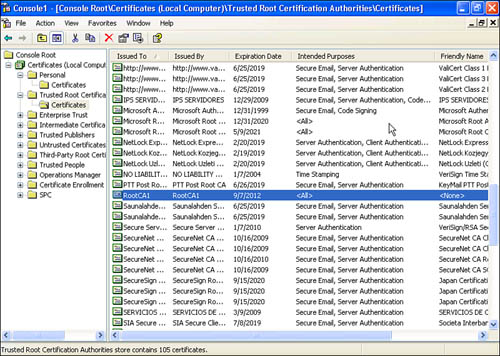
Figure 11.11 illustrates the trusted root certificate, RootCA1, which we are using.
In Figure 11.12, we show the certificate in the personal store for our management server (hydra.odyssey.com). Any management server communicating with the workgroup computer will need to have a certificate.
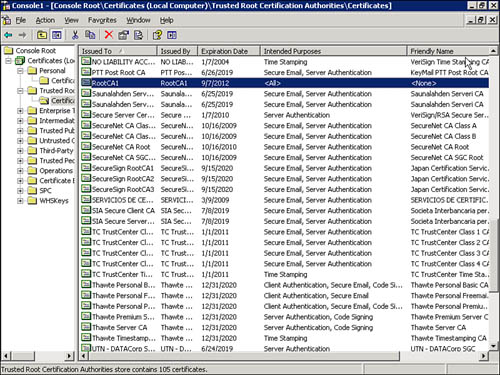
We can also see the certificate in Figure 11.13, which lists all the certificates in the trusted root for Hydra.
Figure 11.14 is a view of the two certificates imported to the certificate server (domain controller), which is Pantheon in our case.
Finally, in Figure 11.15, we see that it all comes together! Figure 11.15 displays our monitored workgroup computer, Gandalf-XP64, in the Operations console.


Tip: Working with Manually Installed Agents
For both the untrusted domain and workgroup scenarios, agent installation and any changes to agent settings are made manually.
You will also want to deselect the Reject new manual agent installations option in the Operations console, under Administration -> Settings -> Servers -> Security. This setting does not allow newly installed manual agents to establish communications with the management server. Choose the setting to Review new manual agent installations in pending management view, and optionally to Auto-approve new manually installed agents. These settings allow the agent to establish its initial communication with the management server.
After all manually installed agents are deployed and communicating with their management server, change the setting to Reject new manual agent installations. This prevents unauthorized manually installed agents from trying to communicate with the management server.
Operations Manager 2007 supports agent proxying. When you will be managing an agentless managed computer, it must be assigned to a management server or agent-managed computer to provide remote (proxy) agent functionality. As we discuss in Chapter 9, “Installing and Configuring Agents,” computers are managed as agentless when you either cannot or do not want to install an agent on them.
Not all management packs work in agentless mode, and agentless management will not work when the agentless computer and its proxy communicate through a firewall. Proxying is the capability for an agent to relay or forward information from other computers or network devices to the management server. Disabling agent proxying prevents spoofing by an attacker pretending to an agent because the management server matches information sent from the agent to a known agent name before accepting the data. Agent proxying is disabled by default.
The proxy agent can be any agent-managed computer in the management group configured to be a proxy, including a management server.
To configure agent proxying on an agent-managed computer, perform the following steps:
Navigate to Administration -> Device Management -> Agent Managed.
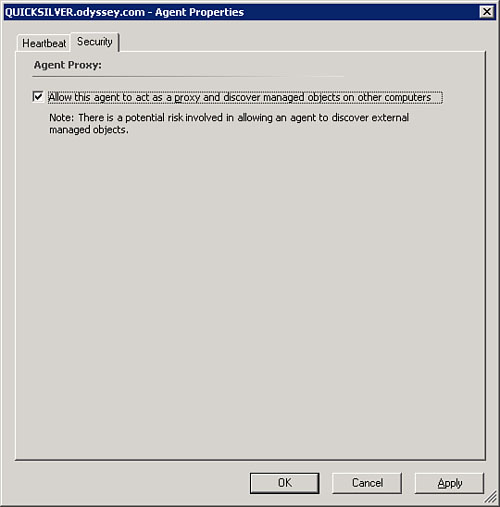
Right-click on the agent-managed computer you want to act as a proxy agent, and select the Security tab. Check the box to Allow this agent to act as a proxy and discover managed objects on other computers (displayed in Figure 11.16), and click OK.
If you want to configure a management server as a proxy for agentless managed computers, perform the following steps:
Navigate to Administration -> Device Management -> Management Servers.
Right-click on the management server you want to act as a proxy, and select the Security tab. Check the box to Allow this server to act as a proxy and discover managed objects on other computers. Click OK.
You will need to perform this procedure for each agent or management server for which you want to allow agent proxying.
A number of management packs use agent proxying. For example, the Active Directory management pack requires agent proxying to populate its topology views. The File Replication Service (FRS) management pack also requires agent proxying for monitoring replica members.
You can obtain a certificate either using an enterprise CA or a standalone CA. The process is somewhat lengthy. The next sections step through the processes for each type of certificate authority.
Once you have a certificate, you use the MOMCertImport tool to configure OpsMgr to use certificates, and then you install the certificates. We discuss these steps in the “Using MOMCertImport” section of this chapter.
You can use the Certificate Services component of Windows 2000 Server and Windows Server 2003 to obtain a certificate from an enterprise certification authority (CA). The process consists of creating a certificate template, requesting a certificate, exporting the certificate, and then importing it.
First, perform the following steps to create a certification template:
On the computer hosting your enterprise CA, select Start -> Programs -> Administrative Tools -> Certification Authority.
In the Navigation pane, expand the CA name, right-click Certificate Template, and select Manage to open the Certificate Templates console.
In the Certificate Templates console, right-click IPSec (Offline request) in the results pane, then click Duplicate Template.
In the New Template Properties window, click on the General tab, and in the Template display name box, type a new name for this template. We are calling our template RootCA1.
At the Request Handling tab, select Allow private key to be exported, and then click CPS. At the CPS selection dialog, select a preferred cryptographic service provider, and click OK.
At the Extensions tab, in Extensions included in this template, click Application Policies, and click Edit.
At the Edit Application Policies Extension dialog, click IP security IKE Intermediate, and click Remove.
Now click Add, and in the Application policies list, hold down the CTRL key to multi-select items from the list. Click Client Authentication and Server Authentication, and click OK.
Click OK in the Edit Application Policies Extension dialog box.
Click the Security tab. Verify that the security group has Read and Enroll permissions, and click OK.
Now you will request a certificate from an enterprise CA. Start by logging on to the computer where you will install your certificate (the gateway server or the management server), and perform the following procedure:
In Internet Explorer, connect to the computer hosting Certificate Servers (http://<servername>/certsrv).
At the Microsoft Certificate Services Welcome page, click Request a certificate. At the Request a Certificate page, click Or, submit an advanced certificate request.
On the Advanced Certificate Request page, click Create and submit a Request to this CA. You will also want to do the following:
Under Certificate Template, select the name of the template you created (RootCA1).
Under Identifying Information for Offline Template, in the name field, enter the Fully Qualified Domain Name of the computer for which you are requesting the certificate. Enter the appropriate information in the rest of the fields.
Under Key Options, click Create a new key set. In the CSP (Certificate Service Provider) field, select the cryptographic service provider of your choice, and under Key Usage, select Both. Under Key Size, select a key size that is appropriate for your business needs. Select Automatic key container name, and verify that Mark key as exportable is selected. Clear the Export keys to file and Enable strong private key protection options. Then click Store certificate into the local computer certificate store.
At Additional Options, under Request Format, select CMC Certificate Management). In the Hash Algorithm list, select SHA-1 (Secure Hash Algorithm-1). Clear the Save request to a file checkbox, and in the Friendly Name list, enter the FQDN (“friendly” name) of the computer you are requesting the certificate for.
Now, click Submit. If a Potential Scripting Violation dialog box is displayed, click Yes.
At the Certificate Issued page, click Install this certificate. If a Potential Scripting Violation dialog box is displayed, click Yes.
On the Certificate Installed page, you will see a message that Your new certificate has been successfully installed. Close the browser.
The next step in the process is to export the certificate:
Select Start -> Run, and in the Run dialog box, type MMC and click OK.
In the File menu, select Add/Remove Snap-in.
In the Add/Remove Snap-in dialog box, select Add.
In the Add Standalone Snap-in dialog box, select Certificates, and then click OK.
In the Certificates snap-in box, select the Computer account. Click Next.
In the Select Computer dialog, select Local computer (the computer this console is running on). Click Finish.
In the Add/Remove Snap-in Dialog box, click OK.
At the Console Root/Certificates (Local Computer) pane, navigate to Certificates (Local Computer) -> Personal -> Certificates.
In the Results pane, right-click the certificate you requested in the previous procedure, point to All Tasks, and click Export.
In the Certificate Export Wizard, click Next at the Welcome page.
At the Export Private Key page, select Yes, export the private key; click Next.
On the Export File Format page, do the following, and then click Next:
Select Personal Information Exchange—PKCS #12 (.PFX). PKCS #12 defines a file format used to store private keys with accompanying public key certificates, protected using a password-based symmetric key.
Clear Include all certificates in the certification path if possible.
Select Enable strong protection (requires IE 5.0, NT 4.0 SP 4, or above).
Clear Delete the private key if the export is successful.
At the Password page, type a password to protect the private key, and click Next.
On the File to Export page, select Browse.
On the Save As page, select a folder and filename for the certificate, verify that the Save as type is set to Personal Information Exchange (.pfx), and click Save.
On the File to Export page, ensure the path and filename are correct, press Next, and then click Finish.
Done!
The process differs somewhat with a standalone certificate authority. You will request the certificate, approve it, and then retrieve it. Let’s start with the steps to request a certificate. This will be at the computer where you want to install the certificate (the gateway or management server):
Start Internet Explorer and connect to the computer running Certificate Services (http://<servername>/certsrv).
At the Microsoft Certificate Services Welcome page, click Request a certificate. At the Request a Certificate page, click Or, submit an advanced certificate request.
On the Advanced Certificate Request page, click Create and submit a Request to this CA. You will also want to do the following:
Under identifying information, enter the FQDN of the computer for which you are requesting the certificate in the Name field.
For the Type of Certificate Needed, click the list and select Other. Enter 1.3.6.1.5.5.7.3.1,1.3.6.1.5.5.7.3.2 for server and client authentication in the OID (object identifier) field.
Under Key Options, click Create a new key set. In the CSP field, select the cryptographic service provider of your choice, and under Key Usage, select Both. Select 1024 for Key Size. Select Automatic key container name, and verify that Mark key as exportable is selected. Clear the Export keys to file and Enable strong private key protection options. Then click Store certificate into the local computer certificate store.
At Additional Options, under Request Format, select CMC. In the Hash Algorithm list, select SHA-1. Clear the Save request to a file checkbox, and in the Friendly Name list, enter the FQDN of the computer for which you are requesting the certificate.
Now, click Submit. If a Potential Scripting Violation dialog box is displayed, click Yes.
On the Certificate Pending page, close the browser.
The next part of this process is to approve the pending certificate request. This takes place at the computer that hosts Certificate Services. If your Certificate Services is configured to auto-approve certificates, these next steps are not necessary:
Select Start -> Programs -> Administrative Tools -> Certification Authority.
At the Certification Authority console, expand the node for your Certificate Authority name, and select Pending Requests.
In the Results pane, right-click the request pending from your request, select All Tasks, and then select Issue.
Select Issued Certificates and confirm the certificate you just issued is listed. Close the console.
Now you will retrieve and import the certificate into the certificate store on the computer where you will be installing it. First, retrieve the certificate:
Logon to the computer that needs the certificate (the gateway server, management server, or agent if this is a workgroup).
In Internet Explorer, connect to the computer that hosts Certificate Services (http://<servername>/certsrv).
At the Microsoft Certificate Services Welcome page, select View the status of a pending certificate request.
At the View the Status of a Pending Certificate Request page, select the certificate you requested.
At the Certificate Issued page, select Install this certificate. Click Yes in the Potential Scripting Violation box.
At the Certificate Installed page, the message appears that Your new certificate has been successfully installed. Close Internet Explorer.
Next, export the certificate:
Select Start -> Run, type MMC, then click OK to open the Microsoft Management Console.
At the File menu, click Add/Remove Snap-in. At the Add-Remove Snap-in dialog box, click Add. In the Add Standalone Snap-In dialog box, select Certificates, and click Add.
In the Certificates snap-in dialog, select Computer account and click Next. In the Select Computer dialog box, select Local Computer (the computer this console is running on), and click Finish.
In the Add Standalone Snap-in dialog box, click Close, and in the Add/Remove Snap-in dialog box, click OK.
At the Console Root, navigate to the Certificates (Local Computer) pane -> Personal -> Certificates.
In the Results pane, right-click the certificate you requested, select All Tasks, and select Export.
Click Next at the Welcome page in the Certificate Export Wizard.
At the Export Private Key page, select Yes, export the private key, and click Next. Do the following at the Export File Format page:
Select Personal Information Exchange—PKCS #12 (.PFX), and clear Include all certificates in the certification path if possible.
Select Enable strong protection (requires IE 5.0, NT 4.0 SP 4, or above).
Clear Delete the private key if the export is successful, and click Next.
At the Password page, enter a password to protect the private key. Click Next.
At the File to Export page, select Browse. On the Save As page, select a folder and filename for the certificate, verify that the Save as type is set to Personal Information Exchange (.pfx), and select Save. Back at the File to Export page, ensure the path and filename are correct, select Next, and then click Finish.
Through either of these two processes (using an Enterprise or Standalone CA), you now have a certificate! The MOMCertImport utility configures Operations Manager 2007 to use that certificate by putting the certificate’s serial number in the Registry. Remember, certificates can be used as an alternative to the Kerberos protocol for mutual authentication, and typically are used in situations where there is a firewall, workgroup, or untrusted domain with agents that you want to monitor with OpsMgr. Certificates provide encryption between an agent and either a gateway server, management server, or RMS, or between a gateway server and a management server or RMS.
Use MOMCertImport to import certificates on all OpsMgr roles requiring certificates, including the agent. To run the utility, perform the following steps:
Log on to the computer with a user account that has Administrator privileges.
Select Start -> Run, type cmd, then click OK.
At the command prompt, navigate to the drive where the Operations Manager installation media is located.
Type CDSupportTools<i386> (specify the AMD64 or IA64 folder as appropriate); then press enter.
Type the following command; then press enter:
<LINELENGTH>90</LINELENGTH>MOMCertImport <path to the PFX certificate> [/Password <password>]
The last part of this process is to import the CA certificate to the OpsMgr components that need to trust the certificate authority. Perform these steps on the gateway server(s), management servers(s), and any agent(s) that require certificates:
Tip: Using GPOs to Simplify the Process
Consider creating a domain Group Policy Object that pushes the trusted certificate.
Logon to the computer that will use the certificate.
In Internet Explorer, connect to the computer hosting Certificate Services (http://<servername>/certsrv).
At the Welcome page, click Download a CA Certificate, certificate chain, or CRL.
At the next page, click install this CA certificate chain.
At the Potential Scripting Violation box, click Yes.
Close Internet Explorer when the CA Certificate Installation page displays.
Removing a certificate imported with MOMCertImport requires editing the Registry. Perform the following steps:
Logon to the computer with an account that is a member of the Administrators group.
Select Start -> Run, type regedit, then click OK.
On the Registry Editor page, navigate to HKEY_LOCAL_MACHINESOFTWAREMicrosoftMicrosoft Operations Manager3.0Machine Settings.
In the Results pane, right-click ChannelCertificateSerialNumber; then select Modify.
In the Edit binary Value dialog box, select the binary data and press Delete.
If you start the OpsMgr services and receive Connector alerts with errors 20057, 21001, and 21016, you most likely are having some sort of certificate failure. Debugging steps you can take include the following:
Validate that the gateway server can ping the RMS using the fully qualified domain name (if ping is restricted to the RMS, validate using telnet).
Validate that the gateway server can telnet to the RMS on port 5723. Port 5724 may also be required, depending on your environment.
Validate that the RMS can ping the gateway server by its fully qualified domain name.
Check the following for the certificates on the RMS:
Validate that the certificate exists in Local Computer -> Personal -> Certificates on the RMS. Figure 11.17 displays the certificate.
Validate that the root certificate exists in Local Computer -> Personal -> Trusted Root Certificates -> Certificates on the RMS (see Figure 11.18).
Validate that the certificate also exists in Local Computer -> Operations Manager -> Certificates on the RMS. You can see this displayed in Figure 11.19.
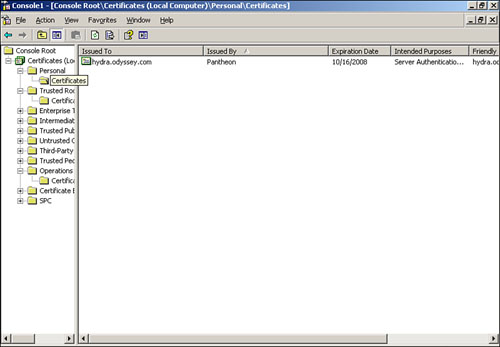


Check the following areas for the certificates on the gateway server:
Validate that the certificate exists in Local Computer -> Personal -> Certificates on the gateway server. See Figure 11.20 for an example of this certificate.
Validate that the root certificate exists in Local Computer -> Personal -> Trusted Root Certificates -> Certificates on the gateway server (see Figure 11.21).
Validate that the certificate exists in Local Computer -> Operations Manager -> Certificates on the gateway server. This is displayed in Figure 11.22.
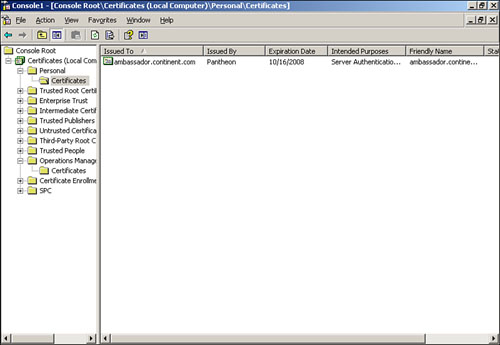
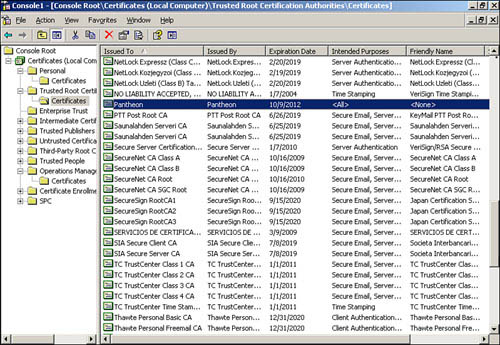

You will also want to verify Registry settings on the two computers:
Validate the existence of the HKLMSOFTWAREMicrosoftMicrosoft Operations Manager3.0Machine SettingsChannelCertificateSerialNumber with the value of the certificate (from the Local Computer -> Personal -> Certificates folder within the details in the Serial number field) reversed within it on the gateway server. See Figure 11.23 for a sample of the Registry key.
Validate the existence of the HKLMSOFTWAREMicrosoftMicrosoft Operations Manager3.0Machine SettingsChannelCertificateSerialNumber with the value of the certificate (from the Local Computer -> Personal -> Certificates folder within the details in the Serial number field) reversed within it on the RMS, and displayed in Figure 11.24.

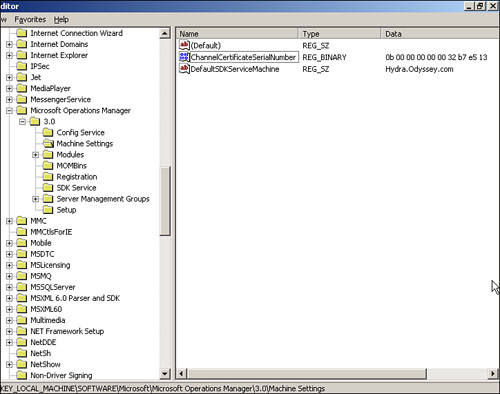
Many organizations are now implementing secure websites using SSL technology. If you have SSL installed on your Reporting server, you must configure the Operations console to use SSL. Port 443 is used for secure http (https). Perform the following steps:
In the Operations console, select the Administration button.
In the Administration space, navigate to Administration -> Device Management -> Settings. Right-click on Reporting and select Properties.
In the General tab, under the Reporting Server Settings section, click the Reporting Server URL drop-down list and select https://.
Edit the URL, replacing :80 with :443, and click OK.
Tip: Implementing SSL in IIS
KB article 299875 includes an excellent discussion of how to implement SSL in IIS. You can access this article at http://support.microsoft.com/kb/299875 or http://go.microsoft.com/fwlink/?linkId=87862.
On computers that require high security, such as a domain controller, you may want to deny certain identities access to rules, tasks, and monitors that could jeopardize the security of your service. The Health service lockdown tool (HSLockdown.exe) includes command-line options to control and limit the identities to run rules, tasks, or monitors.
The syntax is as follows:
HSLockdown <ManagementGroupName> /<Option>
<Option>:
/L - List accounts/groups
/A - Add an allowed account or group
/D - Add a denied account or group
/R - Remove an allowed/denied account or group
Accounts must either be specified in NetBIOS (domainusername) or UPN ([email protected]) format.
Run HSLockdown from the command prompt. The utility is located in the %ProgramFiles%System Center Operations Manager 2007 folder.
If you use the Add or Deny options, you will need to restart the OpsMgr Health service for the changes to take effect.
The Health service will start but its availability state displays as Red if you used the Health Service Lockdown tool to lock out the Action account. To be able to resolve this, perform the following steps:
ACS collects Security log events and stores these events in a central SQL Server database in near real time. After establishing a connection between an ACS forwarder and its ACS collector, the forwarder sends audit events to the database on the collector as they occur. Sending events immediately to a central repository minimizes the amount of time an attacker has to tamper with the audit log and remove evidence of the attack.
ACS can also help organizations separate the roles of the administrator and auditor. When audit events are stored on local computers, members of the local Administrators or Domain Admins group typically fulfill the auditor role. They review audit events and could possibly tamper with the Security Event log or simply overlook events that indicate they took part in an attack. However, if administrators are not auditors and do not have permissions to access the central repository, the administrator and auditor roles are separated, and unauthorized actions can be spotted.
Using ACS helps separate these roles. ACS forwarders and the ACS collector can communicate across forests, so you can collect events from computers in one forest while collecting and saving them in a different forest. With this configuration, members of the Domain Admins group in the production forest cannot hide events by using their elevated credentials to log on to the ACS forest and alter the ACS database. ACS does not completely prevent administrators from tampering with the audit trail but it minimizes the window of time for tampering. We discuss Audit Collection Services in Chapter 15, “Monitoring Audit Collection Services.”
The ACS database, created during ACS installation, is associated with the Audit Collector service, which runs on an ACS collector. Each collector requires its own database, which can be on the same computer as the ACS collector but for best performance should be on a dedicated member server. This database is separate from the Operations database. Security events that are cleared on an agent are tracked in this database, and a new table is created daily for that day’s events.
ACS ensures its security in several ways:
Requiring mutual authentication of the ACS forwarder and the collector. Before opening a connection, the forwarder authenticates to the collector and the collector authenticates to the forwarder.
Encrypting communication between the forwarder and the collector. This ensures that the received information is not tampered with.
Alerting an auditor if gaps are detected in the transmitted data. Each event has a sequence number expressed as a 32-bit integer. ACS remembers the sequence number and expects the next sequence number to be one greater than the current number. If the numbers are not sequential, ACS generates an alert.
Only allowing forwarders to send information. The forwarder will not receive any information from its collector. The collector must disconnect the forwarder and allow it to reconnect before it can listen to the connector again. Although this produces some network overhead, it minimizes the possible attack surface if the collector is instructing the forwarder to do something differently.
You can use either certificates or Kerberos authentication to enable encrypted communication between forwarders and the collector. Encryption is necessary because mutual authentication is required. If the forwarders and collectors are in the same domain or domains that share a Kerberos trust, use Kerberos authentication. Use SSL/TLS (Secure Sockets Layer/Transport Layer Security) if the components are not in domains that share Kerberos trust, or if the forwarder is not in a domain.
SSL/TLS support requires that the collector and each forwarder install a certificate. Each forwarder must also have its own account in Active Directory; this can be either a computer or a user account. Computer accounts provide better security. Using SSL/TLS for mutual authentication and channel encryption requires enabling certificate support on the forwarder and a domain controller.
The following steps enable certificate support on an ACS forwarder:
Logged on as an administrator, request or acquire a certificate that contains the object identifier (OID) 1.3.6.1.5.5.7.3.2 for the client authentication extended key usage. This certificate must have both a Subject and Issuer Name to allow one-to-one mapping to a computer account.
Run the MMC and add the Certificates snap-in, applying it to the local computer.
On the Action menu, select All tasks, then select Import.
Right-click the Personal folder, and select Import.
Use the Certificate Import Wizard to import the certificate.
Right-click the certificate, select All Tasks, and select Export.
At the Export Private Key page of the wizard, select Do not export the private key. Click Next.
At the Export File Format page of the Wizard, select DER encoded binary X.509 (.CER). Click Next.
At the File to Export page, specify the certificate name. Save the certificate to a network share or location where another computer can access it. Click Next. Review the configuration details on the Completing the Certificate Export Wizard page, and click Finish.
In the Services snap-in, stop the AdtAgent service if it is running.
Go to a command prompt (Start -> Run, type cmd, then click OK); run the command AdtAgent –c.
Select the certificate in the AdtAgent command-line menu.
To enable certificate support on a collector, you must enable certificate support on a domain controller and each forwarder that will connect to the collector. The collector must be installed on a management server and belong to a domain. The following procedure enables certificate support on a collector:
Request or acquire a certificate containing the 1.3.6.1.5.5.7.3.1 OID for the server authentication extended key usage. This certificate must have both a Subject and Issuer Name to allow one-to-one mapping to a computer object.
Open the MMC, and add the Certificate snap-in to manage certificates for a local computer account.
Right-click the Personal folder and select Import.
Import the certificate using the Certificate Import Wizard.
Right-click on the certificate, select All Tasks, and select Export.
At the Export Private Key page, select Do not export the private key. Click Next.
At the Export File Format page of the Wizard, select DER encoded binary X.509 (CER). Click Next.
At the File to Export page, specify a certificate name and save the certificate to a network share or location where another computer can access it. Click Next.
Review the configuration details at the Completing the Certificate Export Wizard page, then click Finish.
In the Services snap-in, stop the AdtAgent service if it is running.
Go to a command prompt (Start -> Run, type cmd, then click OK); run the command AdtAgent –c.
Select the certificate in the AdtAgent command-line menu.
Before enabling certificate support on a domain controller, verify that all forwarders and collectors have certificates installed. Then perform the following steps:
At the View menu, select Advanced Features.
Create a unique account for the forwarder. This can be either a computer account or a user account, although Microsoft recommends using computer accounts.
Select the account the forwarder will use for authentication.
Right-click on the account; choose Name Mappings.
On the X.509 Certificate, click Add.
Locate and select the .CER file exported in the “Installing a Certificate on an ACS Forwarder” section of this chapter.
Check User Issuer for alternate security identify and Use Subject for alternate security identify. Click OK.
If the data traffic between the ACS database and the collector is over an unsecured or untrusted network, you will want to use SSL/TLS to enable encryption between these components. Be sure that an appropriate Trusted Root and Machine Certificate is installed on the SQL Server computer running the ACS database and on the collector; then perform the following steps:
Logon to the collector using an administrative account.
Select Start -> Run, type cliconfg.exe, then select OK. This starts the SQL Server Client Network Utility.
In the SQL Server Client Network Utility, select the General tab, then select Force Protocol encryption. Click OK.
Restart the collector.
Tip: Best Practice Recommendations for ACS Security
To create a secure ACS environment, establish a new management group for ACS and limit access to it. If that is not possible, lock down access to the database to auditors only. You will also want to lock down access to the folder structure and data sources used with reporting.
In the “OpsMgr and Non-Trusted Domains” section of this chapter, we discussed using a gateway server as a proxy to communicate with a management server across a firewall. This section discusses other considerations for a firewalled environment.
Table 11.5 shows Operations Manager 2007 component interaction across a firewall. The table lists the ports used to communicate between components, which direction to open the inbound port, and if the port number can be changed.
Table 11.5. Ports Across a Firewall
Component A | Port/Direction | Component B | Configurable |
|---|---|---|---|
Root Management Server | OLEDB (SQL) 1443 —> | Operations Manager Database | Yes (Setup) |
Management Server | OLEDB (SQL) 1443 —> | Operations Manager Database | Yes (Setup) |
Management Server | 5723 —> | Root Management Server | Yes (Command-line setup) |
Gateway Server | 5723 —> | Root Management Server | Yes (Command-line setup) |
Root Management Server | OLEDB (SQL) 1443 —> | Reporting Data Warehouse | Yes (and in a cluster, the second node requires a unique port number) |
Reporting Server | 5724 —> | Root Management Server | No |
Operations Console | 5724 —> | Root Management Server | No |
Connector Framework Source | 51905 —> | Root Management Server | No |
Web Console Server | 5724 —> | Root Management Server | No |
Root Management Server (Top Tier) | 5724 —> | Root Management Server (Mid-Tier) | No |
Agent | 5723 —> | Root Management Server | Yes (Setup) |
Agent | 5723 —> | Management Server | Yes (Setup) |
Agent | 5723 —> | Gateway Server | Yes (Setup) |
Gateway | 5723 —> | Gateway Server | Yes (Setup) |
Agent (ACS Forwarder) | 51909 —> | Management Server ACS Collector | Yes (Registry) |
AEM Data from client | SMB 445, 51906 —> | Management Server AEM File Share | Yes (AEM Wizard) |
Software Quality Metrics (SQM) Data from client | 51907 —> | Management Server SQM End Point | Yes (AEM Wizard) |
Operations Console (Reports) | HTTP 80 —> | SQL Reporting Services | Yes |
Reporting Data Warehouse | OLEDB (SQL) 1443 —> | Reporting Server | Yes (and in a cluster, the second node requires a unique port number) |
Audit Collection Service (ACS) Database | OLEDB (SQL) 1443 —> | Management Server ACS Collector | Yes (and in a cluster, the second node requires a unique port number) |
Web Console Browser | HTTP 51908 —> | Web Console Server | Yes (IIS Admin, Web Configuration File) |
We can also illustrate this information using Figure 11.25, which you may remember from Chapter 3.

If you are installing agents on any computer running the Windows firewall (Windows 2003 with Service Pack 1 or later, Windows XP with Service Pack 2 or later, or Windows Vista), it is necessary to modify the default firewall configuration. This is true also for computers that will utilize the agentless managed feature of OpsMgr.
If you are certain the Windows firewall is disabled on all prospective managed computers, you do not need to perform this action. However, in many environments, the Windows firewall is deployed, particularly on managed desktop computers.
We recommend using the Group Policy Management Console (GPMC) to create and deploy an OpsMgr firewall exceptions GPO in the domain(s) where OpsMgr is going to be managing computers. Here are the steps to follow to create and deploy the GPO using the GPMC:
Right-click on the Group Policy Objects node and select to create a new GPO named OpsMgr Firewall Exceptions Policy.
Right-click on the new GPO and select Edit. The Group Policy Editor will open in its own window.
Navigate to the Computer Configuration -> Administrative Templates -> Network -> Network Connections -> Windows Firewall -> Domain Profile node.
In the setting Windows Firewall: Allow remote administration exception -> Allow unsolicited incoming messages from:, enter the Internet Protocol (IP) addresses and subnets of the primary and secondary management servers for the agent.
If all computers are on the same subnet, you can enter the word localsubnet. This setting opens TCP ports 135 and 445 to permit communications using Remote Procedure Call (RPC) and Distributed Component Object Model (DCOM).
In the setting Windows Firewall: Allow file and printer sharing exception -> Allow unsolicited incoming messages from:, enter the IP addresses and subnets of the primary and secondary management servers for the agent in the same manner as the previous step. This setting opens TCP ports 139 and 445, and UDP ports 137 and 138 to permit network access to shared files.
In the setting Windows Firewall: Define port exceptions, click the Show button, then the Add button, and enter the port the agent uses to communicate with the management servers (the default is 5273): TCP:<IP address of RMS>:<subnet>:enabled:OpsMgrAgent.
An example entry would be
5273:TCP:localsubnet:enabled:OpsMgrAgent.Close the Group Policy Editor and return to the Group Policy Management Console. Go to the Settings tab of the new OpsMgr Firewall Exceptions Policy and select to show all settings. Compare your GPO to the example shown in Figure 11.26. Your settings should be similar except for the localsubnet parameter; your policy may specify specific subnets or computer addresses.
Navigate in the GPMC to the domain and/or Organizational Unit (OU) where the computers to be managed are located. Right-click and choose to Link an Existing GPO...; then select the OpsMgr Firewall Exceptions Policy.
Allow the GPO to take effect on prospective managed computers. Automatic Group Policy refresh will occur within an hour on most Windows computers. To have the new GPO take effect immediately on a particular computer, either restart it, or execute the command gpupdate /force on Windows 2003 and XP computers or secedit /refreshpolicy machine_policy /enforce on Windows 2000 systems.

You will need to configure proxy settings for a management server if it will be communicating over the Internet (for example, if you configured Client Monitoring to transmit or receive data from Microsoft). Perform the following steps:
In the Operations console, click on the Administration button. Navigate to Administration -> Device Management -> Management Servers, select the management server, right-click on Properties, and select the Proxy Settings tab.
Click on the option to Use a proxy server for communication with Microsoft and then select http:// or https:// from the drop-down list, typing the name of your proxy server in the address text box.
Enter the Port number, and click OK.
This chapter looked at a number of concepts new to OpsMgr 2007. We discussed user roles, Run As Profiles and Run As Accounts, and Operations Manager-required accounts. We discussed database security, mutual authentication, non-trusted domain considerations, DMZ implementations and workgroup support, obtaining certificates, and agent proxying. We concluded the chapter by looking at ACS security, firewall considerations, and communications security. Additional information on Operations Manager security is in the Operations Manager 2007 Security Guide, which you can access at the System Center Operations Manager 2007 Documentation site at http://www.microsoft.com/technet/opsmgr/2007/library/proddocs.mspx. You can also download the security guide from http://go.microsoft.com/fwlink/?linkID=64017.
The next chapter looks at backup and recovery techniques for OpsMgr 2007 and discusses disaster recovery planning.