
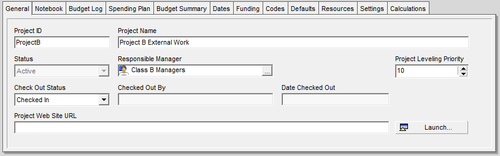
Project properties are set by going to the Project screen, choosing the project, and choosing Project Details. This will bring up a window as shown in the following screenshot in the lower half of the screen:
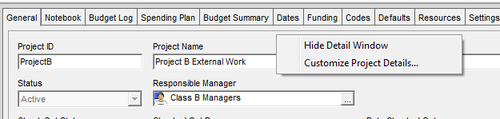
By default, not all of the tabs are shown in this screenshot. To add and remove tabs from the project details screen, right-click anywhere in the Details tab and choose Customize Project Details….
The General tab lets you set certain high-level information about the project. While the Project ID, Project Name, and Responsible Manager were entered in the wizard screens, they may be changed here as well.
Project Status can be set to one of four values:
- Planned: Progress Reporter users cannot access the activities
- Active: Progress Reporter users can access activities
- Inactive: Progress Reporter cannot access activities
- What-if: Progress Reporter users cannot access activities, and closed projects will not show in resource profiles

Tip
Your organization should have a policy in place as to when each of these status types is assigned to a project. The technical function of each one is as important as your reporting. Define in your lifecycle when a project moves from the Planned (where resources are shown as reserved but the project is not shown in the Active portfolios) or Active state when there are a few technical differences in how P6 handles the project—but big differences in how your company manages the project. Inactive is typically where a project has been in active state but is no longer being worked (cancelled or completed). In the inactive status, P6 does not show future reserved time for any resource assigned to an activity scheduled past the project data date. What-if projects do not report any of the data in assignments past or future—it is "off the radar" and therefore all copies or duplicate projects that exist to create different scenarios should be placed in the What-if status to avoid duplication of information and assignments.
The Responsible Manager was also set in the new project wizard and it is the OBS element responsible for the project.
Project Leveling Priority can range from 1 (highest) to 100 (lowest). When multiple projects are scheduled, this determines the order in which projects are considered when leveling resources across projects.
Check Out Status shows whether a project is checked in or out and Checked Out By shows who has checked out the project. The Date Checked Out shows when that user checked out the project. Check out is very helpful. It allows one user to lock the project for their exclusive use for a period of time. For example, a scheduler may want to ensure that no one is changing anything about the project while the schedule status update is being performed. It is important to always check a project back in after exclusive use is no longer needed.
If you have a project website, enter the URL in the Project WebSite URL screen. For example, if your project website is www.packtpub.com, simply enter this. Press Launch to view the site in your default web browser.
Notebooks allow you to enter information about a project. The Notebook tab lets you enter a number of notebook topics, each with its own notebook entry. The notebook topics are set through the menu item Admin | Admin Categories…. Within each notebook, you can edit the text using HTML editing features, including formatting text, inserting pictures, copying, pasting, and adding hyperlinks. Notebooks can be used to enter project notes, such as the project's purpose, core requirements, or any other project-specific detail.

Notebooks exist not only for Projects, but also can be added to any EPS, WBS, or activity. So, for example, you could create a notebook that describes the purposes and objectives of each WBS element. These notebooks could then be gathered together in a report, which outlines the project by WBS, using the notebooks as summary paragraphs.
Use the Budget Log to enter project budget information. Note that budgets can also be entered at the WBS and EPS level. The budget information is not shared among the EPS, Project, and WBS. Instead, they are treated as independent values.
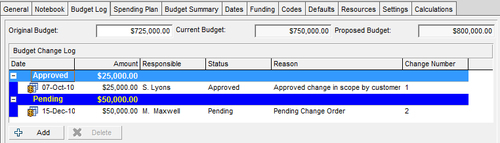
You may enter the original budget manually. Changes to the budget can be entered as change orders, and the status of a change can be Approved or Pending. Only approved change orders will modify the current budget.
Tip
The Budget Log is completely separated from costs in a cost-loaded schedule and will not progress as the activities progress. It is a disconnected area that is best used for the overall budget and change management to that budget. Spend plan and benefit tally are also not calculated or changed by the progress of the schedule in P6—it is a separate area.

Enter monthly amounts into the Spending Plan tab. This allows you to set the expected cash outlay for the project. The months shown begin three months before the project start and extend to four years after the project start date. Unfortunately, there is no way to extend the spending plan beyond these four years for longer-term projects.
The Spending Plan tally and Benefits Plan tally columns are empty when viewing a project. However, for an EPS node, the tally shows the project totals for all projects beneath the node. Thus, you can plan your expected spending at the EPS level and compare it to the planned spending at the project level.
.jpg)
The budget summary table summarizes the information from the Budget tab and the Spending Plan tab. It is display only.
What is a schedule without dates? The Dates tab shows you high-level dates for your project.
.jpg)
- Project Planned Start was entered when the project was created, and can be changed in this tab. If the project has activities, then this date is based on them. If the project as no activities but does have an Anticipated Start, then that value is used.
- Must Finish By is a constraint that can be added to a project if the project has a set end date. However, we strongly recommend that the project schedule be developed prior to setting the Must Finish Date. There are only a few examples where a mandatory Finish Date is appropriate at the project level.
- Data Date, also referred to as DD, simply equals the start date when a project is first created. Once a project is under way, the data date becomes critically important. The Data Date reflects the date as of which project progress is updated. For example, every week the scheduler could collect progress information about all work performed as of the prior Friday. The schedule is then updated to reflect the reported progress. After the scheduler enters that information, the schedule is updated using the F9 key. The data date entered for the schedule update is then set to that prior Friday. Schedule updates and data dates are discussed more fully in Chapter 9, Baselining and Statusing.
- Finish is also a result of the last schedule calculation, and is the latest early finish date. If there are no activities scheduled, and there is an Anticipated Finish, then that value is used. Otherwise, this value is blank. If the project has started, the Actual Start date is shown here. Likewise, if the project has ended, the Actual Finish date is shown as well.
- Anticipated Start and Anticipated Finish are dates entered by the user as their best guess about the project schedule. These dates are completely free of constraints, and can serve as a helpful reality check on the dates that arise from the scheduling algorithm.
.jpg)
Your project may have funding sources that you wish to track. In the Funding tab you can choose funding sources and assign amounts and percentages. The list of funding sources is defined through the menu item Enterprise | Funding Sources.
Funding can also be assigned at the EPS level. Funding amounts do not roll up, and there is no logic connecting the percentages of each fund used. As such, this information is purely for reporting purposes.
Project Codes allow for grouping, sorting, and filtering projects. They are used extensively and allow you to organize your project in many ways, particularly for reporting and when performing portfolio analysis (See Chapter 11, Portfolios). Think of codes as categories or labels; they can be used individually or in combination to group or give totals for different categories in reports or portfolios.

In the previous screenshot you can see that for our project, there are many project codes assigned. The first code is Business Process, which describes the kind of work that is to be performed. Within Businesses Process, there are many different kinds of work, but for this project, we have assigned the Business Process to be Construction.
One key to manage a portfolio of projects is to have meaningful project codes. To edit project codes, go to Enterprise | Project Codes.

Here you see that besides Construction, there are other business processes, including Accounting, Legal, and Training. For a given project, you could assign any of these values to be the business process. These code values have two parts—the Code Value itself, which is limited to a maximum length defined for the code, and a Code Description, which is limited to 100 characters. This allows you to choose concise values for the codes, which can help in reporting, along with more descriptive text that can help an end-user understand the meaning of the code.
The project codes themselves can be modified by pressing the Modify… button that brings up the following screen:

Here you can add new project codes, delete, or modify them. You can also set the maximum length allowed for a code value. Use this screen cautiously, as project codes are global across all projects. If you set Max Length shorter than existing code values, you can still use those values, but will not be able to add a code longer than the current Max Length.
Checking the Secure Code box will assign security to the code. Security can be assigned so that only certain users can view or assign these code values.
Once you have defined your project codes, you can enter the allowed values in the Project Code screen.
In practice, many codes are generally used. Codes can describe units within your company, physical locations, or geographical regions. How you define your project codes speaks volumes about how you view your business.
The Defaults tab lets you set a variety of activity-level defaults that help you to manage your projects efficiently. These defaults are project-specific, so apply to all users who are working on the project. Activities are covered in Chapter 5, Adding Activities and Relationships.

The Resources tab also lets you define default settings for resources. Resources are covered in more depth in Chapter 6, Resources.
The Settings tab covers a variety of project settings.

- Last Summarized On shows the last time that the project data was summarized. Summary data is used for reporting and project analysis.
- Summarize to WBS Level indicates the level at which the project is summarized. As summarization can be a slow process, and as summaries are not necessarily needed at every level, you can set the summarization value so that the level of summary is right for the specific project.
- WBS separator is the symbol to use when showing WBS names in the tree. For example, if you have WBS elements A, B, and C, each as successive children under the other, then by default, they will be displayed as A.B.C. But you can change this to use another symbol, such as a > so that it is shown as A>B>C instead.
- Fiscal year start month can be set as well to match your company's or your client's fiscal year.
- The Baseline for earned value calculations can be set to use the calculated project baseline or user's primary baseline. If you want all the users to see the same calculations, use the project baseline. At the very least, make sure that anybody who is comparing schedules is using the same baseline.
- How a project defines critical activities can be set as either those activities that are on the longest path to complete the project, or those activities whose total float is less than the specified amount. Critical activities and paths will be discussed further in Chapter 7, Scheduling and Constraints.
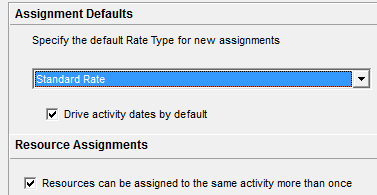
The Calculations tab lets you set default behaviors for activities and resources in the project.

- If you create activities without assigning a role or resource that has rates assigned, then you can set the Default Price/Unit… that will be used to calculate the planned cost of the activity. This is very helpful if you have a rough average rate that you wish to use during the planning stages.
- The Activity percent complete… calculation can be tied to activity steps. If this is turned on, then as each activity step is completed, the percent complete is updated according to the weighted value of each completed step. (For P3 users, this is one part of the Auto Cost rules). See Chapter 5 for more on activity steps.
- If an activity has not started, then you may wish to have the calculated amounts at completion remain equal to the planned budgeted amounts even as the schedule progresses. When you update activities you can tell the system to do one of two things:
- The system can Reset Original Duration and Units… when you update the Remaining Duration and Units
- Or, Reset Remaining… will tell the system to calculate the remaining duration and units based on the planned valued
If your activities have resources assigned, then the following settings may be chosen when updating actual units or costs:
- Add Actual to Remaining will calculate the new At Complete cost based on the actual values entered plus the remaining values. In this case it is important that when you enter actuals, that you also update the remaining values. For example, an activity is planned to take 40 hours to complete. You currently have 25 hours actual worked and 15 hours remaining for 40 hours At Complete. When you collect schedule progress you learn that 30 hours actual have been performed. If you simply enter 30 hours actual, then the new At Complete will be 30 + 15 = 45 hours remaining. This may not be correct. If the At Complete work is still expected to be 40, then you must update the remaining hours to 10. This is the option to choose for cost-plus contracts.
- Subtract Actual from At Completion is the opposite of the choice shown earlier. In this case, when you enter actual values, then the remaining work is set to equal At Completion minus actual. This is the appropriate choice for fixed-price contracts, as the budget is fixed and the At Completion budget should not change.
- Recalculate actual units and cost when duration % complete changes. This will cause the actual costs to be updated when the % complete duration of the activity is updated. The actual will be the duration percent complete times the planned units or costs.
- Update units when costs change on resource assignments will cause P6 to recalculate the units for an activity when the cost of the assigned resource changes.
- If you plan to store past period performance of actuals, Link actual to date and actual this period units and costs will cause the actual to date and the actual this period values to be linked to one another.
All of the settings mentioned are intimately related to how you manage your project activities. See Creating a New Project using the New Project wizard recipe, Chapter 6, Resources, Chapter 7, Scheduling and Constraints, and Chapter 9, Baselines and Statusing, for more information on setting up activities and resources, and planning and updating your projects.