
Before we begin our overview of the menu items, let's address the issue of what shows up in the menu. By default the menu items only include recently chosen items with a set of arrows at the bottom which you can click on to see the menu items that have been hidden. This can be convenient if you have a small screen or if you don't use certain items. Personally, I prefer that the menu always shows all of the items every time.

If you desire this behavior, you can set it easily. Right-click on any toolbar or on the menu bar, and choose Customize…. Then choose the Options tab as shown in the following screenshot:
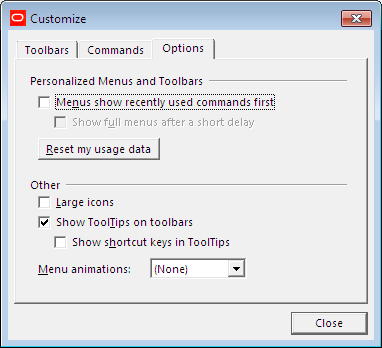
Simply uncheck the item Menus show recently used commands first.
Then you will see the exact same menu every time, which is convenient if you want to use the application quickly.

This menu also allows you to use larger icons, which can be helpful when learning the application and the smaller icons may all look the same to you. The menu animations are cute, but not worth bothering with once you're doing serious work.
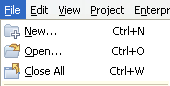
Each menu is grouped into sections, separated by a horizontal menu separator bar. The first group concerns projects: create a new project, open an existing project, or close all projects.
Each of these actions can be accomplished by a shortcut key:
- Ctrl+N: Create a new project
- Ctrl+O: Open an existing project
- Ctrl+W: Close all projects
(Where "Ctrl" means press the right or left "Control" key).
Many menu items have such shortcut keys. Knowing and becoming proficient at these can greatly enhance your experience of using P6.
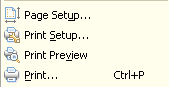
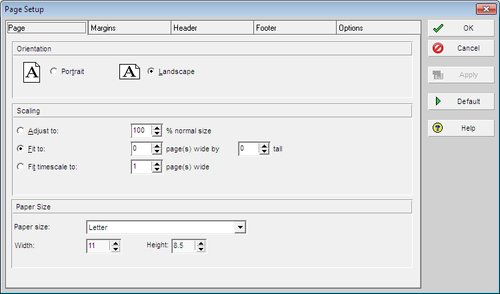
The next group of items on the File menu concerns printing, beginning with Page Setup.
This screen is similar to Print Setup in other Windows applications. There are tabs for headers and footers. We highly recommend that the company name and current date be set in either the header or footer. This ensures that printouts are clearly marked as property of your company, and it is also clear when the data was printed out. Showing the project name and data date are also very helpful.
Print Setup concerns the settings for your specific printer, and so may vary greatly from person to person.
Print Preview shows what P6 will be sending to the selected printer. This is very helpful because you can adjust the Page Setup, view Print Preview, and continue to make adjustments until the preview shows the printout how you want to see it.
Print sends the printouts to the chosen printer.
The next section of menu items concerns working with projects:
Import lets you bring a project and data into P6 from specially formatted data sources. These may come from a variety of sources, including earlier versions of P6, P3, Microsoft Project, and Excel. Care should be taken while importing data into P6 because external data sources may introduce trash codes and values into the database.

Export lets you send projects and data out of P6 into a data file. This file may be exported to a variety of formats, including earlier versions of P6, P3, Microsoft Project, and Excel.
Send Project exports the project to XER format and opens your e-mail client so that you can e-mail the project to someone. It is simply a convenient shortcut for exporting the project and emailing the file separately.
Check Out creates an XER for the project and then changes the project's status to "checked out". The expectation is that the user will then take this XER file, import it into another instance of P6 or perhaps even another application, and make changes to it. While the project is checked out, no one else can make permanent changes to it until the person who checked it out checks it back into the system, effectively re-importing the modified XER file.

Check In is very similar to importing an XER file, and the menu items asking for what actions to take are the same. Once a project is checked back in, other users can make modifications to it.

Select project portfolio lets the user choose from the available portfolios. These are sub-sets of projects. For example, a portfolio could contain all capital projects above a certain budget, or could be the set of projects that are the responsibility of a specific project manager. Portfolios will be covered in more detail in Chapter 11, Portfolios.
Commit Changes writes any changes you have made back to the database. This item can be confusing because certain actions (for example, renaming a project) will always be written immediately back to the database regardless of whether you click on Commit Changes or not.
Refresh Data is very helpful when multiple people and/or processes are making changes to the system. Pressing F5 will update the data to reflect changes from others.
Recent Projects lets you choose from a list of projects that were opened recently.
Exit is the standard Windows command to close the application. Choosing Exit will always prompt you to answer the question Are you sure you want to exit P6? Responding to this query may grow quite tiring, but the prompt is a safety measure for people who repeatedly tell the program to exit by accident.
The Edit menu is a standard Windows menu that lets you do common actions such as cut, copy, and paste.
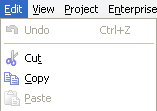
Undo removes the latest change you made. Though Undo is not implemented for all actions, it is implemented for certain very crucial actions, such as renumbering activities.
For example, suppose you need to renumber 50 activities. You can select them, choose Edit | Renumber Activity IDs, and then have all of them renumbered according to a new scheme. But suppose you chose the wrong prefix, or wrong increment value. If you make such a mistake, you can undo the change with Edit | Undo, or via the common Windows shortcut, Ctrl+Z.
Cut will remove an item, and place it into a buffer so that you can paste it later. You can cut simple text, or complex items such as activities. The shortcut for this is the same as in most Windows programs, Ctrl+X.
Copy, like Cut, makes a copy of an item. However, Copy will not delete the original after the paste. The shortcut is Ctrl+C.
Paste will insert the last item cut or copied. The shortcut for this is Ctrl+V.
The Cut, Copy, and Paste functions can save a good deal of time, especially when the shortcut keys are used. They are powerful functions, allowing you to copy objects as simple as some text characters or as complex as an entire project!
Add: The results of Add function depend on the screen on which you are located in the main application. If you are viewing Activities, Add will add a new activity. If you are viewing WBS structure, Add will add a new WBS element. Though no shortcut is shown, you can usually achieve the same result by pressing the Insert key.

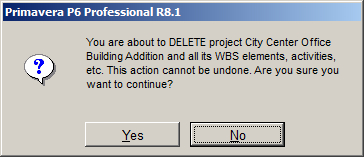
Delete: As with Add, the results of the Delete function depend on which screen you are on. If viewing activities, Delete will delete activities; if viewing projects, Delete will delete projects. Fortunately, whenever you press Delete you will be prompted before the delete is committed, which is a great safety valve. This can also be done via the Delete button.
Dissolve is only available when you select an activity that has both predecessors and successors. It allows you to delete the activity. The predecessor activities are then assigned to its successor activities.
Renumber Activity IDs lets you change the ID numbers on a group of activities. Since Activity ID is a key piece of data, this is an incredibly helpful function. Suppose that at the beginning of a project, all activity IDs under a certain WBS element are to be prefixed with "PD" and incremented by 10. But later on, it is decided that these same activities are to be prefixed with "PR" and incremented by 5. Rather than having to update all of the activities manually, Renumber Activity IDs can be used.

Assign lets you assign additional entities to activities. Such entities include Resources, Roles, Activity Codes, Predecessors, and Successors.

Link Activities: If you choose two activities, this menu item will be enabled. If you choose Link Activities, then the two activities will be linked via a Finish-Start relationship. The default behavior is that the upper item in the activity view will become the predecessor of the item below it. So if you sort by Activity ID ascending, such that A100 appears before A200, and link the two, then A100 will be a predecessor of A200. Yet if you sort by Activity ID descending, such that A200 appears before A100, and link the two, then A200 will become the predecessor to A100. Linking in this manner can be convenient, but use it with caution.

Fill Down lets you copy the same value into different rows. For example, you can quickly rename activities using this function. The shortcut is Ctrl+E.
Select All will highlight and select all items on the screen. The shortcut is Ctrl+A.
Find will search the currently selected column for the entered text. To find on another column, select that column. The shortcut is Ctrl+F.
Find Next, with the common Windows shortcut F3, will repeat the last Find and take you to the next matching item in the grid.
Replace will let you search for text in the currently selected column and replace it with a new value. The shortcut is Ctrl+R.
Spell Check performs a check of the spelling of all values in the currently selected column, but only if that column contains text data, such as Activity Name. As in many other Windows programs, the shortcut is F7.
User Preferences: This menu item is quite unrelated to every other item found under the Edit menu. It brings up a dialog box that shows a plethora of user settings:

User Preferences | Time Units lets the user choose a number of settings.
Unit of Time is used with Resources. The options are Hour, Day, Week, Month, or Year. The subunits are relative to the units chosen. If Show Unit Label is checked, units and (if checked) subunits will be displayed. The user can choose 0, 1, or 2 decimal places, and the Example fields will then show an example for previewing.
Durations are used when displaying Activities, and the choices are similar to Unit of Time. For example, if the Unit of Time is set to Hours and Duration is set to Day, then an Activity's value "Budgeted Units/Time" will be displayed as "h/d" (hours per day).
User Preferences | Dates lets the user choose how dates will be displayed throughout the application. Users can choose 2-digit or 4-digit year, whether to show month name or number, and whether to show leading zeros so that, for example, July will show up as 7 rather than 07.
Time can be displayed as 12 hours with the AM and PM suffixes, or as a 24-hour clock. Users can also choose not to show time at all.
Shown in the screenshot is the author's preferred setting: year-month-day with four-digit year, dash as the separator, leading zeros displayed. Showing the clock and minutes is highly dependent on the event being scheduled. It may be a great hindrance on a five-year schedule. But on a three-day plant turnaround, displaying hours (and minutes) is critical.

User Preferences | Currency sets the currency to display in P6, as well as the type of currency symbol and whether to show decimal places. Note that the exchange rate for currencies is set through Currencies under the Admin menu.

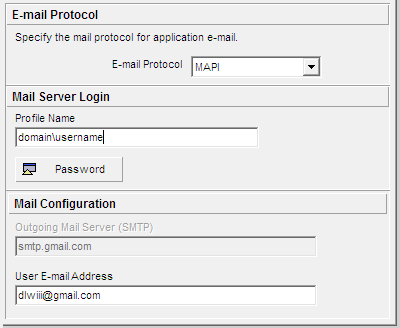
User Preferences | E-Mail sets e-mail information for the user.
E-mail Protocol can be either:
- Internet (i.e. SMTP or POP)
- MAPI
If choosing MAPI, the Mail Server Login will be enabled. Contact your system mail administrator for the appropriate profile to use.
If using Internet, choose the outgoing mail server and your e-mail address.
User Preferences | Assistance turns on and off flags telling whether P6 should use its built-in Wizards when creating new activities or resources.

User Preferences | Application establishes a number of user settings. You may choose which window opens at startup:
|
|

For example, if you primarily work with project risks, you may want to set this as the window that is opened on startup of P6.
This screen also lets you turn on logging, which can be helpful when diagnosing application issues.
You may also choose how grouping and sorting is done and which financial periods to view. If you have jobs, such as summarization, which run on a schedule, the polling interval will determine how often the application will look to notify you when a job runs.
User Preferences | Password lets the current user change their own P6 password.
Note that an Administrator can always change anyone's password.

User Preferences | Resource Analysis allows the user to choose which projects are displayed on the Resource Usage Profile screen. The user can view:
- All closed projects except what-if projects
- All closed projects with a leveling priority
- Opened projects only
Remaining Early data can be shown using Remaining Early Dates or Forecast Dates.
The user may also choose the interval to use when making time-distributed resource calculations:
- Hour
- Day
- Week
- Month
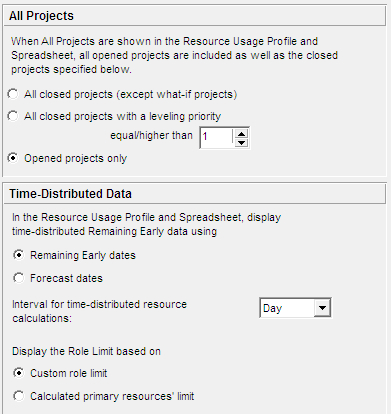
The Role Limit may be selected from either the resource limit of the Primary Resource or the custom limit assigned to the Role.
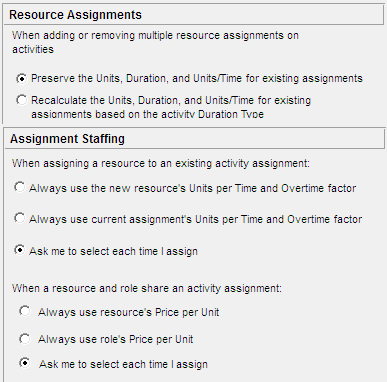
User Preferences | Calculations: This screen lets the user choose whether existing Units, Duration, and Units/Time are affected when adding and removing resource assignments.
This screen also lets the user choose whether to use the resources Units per Time and Overtime when assigning to an existing activity, or to use the current assignments values, or whether to prompt the user each time.
It also allows the user to choose what to do with Price per Unit when a resource and a role share the same activity.
While it is convenient to choose one of the "always" options, it is important to be aware of how you make these assignments and how that affects your project.
User Preferences | Startup Filters lets the user choose whether to see certain data, such as resources, filtered by project by default.
If you mainly work in one project, then it can be helpful to filter by project by default. However, if you find yourself frequently using resources, activity codes, and other items from different projects, you may prefer to have no filter by default.

The View menu is quite extensive, and the items available vary as you view different modules. The items on this menu will be discussed as they occur in relation to other screens, and also in the section Customizing screens and saving layouts. Note that near the bottom of this menu there are two very helpful items:
The Project menu lets you perform a number of project-related actions, such as working with Activities, Resources, and WBS elements. These and other project-related activities will be covered in-depth in future chapters such as Chapter 4, which walks through setting up a new project.
However, one element of this menu is immediately useful: Set Default Project… When you work with multiple projects opened at once, this becomes the project selected when you choose to open a group of projects. It is also where new activities and issues are placed, unless you actively choose another project.

The Enterprise menu will show different items, depending on whether you are running P6 Professional or the P6 Enterprise Optional Client. The following screenshot shows Enterprise menu from the P6 Professional Client on the left-hand side, and the same menu from the P6 Enterprise Optional Client on the right-hand side.

The differences in these two menu items reflect that P6 Enterprise assumes that the system will be installed in an environment where the administrative responsibilities have been separated from the daily scheduling of jobs, while P6 Professional will be installed at places where schedulers have more responsibility and ownership of the entire P6 installation.
The following menu items are found only in P6 Professional. For the Enterprise Optional client, these items are set through the web interface:
- Enterprise Project Structure
- OBS
- Resource Codes
- Project Codes
- Activity Step Templates
- Cost Accounts
- Funding Sources
The Tools menu contains a range of items. The first section deals with progressing project status. These topics will be covered in further chapters, particularly in chapters 7 through 9. In this section we will focus on the items below that first section in the Tool menu.

Auto-Reorganization determines whether a screen of data will be automatically re-sorted when you change data. Take, for example, the list of activities in the following screenshot:
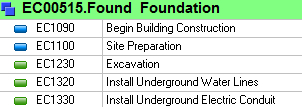
In this screen, activities are sorted by Activity ID. Let us take Activity EC1230 and change it to EC01230. If Auto-Reorganization is enabled, the activity will be moved to the top. If Auto-Reorganization is disabled, then the activity will remain where it is on the screen.
Global Change is a powerful utility that allows you to alter all of the data within a project. Note that this tool does enforce security, so if your global change attempts to affect any data to which you do not have access, it will not be allowed to proceed.

In the following example, task Renumber EC1230, we use global change to change Activity ID EC1230 to EC01230 and to change every other Activity ID by prefixing them with three asterisks.

When you click Change, the change is not made immediately. Instead, a screen appears showing a preview of all the changes that will take place. You may then choose to save the results to a text file for review, cancel the changes, or commit the changes.

If you develop particularly helpful global changes, you can share them with other users within the same database instance and you can export them into a file that can then be imported into a different instance of P6.
Monitor Thresholds and Issues Navigator will be covered in Chapter 8.
Timescaled Logic Diagrams bring back a feature that had been missing in between P3 and P6 v8 (also implemented in P6 v7 service pack 3). It is a separate program which is invoked from the P6 tools menu, but which reads data in from P6 and then runs independently. A Timescaled logic diagram has been described as a cross between a Gantt chart and a Logic diagram, and is helpful when reviewing the logic and critical paths of the project as a whole.

This menu is only visible for the P6 Professional client. For P6 Enterprise, all administrative functions are accessed via the web interface.

Users and Security Profiles lets you set up users and administer profiles and security.
Admin Preferences allows the user to alter a number of global settings.
Admin Categories manages a number of global categories used to describe and organize items.

Currencies manages conversion rates between currencies and how currencies are displayed throughout P6. It is very important to update any currency conversion rates that you use in your projects.

Financial Periods lets you set the reporting periods for financial reporting. The Batch Create function can be used to quickly generate financial periods. Note that this setting is enterprise-wide and not project-specific.

This is the standard help menu.
Contents brings up a full help system that documents all features of P6. The second item brings up a screen telling you about the current system setup. The System tab on this screen can be very helpful when trying to diagnose issues. There is a convenient Copy button that will allow you to send this information to your local support staff or Oracle Support.

