
You can also create a new project by importing it from other systems, such as Microsoft Project (MSP), earlier versions of P6, even Excel files. As each system manages and organizes schedule data differently, care must be taken when importing. However, when receiving schedules from subcontractors or when building your historical data from a previous tool, importing is a quick route to get your data in quickly.
When importing into P6 there are several ways to import, and several formats available. If you are using the P6 Professional Client, then there is a little bit more flexibility over the formats and options than those available in the web. Web imports are limited to two XML-based formats.
To import from P6 Web, go to the EPS screen, and choose Actions | Import/Export | XML Project Import/Export.

This will bring up a screen that looks similar to the following screenshot:

The Import window has three main tabs—Import, Export, and Status.
The Import tab has areas to choose—the import type, the particular file to import, the mapping template choices (if importing MSP XML), and an area to indicate the location of the project within the EPS after it is imported or if this import will merge with an existing P6 project already in the EPS.
There is also an Advanced button to make more selections for this import.
First, choose the Import Type drop-down field. There are two choices:
- Primavera XML
- Microsoft Project XML
Then choose the appropriate XML file to import by clicking on the Browse button.
Once your file is located, its path will be shown in the Import File field. Next, choose the EPS, where you want the newly imported project to appear. In this example, we have chosen Energy Services.

If you do not wish to indicate some advanced functions, click the Import button.
The Advanced button allows a user to indicate more details about how to handle specific items in the import process.

For each of the project components listed, choose to Update Existing Data, Keep Existing Data, or choose Do Not Import the Data.
For example, if you choose to Keep Existing Data, the Issues on the imported project will be created if they only exist in the imported version and will not touch or add to the existing issues for that project in P6. If you choose to Update Existing Data, all issue data will be overwritten and new incoming issues will be added. To prevent any issues being affected by the import, choose Do Not Import Data and no issues will be changed or added.
If you are importing an MSP XML file, the Microsoft Project Template option field is no longer grayed out. MSP formats data differently than P6, and this mapping template lets you choose how to translate certain MSP data into P6. Ever with these mappings, the import will not necessarily be perfect. When importing from MSP, always review your project data after the import to ensure that the data is still an accurate portrait of the project schedule.
To better manage some of the differences in the two software systems, there are choices at a more detailed level that you can manipulate for more desirable results. One note to remember is that MSP refers to work packages items as tasks but Primavera uses the term activity. Click on the wrench icon to see deeper detailed selections and options.

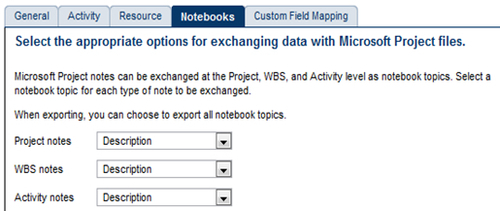
There are tabs with General, Activity, Resource, Notebooks, and Custom Field Mapping options. Once you have made all appropriate selections here, the group of settings can be saved as an import template to use on a future import.
- Template name: Enter the name for this group of settings you select to be used on a future import.
- Select a Currency: The database will take figures entered into cost fields in the original software and place a dollar sign in front of them in the P6 database.
- Import Microsoft Project summary tasks as WBS summary activities: These are not really a 1:1 match; but one option is to take the hierarchy created in the original file and assume it as your WBS in P6. There are values in the original file assigned to those levels, but the values shown in P6 on WBS summary bars are calculated. So the values will be different once imported and especially when the F9 calculation is performed on the newly imported P6 schedule.
- Select the Microsoft project baseline to be used for planned/budgeted values: MSP and P6 handle baselines very differently. This would take the selected MSP baseline and remove values from its planned fields and insert those same values into the field for planned or budgeted in P6. This does not mean that the baseline has imported nor does it mean there is a baseline in Primavera after the import. We recommend creating and assigning a baseline in P6 or importing a project to be used as a baseline in P6. See Chapter 9, for more information on baselines.
Milestones in MSP are also handled differently than in P6. They are simply milestones, with no distinction between start and finish milestones. Two options may be selected for how MSP milestones are imported. They may be imported as P6 Start milestones with expenses, where values in the cost fields are considered Expenses in P6 and not resource costs. Or, they may be imported as activities with resource assignments. After import, these can be designated as the appropriate milestone type in P6.

MSP calls work package items tasks, and P6 calls them activities. So choose to have the MSP task ID field become the P6 activity ID or create an activity-level-user-defined field that will be populated with the MSP activity ID after import to P6. This can later identify which activities to match up if you continue to import and update the same file periodically. However, the risk is that UDFs in P6 are a text box that can be typed into and the values may be overwritten before the next import, either by accident or some other reason. The UDF would have to be created in the P6 system before importing so it can appear as an option in the drop-down list.
You can also choose to take fixed costs in MSP and make them P6 expenses or uncheck this box to leave fixed costs only in MSP and not import them to P6.
It is a good idea to click on the Save button each time you change tabs or leave your screen unattended.
The Resources tab determines how resources will be imported. MSP has a field called Resource Initials and Resource Name, but P6 has fields for Resource ID and Resource Name.

Here you can choose to make the MSP resource initials the P6 resource ID or to import the MSP resource name into the P6 Resource ID field.
If a resource already exists (spelled exactly the same in both systems), there are three choices:
- Keep existing resources: This does not overwrite P6 if the project is being re-imported.
- Update existing resources: This will completely overwrite whatever is in the current project.
- Add new resources: This will add every MSP resource as a brand-new resource in P6. The resource ID will be appended with sequential numbers in order to make it unique. For example, MSP resource 456 may become P6 resource 456-1 on the first import, then on a subsequent import be added as 456-2. Of course, this is not an ideal situation.
The Add a new resource if a resource does not exist checkbox will only add a new resource if it is not already in P6.
The next field allows you to identify the resource parent node of the hierarchy under which to put the incoming resources. (This makes the imported items children of what you select in this field.)
MSP stores descriptive notes at three levels: Project, WBS, and Task (Activity). The Notebooks tab determines how these will be brought into P6 and under which notebook topic:
The last tab allows a user to select a P6 category and make additional choices within that category for the imported data.

As each category is selected, the listing below will have the MSP field names listed for that category in the right-hand column and the available custom fields in P6 in the left-hand column. The drop-down will show all UDF fields at the same level as of category that has been pre-defined in P6. So Project-level UDFs will be listed in the Projects category, and so on.
The categories are Projects, WBS, Resources, Activities, and Activity Resource Assignments. Basically you are to map items on the right with the P6 UDF on the left. To import the file, click on the Import button.