
Exploring Android App Development: The Lingo of Android and Building Your First Hello World App!
Because this book is geared toward readers already familiar with computer programming principles and work processes, everyone is familiar with the universal concept of the Hello World programming example, which is used to show us all the basics regarding how any given programming language and platform gets its basic code structure up and functioning.
Because I want to fast-track our readers to an intermediate level as rapidly as possible within this book, I am going to get the Hello World app up and running here in the second part of the chapter. First, I will discuss the terminology used in Android application development. We’ll then use the Hello World app example to show you how Android structures its programming environment and expose you to the basic Android Application Development work process.
We will take a look at how to create a new Android application project inside Eclipse, how that project is structured and organized in the Eclipse Package Explorer, how Android uses XML mark-up to define data structures, project parameters, OS permissions and user interfaces quickly and easily, so that we don’t have to do this in Java, how our new media assets are named and stored in predefined logical resource folder hierarchies, and of course, how the Java programming language bootstraps and pulls it all together via Android Packages, Classes, Methods and Constants. Android Development is definitely unique.
First, however, we will need to spend a little time up-front learning about the various components of an Android Application. We will learn what the various Android components are termed inside of the Android environment. Android uses some very unique terminology or lingo to describe the various Android application components, and we will learn this lingo as well as how these components all work seamlessly together.
Then, in the next part of this chapter, we can get down to work and build our very first Android application, using some of this new terminology and some XML mark-up and the Java programming language.
Android Application Development Lingo
Android uses very unique terminology to describe the various components or areas of its application development. In this section, I define what these areas are, and what they most closely equate to in other common programming languages such as C++ or Java. Plus, I’ll give you a little more insight as to what open source technologies besides Java and XML drive Android under the hood, as well as how Android optimizes its Java into binaries for use on Embedded (Portable Consumer Electronics) Devices.
The Foundation of Android: The Linux 2.6 Kernel
The foundation of the Android OS is the Linux 2.6 Kernel; just like the Eclipse IDE runs on top of Java, Android runs on top of a full version of the latest Linux operating system. So yes, any and all Android devices are essentially fully functional Linux computers, which is why you see Android devices these days with dual-core, quad-core, and octa-core processors, just like “real” computers feature. The same thing goes for memory—most Android devices have at least one full gigabyte (1GB) of RAM (random access memory), and many feature 2GB, and soon you will see Android devices that have 3GB or 4GB of RAM.
The Android OS uses the core libraries of the Linux OS to do all the low-level things with files, memory, and processing that are done using any computer OS, and because Linux is so highly optimized, it can do this with less memory (more efficiently) than other OSes can. Why is the new Windows 8 OS so memory efficient all of a sudden? Because it has to compete with Linux (Android), that’s why.
It is rumored that Google has Android 4.2.2 running on top of the much more recent Linux 3.8 Kernel and that Android 5.0 will run on top of this more modern Linux Kernel later on in 2013.
Android Optimization: The Dalvik Virtual Machine (DVM)
An Android application developer uses the Android SDK and its Java programming language to access lower-level OS functions, as well as other higher-level functions that Android provides for using various new media assets, SQLite databases, and hardware features of the Android devices, such as cameras, gyroscopes, GPS, and the like.
When you compile your Java code and other assets (XML, audio, images, etc.) Android uses a DVM, or Dalvik Virtual Machine, technology to optimize these into a highly optimized binary format, much like an executable file, only even more optimized to run on smaller, more portable devices. If you look inside your Android APK file, you will see a .DEX file for your application in the root of your project. This is stands a Dalvik executable file.
DVM is not something an Android developer needs to be concerned with during day-to-day development, I am just mentioning it here so that if you happen to come across it on an Android-related Google search someday, you’ll have the context to know what it is and what the DVM is doing in the overall development process. Next let’s get into the lingo of Android and learn about each of the four major components of an Android application and what they are and how they work together to form a single cohesive Android app.
Android Activities: The Presentation Layer
Android uses the term Activity to describe the “front-end” screens of your application that your users view.
An Activity is a collection of design elements that, working together, compose each screen view of your application. These would include such things as user interface elements, text, background graphics, 3D, foreground content, digital video, pop-up menus, animated elements, and other visual design components that serve to provide an interface between what your application does (its Activities), and the end-user who is utilizing your application. We learn about Activities in detail in the first two parts of this book.
In Android terms, Activities generally consist of a Layout Container, which organizes and arranges a series of user interface elements called Widgets, along with your application’s content, into predefined screen areas. If you want to include graphical elements, to make your designs more compelling, then you would use Drawables, which is Android’s terminology for graphic elements such as images or animation.
Animation in Android uses both Widgets and Drawables; Drawables are used for frame-based animation (raster animation), and Widgets are used in procedural or tween-based animation (vector animation), as drawables can be as well. Amazingly, Android calls animation exactly what it is: animation. There is one other term in Android that is the same as it is in other programming languages: Events. Events allow the many elements that comprise our Activities to be processed using Event Handling code, just like in many other programming languages. Because readers of this book are familiar with programming, and because Event Handling is needed to make user interface designs in the first half of this book functional, I am going to cover Events early on in this book, so that we can create more robust applications sooner.
We will learn more about the Android Activity Class, and designing screen layouts via Android Layouts, which leverage the Android ViewGroup Class, in Chapter 4. We’ll learn more about User Interface Design via Android Widgets, which leverage the Android View Class, in Chapter 5. Finally, we will learn more about Events in Chapter 6, and Drawables in Chapters 7 through 10, when we cover advanced User Interface Design and Graphics Design using Digital Images, Digital Video and Animation within Android.
Android Services: The Processing Layer
Whereas Activities represent the front-end or foreground of your Android application, Android Services represent the back-end, or background processing, the heavy lifting if you will.
The Android Service Class is used to create Java classes that do repetitive processing tasks, usually via programming constructs called loops or via data-fetching processes, such as streaming, in the background, while your user is simultaneously uses your application via its the front-end user interface activities. A good example of this would be a user playing an MP3 audio file while using your app.
There are many uses for Service classes in Android, obvious and common uses would be playing audio MP3 and digital video MP4 files for entertainment, streaming new media files from a remote server, converting text to speech (speech synthesis), calculating game logic while playing the game, processing Android Live Wallpapers or Android Daydreams, using Bluetooth or NFC to transfer large new media files between end-users in real-time, running a spelling checking process, any overly complex mathematical calculations, 3D rendering, and anything else that requires so much processor overhead (power) that it makes the Activity user interface or content become stilted and unprofessional.
Fortunately for Android Developers, most modern-day Android devices, such as smartphones, tablets, e-readers, and iTV sets, come with a minimum hardware configuration of a dual-core (two central processing units, or CPUs) processor, and many more are now becoming available with quad-core (four CPU) processors, and now octa-core (eight CPU) processor Android devices are appearing on the market. This means that there is plenty of processing power for your Android Service classes to leverage!
One of the more powerful options in the Android Service class is to have your background processing Service placed into its own thread (I like to call it spawning, but it is known in programming terminology as a process), which, with so many CPUs present in an Android device, could actually translate into your Service classes being allocated their own CPU cores.
Android also features a number of specialized Service classes that are already sub-classed (we will learn about this Java terminology in Chapter 3) from the primary Android Service class. For example, there are SpellCheckerService, WallpaperService, TextToSpeechService, DreamService, IntentService, AccessibilityService, VpnService, and AbstractInputMethodService classes also available for use by Android Developers. We will be learning all about Services in Chapter 17 of this book.
Android Broadcast Receivers: The Communications Layer
Android communicates inside its application infrastructure via Broadcast Receivers.
These are usually used for inter-application communication, as well as to provide alerts for your users, many times from the Android OS or Android device itself. For instance, if the phone is ringing, or if the tablet is about to run out of battery power, the Android OS sends out a Broadcast Receiver that your application programming logic can respond to with some sort of custom action. Other common messages relate to the camera being used to take a picture, a time-zone change, a data download completion, a language preference change, a video cache is complete and ready for playback, and so forth.
Similar to Android Services, Broadcast Receivers run in the background, and you can configure your app code to “trap” any type of Broadcast Receiver that you feel is necessary for your application and its end-users to be concerned with. Once your code detects a Broadcast Receiver that it needs to respond to, it can invoke the appropriate user interface element in the appropriate Activity, and alert the end-user to the change in the OS or device status. We will be taking a close look at Broadcast Receivers in Chapter 18.
Android Content Providers: The Data Storage Layer
Android has a unique term for a common concept: Data Storage. Whether it is stored in memory, in files on an SD Card, or in a SQLite database, stored data in Android is accessed via a Content Provider.
The primary (and best) way to store and share data across Android applications to use the open source SQL technology, which is a part of the Android OS. This is the SQLite database management tool package. Android has an entire package dedicated to the SQLite database management paradigm, called android.database.sqlite, which contains everything you will need to create and access SQLite databases.
Android Content Provider SQLite databases are used for Android device user-defined data storage by the Android OS across the board. We will be learning more about some of the more important databases to an Android device user, such as the Contacts databases and the Calendar databases, later on in this book. There are also new media related databases that keep track of a user’s images, audio files, and video assets and playlists.
We’ll learn more about Android Content Providers and learn about creating, populating, modifying, and deleting Android SQLite databases, in Chapter 19.
Android Intents: Inter-Application Communications
An Android application communicates between its primary components via an Intent.
For example, you can use Intents to communicate between your Activities and Services, and you can do everything from launching new tasks or activities, to sending out new task instructions to existing ones.
The Intent object holds information regarding which application component needs to perform the required task. This includes what actions need to be taken to complete that task, a definition of the data that the task uses to perform that action, and, optionally, that data’s MIME type and any flags (settings) and other optional data or information that may be needed to completely convey what exactly needs to be accomplished via the Intent object that is being sent from one Android app module to another. Yes, Intents are one of the more complicated areas of the Android OS, as far as their implementation goes.
Each type of of Android component, Activities, Services, or Broadcast Receivers, has its own type of Intent object. This assures that Intents do not get mixed up and keeps everything well organized. So to start up a Service via an Intent, you pass over a Context.startService( ); Java method call with your Intent. For an Activity, use a Context.startActivity( ); Java method call, and for a Broadcast Receiver use a Context.sendBroadcast( ); Java method call. We will learn all about this in Chapter 3 (Java) and Chapter 16 (Intents).
Android Manifest: Application Permissions Definition
Finally, Android utilizes the term Manifest to describe the XML file that “bootstraps,” or defines and launches, any given Android application. Android uses XML to define many things, and like the index.html file used to launch websites, Android apps launch via their project APK’s AndroidManifest.xml file.
In the root level of any Android application .APK (Android PacKage) file, you will find a file named: AndroidManifest.xml that contains XML mark-up tags that define everything that the Android OS needs to know about your application. This includes, but is not limited to, what Android OS versions the app supports, what Activities, Broadcast Receivers, and Services the app contains, what permissions the app needs to access secure databases and Internet resources, and Intent Filters that need to be established.
We’ll discuss Android Manifest in the chapters where we need to define special Activities, Services, Broadcast Receivers, or assign permissions to application components. This will turn out to be quite a few, by the time we hit the end of this book.
Creating Your First Android Application
Let’s not waste any more time, as we have a lot to cover in this chapter, so let’s get right down to it and fire up Eclipse via the Quick Launch Icon that you set up in Chapter 1. We will create a Hello World application framework in this section that we will use to build a world generation toolkit that you can use as a jumping off point for creating your own interplanetary games.
Accept the default path to the workspace folder that Eclipse set up for you in your Users folder, and launch the IDE onto your screen. Go into the File menu, and find the New sub-menu at the top, and then select the Android Application Project sub-menu.
Alternatively, you can also use the File ![]() New
New ![]() Project . . . menu sequence, which is how it used to be accessed prior to Android 4.2. This opens a New Project dialog, which lists the different types of projects that you can create inside of Eclipse. Find the Android project type, and click the triangle UI element to the left to open up the sub-menu of Android application types, and then select the Android Application Project and finally click on the Next
Project . . . menu sequence, which is how it used to be accessed prior to Android 4.2. This opens a New Project dialog, which lists the different types of projects that you can create inside of Eclipse. Find the Android project type, and click the triangle UI element to the left to open up the sub-menu of Android application types, and then select the Android Application Project and finally click on the Next ![]() button at the bottom of the dialog.
button at the bottom of the dialog.
Either of these work processes will open the New Android Application dialog, where we can set all the top-level attributes of our Hello World Android application, as shown in Figure 2-1.

Figure 2-1. Naming our Application, Project, and Package in the New Android Application dialog in Eclipse
First enter the Application Name, Hello_World, into the first field in the dialog. Notice that as you type in Hello_World that the second field, Project Name, is also being filled out via a dual-typing feature. This means that Android wants our App Name and Project Name to be the same, and because of this, I am going to use an underscore instead of a space in our Hello World app name, as this is a fairly common programming practice, and because I don’t like to use spaces in my file names or folder names.
The third field allows us to create our package name for our new Android application project, and to use a consistent package naming convention for this book, let’s use: chapter.two.hello_world as our package name, which should use all lowercase letters and underscores. Next, we need to select our Minimum Required API Level of support for our Android application, which we will set to nine versions of backward compatibility via the Android 2.2 API Level 8 setting, because there are still lots of Android 2.2 and 2.3.7 devices on the market that we need to provide support for. We also need to set our Target SDK Level, which is the target Android API Level for which we are developing, in this case it’s the Android 4.1 API Level 16, as that is the emulator that we installed back in Chapter 1. We’ll compile with the current Android 4.2 API Level 17 that we just installed in Chapter 1 because that’s the latest (and most bug-free) software that we have, and you always want to compile with the latest development software code. Now click the Next ![]() button and proceed to the next dialog as shown in Figure 2-2.
button and proceed to the next dialog as shown in Figure 2-2.
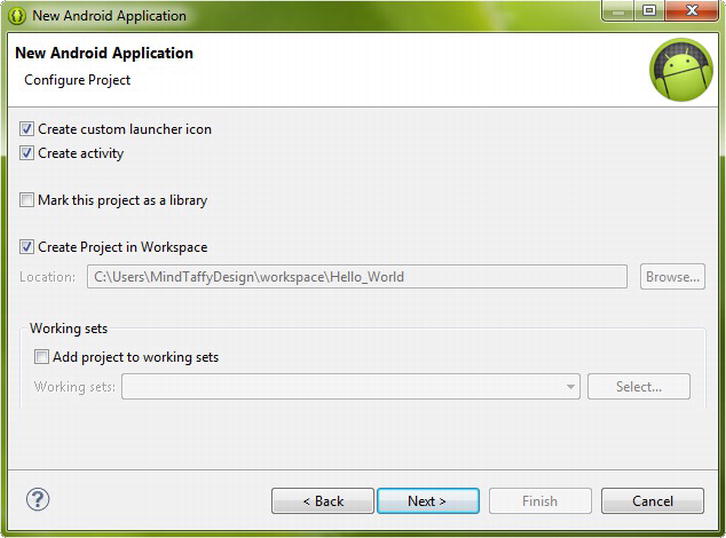
Figure 2-2. The New Android Application – Configure Project dialog, where we select options for our new project creation
In the Configure Project dialog, check the Create custom launcher icon checkbox and the Create Activity checkbox at the top of the dialog, as well as the Create project in Workspace checkbox in the bottom of the dialog, and then click Next ![]() to proceed to the Configure Launcher Icon dialog, as shown in Figure 2-3.
to proceed to the Configure Launcher Icon dialog, as shown in Figure 2-3.

Figure 2-3. The Configure Launcher Icon dialog where we can select a predefined Android Application Launch Icon
This dialog allows you to select a predefined Android App launch icon from an image, clipart, or text asset, many of which have already been provided for you. Let’s select the default for now (as we are doing in all these dialogs) just to see what the default New Android Application Project creation process does so we have a minimum baseline understanding to build from. After you have chosen your application Launcher Icon (which Android names ic_launcher.png, as we’ll see later on in this chapter), click Next ![]() to proceed to the Create Activity dialog, where we will create a BlankActivity for our application. We are selecting a BlankActivity so that we can see the minimum code that Android will generate via the New Android Application Project series of dialogs. The dialog is shown in Figure 2-4.
to proceed to the Create Activity dialog, where we will create a BlankActivity for our application. We are selecting a BlankActivity so that we can see the minimum code that Android will generate via the New Android Application Project series of dialogs. The dialog is shown in Figure 2-4.

Figure 2-4. The Create Activity dialog in the New Android Application Project series of dialogs
You are probably wondering what an Activity is in Android, and what exactly its function is. An Activity is a screen area that holds content and user interface (UI) designs that provide a front-end (display area) for your application to interface visually with your end-users. As you will see in this chapter, the main activity is defined via XML mark-up and then inflated via Java code in your application onCreate( ) method in your Main Activity class. The Activity contains Layout Containers that are specified by the Android ViewGroup Class (logical as Layouts are groups of Views) that contain Android View Class Widgets that are UI elements and content containers.
Click the Next ![]() button and proceed to the New Blank Activity dialog shown in Figure 2-5 where we will set the parameters for our Android application’s Activity, much like we did in the first New Android Application dialog. Let’s accept the default (suggested) names, just to become familiar with what Android would like us to call the various main components of our application, and name our Activity MainActivity and name our Layout XML file activity_main with a navigation type of None—again, this is so we can see the minimum bootstrap code that will be provided for us by the New Android Application Project series of dialogs. Now click Finish and let ADT proceed with the new project creation process.
button and proceed to the New Blank Activity dialog shown in Figure 2-5 where we will set the parameters for our Android application’s Activity, much like we did in the first New Android Application dialog. Let’s accept the default (suggested) names, just to become familiar with what Android would like us to call the various main components of our application, and name our Activity MainActivity and name our Layout XML file activity_main with a navigation type of None—again, this is so we can see the minimum bootstrap code that will be provided for us by the New Android Application Project series of dialogs. Now click Finish and let ADT proceed with the new project creation process.

Figure 2-5. The New Blank Activity dialog, where we name our Activity and select its Navigation Type
Once you click the final Next button in the last dialog, Android Development Tools (ADT) will check your current installation (SDK and Plug-Ins set-up) to make sure that you have everything that you need to create the Android Application Project that you just specified. For instance, if you specified Android 2.2 through 4.1 support, but only installed API Level 10 (2.3.7) through API Level 16 (4.1.2), then an Install Dependencies dialog will appear asking you to install API Level 8 (2.2). Once you click the Install/Upgrade button these additional APIs will be pulled over from the Google repositories and installed on your system to be used in your Eclipse Android Development configuration. Now we’re ready to develop our new Hello World application inside of the Eclipse IDE, which will appear, populated with the new Android application project, once the Install Dependencies download is complete (if needed) and its install process has been completed. Next let’s take a look at the virgin Android Project that ADT has so kindly created for us!
Anatomy of an Android Application Project
Let’s take a look at what the ADT New Android Application Project helper has created for us in our Eclipse IDE, starting with the Package Explorer project navigation pane on the left side of the IDE. The Package Explorer Utility allows us to navigate through the project assets hierarchy for our Android application at any time during its development, much like the Windows Explorer Utility allows us to navigate our hard disk drive and OS. Figure 2-6 shows what Eclipse will look like after the new project pops up on the screen in the IDE.

Figure 2-6. New Android Application Project shown in Eclipse with key folders and sub-folders open to show project assets
Let’s open up some of the key sub-folders in your Hello_World top-level project folder by clicking on the little triangle UI elements next to each folder that point to the right. For now, let’s focus on the folders named src (source code) and res (resources), as those are the most important folders in any Android Project. Open up the src folder, which contains one sub-folder named chapter.two.hello_world that you might remember we specified in the New Android Application dialog as our package name.
Dig a little bit deeper and look under the chapter.two.hello_world folder, where you will find our MainActivity.java file, which contains the Java code that the New Android Application creation process has written for us, and which “bootstraps” or launches our Activity (main screen) user interface layout and menu code, which happens to be defined via XML files in the layout and menu folders. We’ll open this Java file in a later section of this chapter and take a look at that Java code and what it does exactly. All your Java code files will be kept in this package-name folder for any Android application that you develop.
Also notice in Figure 2-6 that I clicked the right-facing arrow triangle next to the MainActivity.java file, and that the Package Explorer also shows the Java Methods that are within this Java code, so it seems that the Eclipse Package Explorer not only navigates files, but also code structures as well. This is a pretty vanguard feature for an IDE.
The other primary application assets folder that we need to take a closer look at is the resources or res folder, which, as you may have guessed, is where all the XML and new media resources that Android applications will inevitably draw on to create its User Experience (UX) are kept in immaculate order. Click the triangle UI icon next to the res folder, as shown in Figure 2-6, and open it up, so you can see its many sub-folders that were created for us by the New Android Application Project helper.
The first four folders you see at the top all start with the word drawable which, as you might surmise correctly, is an Android application asset that can be drawn to the screen via the Activity that we learned about earlier. A drawable can be an image, a shape, a frame animation, an image transition, an icon, or any similar graphics-related content or user interface elements needed for your application. Also notice that there are four drawable folders—one for each level of screen density: low, medium, high, extra high. It is important to note that as of Android 4.2.2 there is also an Extra, Extra High (XXHDPI) classification.
Click the triangle UI element next to any one (or all four, if you like) of the drawable folders, and you will see the ic_launcher.png Launcher Icon, which we created in the third Configure Launcher Icon dialog of the New Android Application Project series of dialogs. Note that just having your application icon named correctly (ic_launcher.png) and placed in the correct drawable folder is all that you have to do to have an icon appear for your application. That’s right: zero coding. We’ll get into how to optimize icons and graphics for these different drawable folders later on in Part 2 of this book.
These four drawable folders allow Android Developers (such as yourself) to provide custom pixel-perfect graphic elements across all genres of Android devices, from smartphones to tablets to e-readers to iTV sets. Low Density Pixel Imagery (LDPI) is optimized for the smallest of Android screens, such as 120 DPI (which also stands for Dots Per Inch) flip-phones or MP3 players, which usually have small 320 by 240 pixel screens. Medium Density Pixel Imagery (MDPI) is for entry-level smartphones (480 by 320 and 640 by 480 resolution) that use a 160 DPI pixel screen density.
High Density Pixel Imagery (HDPI) fits mainstream smartphones and the 5" to 7" mini-tablets (800 by 480, 854 by 480, and 960 by 540 resolution) that use 240 DPI pixel density screens. eXtra High Density Pixel Imagery (XHDPI) uses 320 DPI pixel density screens, and fits HD smartphones and larger 8" to 11" tablets (1024 by 600, 1280 by 720, and 1280 by 800 resolutions). Interactive Television Density Pixel Imagery (TVDPI) also uses 320 DPI (at 1920 by 1080 and 1920 by 1200 resolutions) and fits the new GoogleTV iTV sets. We’ll cover this topic in far more detail in Part 2 of this book, which covers graphics design and animation for Activity User Interface and Content Development.
The next folder down is the layout folder; click the triangle UI element to open it, and you will see that it currently contains the Layout XML file for our Activity, named activity_main.xml as we previously specified in the fifth dialog in our New Android Application Project series of dialogs. This file contains all the XML mark-up tags that define our Activity Screen Layout and its User Interface elements. We’ll open this in the Eclipse IDE in the next section of this chapter and eventually customize the XML tags to create an even cooler Hello World user experience.
Each of the Activities (user interface screens) that you define for your application will have its own XML file in this layout folder, each containing unique tags that define what each application screen will look like. So, if your app has a Log-In screen, for instance, there would also be an activity_login.xml file in this folder, which would contain completely different XML mark-up (tags) than the activity_main.xml file does.
The next folder down is the menu folder, which holds XML files that define your Android application menu structure for each Activity user interface screen. Click the triangle UI element next to the menu folder to open it, and you will see that it currently contains the Menu XML file for our Activity, which Android has named activity_main.xml as previously specified in the fifth dialog in our New Android Application Project series of dialogs.
The reason that the Layout and Menu XML files have the same name is because normally you will have both UI elements and menus for each of your application (activity) screens, so the most logical way to group them is by their file names. Because these files are in different folders, they are kept separate, and therefore can have the same file name, which Android will look for by using the first part of the file name, as well as by the folder it is in. We’ll open up both these files in the Eclipse IDE a little later on in the chapter, and later we will even customize their XML tags to create a more advanced Hello World Layout and Menu system, so that you can better experience how exactly Activities work inside of Android.
The last three sub-folders in the resource folder are the values folders, which hold our constants or “hard-coded” values for our application, such as strings, themes, dimensions, colors, and the like, so that they can all be later accessed (and changed with the greatest of ease) in one centralized location within your project hierarchy. Android wants all values externalized into these folders, as we will see with the strings.xml file in the next section. As you will see throughout the book, if you do not use values properly Eclipse flags your code with triangular yellow warning icons in the IDE. Android OS is kind of strict!
Next let’s take a closer look at how Android leverages XML mark-up to allow team members, primarily non-programmers in design roles, to contribute to the application development process. XML is used for many things in Android development, such as User Interface Design, Application Configuration in the AndroidManifest.xml file, and much more.
Android Application Project: XML Mark-Up
Your application’s Java code in MainActivity.java references the activity_main.xml files that we have seen in both the layout and menu folders, and in fact when Eclipse opens up after the New Android Application Project creation process, it automatically opens up the Activity Layout XML file activity_main.xml from the layout folder in its central main editing area. This can be seen in Figure 2-6, which shows what Eclipse looks like when it first opens up your new application project. Notice in the central area that the activity_main.xml is open (note name in top tab) in the Graphical Layout editor (note name in bottom tab).
Creating User Interface Screen Layouts in Android Using XML
Let’s click the activity_main.xml tab at the bottom of the Eclipse central editing pane, as shown in Figure 2-7, and see exactly how this XML mark-up works inside your Android Application. Here’s the XML mark-up to define a Relative Layout Container and place some Hello world! text inside it:
<RelativeLayout xmlns:android="http://schemas.android.com/apk/res/android"
    xmlns:tools="http://schemas.android.com/tools"
    android:layout_width="match_parent"
    android:layout_height="match_parent"
    tools:context=".MainActivity" >

    <TextView
        android:layout_width="wrap_content"
        android:layout_height="wrap_content"
        android:layout_centerHorizontal="true"
        android:layout_centerVertical="true"
        android:text="@string/hello_world" />

</RelativeLayout>
Figure 2-7. Using the XML Editing tab at the bottom right of the main editing area to view the activity_main Layout XML
The first XML tag shown in the <RelativeLayout> tag, which provides a Layout Container that will hold our user interface elements, in this case text, and eventually, imagery and buttons, for example. Inside of the RelativeLayout tag you will find several parameters, each of which follow the following format:
platform:feature="setting value"
For instance, the first parameter is xmlns:android and referenced the XML platform (XMLNS means eXtended Mark-up Language Naming Schema) and defines a location on the Internet where the XML tags for use with Android that are used in this XML document are publicly defined and referenced in one central location. The second parameter xmlns:tools is also from the XML platform, and defines where on the Internet the XML tools used in this XML document are defined publicly. The tools:context tag tells where these tools will be utilized, in this case in our MainActivity Java class, referenced via .MainActivity setting value held in quotes within that parameter.
The other parameters in the Layout XML file are all from the Android platform and define parameters that pertain to the Android OS, for instance, android:layout_width and android:layout_height are both set to the match_parent value, which tells the Relative Layout container to expand to fill the entire display screen.
Now let’s look at the parameters in the <TextView> tag that sets our Text within our Relative Layout container. We again see the android:layout_width and android:layout_height parameters, but this time they reference the wrap_content setting, which essentially does the exact opposite of what the match_parent setting does. Instead of expanding the tag to fill its container, wrap_content “shrink-wraps” the container, or in this case user interface element, around its content! Let’s look at the layout centering parameters and the string.xml file values that the android:text parameter references next.
The android:layout_centerHorizontal and android:layout_centerVertical parameters are both set to true, which signifies that we want to center our TextView UI element both horizontally as well as vertically, so that the TextView UI element lives in the center of our Activity screen, no matter what the screen density, orientation, or resolution is that the user’s device might be using at the time.
The final and most important parameter for the TextView UI element is the actual text content that that UI element is to contain, and this is accessed via the android:text parameter. The setting value contained in quotes is set to @string/hello_world which is Android OS specific symbolic notation for:
C:UsersUsernameworkspaceHello_World
esvaluesstrings.xml <string> tag named: hello_world
Creating Option Menus in Android Using XML
We’ll be looking at the strings.xml file in our values folder later on in this chapter to see how this text value is set as well. First, let’s take a look at the other activity_main.xml file that is contained in the menu folder, and analyze the Menu XML code that ADT has written for us. Right-click the activity_main.xml file inside the menu folder in your Package Explorer (shown in Figure 2-6), and select Open or simply select the file and use the F3 key on your keyboard to open it. A second tab opens in the central editing area of Eclipse labeled activity_main.xml and you will see XML mark-up defining your menu settings entry, as shown in Figure 2-8.

Figure 2-8. The Menu XML file shown in the second (menu) activity_main.xml tab in the Eclipse central code editing area
Menu XML files in Android also use mark-up structures called Tags to define menu items via the <menu> tag container and inside of it the <item> tags for each menu item. In this case there is only one menu item called Settings however, later on we’ll add some more menu items and make them active, so that you have a complete understanding of how to implement menu items in your apps.
It is important to note that when you run your app the menu pops up when you use the Menu key (button) in your Android Emulator, even though the menu item when clicked does not do anything yet. This allows you to define your Activity menu user interface and test it before you write the code to implement what it actually does. So let’s look at the Menu XML code that Android created for us now line by line:
<menu xmlns:android="http://schemas.android.com/apk/res/android" >

    <item
        android:id="@+id/menu_settings"
        android:orderInCategory="100"
        android:showAsAction="never"
        android:title="@string/menu_settings"/>

</menu>
As you can see, the opening tag in any XML file, in this case the “parent” <menu> tag, contains a HTTP reference to the Android XML Naming Schema, just like the <RelativeLayout> tag did in the layout folder version of the activity_main.xml file that we looked at earlier. Inside the <menu> tag we “nest” <item> tags that define each menu item, and each <item> tag in turn has its own parameters that define what each menu item is named, what it says on the menu, what order it appears in, and whether it shows as an Action Icon in Android 3.x, 4.x, or 5.x operating systems. Let’s go over each parameter.
The first android:id parameter names this menu item menu_settings so that we can reference it in our Java code. The second android:orderInCategory parameter sets the order that the menu item will be in a menu that has more than one menu item, as most menus do. As we add menu items later on, we will set this parameter to 200 (and so on) to determine the importance of each menu item function that we add.
The third android:showAsAction parameter determines whether your menu shows on the Action Icon Bar on Android OS version 3.x and 4.x (and soon 5.x) devices. In this case, we are using the none setting, because we want backward-compatibility to Android 1.6 and 2.x devices such as the Amazon Kindle Fire (2.3.7). A none setting pops-up the menu at the bottom of the screen as you will see when you run the Hello_World app in the 4.2 Emulator later. If you are developing apps solely for Android 3.x and later, you can use the ifRoom parameter as a setting instead, and your menu items will appear in the Android Action Bar, if there is room for them, that is.
The final android:title parameter is the title, or label, for the menu item within the pop-up menu itself. Because this menu title is a string constant, it is set in the values folder in the strings.xml file. In fact let’s look at that now by right-clicking the strings.xml file in the values folder and selecting the Open command!
Setting Constant Values for Your Android Application Using XML
The strings.xml file opens in its own editing tab in the central area of Eclipse as shown in Figure 2-9, if you want to see the strings edited visually, click the bottom Resources tab on the left or use the XML view tab on the right, labeled with the strings.xml filename.
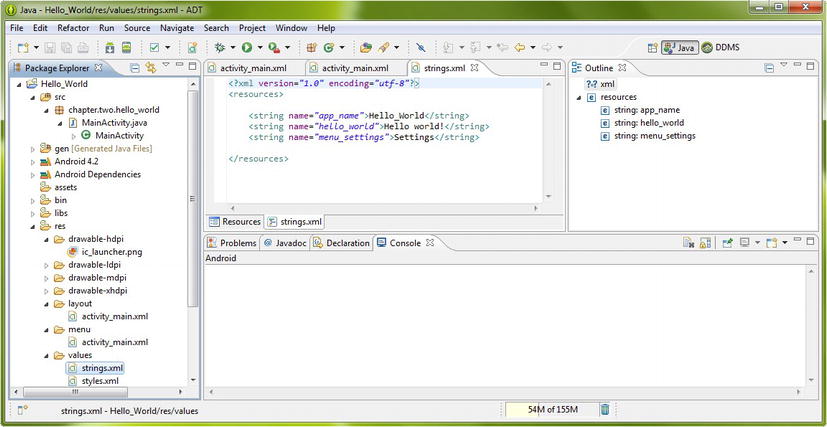
Figure 2-9. The strings.xml file (located in the values folder) shown in the Eclipse central editing pane in XML coding mode
Because we’re learning XML code in this section of the chapter, I chose to show the XML mark-up view pane in the Eclipse ADT Editor shown in Figure 2-9.
Let’s look at that XML mark-up code now, to see how we define constants:
<?xml version="1.0" encoding="utf-8"?>
<resources>
    <string name="app_name">Hello_World</string>
    <string name="hello_world">Hello world!</string>
    <string name="menu_settings">Settings</string>
</resources>
The first XML tag declares we are using XML version 1.0 and that we are using text (font) encoding paradigm UTF-8, which accommodates a fairly large character set that spans many common languages. The second “parent” tag is the <resources> tag that holds our <string> resources that are nested inside the Resources container. The first <string> tag is named app_name and its value holds the name for the application Hello_World that appears at the top of the application in the emulator when we run it. The second <string> tag is named hello_world and its value holds the text that is used in the TextView UI element that displays: Hello world! that appears in the middle of the application Activity screen in the emulator when we run it. The third <string> tag is named menu_settings and its value holds the name for the first menu option title: Settings that appears at the bottom of the application in the emulator when we run it and click the Menu button or icon on the right side of the emulator screen.
Now that we’ve covered the plethora of options and values that can be set via the XML mark-up in our Android application, let’s take a look at how Java calls, starts up, and inflates all these XML assets via various onCreate( ) methods.
Android Application Project: Java Coding
Now let’s take a look at the Android application Java code assets themselves that live in the Project Explorer hierarchy we examined in detail earlier in the chapter. We’ll again start at the very top of the Project Folder hierarchy, and look in the src folder and under our package folder we’ll find the MainActivity.java Java source code file that contains our MainActivity class and onCreate( ) methods.
Assuming your src and package-name folders are open and you can see the MainActivity.java file, click the MainActivity.java file to select it, and hit the F3 key on your keyboard, or alternatively you can right-click the file name, and select the Open menu item from the context-sensitive menu that will appear. A fourth tab opens at the top of the Eclipse central editing pane and you should see something like what is shown in Figure 2-10.
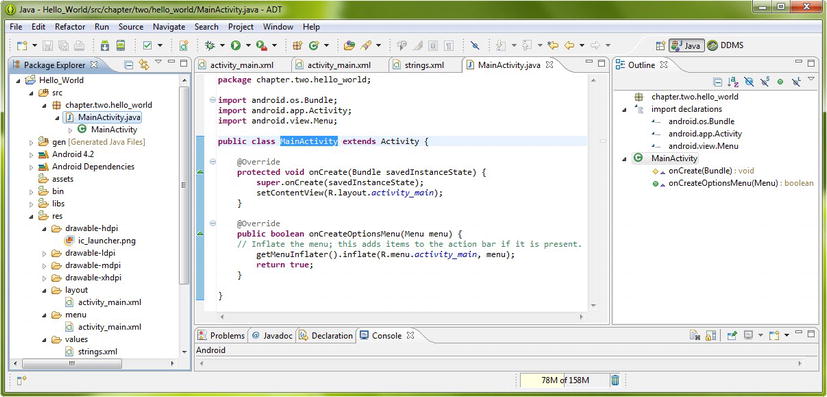
Figure 2-10. The MainActivity.java file shown in the Eclipse central editing pane ready for further editing
Notice that a tab opens in the central part of Eclipse that says MainActivity.java at the top and contains the Java code that is in that file. This central part of Eclipse is the code editing pane and can have more than one tab open at a time, as we have seen when we opened our Layout and Menu XML files for review and editing. So, let’s take a look at our Java code now.
Defining the Android Classes via Import Statements
There are three import statements at the top that reference other Java code that we will use in the Java class and its methods below it. Note we will get into all this Java terminology in greater detail in the next chapter. To see all the import statements, click the + UI symbol next to the first import statement, and you can see all three import statements.
The first onCreate( ) method uses the first Bundle class, the second Activity class extends our MainActivity class, and the third Menu class creates a menu via the onCreateOptionsMenu( ) method. All these Android classes are discussed in greater detail in the first two parts of this book. Here is the Java code that creates our Activity (User Interface) and Menu for our Hello_World application as it was created for us in the ADT New Android Application Project helper:
package chapter.two.hello_world;

import android.os.Bundle;
import android.app.Activity;
import android.view.Menu;

public class MainActivity extends Activity {
        @Override
        public void onCreate(Bundle savedInstanceState) {
                super.onCreate(savedInstanceState);
                setContentView(R.layout.activity_main);
       }
        @Override
        public boolean onCreateOptionsMenu(Menu menu) {
                getMenuInflater().inflate(R.menu.activity_main, menu);
                return true;
       }
}
Creating Our Application Infrastructure Using the onCreate( ) Method
Next, let’s take a look at the MainActivity Java class and the onCreate( ) method that lives inside of it. In Java, you declare a class using the class keyword before the name of the class. In this case, our class is called MainActivity, and it can be accessed by any other code, so it is also declared as public using the public keyword prior to the class keyword. This MainActivity class extends (or borrows methods from) the Android Application Activity “super class,” which we previously imported at the top of this code using the import android.app.Activity; line of code. Our complete MainActivity class declaration reads as follows:
public class MainActivity extends Activity { ... }
The first method in our class is also public and also is declared as void, which means that it does not return any value to the calling function (in this case the Android OS), it just does something, which in this case is to create our initial Activity or User Interface Screen via the onCreate( ) method. The onCreate( ) method is passed a Bundle object by the Android OS that is called saveInstanceState and contains the states (settings) of the user interface elements in our Activity in the form of a Bundle of values and settings.
Inside the onCreate( ) method are two method calls. The first method call uses the super keyword to pass the saveInstanceState Bundle object up to the android.app.Activity superclass and its onCreate( ) method. The second method call sets the Content View (Activity Screen) for the application via the setContentView( ) method, along with a reference to our activity_main.xml file in the layout folder that we looked at earlier in the chapter. That looks like this: setContentView(R.layout.activity_main); where the R equates to the Hello_World Project path down to the layout folder, or C:UsersUsernameworkspaceHello_World es so as you can extrapolate from this information, R.layout.activity_main actually translates into (means to Android):
C:UsersUsernameworkspaceHello_World
eslayoutactivity_main.xml
This serves to load your XML layout definition through the Java setContentView( ) method in the Activity subclass (remember the extends Activity part of our class declaration). Next, let’s look at the second method onCreateOptionsMenu( ) that similarly serves to create your Activity’s Options Menu from the activity_main.xml Menu XML file using the getMenuInflater( ) method accessed via the android.view.Menu class import statement we looked at earlier.
The getMenuInflater( ) method calls an .inflate( ) method that has two parameters, a Menu object named menu passed into the method via onCreateOptionsMenu(Menu menu) and the path to our activity_main.xml file in the menu folder via the now familiar R.menu.activity_main which equates to:
C:UsersUsernameworkspaceHello_World esmenuactivity_main.xml
So, basically, the .inflate( ) method takes the Menu object named menu and inflates it with the XML Menu definition referenced in R.menu.activity_main. Note that Android uses the first part of the filename (not the .xml part, it does not use the file extension) to reference both XML and graphics (drawable) files. Once the Menu object menu is inflated and ready for use it returns a true value to the OS.
Running Your Hello World App in the Android 4.2 Emulator
Now let’s compile and run all this XML and Java code and see what it does in the Android 4.2 Emulator that we created in Chapter 1 for the Nexus S smartphone. To launch the emulator, simply right-click the Hello_World Project top-level folder in the Eclipse Package Explorer, and select the Run As ![]() Android Application menu item. When the Android 4.2 Emulator for the Nexus S smartphone appears you will see the Hello_World app and its Hello world! exclamation on the emulator screen as shown in Figure 2-11.
Android Application menu item. When the Android 4.2 Emulator for the Nexus S smartphone appears you will see the Hello_World app and its Hello world! exclamation on the emulator screen as shown in Figure 2-11.
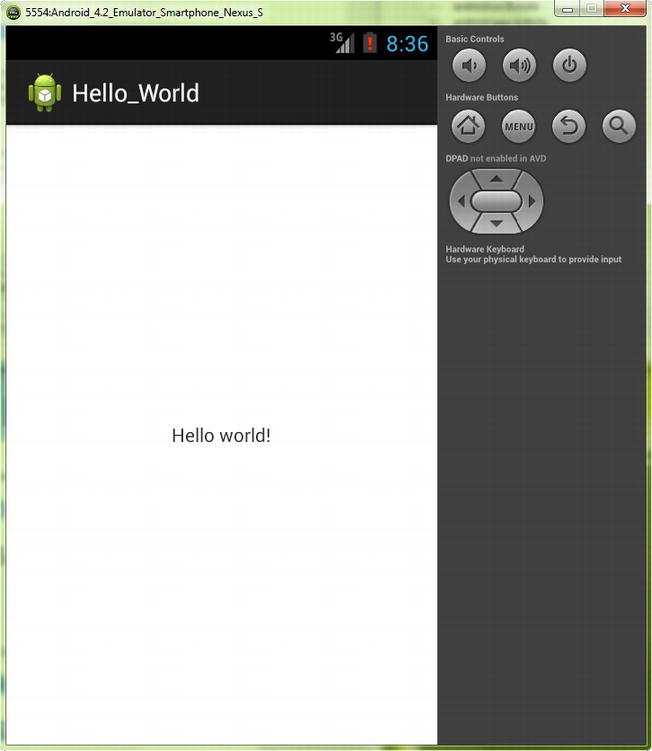
Figure 2-11. Running our Hello_World Android Application in the Android 4.2 Nexus S Smartphone Emulator
We can see the Application Name we specified in the New Android Application Project series of dialogs, as well as the Launch Icon we chose and the text message we set in the strings.xml file. Our XML Layout tags centered the text perfectly, and now we are ready to click the X at the top right and exit the emulator.
Setting Up Logcat after Your First Android 4.2 Emulation
Once you exit your Android 4.2 Nexus S Smartphone Emulator for the first time, you will notice that you get an error dialog that informs you that Logcat is not set up for your Eclipse Android Development environment and offers to set it up for you. This Auto Monitor Logcat dialog is shown in Figure 2-12.

Figure 2-12. Auto Monitor Logcat dialog that appears after the first launch of any emulator in ADT
Android’s Logcat stands for Log Catalog and is an automatic logging system that provides you with a convenient method for collecting and viewing all Android system debugger output. Detailed logs from various applications and parts of the operating system are collected within a series of circular buffers, which then can subsequently be viewed and even filtered by the Logcat pane inside of the Eclipse IDE.
You can also use the Logcat from an ADB shell to view the log messages once you become a more advanced Android Developer. More information can be found at the following URL:
http://developer.android.com/tools/help/logcat.html
You will find that the Logcat utility is helpful in researching errors that may pop up during your application development process. If you cut and paste the error message right out of the Eclipse Logcat pane into the Google search bar and press Return or click Search you can quickly find other developers who are getting the same error message in their applications and see how they solved it.
Summary
In this chapter you created your first Android Hello World application, with the help of the Android Developer Tools (ADT) New Android Application Project “helper” series of dialogs. In the next chapters, we will modify this basic code to build a more impressive Hello World application, so that you can take your knowledge of Eclipse, XML mark-up, and Java coding in Android to the next level.
The first thing we looked at was the work process for creating a New Android Application Project via a handful of dialogs that allow developers to set a myriad of options to create a “bootstrap” application shell that they can then modify and morph into the application they want to develop. This involves naming the application, Java class and XML files, determining Android OS version support, selecting application launch icons, naming and selecting Activity types, and selecting navigation modes.
Next we looked at the Eclipse IDE and its very useful Package Explorer pane and used that utility to examine the anatomy of the Android Hello_World application structure that the New Android Application Project helper created for us. We looked at the Source Code and Resource Folder hierarchies and where files are kept for graphic assets, XML definitions, and Java code.
Next we opened the key XML files used for Layout, Menu, and String Constant definitions for our Hello_World Application Project and examined what makes them tick: Tags and Parameters. We learned about the Eclipse center code editing pane and the top and bottom tab areas that allow us to select what file and what editing mode we are working in.
Next we opened up our main Java class file, and took a look at how the Java code pulls together our XML definitions for our user interface, menus and content, and learned a little about some of the core Android classes, such as the Activity, Bundle, and Menu classes. Finally, we ran our Hello_World application for the first time in the Android 4.2 Nexus S Emulator we set up in Chapter 1, and allowed ADT to set up Logcat for us when we exited the emulator.
In the next chapter, we will take our Hello_World application to a new level by adding to and changing the initial code that ADT created for us, and adding in our own Content, User Interface elements, Icons, and Menu selections to learn how to take the bootstrap application that ADT creates for us and morph it into something customized to achieve our own Prime Directive. At the same time we’ll learn more about Java, XML, icons, and other Android secrets that we didn’t uncover in the first two chapters.