
Building an Android IDE for Version 4.12 and Earlier: Acquiring, Installing, and Configuring an Android Development Environment
This appendix matches up closely with Chapter 1 of this book, in fact, it is the Chapter 1 of this book that I wrote when the Android OS was at Version 4.1.2, and there was no ADT Bundle, and thus the Android development environment had to be built from scratch on the developer’s side of the equation. With the advent of Android 4.2, Google put everything together on their side and allowed developers simply to download one 400MB “ADT Bundle” that removed dozens of steps from the work process. These steps are contained in this appendix so that you can see what they are (were).
Reading through this appendix will give you some insight as to how the Eclipse IDE and Android SDK are tied together via the ADT Plug-Ins and Google Plug-In for Eclipse 4.2.
For this reason, some of the content in this appendix is the same as or similar to the content found in Chapter 1.
Fortunately for us Android App developers, very powerful 64-bit computers are readily available for a few hundred dollars. If you have a 32-bit computer, that will work just as well for Android App Development, as the Android 4.1 OS is also currently at 32-bit. Android 4.2 also added the option of running a 64-bit development environment across Eclipse and ADT, so users with 64-bit systems can now use 64-bit software for Android development, as of Version 4.2.
Additionally, most the software that we use for app development in this book is free for commercial use, also known as open source, so the cost of starting up your own Android Application Software Development business is quite low these days indeed.
In this appendix, we make sure that our system has the latest version of the Oracle Java 6 Software Development Kit (Java SDK, also known as the JDK or Java Development Kit) programming environment as well as the Android Software Development Kit (Android SDK). After our JDK is downloaded and installed, we will then download and install an Integrated Development Environment (IDE) called Eclipse.
Eclipse makes developing Android Apps easier by providing a slick Graphical User Interface (GUI), with which we can write, run, test, and debug our Android application code. Eclipse runs “on top of” the Java Runtime Environment (JRE), because Eclipse is written in Java, and thus uses the Java Platform to run its own code that makes up the Eclipse IDE user interface and feature set. This is the primary reason that we downloaded and installed the Java 6 JDK first, so that the Java SDK and JRE are in place on our workstation, so that when we get into installing Eclipse, it can find the Java Runtime Environment (so that Eclipse can launch or run), and so that it can use the Java SDK to build the programming code foundation for our Android Development Environment.
Once we have Eclipse installed and working smoothly on top of Java 6, we will download the Google Android Software Development Kit (SDK), and install that right alongside of the Java 6 SDK and Eclipse Juno 4.2 for Java EE. Once the Android SDK and ADT Plug-Ins are installed and configured properly, they will then modify (enhance) the Eclipse IDE with additional Android-related tools and features, all of which will essentially turn the Eclipse Juno 4.2 for Java EE IDE into a highly customized Android Application IDE.
As part of the Android SDK installation process (the second part), we will install the Android Developer Toolkit (ADT) Plug-Ins, which will live (plug-in) inside of Eclipse, and that will serve to “bridge” the Android SDK and the Java 6 SDK into a single cohesive Android software development environment. As part of this ADT installation process, which you need to be connected to the Internet to perform, your workstation talks with Android Software repositories on Google Servers and retrieves even more Android software APIs to make your Android Development Environment complete.
For a bird’s-eye view, if this process were formulated into an equation, it would look something like this:
JDK 6 (Java 6 SDK) + Eclipse 4.2 IDE + Android SDK + ADT Eclipse Plug-Ins = Custom Android IDE
Let’s get started with this long and involved process now, so we can get it over with and develop apps!
Foundation of Android Programming: Java 6
The Foundation of Android Application Development, both from a Programming and an Integrated Development Environment (IDE) standpoint, is Java 6. Android Applications are written using the Java programming language (and using XML as well, which we’ll get into in more detail in Chapter 2), and Android Apps are developed inside of the Eclipse IDE, which is also written in the Java programming language, and which runs on top of the Java 6 Runtime Environment (JRE). To put it mildly, the exact order in which you set up the software components that make up your Android Development Environment is very important!
So that we have both the Java programming language, which we gain access to via the Java Developer Kit (JDK) , as well as the Java Runtime Environment (JRE), which is part of the JDK, we will go to the Oracle TechNetwork and download the latest JDK6 installation software and install it on our machine. We do this first because Eclipse needs Java to run, that is, Eclipse can be said to run “on top of” the Java Platform and Language. Android also requires Java, as well as Eclipse, for its Android Developer Tools (ADT) Plug-Ins, so we install the Java Platform and Environments first, then Eclipse, and then Android.
Installing the JDK
The first thing we must do is get to the Java SDK Download page. There are two ways to do this; one is generic, one is precise. The generic way, which will always work even if Oracle changes the location of its Java SDK Download page (which it probably won’t), is to use Google Search with the keyword phrase “Java SDK Download” that should bring up the Oracle TechNetwork Java Download URL. The second way is to type the URL for the page directly into the browser. Here it is:
http://www.oracle.com/technetwork/java/javase/downloads/index.html
This points to the Internet (HTTP) and the Oracle website in their TechNetwork area (folder) in the Java area (sub-folder) for the Java SE or “Standard Edition” area (sub-sub-folder) in the Downloads area (sub-sub-sub-folder). There are three primary versions of Java: SE or Standard Edition for individual users, EE or Enterprise Edition for large collections of users, and ME or Micro Edition for mobile flip-phones. Most modern smartphones these days use Android and Java SE rather than Java ME. One of the really cool things about Android is that it uses the full Standard Edition of Java just like a PC does. This is because Android runs “on top of” a full version of the Linux OS Kernel, so an Android consumer electronics device is essentially a computer, for all practical purposes.
After you type in this URL, you arrive at the Java 6 JDK Download page, and you need to find the Java 6 JDK download portion of the page, which looks like the (partial) page section shown in Figure A-1.
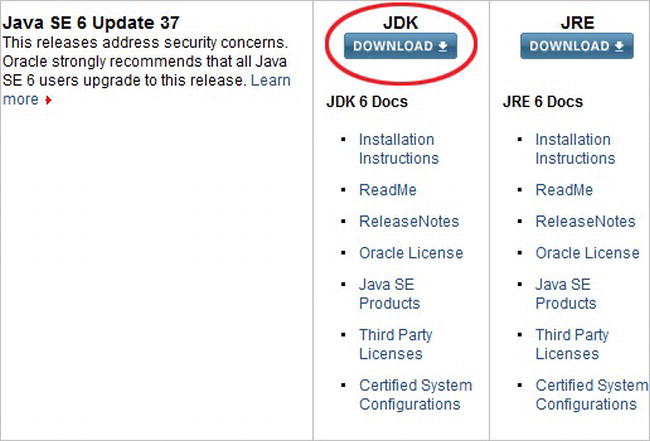
Figure A-1. The Java SE 6 JDK download section of the Oracle TechNetwork Java SE webpage
Click the blue DOWNLOAD button under the JDK (remember, the JDK is both the JDK and the JRE) shown in Figure A-1 to go to the Java 6 JDK download page where you will accept the software licensing agreement and download the Windows 32-bit version of Java 6. Because Android SDK and ADT are currently 32-bit software, we will use 32-bit versions of Java 6 and Eclipse 4.2 for Java EE, so that everything is 100% compatible.
Remember that 32-bit software runs just fine on 64-bit OSes and workstations, so there will be no problems. Once Android SDK and ADT come out in 64-bit versions, we may eventually be able to put together a 64-bit Android Development Environment (believe me, I’ve tried to do it). Maybe Android 4.2 will use 64-bit Java 6 and Eclipse, if so, I’ll include a chapter on assembling a 64-bit Android IDE, I promise.
Before you can download the x86 Windows 32-bit .exe file, you must click the radio button selector next to the “Accept License Agreement” option at the top of the webpage section, as shown in Figure A-2.

Figure A-2. Accepting the Java 6 SE License Agreement and downloading the Windows x86 32-bit version .exe file
Once you do this, the download links on the right become bold, and you can click them to download the installation file. Click the jdk-6u37-windows-i586.exe link (or whatever that latest update revision happens to be), and then download it to your Downloads folder on your workstation.
Before we install the current Java 6 JDK, we should check our system to make sure that no existing (older) versions of Java are already installed on our workstation. This is done in Windows via the Control Panel, which is accessed via the Windows Start Menu. Launch the Control Panel now, and find the icon labeled “Programs and Features” and launch the Programs and Features dialog shown in Figure A-3.

Figure A-3. Right-clicking the existing Java installation, and selecting the Uninstall option to remove it from your system
Notice on my workstation that I already have Java 6 Update 31 installed. Because I want to install the most recent development software possible during this installation process, I am going to Uninstall the previous Java 6 Update 31 installation, as well as any older versions of Eclipse and Android (if they exist, which they didn’t on this particular workstation) using the exact same work process. To do this you select the older version of Java and right-click on it and select the Uninstall option as shown in Figure A-3. Windows will then proceed to remove the older version(s) of Java (and Eclipse and Android if needed) from your system.
Now go into your Downloads folder (or your desktop, or wherever you put your downloads) and double-click the jdk-6u37-windows-i586.exe file to start the Java 6 installation. Accept the default settings for the installation, which should proceed fairly quickly if you have a modern day workstation with a fast hard drive and at least 3GB of memory. Once the Java 6 install is finished, you will be ready to download and install Eclipse Juno 4.2 for Java EE. Let’s do that next, so that we have an IDE to use for our Android development.
Installing an Integrated Development Environment: Eclipse
Android’s Development Environment is based on a unique and powerful piece of open source software called Eclipse. Eclipse is an IDE, or Integrated Development Environment, which is very similar to a word processor, but instead of publishing documents, it is used for writing, testing, and debugging programming logic. Eclipse supports a number of different programming languages, and the most popular (as you will soon see from the Eclipse download page) of those is Java. Fortunately for us, Java is what Android uses for its development environment, and thus that is what we are going to be downloading and installing.
The first thing we must do is get to the Eclipse IDE webpage, and there are again two ways to do this; one generic, the other precise. The generic way, which will always work, even if Eclipse changes the location of its webpage (which it probably won’t), is to use Google Search with the keyword phrase “Eclipse IDE” that brings up the Eclipse website URL. The second way is to type the Eclipse website URL for the webpage directly into the browser. Here it is:
http://www.eclipse.org/
Once you type in this URL, you arrive at the Eclipse website home page, and you need to find the Eclipse IDE Download banner, which looks like Figure A-4.
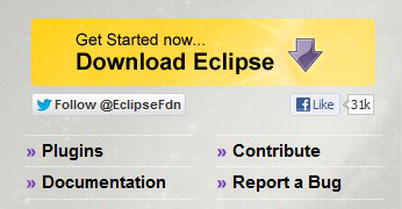
Figure A-4. Download Eclipse button found on the Eclipse home page
Once you click the Download Eclipse button, it takes you to the Downloads page, where you select the first and most popular download, Eclipse for Java EE. Figure A-5 shows what the relevant (top) portion of the Eclipse Downloads page should look like, and shows where to click the 32-bit version download link.

Figure A-5. Eclipse Juno 4.2 IDE for Java EE Developers download link for 32-bit Windows version
After you click the Eclipse IDE for Java EE Developers for Windows 32-bit link, you are taken to the download page for that version of the IDE (Eclipse Juno 4.2 Service Release 1 for Java EE 32-bit Windows XP, Vista, 7, or 8 version was the current version at the time this book was written). There you can download the Eclipse Juno JEE software from one of the mirror sites located nearby.
Once the 226MB download has finished, open your Windows Explorer File Navigation and File Management Utility, and find the .zip file in your system’s Downloads folder. If you can’t find it, put the name of the .zip file (shown in Figure A-6 for this download and install) in the Search box at the upper right, and select your Computer or C: drive on the left and the Windows Explorer finds the file for you.
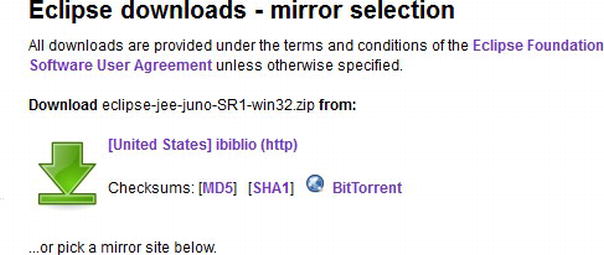
Figure A-6. Download Eclipse JEE Juno Service Release 1 for Windows 32-bit ZIP file from one of the mirror site selections
After you find the Eclipse Juno for Java EE installer file, right-click it to get a context-sensitive menu of everything that can be done to or with that file, and choose the Extract All . . . option to extract all the files and folders inside of the .zip archive onto your hard disk drive. This is shown in Figure A-7 circled in red.

Figure A-7. Extract All files from the Eclipse .zip file by right-clicking the downloaded file in your Downloads folder
Next you see an Extract Compressed (Zipped) Folders dialog asking you to select a destination directory to extract the Eclipse files and folder hierarchy into. As shown in the top dialog of Figure A-8, the archive extraction utility places the current location of the file into your Downloads folder as its destination path, which is not surprising, as it really doesn’t know where you want to put it, so it puts itself right where the .zip file is “standing” currently, so to speak.

Figure A-8. Change Extract Compressed (Zipped)Folders Path from the Downloads directory to a higher profile C:/ (root) location
Because we don’t really want our Eclipse 4.2 for Java EE IDE installed in our Downloads folder (which we use primarily to hold file Downloads), the easiest work process to move it up to the top or “root” of our C: primary hard disk drive is to click the cursor right in front of eclipse in the filename, and to then backspace over the Users, (Your Name Here), and Downloads sections of the auto-generated pathname.
In this way, you end up with the C: hard drive specifier right in front of the eclipse .zip filename that you just downloaded as your folder name. This installs Eclipse JEE Juno in the root (top) of your C: drive, on your primary hard disk partition where you can easily see it and find it anytime you need to. The resulting path is shown in the lower part of the screen shot in Figure A-8.
Once you click Extract, you get a small progress dialog that shows you all the 3,427 items (250 megabytes) that are being rapidly copied to your hard disk drive. After this is complete, open your Windows Explorer file viewing utility, and find the eclipse.exe executable file.
To do this, open the C: drive on the left, and look for the eclipse-jee-juno filename that you downloaded and installed, and under that you will find the eclipse folder and its sub-folders, as shown in Figure A-9.

Figure A-9. Find eclipse.exe executable file and right-click to access the Pin to Taskbar option to create a launch icon
Look for a purple sphere next to the word eclipse with a file type of Application and that is your Eclipse IDE software executable file. Next, right-click the Eclipse application file to get a context-sensitive menu of commands, and then choose the Pin to Taskbar command. This installs Eclipse as a Quick-Launch icon in your Taskbar Program launch area. This work process is also shown in Figure A-9.
Once you select the Pin to Taskbar command from the right-click menu, the Eclipse Juno purple sphere launch icon appears on your Windows Taskbar, which is usually at the bottom of the screen but which can be docked (via dragging) on the top or the left or right of the screen, as well. Figure A-10 shows the Eclipse for Java EE launch icon on my system along with other open source software (Gimp, Blender 3D, Audacity, Lightworks, OpenOffice, Chrome), some of which we’ll be installing later on in the appendix.

Figure A-10. Eclipse Juno 4.2 for Java EE Launch Icon is shown on the left side of the Windows Taskbar
Click once on the Eclipse launch icon and make sure Eclipse fires up; if it does, it means you have Java 6 installed correctly, and that Eclipse has successfully found Java, and is using it to run its integrated Java development environment. Now that we have Eclipse 4.2.1 working for Java development, let’s go and get the Google Android SDK, and we’ll use it to customize Eclipse to make Eclipse into a custom Android Development Environment as well as a Java SE and Java EE Development Environment.
Android SDK and Android Developer Tools
The Android Software Development Kit, or Android SDK, is essentially all the code and utilities that need to be installed inside of Eclipse so that the Eclipse IDE can not only be used for Java Development but can also be used for the more specialized Android Application Development as well.
Making the Android SDK and Android Developer Tools Plug-in a seamless part of Eclipse Juno 4.2 for Java EE is essentially a six step process:
- Download the 70MB Android SDK installation file.
- Run that installation and decompress 110MB of files onto your hard disk drive.
- Run the Android SDK Manager, and pull even more API files over from a Google Android software repository.
- Install the Android Developer Tools and the Google Eclipse 4.2 Plug-ins.
- Check for even more software updates inside of Eclipse, once Android is “plugged in” to Eclipse.
- Launch Eclipse and you see if you can create a new Android Application Project.
If you can create a new Android Application Project file, then you have succeeded in making Android a seamless, integral part of the Eclipse IDE, essentially making it into an Android IDE. At this point you can finish up by customizing your configuration, checking for the newest file versions and installing an emulator to use throughout the book for testing your applications.
First, get to the Android Developers webpage. There are again two ways to do this; one generic, the other precise. The generic way, which always works, even if Google changes the location of its Android Developer webpage (which it probably won’t), is to use Google Search with the keyword phrase “Android Developer Website,” which should bring up the Developer.Android.com website URL. The second way is to type the URL for the Android Developer webpage directly into the browser. Here it is (I suggest you memorize this one):
http://developer.android.com/index.html
Once you type in this URL, you arrive at the Android Developers website home page, and you need to find the Get the SDK button at the bottom of the page, which looks likes Figure A-11.
![]()
Figure A-11. Selecting the Get the SDK button to go to the Android SDK Download page on the Developer.Android.com site
Once you click the Get the SDK button you are taken to the Get the Android SDK page where you see a large blue button that says: Download the SDK for Windows (or Linux or Macintosh, if you are using those OSes). Click this button to download the SDK installer .exe file, as shown in Figure A-12.

Figure A-12. Download the SDK for Windows button on the Get the Android SDK page on the Developer.Android.com site
After you download the file, use the Windows Explorer to locate it in your Downloads folder just like we did for Java and Eclipse and double-click the .exe file to run the installer (or use right-click and Open).
Once you launch the Android SDK Tools Setup installation you will see the Choose Install Location dialog shown in Figure A-13. Accept the default Windows Program Files Folder suggested by the Android SDK Tools Setup utility, which Google wants to see named Android with a sub-folder underneath it called android-sdk. The full path on a 64-bit workstation, such as the one I am using, will be: C:Program Files (x86)Androidandroid-sdk and on a 32-bit OS it would read C:Program FilesAndroidandroid-sdk instead.

Figure A-13. Choose Install Location dialog of the Android SDK Tools Setup process showing default Android folder location and click Next
This dialog also shows you the space required for the install, which is 110MB, as well as the space available on your hard disk drive (I have a 1TB HDD with 867GB still available). Note that you will need significantly more space than this to install the rest of the Android APIs and Documentation, so make sure you have plenty of gigabytes of free space on your hard disk drive via this space available indicator.
Once you click Next, you will see the Choose Start Menu Folder dialog, which I also recommend that you accept the default folder name Android selects for you, which is Android SDK Tools, as shown in Figure A-14. Now you are ready to click the Install button and start the Google Android SDK installation.

Figure A-14. Choose Start Menu Folder dialog in Android SDK Tools Setup process showing default Android SDK Tools folder
Once the 110MB of Android SDK files finish installing on your system, a dialog called Completing the Android SDK Tools Setup Wizard appears, as shown in Figure A-15. Be sure and leave the Start SDK Manager checkbox selected, so that once you click the Finish button the Android Developer Tools (ADT) Plug-Ins and the Google Eclipse 4.2 Plug-In can be installed.

Figure A-15. Start SDK Manager dialog in the Android SDK Tools Setup process (leave checked and click Finish button)
This can be a bit confusing, because you are clicking a Finish button, but you are not even close to being finished yet! Google is finished installing the downloaded “bootstrap” files for the Android SDK, but the SDK Manager ends up doing the real heavy lifting next, by installing significantly more files over the Internet from the Google Android Repository residing on their massive server farms in the Silicon Valley.
In any event, go ahead and click the Finish button, and start the Android SDK Manager utility window shown in Figure A-16. Notice that Android SDK Manager pre-selects the current Android 4.1 OS API Level 16 files for automatic installation. The Android Developer website also recommends installing two other packages listed on this screen (I am not sure why they are not also checked as default installs), shown circled (red squared, actually) in Figure A-16.

Figure A-16. Android SDK Manager auto-select of Android 4.1.2 plus select Android Support Library and SDK Platform-tools
These options represent the Android SDK Platform Tools and the Android Support Library. So you should also check these options as shown, and once the Install button says “Install 11 packages” then click it and install 11 more Android related packages onto your system now. This may take some time, especially if you have a slower Internet connection.
After you click the Install button you get the Choose Packages to Install dialog, and you find that there is an easy Accept All radio button that you can use to install all of these packages, so that you can develop for all of these Android hardware device technologies (ARM, Intel, Mips, etc.) that support the Android 4.1 API Level 16. Next, select the Accept All radio button, and click the Install button to proceed as shown in Figure A-17.

Figure A-17. Choose Packages to Install dialog (select the Accept All option and then click the Install button)
Once you click Install you see a Progress Bar at the bottom of the Android SDK Manager similar to what is shown in Figure A-18 that shows you in real-time (if you are interested enough to watch it) which package is being downloaded currently, along with that package’s API Level, Revision Number, Percentage Transfer Completed, Data Transfer Rate, and Time Left to Download for that package.

Figure A-18. Downloading the SDK Platform Android 4.1.2 API Level 16 revision 3 from the Google Android Server Repository
Note also in Figure A-18 that there is an icon at the far-right corner that opens an Android SDK Manager Log window that actually shows in real-time what is being done on a more detailed level.
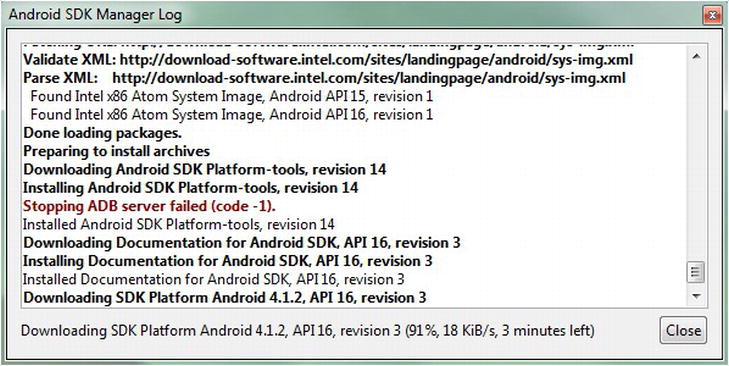
Figure A-19 . Android SDK Manager Log window (opened via Log Window icon shown at far right side of Figure A-18)
Once your Android 4.1 API is installed, you can go back and install any other API Levels that you need to develop for devices that you want to support in the Android Market. For instance, the original Kindle Fire uses API Level 10 (currently at 2.3.7) and the new Kindle Fire HD uses API Level 15 (currently 4.0.4). These are two of the more popular API Levels based on the number of devices sold that support them.
Be advised that each of these other (previous) API Levels that you select to install will take some time to download, and will install hundreds of megabytes of additional Android development files onto your hard disk drive, so make absolutely sure that you need to develop for these older devices before you do so.
Eclipse’s Android Development Tools Plug-in
The next step in the work process to build a solid Android Development Environment is to show Eclipse where the Android SDK assets are located, and to start to solidify the “bridge” between Eclipse’s IDE functionality and Android’s Software Development functionality. This is done inside Eclipse via something you may be familiar with called plug-ins, which were invented decades ago by software developers who wanted to let third-party developers add functionality to their software that they did not have the time or resources to code themselves. Plug-ins are especially prevalent in digital imaging software packages, such as Photoshop and GIMP, and allow software development functions to be added to Eclipse, such as being able to turn Eclipse from a Java Development Environment into an Android Development Environment. Let’s launch Eclipse via your Taskbar and plug in the Android SDK functionality.
Once Eclipse launches, accept the default workspace location in your Users folder, and then click the Help menu at the top right of the IDE and select the “Install New Software” option near the bottom of the menu. In the Install Available Software dialog that appears, click the “Add…” button on the upper-right to add a new software repository website address to Eclipse; in this case, it will be one of Google’s Android repositories. In the Add Repository dialog that appears, enter: Google Plug-In for Eclipse 4.2 in the first data entry field, and in the second data entry field, enter the following exact URL location:
http://dl.google.com/eclipse.plugin/4.2
Next, click the OK button. In case you are wondering, the dl before google.com stands for download.
Now you will see that Eclipse goes to the Google software repository and fetches the plug-ins for Android Development in Eclipse and populates the center of the Install Available Software dialog with them for you. Select the Developer Tools checkbox and the Google Plug-In for Eclipse checkbox, and then click on the Next button to proceed with their installation. An Install Details dialog will soon appear, which will outline in detail the contents of the Android Developer Tools (ADT) plug-in collection, along with the Google Plug-In for Eclipse 4.2, which bridges the new Eclipse 4.2 IDE with the ADT plug-in suite.
Again, click the Next button, and a dialog appears that allows you to review and accept the software licensing agreements associated with all the software packages that you are using. Select the “I accept the terms of the licensing agreements” radio button option, and click the Finish button to proceed to the Installing Software (Progress Bar) dialog that installs the plug-in software that connects the Android SDK to the Java SDK via Eclipse.
Once the installation process is complete, a dialog pops up, asking you to restart Eclipse for the new changes (the Android plug-ins) to be installed into memory. The reason for a restart is because although the software has been installed into Eclipse on your hard disk drive, the software needs to be restarted for these changes to actually be loaded into your system memory, so that they can be used in the Eclipse IDE at runtime.
Enter Eclipse once it restarts, and use the File ![]() New
New ![]() Project. . . menu sequence to see if you have correctly installed Android Development capability into Eclipse via the ADT plug-ins you just installed.
Project. . . menu sequence to see if you have correctly installed Android Development capability into Eclipse via the ADT plug-ins you just installed.
If you see a folder named “Android” in the New Project dialog, and it has sub-folders for creating Android Application, Sample and Test Projects, then you have successfully turned Eclipse into a working Android Software Development Environment! Here’s the chain of command, so to speak, regarding what talks to (connects with or plugs in to) what, from Java to Android, at this point:
Java ![]() Eclipse
Eclipse ![]() Google Plug-In for Eclipse 4.2
Google Plug-In for Eclipse 4.2 ![]() Android Developer Tools
Android Developer Tools ![]() Android SDK
Android SDK ![]() Android App
Android App
So, your Android App uses functions from the Android SDK, which passes them to the Android Developer Tools Plug-In, which implements them in Eclipse, via the Google Plug-in for Eclipse 4.2, and all of it runs on top of both the Java SDK (Java language functions) and JRE (Eclipse runs on top of the Java Runtime Environment in order to run/function). Whew! No wonder it’s no walk in the park to set up and configure!
Configuring the Android Development Environment
Finally, let’s make sure that our Android Development Environment is configured optimally, before we get into application development in the rest of the book. This is done in Eclipse via the Window ![]() Preferences menu sequence, which brings up the Eclipse Preferences dialog. In the left pane of the dialog, you see an Android section with an arrow-head at the left that opens up a sub-section showing all the Android Preference Configuration areas. Select the top primary one (the word “Android”) and you will get the main Android Preferences settings area, showing the SDK Location at the top along with all the installed Android SDK API Levels underneath that.
Preferences menu sequence, which brings up the Eclipse Preferences dialog. In the left pane of the dialog, you see an Android section with an arrow-head at the left that opens up a sub-section showing all the Android Preference Configuration areas. Select the top primary one (the word “Android”) and you will get the main Android Preferences settings area, showing the SDK Location at the top along with all the installed Android SDK API Levels underneath that.
You might also encounter the Thanks for using the Android SDK dialog, asking you to share your usage statistics for Android in Eclipse with Google, so that Google can make improvements to their ADT plug-in products. I choose to allow this for the good of the developer community, because, as Enterprise First Officer Spock once stated: “The needs of the many outweigh the needs of the one.”
Make sure that Eclipse found and set the Android SDK to its proper installed location, and that all the API Levels that you installed are present and accounted for, and then click the OK button at the bottom. Just to make absolutely sure that you are leaving no stone unturned, go to the Eclipse Help Menu, and select the Check for Updates menu item. We are doing this to make sure that you have the very latest revisions of everything that you have installed. Don’t be surprised if Eclipse finds updates to the dozens of packages that you have recently installed, it always does find later versions whenever I install a new Android IDE environment onto a new development workstation.
If Eclipse does find any available updates to Eclipse, Android Development Tools, Google Plug-In for Eclipse 4.2, or any of the Android API Level Packages, it will give you an Available Updates dialog. If you get this dialog, select the available updates for installation by putting a check in the box next to each update, and then click the Next button to proceed.
You will then encounter an Update Details dialog, which will give you further detail regarding each software update. Click Next in this dialog as well, and then review and accept the software licenses shown in the final Review Licenses dialog and click the Finish button to begin the Install Process. You should get an Updating Software progress bar dialog while the software updates download, and then a Security Warning dialog when the software is downloaded and ready to install telling you that you are about to install unsigned content. Click OK to install the updates and then click Yes when you are asked to restart Eclipse, so that the changes can be loaded into system memory and so that you can now run the newly updated version of Eclipse. Whew! We must be done with this process now, Right?! Almost!
Configuring Your Android Virtual Devices
The last step in the process of getting your Android Development Environment ready for the rest of this book, which we are doing up-front in this appendix so we don’t have to worry about it again later, is to set up the Android Virtual Device (AVD. The AVD is an emulator that allows you to test your Android Apps on your workstation using a software device emulator that mimics an Android smartphone or tablet.
This is desirable because the work process of uploading your app onto an actual physical Android device (hardware) is much more tedious than right-clicking your project and selecting Run, which we’ll see in the Chapter 2. That’s not to say you shouldn’t test your app once in a while on a real Android hardware device, but the AVD allows you to test as you develop with much greater speed and frequency.
Since you’ve just restarted Eclipse for the final time, go into the Window menu, and select the AVD Manager option near the bottom. This opens the Android Virtual Device Manager dialog, which lists your AVDs, and currently has no AVD set-up, and thus says: No AVD available in the central area of the dialog. To add a new AVD to your Eclipse environment click the New… button at the top right of the dialog and open up the Create New Android Virtual Device dialog.
The first thing to do is name the emulator, so enter API_16_Emulator in the Name field. Then select the Target for the emulator, which is the API Level for the emulator, which is Android 4.1.2 or API Level 16. Select: Android 4.1 – API Level 16 from the drop-down selection menu. Next set the SD card to be a common 512MB SD card configuration, and check the Snapshot Enabled option. Next, set the Default Built-In Skin of WVGA 800x480 because most smartphones and tablets use at least this resolution.
Finally, you are ready to create your first Android 4.1 emulator, by clicking the Create AVD button. If you are developing for some of the other popular API levels, utilize the same work process and add other emulators for Kindle Fire (Android 2.3.7 API Level 10) or Kindle Fire HD (Android 4.0.4 API Level 15), if you need to test your applications for delivery on those hardware platforms.