
Android Intents and Events: Adding Interactivity
In this chapter, we will take our Hello World Android application that we have created thus far during the previous three chapters, and add in some more Java code to start the process of making it interactive and usable.
Now that we have created the Android application project (in Chapter 2), defined our WorldGen object structure (in Chapter 3), created our five user interface layout containers, four Activity screens, and an application menu structure (Chapter 4), it is time to wire all these together so that the user can use the main menu to navigate through the application’s functional screens to experience actual results when they click some of the (placeholder) user interface elements.
At the same time, we are also going to use this chapter to teach two very important concepts in Android programming: Intents and Events. These even rhyme in a strange way! Both Intents and Events allow communication inside your application, which is why they allow interactivity to be implemented.
Intents allow communication at a more global level within the Android app, allowing the components of an Android application, such as the functional Activity subclasses that we created in the previous chapter, to be called and accessed (via Java code) whenever they are needed by the end-user.
Events allow communication at a much more localized level within an Android application, as they enable the lowest level component parts of an app, which are usually the user interface elements, or widgets, to talk, or more accurately to call back, to your Java and XML programming logic.
Because you are already a programmer, you are probably familiar with the concept of event handling. In the second half of this chapter, we will cover exactly how this is done in Java and Android, as well as what events are supported in Android, and how they are processed. Let’s get started!
Android High-Level Communication: The Android Intent Object
An Android Intent is actually an object, so the Android Intent class in the package android.content, is a subclass of the java.lang.Object class. It is in the Android Content Provider android.content package because Intents can be used to quickly access database records, which we will learn about later on in this book. An Intent object can be (and usually is) very simple, however, it can also be complex, as an Intent object can have up to seven different parts or components to it. We cover Intents in far greater detail at the end of this book (in Chapter 16), but need to use them in our app at this stage, so we are going to cover them at a precursory level in this chapter.
The Intent is aptly named, as it is actually an object that describes something that needs to be accomplished, and is sent from one component of an application to another component. This is similar to the way a personal intent to perform or to accomplish something is communicated in real life.
The primary areas of Android applications that can process Intent objects include Activities, which we have created already; Services, which are used for background processing, and which we cover later on; and Broadcast Receivers, which are used for sending messages to the Android end-user.
Each of these three different functional areas of Android has its very own Intent object that is optimized for dealing with the unique attributes of each of these areas. After all, Activities are optimized to display screen interfaces, Services for doing heavy background processing, and Broadcast Receivers for broadcasting communication messages, and thus each of these application components must have different Intent object handling structures to work optimally and seamlessly with each other.
So what types of information does one of these Intent objects pass between application components? Functional areas of an Intent object include:
- The component name of the component (class) which needs to process the intent
- The action that needs to be performed
- The data that the action needs to operate on
- The type of data (a MIME type) that is being processed
- The category that this processing falls under
- Any flags and extras that are needed to further define this processing that needs to be performed
The most important field in the Intent object is the component name, and the instance variable for each Intent object contains a reference to the full path to the class that the Intent object is targeting. An Intent that contains a component name is termed an explicit Intent, whereas an Intent that does not specify a component name is termed an implicit Intent.
The full path to a class name includes the package name and also the class name, if the class were in another package. So if you were going to launch our NewPlanet Activity class from another package, you would use chapter.two.hello_world.NewPlanet.class as the complete path name to the class. If you were inside the chapter.two.hello_world package (such as we will be, in the Intent examples later in this chapter) you would use NewPlanet.class as a run-time reference to our NewPlanet.java class code.
The next most important variable in the Intent object is the action, and there are many predefined action constants within the Android OS that can be accessed via Intent objects. If you want to review them all, go to http://developer.android.com/reference/android/content/Intent.html.
Some examples of commonly used actions used with Activity classes for the Android OS include:
- ACTION_DIAL (Display a phone number to dial)
- ACTION_CALL (Make a phone call)
- ACTION_MAIN (Start the main activity for the app)
- ACTION_EDIT (Edit a database)
Some commonly used actions with Broadcast Receivers include:
- ACTION_TIMEZONE_CHANGED (User has moved into a new time zone)
- ACTION_POWER_CONNECTED (User has plugged in the device)
- ACTION_SHUTDOWN (User has shut down the Android device)
The next most important reference in the Intent is the data reference, which points to the data that the action is to act upon. Every action needs something to act upon (some data value to use or change) and every data value needs some action to be specified (what to do to or with the data). Thus, Intent actions and data go hand in hand, and data is usually specified using something called a URI or Universal Resource Identifier.
The next most important reference within the Intent is the type reference, which refers to a MIME Type, which is a standard data classification used in Internet 1.0 (HTTP) and 2.0 (Mobile or Consumer Electronics) platforms.
MIME originally stood for Multipurpose Internet Mail Extensions and it was initially created to define e-mail (attachment) data types supported by e-mail servers, but MIME has since been adopted by many different types of data servers, and now, even on the client-side, by the Android OS itself.
It is important to note here that if any of the seven areas of the Intent object parameter classifications are left out that Android will infer what should go in that parameter slot. This is probably easiest for an omitted MIME Type, because it’s easier to infer than the MIME Type for an MP3 audio data file should be: Content-Type: audio/mp3 or that the proper MIME Type for an MP4 video data file should be: Content-Type: video/mp4.
The next most important reference in an Intent object is Android category constants, which are used to define a specific area of the Android OS to target the Intent toward. Some more popular category constants include:
- CATEGORY_DEFAULT
- CATEGORY_BROWSABLE
- CATEGORY_TAB
- CATEGORY_LAUNCHER
- CATEGORY_INFO
- CATEGORY_HOME
- CATEGORY_PREFERENCE
- CATEGORY_CAR_DOCK
- CATEGORY_DESK_DOCK
- CATEGORY_CAR_MODE
- CATEGORY_APP_MARKET
The category constants are all listed, and described (via links), at http://developer.android.com/reference/android/content/Intent.html.
An example of how a category would be used with an Intent action would be, for instance: to launch your user’s Android device Home Screen, you would utilize an Intent object that was preloaded with the ACTION_MAIN action constant as well as the CATEGORY_HOME category constant.
The last two reference types that can be added to a more complicated and involved Intent object structure are flags and extras. Flags, as you know from your programming experience, are Boolean values that are like option switches that can be passed over with the Intent object. Extras are other types of data that are needed, such as text or other object structures.
Because we are not going to cover Intents at an advanced level in this book, we will not be using flags and extras in our Intent objects, but I wanted to let you know that they are included in the Intent object hierarchy and are available if your advanced Intent object design requires them.
Implicit Intents: Intent Filters that Define Implicit Intent Handling
As I mentioned earlier, Implicit Intents are Intent objects that do not specify any component specifier within the Intent object itself, that is, the Intent object does not specify (does not direct the Intent) where it needs to go to get handled or processed to its resolution.
In this situation, the Android OS has to infer by using the other Intent object parameters what area in the OS (or more precisely, what code that is currently executing in system memory) that it needs to pass the Intent object over to for the successful processing or resolution of that Intent.
Android performs this inference process based on a careful comparison of all the various actions, data, MIME types, and categories that are in fact defined inside the Intent object, using the code components that are currently available in system memory with which to process that intent.
You can also create your own inference engine using intent filters, which can be defined using XML tags in the application AndroidManifest.xml file. You can find much more detailed information regarding Intent Filters at developer.android.com/reference/android/content/IntentFilter.html.
Designing Android applications that process implicit intents and leverage intent filter XML is beyond the reach of an introductory book on learning Android application programming; however, we’ll cover the concept here, to give you a general idea of what can be accomplished with them and in which situations you would want to use implicit intents and intent filters.
Intent filter structures are declared inside the AndroidManifest.xml file, by using the <intent-filter> tag. They filter implicit intents based on three of the seven attributes of an Intent object; the Intent action, its data, and possibly its category, if included and applicable.
Intent filter tags can be contained (nested) inside the <activity> and <activity-alias> XML tags, as well as inside the <service> and the <receiver> tags. This is because, as we learned earlier in the chapter, there are different types of Intent objects for each of these three unique Android areas: Activities, Services and Broadcast Receivers.
If you want to review more detailed information regarding implementing Intent Filter structure definitions by using the <intent-filter> tag, visit the Intent Filter Element Android developer page, located at developer.android.com/guide/topics/manifest/intent-filter-element.html.
Intent filter tag structures are used to define a description of Intent object configurations that need to be matched. They also allow a priority attribute that can be implemented, if more than one match is encountered.
Intent filters are tested for action matches first, then for data matches, and finally for category matches. If no action intent filters have been specified, then the action parameter of the intent will not be tested at all, moving the testing process on down to test the data parameter of the intent. Similarly, if no data intent filters have been specified, then only intents that contain no data will be matched.
For Intent filters that include data characteristics, a data parameter gets broken down into four categories, including the data type (MIME Type), the data scheme (such as http:// ), the data authority (server host and server port, specified as host:port), and finally the data path.
The data path to your strings.xml file, for instance, would be specified C:/Users/UserName/workspace/Hello_World/res/values/strings.xml.
For instance, in the following intent filter data parameter specification content://com.apress.projects:500/project_files/android/file_number_2, the data scheme is content:// and the data authority (host is specified first) is com.apress.projects:500 (port is specified second), and the data path is /project_files/android/file_number_2, respectively.
Here is a brief example of an intent-filter data definition that specifies (from the inside of an application AndroidManifest.xml file) that videos (MPEG4 H.264 format data) and audio (MPEG3 format data) will be remotely accessed from the internet, using the HTTP data scheme:
<intent-filter>
<data android:mimeType="video/mp4" android:scheme="http" />
<data android:mimeType="audio/mp3" android:scheme="http" />
</intent-filter>
Implicit intents and intent filters are most often used in more advanced application development scenarios, when an application is designed to be used by other developers or used with other applications where the methods of that usage are not known in advance by other developers. In this case, intent filter structures will need to be built to handle unforeseen access to the application feature set by external developers who have not been educated as to how to access the application data structures and features.
We will focus on explicit intent structures for our application development in this book as we know which application components we will be targeting.
Using Explicit Intents: Making Our Hello_World Menu Functional
Now it’s time to use Explicit Intents to take our Hello_World Android Application to the next level, by making our application menu functional.
Over the past three chapters, we have coded custom Java program logic into six different classes, five of which we created 100% from scratch. So far, we have created Java code that allows our users to create new worlds, colonize those worlds, travel to each world, militarize a world, protect a world using a forcefield, and even mount an attack on another world.
We have written Java code to create WorldGen objects, and written XML tag mark-up to define screen layouts that hold user interface elements, menus, and buttons which access different features of our Android application. Our four new classes that we wrote in the previous chapter utilize Activities to hold all these UI elements within their own functional screens.
Without Explicit Intents, however, these are all just isolated components, which cannot be used together to do anything significant. Sure, each will do something in and of itself, like creating new planets (NewPlanet.java), configuring a given planet with colonies, colonists, bases, and army forces (ConfigPlanet.java), traveling to a planet (TravelPlanet.java), or attacking a planet (AttackPlanet.java). But to make the app a useful sum of its component parts, we need to access all these functional screen modules (Activities) via our Home Screen options menu system, which requires that we use Intent objects to call and to start these Activities.
So, the next thing we need to do is to leverage explicit Intent objects to enable our four primary menu items to call the Activity subclasses that we have created to hold these different functional areas of our application. Let’s set up our menu functionality now so that we can use explicit intents to call these Activities we have created.
Menu creation involves the onCreateOptionsMenu( ) method, which contains our app options menu inflation routine, which we have already utilized to create our primary application menu, by inflating our menu XML definition.
To make this options menu functional requires that we add a second method to our MainActivity.java class. The onOptionsItemSelected( ) method is used with the onCreateOptionsMenu() method, and contains all the code that allows the various menu options to be selected and executed on a case by case basis. This is done via the Java switch code construct, which some of you programmer types may have also referred to as case statements.
Let’s write this code now, so that we can see how it all works together. First, use the tiny minus sign on the left of each of the methods in our MainActivity.java class to close up the code views for all those Java methods to give us some more code editing room inside of the editing pane.
Next let’s add a line of white space (by pressing the return key) after the onCreateOptionsMenu() method, and then press the Ctrl-Spacebar keystroke combination, which we learned in the previous chapter. This brings up the method selector helper dialog, at which point we can then locate the onOptionsItemSelected( ) method, and double-click it to implement it on the inside of the current MainActivity.java class (Activity subclass).
Notice that it has public access control, so all code can access the menu options, and a boolean return type, so that a processing status (true for processed, and false for failed to process) can be returned to the calling entity. The method takes a MenuItem object, named item, as its parameter.
Inside the onOptionsItemSelected() method we will use a switch statement to select between the five menu options, or cases, with code inside of each case branch in the switch statement, which will be executed when that case arises. The switch statement itself needs the ID for the MenuItem object as its parameter, and because the MenuItem object named item is passed into the onOptionsItemSelected() method as its parameter, we can also use the .getItemId( ) method on the MenuItem object named item inside of the switch statement parameter area, which we code all in one line of code like this:
switch(item.getItemId()) { the case statements will go inside of these brackets }
So, let’s type this into our method, and then add our first case branch, using the menu_add ID parameter that we created in the previous chapter for our Add a Planet menu item, like this:
case R.id.menu_add:
This is all shown in Figure 5-1, along with the next step, where we add in our explicit Intent object, which calls our NewPlanet Activity class.

Figure 5-1. Adding an onOptionsItemSelected( ) method to process our menu options and importing Intent class
On the next line of code, we create our first explicit Intent object, which we use to call the NewPlanet Activity subclass that we wrote in the previous chapter. This is done in a similar fashion to how we declared our WorldGen objects in Chapter 3, using the new keyword, like this:
Intent intent = new Intent(this, NewPlanet.class);
Notice in Figure 5-1 that Eclipse underlines our Intent object declaration with a wavy red error line, which we realize at this point is because the Intent class has not been properly declared for use in our code by using an import statement. Let’s mouse-over that red-underlined Intent keyword, and when the helper dialog pops up, select the option to Import Intent from the android.content package in which the Intent class is contained.
As you are now familiar with this object declaration process, you realize that the line of code above declares an Intent object named intent and loads it with a new Intent object with the current context of this and then points it toward the NewPlanet Activity class via a NewPlanet.class run-time class reference. Since we will be adding more Intent objects to this switch structure later on, we will name this Intent object intent_add to more clearly reflect which Intent object it is.
Intent intent_add = new Intent(this, NewPlanet.class);
Next add in a line of code that calls the Intent object’s .startActivity( ) method, which uses the Intent object we just created to start the Activity subclass NewPlanet.class that we just defined in the previous line of code and which is called from the current context object (this) using the code:
this.startActivity(intent_add);
Finally, we add a break; statement, so that we can exit this section of the switch case statement after the code we need executed has been processed.
This is shown in Figure 5-2, along with the rest of the case statements which we’ll add in the next few paragraphs. Each individual case statement inside of the Java switch container needs to be structured just like this:
case R.id.menu_add:
        Intent intent_add = new Intent(this, NewPlanet.class);
        this.startActivity(intent_add);
        break;

Figure 5-2. Adding five case statements that send Intent objects, calling our Hello_World functional Activity screens
We will add in the rest of the case statements for our menu options inside of our Java switch container in the next section of this chapter.
Adding the Rest of the Intents
Next, let’s take the programmer’s short-cut, and copy and paste the first case statement right underneath itself and make the changes needed to make it call our ConfigPlanet.java Activity subclass. Change the R.id reference to R.id.menu_config and the name of the Intent object to intent_config and set the Activity class called to ConfigPlanet.class so that we open up the correct screen when the Configure Planet menu option is selected.
Half of our Activity subclasses are now called via Intent objects from our options menu; let’s add the other two using the same copy and paste method we just used. Copy either the first or the second case statement in our switch code structure under the second case statement, to add a third case statement, and then change the R.id reference to R.id.menu_travel and the name of the third Intent object to intent_travel and a third Activity class call set to TravelPlanet.class so that we open up the Travel to a Planet screen when the Travel to Planet menu option is selected.
Let’s call the fourth AttackPlanet Activity subclass within the next case statement, by pasting the case statement again, underneath the third case statement to create a fourth case statement, and then change the R.id reference to point to R.id.menu_attack and the name of the fourth and final Intent object to intent_attack along with the fourth Activity class call set to AttackPlanet.class so that we open up our apps Attack a Planet function screen when the Attack on Planet menu option is selected.
Finally, at the bottom of every switch or case statement, we can have a contingency statement that processes some code that is executed only if none of the case statements inside of the switch construct match any of the parameters for executing those case statements.
In the Android switch statement, this is called the default case statement and in this case, it returns control to the superclass via a line of code that reads:
default: return super.onOptionsItemSelected(item);
This is essentially the same as returning a false value for the entire switch statement, and passes control back up to the superclass’s onOptionsItemSelected() method. Let’s right-click our Project Folder and Run As Android Application and run our code to see if it works. The menu items now call each of the Activity classes and layout containers that we designed in the previous chapter (review Figure 4-16).
Enabling Our New Planet Activity’s User Interface: Event Handling
Now that we can start our Activity subclasses from our MainActivity class options menu, we need to be able to use those Activity subclasses to perform their respective functions, and then return users to our MainActivity Home Screen. This is done via the android.app.Activity class (or our subclass) finish( ) method, which closes an Activity after we are finished using it.
Let’s code part of our NewPlanet.java class (Activity subclass), to show you how the finish( ) method is implemented, as well as to show you how to use the onClick( ) event handling method to process a click on one of our New Planet images (or for now, on one of our placeholder images).
First, we’ll add a line of code after our onCreate() and setContentView() methods that we created when we created the class, and create an ImageView object used to reference an imageMars UI element we defined earlier in our activity_add.xml file. This is done by declaring an ImageView object named marsImage and by referencing it to the XML UI element definition using the findViewById( ) method referencing the XML android:id parameter as follows:
ImageView marsImage = (ImageView)findViewById(R.id.imageMars);
Notice that when we enter this line of code into Eclipse, that it will red underline this ImageView class reference, because we have not yet imported it for use. Let’s mouse-over this highlighted code element, and select the Import ImageView (android.widget package) initial option, and have Eclipse ADT write that import code statement for us, as shown in Figure 5-3.

Figure 5-3. Create an ImageView object named marsImage in NewPlanet.java that references XML UI definition
Now that we have defined our marsImage UI object for use in Java, we want to attach a method to it by using dot notation that allows it to process a user’s click (or touch, if a touchscreen device is being used). This is done using the .setOnClickListener( ) method from the View class.
Let’s set up an OnClickListener() method for our marsImage ImageView UI object using the new keyword and setOnClickListener() method like this:
marsImage.setOnClickListener(new View.OnClickListener() { code goes in here } );
What this compact line of code does is to declare a new OnClickListener( ) method in the View class inside of a setOnClickListener( ) method attached to a marsImage ImageView object that we created one line of code earlier.
Notice that Eclipse again red underlines our Java code because we’re using methods from a View class that is not yet imported into our NewPlanet.java code. So now let’s mouse-over the View class reference in the code, to get the helper dialog shown in Figure 5-4 that will Import View (android.view package) for us, so that we don’t have to write the import code ourselves.

Figure 5-4. Add setOnClickListener method to marsImage ImageView Object and creating new OnClickListener( )
Once our import android.view.View; statement has been put in place for us, Eclipse re-evaluates our code, and places the red underline under only the OnClickListener( ) method.
This new error highlight appears because, at least for now, this listener method is currently an empty or unimplemented method, as we have not yet added in any of our event handling code inside of the two curly braces.
Let’s take the opportunity to have Eclipse write some more code for us and again mouse-over the red underlined code, and select the Add unimplemented methods option, as shown in Figure 5-5. Voila! Eclipse writes this method:
@Override
public void onClick(View v) {
  //Add Code To Process Here
}

Figure 5-5. Implementing the inherited abstract method View.OnClickListener.onClick(View) via Eclipse helper
Next, we add in the code to process what we want to happen (when a user clicks on a marsImage ImageView UI element) inside of this onClick( ) method, which is passed a View object (named v) that it needs to process.
Because this is the NewPlanet class, we want a click (or touch) on the image of Mars to create a new WorldGen object configured with the attributes for the planet Mars. This is done by calling our WorldGen( ) constructor method like we did with the earth object in the MainActivity.java class earlier.
Our first line of code inside the onClick( ) event handler creates a new WorldGen planet object named mars and then configures its name, mass, and gravity via parameters passed to the WorldGen() constructor:
WorldGen mars = new WorldGen("Mars", 642, 3.7);
Notice that once we type in this new object creation line of code, Eclipse yellow underlines the mars object, because it is not yet utilized. We could just ignore the warning, shown in Figure 5-6, but in the interest of a clean code editing view, we’ll add a Colony to Mars, to satisfy Eclipse.

Figure 5-6. Add WorldGen( ) constructor method call to onClick(View) event handler method creating mars object
To add a Colony to Mars we would call the .setPlanetColonies(1) method from the mars object we just instantiated using dot notation like this:
mars.setPlanetColonists(1);
Next, we need to tell the NewPlanet Activity that we are finished using it and wish to return to the MainActivity Home Screen for our application. This is done using the finish( ) method, which is our next line of code in the onClick() event handler method, as shown here and in Figure 5-7:
finish();

Figure 5-7. Call .setPlanetColonies( ) method on mars object to use local mars variable; call finish( ) Intent method
Now let’s right-click the Hello_World project folder, and select Run As Android Application, which saves all our code changes for us, if we haven’t been saving them via CTRL-S, and launches the Nexus S emulator to run our Hello_World app with our new Intent and Event processing code.
The screen again looks like Figure 4-16 when you click the emulator Menu button. Next, click the Add a New Planet menu item and the Intent will reference and open the NewPlanet Activity screen and its Add a Planet layout that we created in the activity_add.xml file in the layout folder.
Now, let’s see if our event handling code works properly. Click the top right (Mars) image placeholder icon, and the onClick() event handler creates the new Mars planet with one colony, and should then return you to the application’s Home Screen, via the finish() method call at the end of our onClick() method code statements.
Next let’s add event handling to our other app functional activity screens so that our app options menu structure can be used to navigate amongst the various areas of our app. That way, we have the basic structure of our app in place by the time we finish the first section (Part 1) of this book.
Enabling Our ConfigPlanet Activity User Interface: Event Handling
Next, let’s prepare our ConfigPlanet Activity and UI Layouts to return our users to their Home Screen when they are done configuring the current planet. We do this by adding a Done Configuring button to our activity_config.xml and a matching button_name_done string constant to our strings.xml file. Then, we’ll wire up this XML Done button using Java code to allow our users to return to the Hello_World Home Screen when the Done button is clicked. I will not use a lot of screen shots for this section as you’ve seen the work process before and so they are not needed.
On the top right of your Eclipse editing tabs in the central pane there is a number (in Figure 5-7 it is a 10); click this to drop-down a menu containing all your open editing tabs. Select the activity_config.xml editing tab, so that we can add the Done Configuring button XML mark-up.
Copy and paste the last button in this XML layout definition underneath itself, and change the android:id tag to doneButton and the android:text tag string constant reference to button_name_done and press Ctrl-S to save the XML file. Then click the “tabs not shown number” drop-down menu again, and select the strings.xml editing tab, and add the new button_name_done string tag along with the value of Done Configuring by copying and pasting the button_name_ffoff string tag, and then change its name and data value.
Now that our XML mark-up editing is complete, we can turn to our Java code editing in the ConfigActivity.java class. Here we need to add a Button object on which to attach our onClick() event handling for the Done button, just like we did for the ImageView UI element in the previous section.
Let’s go through a similar work process as to what we did in our NewPlanet class, and add a Button object named doneButton that references the doneButton ID in the XML file that we just finished editing. We do this by using the findViewById( ) method, using a single line of code, as follows:
Button doneButton = (Button)findViewById(R.id.doneButton);
Next, we’ll use this doneButton Button UI object that we have just created and attach an OnClickListener( ) method to this UI object, via the familiar .setOnClickListener( ) method that creates a new OnClickListener like this:
doneButton.setOnClickListener(new OnClickListener() { our code goes in here } );
The Java event handling code that we use for our Done Configuring button that returns the user to the Home Screen (MainActivity) involves again using the Activity class’s finish( ) method, inside the onClick( ) event handler, as shown in our modified ConfigPlanet class in Figure 5-8.
@Override
public void onClick(View v) {
    finish();
}

Figure 5-8. Adding an .OnClickListener( ) method to our doneButton Button object in the ConfigPlanet.java class
Next, we will modify our TravelPlanet.java class, so that it can be called from the main options menu and later return users back to the Home Screen.
Enabling Our TravelPlanet Activity User Interface: Event Handling
As we did for our ConfigPlanet class, let’s now prepare our TravelPlanet Activity and UI Layouts to return users to their Home Screen when they are done traveling around the currently active planet.
We do this by adding a Return Home button to our activity_travel.xml and a matching button_name_return string constant to our strings.xml file. Then, we’ll wire up the XML Return Button UI element using some Java event handling code that allows our users to return to their Hello_World Home Screen whenever the Return button is clicked by the user.
On the top right of your Eclipse editing tabs in the central pane is a number (in Figure 5-8, it’s an 11); click this again to drop-down the selection menu containing all your open code modules. Select the activity_travel.xml editing tab, so that we can add the Return Home button XML mark-up that our Java event handler code is going to reference.
Let’s take a shortcut, and copy and paste the last button we used in your activity_config.xml layout definition, and use that under our <VideoView> UI element tag, so that we have a button to use in this layout container, as shown in Figure 5-9. The <Button> XML mark-up should look like this:
<Button android:id="@+id/returnButton"
        android:layout_width="wrap_content"
        android:layout_height="wrap_content"
        android:text="@string/button_name_return" />

Figure 5-9. Adding a Return Home Button tag to the activity_travel.xml layout container XML definition in Eclipse
Next, let’s change the android:id tag to returnButton and the android:text tag string constant reference to button_name_return and then press Ctrl-S to save our modified XML layout container definition.
Again click the tabs-not-shown-number drop-down menu, and this time, select the strings.xml editing tab, so we can add the string constant our new Button UI object references. Add the new button_name_return string tag, along with the value of Return Home by again copying and pasting the button_name_done string tag immediately underneath itself and then change the values from done to return, and from Done Configuring to Return Home.
Now that our XML mark-up editing is completed we can turn to our Java code editing in the TravelActivity.java class, where we need to add in another Button object, to which to attach our next onClick( ) event handling method for the Return Home button, just like we did inside our ConfigActivity.java class in the previous section.
Let’s go through a similar work process as in our ConfigPlanet class, and add a Button object named returnButton that will reference the returnButton ID in the XML file that we just finished editing. We do this by using a findViewById( ) method, using a single line of code, as follows:
Button returnButton = (Button)findViewById(R.id.returnButton);
Next use the returnButton Button UI object that we have just created and attach an OnClickListener( ) method to this UI object via the familiar .setOnClickListener( ) method that creates a new OnClickListener like this:
returnButton.setOnClickListener(new OnClickListener() { your code goes in here } );
The Java event handling code that we use for our Done Configuring button that returns the user to the Home Screen (MainActivity) involves again using the Activity class’s finish( ) method, inside of the onClick( ) event handler, as shown in the following Java code:
@Override
public void onClick(View v) {
        finish();
}
This is shown in our modified TravelPlanet class in Figure 5-10.

Figure 5-10. Adding the returnButton Button UI object and event handling code to our TravelPlanet.java class
We are getting close! Once we modify our AttackPlanet.java class to return to our app’s Home Screen, our entire Hello_World user interface navigation infrastructure will have its high-level navigation in place, allowing our end-users to travel (no pun intended) between our application’s functional activity screens via our main options menu, and then to return from each of those app screens to the primary application home screen.
Enabling Our AttackPlanet Activity User Interface: Event Handling
Like we did for our TravelPlanet class, let’s now prepare our AttackPlanet Activity and UI Layouts, so we can return our users to their app Home Screen when they are done having fun attacking the other planets.
We do this by adding an Exit Attack Mode ImageButton UI widget to our activity_attack.xml layout specification. Note that because we are using an ImageButton UI element, that we do not need to add a button_name_exit string constant to our strings.xml file. Later, we will wire up our Exit ImageButton element using event handler code which allows our users to return to the Hello_World Home Screen when an Exit ImageButton is clicked.
On the top right of your Eclipse editing tabs in the central pane there is a number (in Figure 5-10, it’s a 10); click this again to drop-down the selection menu containing all your open code modules. Select the activity_attack.xml editing tab, so that we can add the Exit Attack Mode button XML mark-up that our Java event handler code is going to reference.
Let’s take a shortcut and copy and paste the last ImageButton tag that we originally defined in our activity_attack.xml layout definition, and use that as our fifth ImageButton UI element, so we have another matching image button for use in this layout container, as shown in Figure 5-11. The fifth <ImageButton> tag and its parameters should look like the following XML mark-up:
<ImageButton
    android:id="@+id/exitButton"
    android:layout_width="wrap_content"
    android:layout_height="wrap_content"
    android:contentDescription="@string/content_desc_exit"
    android:src="@drawable/ic_launcher" />

Make sure that you add a <string> tag to your strings.xml file for your Exit button content description parameter that says Exit to Home Planet using the following XML mark-up:

<string name="content_desc_exit">Exit to Home Planet</string>

Figure 5-11. Adding a fifth Exit Attack Mode ImageButton UI element tag to our activity_attack.xml layout markup
Also notice in Figure 5-11 that we changed the android:orientation parameter for our LinearLayout container tag from horizontal to vertical. This is so that our five image buttons (currently icon placeholder images, until we reach Chapter 7) will fit more easily up and down the screen rather than along the top now that there are five of them.
Now that our XML mark-up editing is completed, we can work on our Java code editing in the AttackActivity.java class. Here we need to add an ImageButton object on which to attach our next onClick( ) event handling method, to make our Exit Attack Mode button interactive, much like we did inside of our TravelActivity.java class in the previous section.
Let’s undertake a similar work process to what we did in our ConfigPlanet class, and add an ImageButton object named exitButton that references the exitButton ID in the XML file that we just finished editing. We’ll do this using a findViewById( ) method, via a single line of code, as follows:
ImageButton exitButton = (ImageButton)findViewById(R.id.exitButton);
Next we’ll use the exitButton ImageButton object that we have just created and attach an OnClickListener( ) method to this UI object via the familiar .setOnClickListener( ) method that creates a newOnClickListener like this:
exitButton.setOnClickListener(new OnClickListener() { the code will go in here } );
The Java event handling code that we will use for our Exit Attack Mode button that returns the user to the Home Screen (MainActivity) involves again using the Activity class’s finish( ) method, inside of the onClick( ) event handler, as shown in our modified AttackPlanet class in Figure 5-12.

Figure 5-12. Add ImageButton UI object named exitButton to AttackPlanet.java class to handle events & finish( )
Now right-click the Hello_World project folder, and select Run As Android Application, which again launches our Nexus S emulator, so that we can test our app with its new Intent and Event processing code.
The screen again looks like Figure 4-16 when you click the emulator Menu button. Next, click the Configure Planet menu item and the Intent references and opens the ConfigPlanet Activity screen and its Configure Planet layout we created in the activity_config.xml file. Now let’s see whether our event handler code is working. Click the Done Configuring button, and the onClick() event handler calls the finish() method and returns us to the Home Screen.
Next, click the Travel to Planet menu item, and see whether the Intent references and opens the TravelPlanet Activity screen and its Travel to Planet layout we created in the activity_travel.xml file. To see if our event handler code is working, click the Return Home button. That onClick() event handler should also call our finish() method and return us home.
Finally, click the Attack on Planet menu item, and the Intent references and opens the AttackPlanet Activity screen and its Attack Planet layout that we created in the activity_attack.xml file. Let’s also test whether our event handler code for the ImageButton UI element is working properly. Click the Exit Attack Mode ImageButton, the icon at the bottom left, and see whether our onClick() event handler calls the finish() method.
Now that everything is working well for navigating around our Hello_World application’s functional screens, let’s cover one more important area in event handling—keys. Because a large percentage of Android devices these days have keys of some sort or another, we’ll look at the onKey( ) method of event handling next, just so we cover all the “majors” in this chapter!
Event Handling for Keypads or Keyboards: OnKey Event Handlers
Up until now, we have used the onClick() event handler to capture the user touching our Activity screen UI elements, or navigating using a navigation arrow pad and center select button that is found on many Android devices.
We’ve focused most of our coverage so far on the onClick() handler method because the onClick() event handler is by far the most often used in Android development. This is because the onClick() event handler covers both the usage of touchscreens, as well as any navigation hardware (navigation keys, trackballs, etc.) with the use of one single event handling method.
With the advent of GoogleTV or Android iTVs, we also need to consider that more keyboards (or keypads) will become available for use by our end-users. There are also smartphone (and even tablet) models with slide-out or attachable mini-keyboards still available in the market, so I’m going to cover the onKey( ) event handling method here in this chapter as well.
Let’s add a keyboard shortcut to our app that exits each of our Activity screen functional areas using the common X key, signifying the word exit.
To do this we will need to code methods in each of our Activity subclasses that listen for the X key being pressed using the Android onKeyDown( ) event handler. Pressing an X key will return our users to the Home Screen.
The onKeyDown() method takes in two parameters, one integer and one object and then evaluates them. The first parameter contains the keyCode, which is an integer value that represents the assigned numeric value (constant) for the key that is being depressed. The second parameter is a KeyEvent object named event that is the key event that is being handled.
The onKeyDown() method is public so everything can access it, and boolean, as it returns a true (handled) or a false (not handled) return data value.
The code to compare the keyCode passed into this event handler with the KeyEvent class constant for the letter X (KEYCODE_X) uses a basic if-loop inside of the onKeyDown( ) event handling method. The code looks like this:
public boolean onKeyDown(int keyCode, KeyEvent event) {
        if (keyCode == KeyEvent.KEYCODE_X) {
               finish();
               return true;
       }
       return false;
}
Let’s type this code into our ConfigActivity.java class, right after the onCreate() method, because we want our Activity screen to “trap” the user pressing the X key to return to the Home Screen at any time.
Notice that as we type in this code, Eclipse sees we do not have the Android KeyEvent class declared for use via an import statement. Once you have finished typing in the method, mouse-over the KeyEvent keyword, and have Eclipse add our import statement for us, as shown in Figure 5-13.
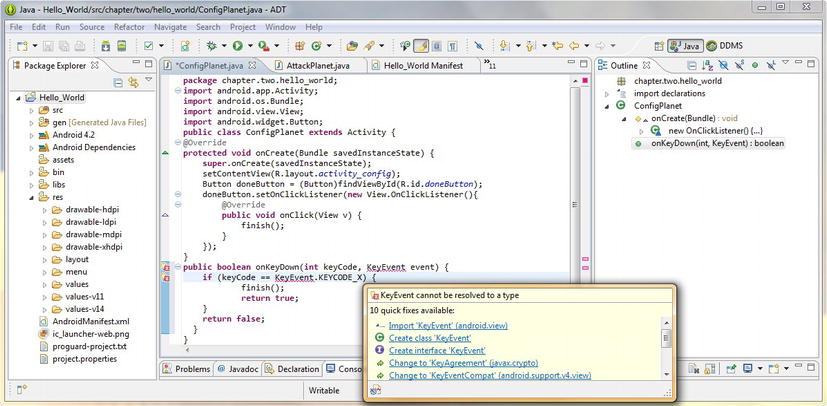
Figure 5-13. Adding an onKeyDown method and removing the error highlights by selecting: Import KeyEvent
What the Java code does inside the onKeyDown() method is fairly basic, but I’ll cover it here for those not as familiar with Java. We use a == numeric comparison operator inside of an if-loop, or in this case, it’s utilized more as an if-statement, to compare a keycode integer representing the key that was pressed by the user to a KEYCODE_X constant that is part of the KeyEvent class to see whether X was pressed by the user.
If an X key was pressed (if the two values equate to being the same), then the statements inside of the if construct are executed, and the finish( ); code statement is executed, and a true value is returned from the called method, signifying that it has completed its event handling successfully.
If any other key is pressed (if the two values do not equate to being the same), then the statements inside of this if construct are not executed, and the method will return a false value signifying that the event was not acted upon. Note that any other event handlers we may create could still operate on that event; the event is said to bubble from one handler to the next, until it is handled (or never handled if we don’t specify that key).
Figure 5-14 shows our completed ConfigActivity.java class event handling code, which we will now replicate (probably via cut and paste, if we’re really smart) in our other three Hello_World Activity subclasses.

Figure 5-14. Final Java code for ConfigPlanet class to handle both click and key events for our app’s navigation
We do this so that each of our application functional screens can be exited easily by the user by simply pressing an X key, if they happen to go to the wrong area of the application by mistake. As you probably know, keyboard shortcuts are common across most popular software applications.
Let’s do our code replication work process first, before we utilize the now familiar Run As Android Application function to test our application one final time, and before we move on to conquer the User Interface Design and User Experience Design sections of this book.
Select the onKeyDown() method in its entirety, and press the Ctrl-C key to copy it to your system clipboard, and then drop-down the active tabs menu by clicking the number (in Figure 5-14, it’s a 12) on the right of the tabs area. Next, select your TravelPlanet.java file, and use the Ctrl-V keyboard sequence to paste the onKeyDown() method code block at the bottom of the TravelPlanet class, right before the final curly brace.
We need to also do this for our NewPlanet.java and AttackPlanet.java classes as well, so that all four of our application’s Activity subclasses implement our new X Key for Exit key shortcut feature. Replicate this work process now, so that the onKeyDown() event handling is present in all four of our functional screen Activity subclasses.
Finally, we need to test our application navigation that we have added in this chapter in its entirety. Right-click our project folder select the Run As Android Application menu option, and launch the Nexus S emulator so that we can see whether everything we have implemented is working correctly.
To test the application once it is running, invoke the options menu, and click each of the four application areas, and then press the X key on your computer keyboard (the emulator uses your computer’s keyboard to simulate a device keyboard), and be sure that your application returns the end-user to their Home Screen.
You will find that if you test the onClick() event handling at this point, that both types of events are handled perfectly alongside of each other. Our application is now ready for us to add actual features!
Other Event Handler Methods: OnFocusChange and OnLongClick
There are four other primary Android event handling methods that we are not going to cover in this chapter, but we will be implementing them later in the book, as we add in more complex user interface elements, graphic designs, animation, and new media assets and features to our application.
The first is the OnLongClick( ) event handling method, which is the Android equivalent of the right-click on a computer or other device using a mouse. A LongClick is invoked by touching and holding the screen, trackball, or the center selection button on any Android device.
An onLongClick() event handler is implemented in your Java code just like an onClick( ) event handler is.
The second type of event handler is an OnCreateContextMenu( ) event handler method, which creates Context Menus for use in Android. Context Menus are also similar to the menus found in a PC O/S that are accessed via right-clicking an object or area of the software to get a menu of Context-Sensitive options that are available specifically for that object.
The third type of event handler is the OnFocusChange( ) event handler method, which is used for handling focus events that are sent out by user interface elements when the user progresses from one element to the next.
When an end-user is using a given user interface element on an application screen, that UI element is said to have the focus, and when the user stops using that UI element, and starts using another UI element, then the focus is said to have changed.
When the focus changes from one of the UI elements to another, Android OS sends out a FocusChanged event that can be trapped by the OnFocusChanged() event handling method. This can be extremely useful for fine-tuning your application UI control, as well as for tracking precisely how the user is accessing your UI elements, and thus how a user is using your application.
Finally, there is also an OnTouch( ) event handler in Android, that handles only touchscreen events. I would suggest using the onClick() event handler for touchscreen devices (as well as non-touchscreen devices) to cover the widest array of Android devices with the least amount of coding.
However, if you are sure that all your users will have and use only touchscreen Android devices, you can then use the onTouch() event handling method as well as, or in place of, your onClick() methods.
The OnTouch() event handler is also used for Android OS features that can only use the touchscreen, the best example of this is an Android feature called gestures, the implementation of which is beyond the introductory scope of this book.
Summary
In this chapter, we learned about two of the most powerful and useful code constructs in the Android programming language: the Intent and the Event.
Intents and Events allow us to “wire up” our Android application, so to speak, so that when our end-users click on our user interface elements, such as our options menu items, ImageButtons, text Buttons or ImageViews, our application is able to process those clicks (or touches) and go where the application needs to go (Intents calling Activity screens), and to do what it needs to do (Events calling program logic to implement something).
First we learned about the anatomy of an Intent object, and the seven primary functional areas (component, action, data, type, category, flags, extras) that an Intent object can include. We learned why each of these areas are important, and why they are needed to process the Intent object, and what each of these areas do for (or in) the Intent processing request.
We learned about implicit Intents and the <intent-filter> tags inside the AndroidManifest.xml file, which implement these Intent Inference Engines that can be custom built by advanced developers. We learned that Intent Filters will process actions, then data, and then categories, to ascertain how developers want their Intents to be processed and executed.
We then learned about and implemented explicit Intents in our Hello_World application to implement the options menu structure we created in previous chapters, and have our menu call our four custom Activity subclasses that we created previously to hold our application functional screens.
Once we got our menu navigation working we needed to learn about event handling to use our user interface elements in each of our application functional screens to return us to our app’s Home Screen.
We learned about the onClick() event handler and how to implement it in our Java code to trap click events on our various UI elements (widgets) so that our users could call the Activity finish( ) method and return to the main app Activity (Home Screen).
We then coded onClick() event handlers for a variety of popular Android user interface widgets, including ImageView objects, Button objects, and ImageButton objects. By doing this we enabled seamless navigation to and from each of the primary functional screens (Activities) within our app.
Next we learned about the onKey( ) event handlers and set up onKeyDown( ) handlers that allow us to trap our users hitting the X key, so that we could implement an exit keyboard shortcut for our application. After that we went over some of the other Android event handlers, which we will be implementing as we need them during the other three parts of this book.
We will be utilizing these Intent and Event capabilities often throughout the rest of this book; I just felt that we needed to get these basic Intent and Event concepts and principles taken care of very early on, here within the first part of the book. You’re coders—you can handle it. No pun intended, of course.
I covered this topical material early on because these Intent and Event Java objects and methods are so very important to getting our application to work at a more advanced level, before we start to make it look really pristine, during the second part (User Interface Design) of this book.
In the second part of the book we will take the application infrastructure that we have created in the first part of the book, and start to focus on user interface design as well as graphics design for our Hello_World app, enhancing our User Experience (UX) and making Hello_World look more like a professional Android application.
In the next chapter, we will learn about Android UI Design widgets, and start fine-tuning our user interface designs for our five primary screen areas in our Hello_World Android application. However, in Chapter 6 we will mainly be using XML mark-up (for the most part) to refine and enhance our UI elements.
Also in Chapter 6 we will explore many of these primary UI element options (as XML parameters) for fine-tuning our User Interface “look and feel,” as well as exploring the precise pixel placement of our UI elements on our Android application’s screen real estate.