
Android Services: Using Background Processing
In this chapter, we will delve into Android Services, which are utilized by developers to perform background asynchronous operations, which can process data streams or computations on their own, without having to synchronize with the application user interface design, or sync-up with the application content (the on-going user experience) in any way.
Services are generally utilized to handle things that need to be going on in the background of your app user experience, in parallel with an Android user’s real-time usage of your application, but not directly synchronized or connected in real-time with that application’s user experience design.
Examples of uses of Android Services would include: the playback of long-form digital audio (say, album music tracks) while the user is using your application, talking to some sort of server or database in the background, downloading data, managing file input-output streams, streaming new media content, such as digital video streams or digital audio streams, handling networking (SMTP or HTTP) protocol transactions, handling payment gateway transactions, real-time processing of GPS data, and similar complex tasks.
Tasks that are generally delegated to an Android Service class are those tasks that should not be tied to the user interface and user experience, because forcing concurrent (synchronized) processing might cause that user experience to become stilted or jerky (i.e., to not portray a smooth user interface response, and thereby a smooth and enjoyable user experience).
Tasks that are delegated to an Android Service also are very processor intensive, so keep your end-user’s battery life in mind, while you are developing processor intensive applications. As you might guess, the two primary power drains on an Android battery are prolonged processing, and keeping the display screen lit (on) for long periods of time (which we covered earlier in the Video chapters).
In this chapter we are going to look closely at the Android Service class, and all the various characteristics of Android Services, as well as how these features, functions, settings, constants, and similar characteristics are declared for use in your Android application. As you may have guessed already, declaring Services for use is done in an AndroidManifest.xml file.
This is one of the more complex and involved topics in Android, because it inherently involves binding, synchronization, processes, processor cycles, threads, access control, permissions, and similarly advanced OS topics.
Android Service Basics: The Rules and Characteristics
A Service is defined as an Android application component that can perform processing intensive functions in the background, without needing any user interface design or any Activity display screen and that does not require any user interaction with the processing that needs to be accomplished.
An Android application component can start a Service class using an Intent object and the Service will continue to process in the background, even if that Android device user switches over to a different Android application.
An Android application component can bind to a Service to interact with it, and even perform inter-process communications, which you may also know as IPC. We will be taking a closer look at processes and threads in the next section of this chapter after this overview of Android Services.
Binding is an advanced programming concept involving establishing a real-time connection between two separate application component processes, where these processes will alert each other when something has changed and when an update needs to be made between their logical bind connection.
An Android Service usually takes one of two formats, bound or started. An Android Service becomes started when an application component (such as an Activity) starts the Service by calling the .startService( ) method.
Once started, a Service can run in the background indefinitely, even in a scenario where the component that started that Service gets subsequently destroyed, either by the application program logic, or by the Android OS.
A started Service performs one single operation, and does not return a result to the calling entity, much like a method that is declared as void.
For example, a started Service might download or upload a data file over a network. Best practices dictates that when a started Service operation is completed, that service should automatically stop itself, to help optimize Android operating system resources such as processor cycles or memory use.
A bound Service is created when an Android application component binds to a Service. This is accomplished by calling the .bindService( ) method. The bound service offers a client-server interface, which allows components to interact with the bound Service, to send requests, to get results, and to even do this across processes, by using interprocess communication (IPC).
Bound Services exist in Android system memory only for as long as any other Android application components are bound to it. Multiple application components can bind to this Service at the same time, however, when all these unbind, the service is then destroyed (removed from system memory).
We will take a look at both of these types of Service formats, as well as a hybrid approach, wherein your Services can work in both of these ways at the same time. What this means is that you can start your Service (so that it is a started Service, and can run indefinitely) and also allow binding.
Whether an Android Service is specified as a started Service or as a bound Service is determined by whether or not you have implemented a couple of the more useful Service class callback methods. For instance, the Service class .onStartCommand( ) method allows components to start a Service, and the .onBind( ) method allows binding to that Service. We will cover methods of the Service class in detail in a later section of this chapter.
Regardless of whether your application’s Service is started, bound, or is both started and bound, any other application component can use a Service, even from a separate application. This is similar to the way that any of your application components can start an Activity, by starting it with an Intent. We covered using Intent objects in detail in the previous chapter, and we will cover how to use Intent objects with Services in this chapter.
It is important to note that Services run with a higher priority than inactive Activities and because of this it is less likely that the Android operating system will terminate a Service class than an Activity class.
It is also important to note that you can declare your Service as private, in the Manifest XML file, and block access from other applications, which is often times what individual developers will do with their applications.
A Service, by default, will always run inside the main thread of the host application’s primary process. Services which run inside of this primary process of your application are often termed Local Services.
A common misconception amongst programmers is that an Android Service will always run on its own separate thread. Although this is certainly possible if you set it up that way, as a default, the Service does not in fact by default create its own thread, and thus does not run in a separate thread unless you specify otherwise. We will be going into processes and threads in the next section of this chapter as it is a very closely related topic.
What this means is that if your Service is going to do any extremely CPU intensive work (such as decoding streaming data in real-time) or blocking operations (such as real-time network access over busy network protocols), you should additionally create a new thread within your service to do that type of processing.
It is important to note that you may not need to use another thread for your service class apart from the one it is on (using already), for instance, in our example in this chapter we play a music file using the MediaPlayer in a Service without needing to spawn another thread.
The only way to really determine if this is needed is to first try using a Service class for your background processing, and then, if it affects your user experience, consider implementing a Thread class and object if needed.
Processes or Threads: Valuable Foundational Information
When one of your Android application’s components, say, your MainActivity class, starts, and your application does not have any components currently running, the Android operating system will start a brand new Linux process for your application, using a single thread of execution, called the UI thread. A Process can generate or launch (or spawn) more than one thread.
As a rule, all your Android application components will run inside the same initial process and thread. This is generally termed the main thread.
If one of your Android application components starts up and Android sees that a process already exists for your application, due to the fact that another component from your application already exists, then that component will also be started within that same application process and will also uses that same thread. So essentially to start your own thread, you must do so specifically in your Java code.
However, you can arrange for different components in your application to run in separate processes, and, you can create additional threads for any process. This is what’s usually done with Android Services as we will see.
How to Specify a Process: Using android:process XML Parameters
As a default in the Android OS, all your application components will be run in the same process, and most basic Android applications will not need to change this setup unless there’s a very compelling reason for doing so.
For advanced applications (which we are not covering in this book, but we will cover this concept here, to be thorough regarding Android Processes) if you happen to find yourself in a situation where you absolutely need to control which Android process a certain application component belongs to, you can specify this in, you guessed it, your AndroidManifest.xml file.
Your AndroidManifest.xml component tags for each major type of application component, whether it is an Activity <activity> tag, a Service <service> tag, a Broadcast Receiver <receiver> tag, or a Content Provider <provider> tag, will include an optional android:process parameter.
This process parameter can be used to specify the process under which that application component needs to run. You can set up the process parameter such that each of your application components run inside its own process, or mix and match in such a way that some of your application components will share a process while others will not share that process.
If you want to get really complex, you can also set these android:process parameters so that components from totally different Android applications can execute together inside of the same Android process.
This can only be accomplished when those particular applications share the same Linux User ID, and which are signed with the same certificates.
It is also interesting to note that the global <application> tag in your AndroidManifest XML file will also accept the android:process parameter.
Using the android:process parameter inside of your <application> tag will set a default process value for your application which would subsequently be applied to all of your application’s components in your XML application component definition (nested) hierarchy. Of course, this would not include those application components which do not then utilize the android:process parameter to specify a different process for that particular application component than the one that you set as the default process for application use via the android:process parameter inside of your <application> tag.
It is important to note that Android has the option to shut down a process at any time, for instance, when memory is running low, or if memory used by your process is required by other processes that have a higher priority or are receiving more usage (attention) from the end-user.
Application components running inside of a process that gets terminated are subsequently destroyed, or removed from memory. Not to worry, as any of these processes can be restarted again at a later time for any of those application components that require something be accomplished for a user.
When deciding which processes to kill, the Android system weighs their relative importance to the user. For example, it more readily shuts down a process hosting activities that are no longer visible on-screen, compared to a process hosting visible activities. The decision whether to terminate a process, therefore, depends on the state of the components running in that process. The rules used to decide which processes to terminate is discussed next.
The Android Process Lifespan: How to Keep Your Processes Alive
Android tries to keep your application process in its system memory for as long as it can, but sometimes the need arises to destroy the older processes running in the OS. This is done to reclaim the system’s memory resources for newer or higher priority processes.
After all, most Android devices today only ship with one or two gigabytes of main system memory, and this can fill up fairly quickly, as users play games, launch apps, read eBooks, stream music, place phone calls, and so on, and so forth.
Even when devices start to ship with three gigabytes of main memory you will still have memory management issues, and using processes and threads are at the core of these memory management issues, so it is important that we understand how processes are handled in the Android OS.
The way that the Android OS determines which of its processes to keep and which of its processes to terminate is via a priority hierarchy. Android places each running process into this priority hierarchy, which is based on each of the components running in the process queue, as well as the current status (running, idle, stopped, etc.) of those components.
The way that memory is cleared from the Android device is that the process with the lowest priority (importance) is terminated first, and then the next lowest priority process is terminated, and so on and so forth, until the system resources that are needed for higher priority processes have been recovered for use.
There are five process priority levels within this priority hierarchy. Once you see what they are you will realize how logically this process priority hierarchy is set up and you will also have a good knowledge of how Services (asynchronous processing or heavy lifting) and Activities (user interface screens) fit into this overall process priority schema, which is very important to understand. Get ready for some Aha moments!
The highest priority process level is the foreground process, which is the primary process that’s currently running (processing) and is thus required for the application task that the user is currently engaging in.
A process is considered to be in the foreground if it contains an Activity (user interface screen) that the user is currently interfacing with, or if it hosts a Service that is currently bound to an Activity which that user is interfacing with.
A process is also considered to be a foreground process if it is currently executing a Service that is running in the foreground, which means that the Service object has called the .startForeground( ) method.
If a Service is currently executing one of its onCreate( ), onDestroy( ), or onStart( ) Service lifecycle callbacks, which we will be learning about in this chapter, or currently broadcasting a BroadcastReceiver object, which happens to be calling its onReceive( ) method, it will also be given a top foreground process priority level status by the Android OS.
In an optimal Android operating scenario, only a few foreground processes will be running at any given time. These processes are terminated only as a last resort, for instance, if the system memory gets scarce enough that the OS or its applications cannot continue to run effectively.
The next highest priority process level is the visible process, which is a process which does not contain any foreground process components but which still can affect what the user is seeing on their device display.
A process is considered to be visible if it contains an Activity that is not in the foreground, but that is still visible on the user’s display screen, for instance an Activity whose .onPause( ) method has been invoked.
A great example of this would be a foreground process Activity that has started a dialog that permits the calling Activity to be seen in the background.
A process that contains a Service class that has been bound to a visible Activity would also gain visible process priority. Visible processes are considered almost as important as foreground processes are, and thus they will not be terminated unless absolutely required to keep all foreground processes running in system memory.
The middle priority process level of the five levels is a Service process, which is a process that contains a Service that has been started using the .startService( ) method but which Android does not classify in either of the two highest process priority categories.
Because the Service processes have no user interface screen, and are running asynchronously in a background process, are not directly tied to anything that the user sees on their display. However, Services are still performing tasks that the end-user wants to proceed (for instance playing an album of music in the background or downloading data over the network). For this reason, Android keeps them processing, unless there is not enough memory to support them along with foreground and visible processes.
The second lowest priority process level is the background process, which is a process that contains an Activity that is not currently visible to the end-user, for instance, the Activity .onStop( )method has been called.
Because these background processes have no detectible impact on the user experience, Android terminates them whenever it is necessary to recover system memory for higher priority level (foreground, visible, or service) processes.
There are often quite a few background processes running, and Android keeps background processes in what is termed an LRU (Least Recently Used) list. This serves to guarantee that the process with the Activity that was most recently utilized by the user is the last process terminated.
It is important to note that if your Activities implement their lifecycle methods correctly, and save their current states, then terminating that Activity’s process will not have any effect on your end-user experience.
This is due to the fact that when your user navigates back to the user interface screen for the Activity, the Activity restores all its visible states (remember your Bundle savedInstanceState code).
The lowest priority process level is the empty process, which is a process that does not hold any currently active application components. If you are wondering why an empty process would be kept in system memory at all, the strategic reason to keep an empty process alive is for caching optimization, which would improve start-up times the next time a component needs to run inside that process.
The Android operating system often terminates these empty processes in an attempt to try and balance the overall system memory resources, between the various process caches, and with its underlying Linux kernel caches.
Finally, a process priority level rank might be increased because another process is dependent on that process. Any Android process that’s currently servicing another process will never be ranked lower than that process it is currently servicing.
Say that a Content Provider (Database or Datastore) contained in Process 01 is busy servicing a user interface Activity in Process 02, or, if the Service in Process 01 is bound to an application component in Process 02, Process 01 is always considered at least as important as Process 02.
Next, we will take a look at threads, which are much lower level and used within processes to schedule processor intensive and user interface tasks.
Some Caveats Regarding Threads: Don’t Interfere with a UI Thread
After an Android OS launches your application via your AndroidManifest.xml file, its operating system spawns a thread of execution that is usually termed the main thread. The main thread is in charge of dispatching and managing events, which we learned about in an early chapter in this book, between the operating system and your user interface widgets.
The main thread also controls drawing your graphics, video, and animation (drawable) assets to the Activity display screen, so it is doing a lot of heavy lifting right off the bat, which is the reason you might need to spawn your own thread, if something that you want to do with your Android application might overload this already heavy workload that is on the main (or primary) thread, which is essentially running your entire application.
The main or primary thread is also often referred to as the UI thread, or user interface thread, because it is the thread inside of which your application components interact with components in Android’s UI toolkit. Android UI Toolkit includes all the components (classes) from the android.widget and android.view packages, which we have learned about extensively in the first three parts of this book.
All the Android UI toolkit components that run in the main process are instantiated inside of this UI thread, and operating system calls to each required component are dispatched from this UI thread.
For this reason, methods that respond to your system callbacks, such as the .onKeyDown( ) event handler, used to report user interface interaction, or one of the lifecycle callback methods, such as an .start( ) method, or a .pause( ) method, or even a .destroy( ) method, always run inside the UI thread contained within the main process for your Android application.
When an application dispatches intensive processing in response to a user interface interaction, the single thread model can result in a slow user experience performance, which is why you must utilize threads properly.
The reason for this is obvious; if lots of processing is happening in the UI thread, then performing long-winded operations, such as network access, complex calculations, or SQL database queries will block the entire user interface response by taking away those processing cycles and essentially blocking the UI related events from being smoothly (quickly) processed.
When a thread is blocked in this way, UI events cannot be dispatched for handling, and this includes drawing graphics (drawable) elements to the screen. From a user experience perspective, your application thus appears to “hang” or pause for an undesirable length of time.
It is important to note that if your application blocks the UI thread for more than a few seconds (for more than five seconds) your user will be shown a dialog containing the exceptionally undesirable (from a user experience standpoint at least) “The Application is Not Responding” (or ANR) dialog.
It is also important to note that the Android UI toolkit is not currently what is known as “thread-safe.” For this reason, you must not at any time manipulate your application user interface elements from a worker thread.
A worker thread is any non-UI thread, and is also commonly referred to as a background thread. In other words, it is a thread that you have spawned within your application Java code, to off-load intensive “worker” background processing, so that your UI will continue to function smoothly.
So remember, the first key rule in Android thread processing is that you must do all manipulation to your user interface elements from the inside your UI thread, which remember is the main or primary thread for your Android application.
The second rule is more generalized, and it is simply to not block the UI thread at any time for any reason. This is why you have worker threads, so that if you need to do something that would cause the UI thread to become blocked, you can spawn a worker thread in your code to do that processing, streaming, database access, or other tasks that represent heavy processor use and probably advanced application programming as well.
Should My Android Application Use Services or Threads?
An Android Service is simply a component that can run in the background, even when the user is not interacting with your application. If you need to perform work outside of your main UI thread, but only while the user is interacting with your application’s user interface, then you should create a new Android Thread object within that class of your application, using a HandlerThread object or an AsyncTask object, and not go to the trouble of coding (and declaring in the Manifest) an entire Android Service subclass.
Let’s say that you wanted to stream some music from a music service while your Activity is running. What you would want to do is to create a thread using an .onCreate( ) method, start it running using the .onStart( ) method, and finally stop it by using an .onStop( ) method.
As I mentioned before, you will probably want to utilize the more refined Android Thread subclasses that are named AsyncTask and (or) HandlerThread instead of the more generalized Thread class, at least until you become a more advanced Android programmer.
So, when would one want to use a Service subclass over spawning a Thread object in an existing class, you might be wondering. If you remember from the previous section, an Android process that contains a Service subclass will always be prioritized (ranked) higher than a process which utilizes a background processing activity (thread).
If your application is going to undertake an extensive processing, access, or streaming operation, you may want to start a Service component (class) for this operation, rather than simply creating a worker thread.
This is an especially relevant consideration if the background function is most likely going to outlast your Activity. For example, the Activity that is uploading a video that you created using the Android Camera class to a web server would want to utilize a Service class to perform this upload so that this upload process would be able to continue in the background, even if your user leaves the current Activity.
Thus the reason that you would want to use a Service class over a Thread object is because using the Service component will guarantee that your processing operation will have at least a Service process priority level, regardless of what happens to your Activity subclass.
Next, let’s learn how to write our Service subclass, and how to call it by using an Intent object. We will do this using the TimePlanet.java Activity subclass, which we created in the previous chapter on Intents.
We will implement our Android Service class lifecycle by creating a music player background service component named MusicService.java. This will be a Service subclass which will utilize the extends keyword inside the class declaration in order to subclass the Android Service class.
After we set up new user interface elements needed to access these Service lifecycle methods, we will then code the Service class lifecycle methods using Java code, including onCreate( ), onStart( ) and onDestroy( ) methods. We will even leverage an Android Intent object in one of them to start our background Service, which will play background music for our Planet Time Atomic Clock Activity which we created within the previous chapter of this book covering Intents.
Finally, we will also look at how to add a <service> tag to our AndroidManifest.xml file, and we will test our background music Service subclass inside of our Nexus S emulator, just to make absolutely sure everything is working in exactly the way that it is supposed to be.
Implementing a Music Service in Our TimePlanet Activity
The first thing that we will need to do is to create Start Music Service and Stop Music Service user interface Button objects that will control our Music Service. These go in our TimePlanet.java Activity class and XML definition file. The first thing we need to set up to do this is the string constants that are needed for the Button UI element labels, so add two <string> constant definitions in your project’s strings.xml file, in the /res/values folder, by using the following XML mark-up:
<string name="start_button_value">Start Music Service</string>
<string name="stop_button_value">Stop Music Service</string>
This is shown in Figure 17-1. Now we are ready to add the two Button tags, which add the two user interface elements to our existing UI design. These control our MusicService background music component.

Figure 17-1. Adding the start_button_value and stop_button_value string constant to our strings.xml file
Open up your activity_time.xml file in the Eclipse editing area, and copy the timeButton user interface component, which we created in the previous chapter, two more times underneath itself. Leave the third (bottom) Button tag as the timeButton, and change the first Button android:id parameter to read startServiceButton and the second Button android:id parameter to read stopServiceButton, as shown in Figure 17-2.
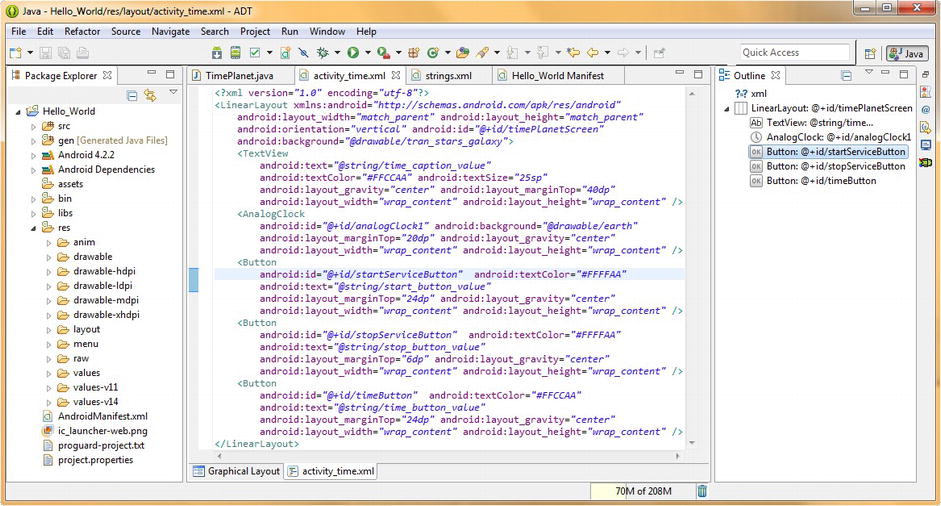
Figure 17-2. Add a startServiceButton and a stopServiceButton Button user interface element to activity_time.xml
Next, let’s change the android:textColor parameters for both of these new Button objects to #FFAAAA, or a nice bright yellow color to differentiate the Music Service Button elements from the Return to Configuration Button element, which is a light orange color to match the plasma background.
Next, change the android:text parameter so it points to the correct string constant values that we set-up in Figure 17-1; so change time_button_value to start_button_value, for the first Button tag, and stop_button_value for the second Button tag. We are almost done parameterizing our new Buttons!
Next, let’s change our android:marginTop parameter in both of the Button tags spacing them close together and set apart from the other UI elements.
To accomplish this we set a startServiceButton marginTop parameter of 24 DIP (24dp) that pushes your Start Music Service Button element away from the AnalogClock UI element. Then set the stopServiceButton UI element marginTop parameter to 6 DIP (6dp) to place the Stop Music Service Button element right underneath the Start Music Service Button element.
Finally, because our startServiceButton is 24 DIP underneath our AnalogClock set the marginTop parameter for our timeButton UI element to be the same exact value. This results in Music Service Button UI elements that center attractively within the existing user interface Design that we created in the previous chapter. The final markup is shown in Figure 17-2.
<Button android:id="@+id/startServiceButton"
        android:textColor="#FFFFAA"
        android:text="@string/start_button_value"
        android:layout_marginTop="24dp"
        android:layout_gravity="center"
        android:layout_width="wrap_content"
        android:layout_height="wrap_content" />
<Button android:id="@+id/stopServiceButton"
        android:textColor="#FFFFAA"
        android:text="@string/stop_button_value"
        android:layout_marginTop="6dp"
        android:layout_gravity="center"
        android:layout_width="wrap_content"
        android:layout_height="wrap_content" />
To get a better idea of how this new TimePlanet.java Activity screen user interface design will look, click the Graphical Layout Editor tab, on the bottom-left side of the XML editing pane. As you can see, the screen UI design is evenly spaced out and the Music Service buttons are functionally grouped together.
To see how the user interface design really looks you will need to use the Run As Android Application work process, because as we know from our past experience, the Graphical Layout Editor utility in Eclipse does not always show the margin spacing parameters in exactly the way that they’ll render on the Android device screen.
Now that our Planet Time user interface screen has our Music Service user interface elements on it, it is time to edit our AndroidManifest.xml file.
Configuring Our AndroidManifest file to Add a <service> Component
When you add an Android Activity, Service or Broadcast Receiver component to your Android application, you must declare it for use inside your AndroidManifest XML file, which is utilized to launch your application.
Let’s do that now, by opening up your AndroidManifest.xml file, inside the central editing pane of Eclipse. At the bottom of the existing XML mark-up add a <service> tag before the closing </application> tag but after the last <activity> tag for TimePlanet which we added in the previous chapter.
This <service> tag should implement an android:enabled=“true” parameter, which will enable this Service component for use inside your app, as well as an android:name=“.MusicService” parameter, which is used to reference the MusicService.java class name. We create this Service class in the next section of the chapter. The tag mark-up should look like this:
<service android:enabled="true" android:name=".MusicService" />
The finished AndroidManifest.xml file and mark-up is shown in Figure 17-3.

Figure 17-3. Adding our <service> tag and parameters to our AndroidManifest.xml file for our MusicService class
Now we are ready to write the Java code that implements the user interface design elements that we created in the previous section of this chapter.
Writing Java Code in Our TimePlanet Activity to Launch the Service
Open up the TimePlanet.java Activity class in the central editing pane of Eclipse, and copy the Button instantiation and event handling method Java code structure for the returnFromTimeButton Button object two more times underneath itself. We do this so that we don’t have to write all this Java code again from scratch, as we are implementing two very similar Button objects, along with their event handling infrastructure.
Name (rename) the first copied Button object startMusicServiceButton, and reference its ID as startButton. Delete the Java code statements in the interior of the onClick(View view) method call, so that we can add our new Service class related method calls.
Next, rename the second copied Button object: stopMusicServiceButton, and reference its ID as: stopButton. Delete the Java code statements in the interior of the onClick(View view) method call, so that we can add our new Service class related method calls.
Inside of our startMusicServiceButton onClick( ) event handler method let’s add a startService( ) method call to start our MusicService component using an Intent object that references our current class context using the code:
startService(new Intent(this, MusicService.class));
This method call starts our Service using an Intent object that we create inside of the startService( ) method call using the Java new keyword that constructs a new Intent object using the current context and our MusicService class name reference as parameters, as is shown in the preceding line of Java code.
Next, inside our stopMusicServiceButton onClick( ) event handler method, let’s add the stopService( ) method call, which stops and destroys our MusicService component, using an Intent object that references our current class context using the code:
stopService(new Intent(this, MusicService.class));
This method call destroys our Service using an Intent object that we create inside of the stopService( ) method call itself using the Java new keyword that constructs a new Intent object using the current context and our MusicService class name reference as parameters, as is shown in the preceding line of Java code.
Note in the Eclipse editor that both of these MusicService subclass method calls that we have put inside of our two onClick( ) event handling methods have been error flagged, using wavy red underline highlighting, as shown in Figure 17-4.

Figure 17-4. Adding the calls to .startService( ) and .stopService( ) and new Intent objects to TimePlanet.java
The reason for the wavy red underline is because we have not yet created our MusicService.java Service subclass, which as you can see is referenced in an Intent object parameter, as the class that this Intent object needs to be passed over to.
Let’s create the MusicService Service subclass now so that we can get rid of this error in Eclipse, and more importantly, because it is the next step in our work process in implementing this Service component anyway!
Creating a New Service Subclass for Our MusicService.java Class
Let’s take a look at another way to create a new Java Class in Eclipse by placing our mouse over the wavy red underline that we see in our current editing pane for our TimePlanet.java Activity subclass, and then select an option shown in the helper dialog that pops up that reads: Create class “MusicService” to launch the New Java Class dialog inside of Eclipse.
This helper dialog is shown in Figure 17-5 and is another way for us to invoke the New Java Class dialog and the Superclass Selection dialog.
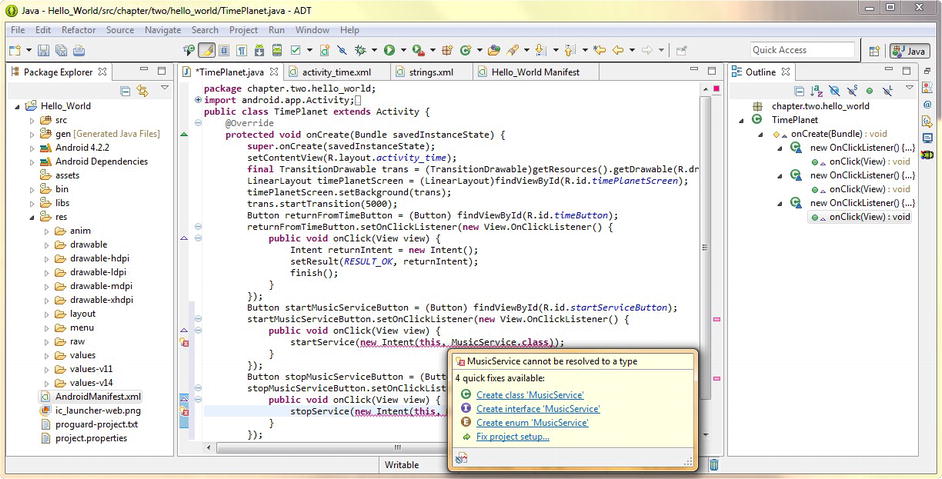
Figure 17-5. Using the Eclipse Error Dialog to invoke a New > Class dialog so we can create MusicService class
The other way that we have seen to accomplish this same work process is to right-click the package name sub-folder in the Eclipse Package Explorer pane, and to then select the now familiar New ![]() Class menu sequence, which then accesses these same New Java Class creation dialogs for us.
Class menu sequence, which then accesses these same New Java Class creation dialogs for us.
Next let’s fill out the New Java Class and Superclass Selection dialogs to specify our new Service subclass named MusicService.java as a public class in our chapter.two.hello_world package in our Hello_World/src source code folder.
As you can see in Figure 17-6, the first five fields have been filled out for us, so just click the Browse button to open a Superclass Selection dialog, type in an “s” character and select the android.app.Service class.

Figure 17-6. Using the New Java Class dialog and Superclass Selection dialog to specify our MusicService class
After you click the OK and Finish buttons in these two dialogs, you will then see your public class MusicService extends Service (subclass) Java code that Eclipse has written for you, as is shown in the following code and in Figure 17-7.
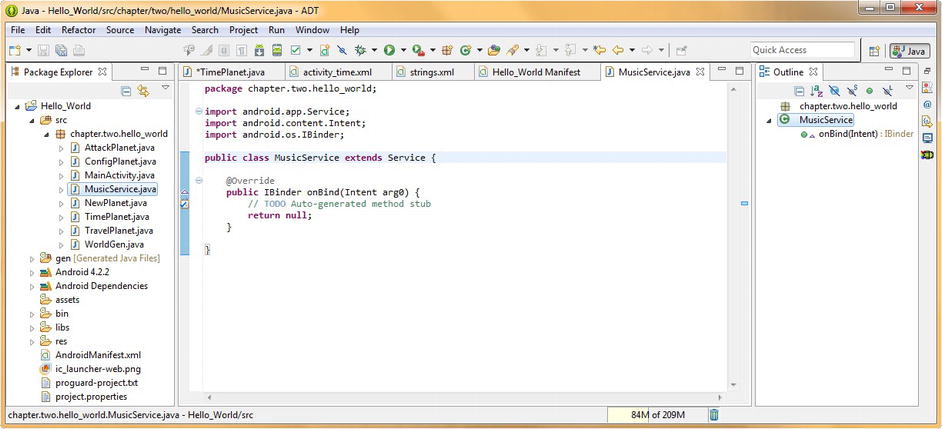
Figure 17-7. New Service subclass MusicService with IBinder( ) method and import statements coded for us
public class MusicService extends Service {
    @Override
    public IBinder onBind(Intent arg0) {
        // TO DO: Auto-generated method stub
        return null;
    }
}
Now all that we have to do is to add our Service class lifecycle method calls to implement our MediaPlayer based Music Playback Service, and we will be ready to test our application in the Nexus S emulator.
Coding Our MusicService Class Service Lifecycle Methods in Java
Now that our MusicService.java class is created and open for editing let’s start by adding a MediaPlayer object named musicPlayer at the top of our class that we can use in our three lifecycle callback methods, which we are going to code next. This would involve the following line of Java code:
MediaPlayer musicPlayer;
The first method that we code is the first accessed when the Service class is called, and that’s the onCreate( ) method. This method creates a MediaPlayer object and sets it up for use, as well as setting any parameters, in this case a looping parameter, as shown in Figure 17-8.
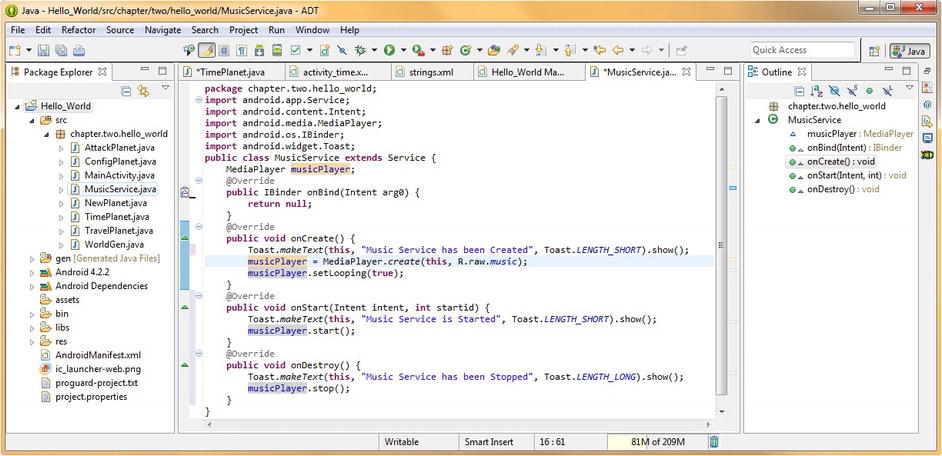
Figure 17-8. Coding our onCreate( ), onStart( ), and onDestroy Service lifecycle methods to control MediaPlayer
We also use a Toast object and a .makeText( ) method call to show us what the OS is doing regarding creating our Service for us. The onCreate( ) method would be declared as public so any class can access it and void as it returns no value, and the method declaration and the three lines of Java code that we will need to put inside of the method to accomplish our MediaPlayer set-up and configuration this would look like the following:
@Override
public void onCreate( ) {
    Toast.makeText(this, "Music Service has been Created", Toast.LENGTH_SHORT).show( );
    musicPlayer = MediaPlayer.create(this, R.raw.music);
    musicPlayer.setLooping(true);
}
Next, we will code our onStart( ) method, as that would be the next method in the lifecycle that will be called when our Service is started. Remember that when a Service is called, the onCreate( ) method is called to create and to set-up the Service, and then the onStart( ) method is called, to start it running. Thus, we would utilize our onStart( ) method to start up the MediaPlayer object for our music playback, and again, also include another Toast message to let us see what exactly is going on regarding the Service process. So the code for an onStart( ) method looks like this:
@Override
public void onStart( ) {
    Toast.makeText(this, "Music Service is Started", Toast.LENGTH_SHORT).show( );
    musicPlayer.start( );
}
Finally, we use our onDestroy( ) method to stop the MediaPlayer object, and also include a Toast message to let us see what is going on regarding the Service. So the code for our onDestroy( ) method looks like this:
@Override
public void onDestroy( ) {
    Toast.makeText(this, "Music Service has been Stopped", Toast.LENGTH_SHORT).show( );
    musicPlayer.stop( );
}
Now that our MusicService.java Service subclass has been coded let’s go back into our TimePlanet.java Activity subclass by clicking the tab at the top of Eclipse that’s labeled TimePlanet.java as shown in Figure 17-8.
Refining Our TimePlanet Class Context Reference Using TimePlanet.this
When you enter the TimePlanet.java editing tab you will notice that your startService( ) and stopService( ) method calls are still red wavy underlined using Eclipse error level highlighting elements. This is because the first (context) parameter for your Intent object needs to refer to the TimePlanet class context, and it is currently referring to the View class that it is inside of, rather than the Activity class that is at the top of our current class’s food chain.
So, we need to modify this code to allow this context to “see” all the way to the top of our class. To do this, we need to modify the first this parameter in the Intent object in the startService( ) and the stopService( ) methods, and make this parameter read: TimePlanet.this so that the Intent object references the TimePlanet class’s current context. As you can see in Figure 17-9, this eradicates any and all errors in our Java code, and we are now ready to compile and run our Service component savvy app in the Nexus S emulator so that we can test it to see how well it works.
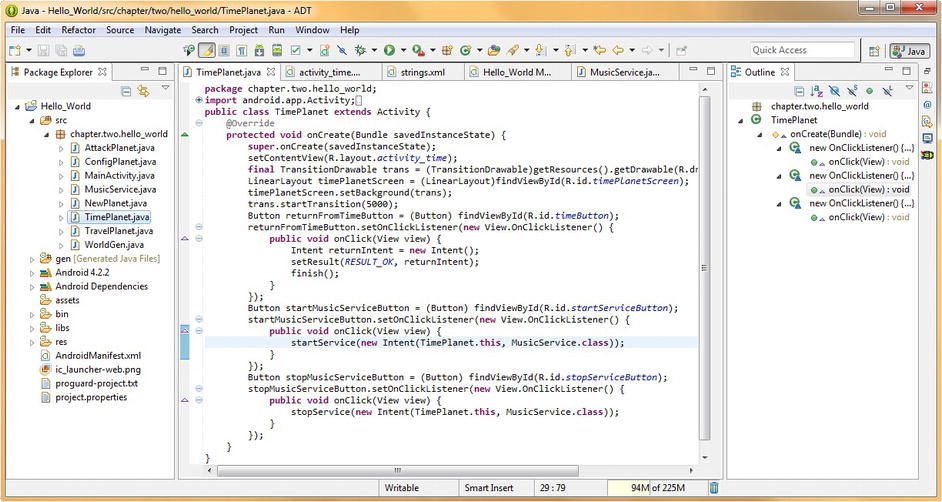
Figure 17-9. Error-free TimePlanet code once MusicPlayer class is in place and TimePlanet.this reference added
Right-click your project folder and use the Run As Android Application work process to launch the Nexus S emulator, and when the app launches, click the menu button and select the Configure a Planet Activity, and once that appears on the screen, click the Atomic Clock button to get into the Planet Earth Time Activity screen that is shown in Figure 17-10.

Figure 17-10. TimePlanet Activity running in the Nexus S emulator with MusicService Buttons
Testing the MusicService Component
Now it is time to test our new MusicService component that subclasses the Android Service class, and see how well it works. Click the Start Music Service button and listen to the beautiful music play back seamlessly. A Toast message should come on the screen telling you when the Service was created and when it was started.
At any time, click the Stop Music Service button, and notice the music stops playing and that a Toast message comes on the screen telling you that the Music Service has been stopped. Go ahead and click each button a few more times to make sure that the application has no bugs and that the Service and the MediaPlayer object can be started and stopped at any time.
Summary
In this chapter, we took a closer look at some of the more complex Android operating system features and concepts, including Services, Processes, and Threads. We learned how these related to each other, as well as how they differed from each other, and when to use each of them in our application.
First we took a look at Android Services and their basic forms and rules, including the difference between started Services and bound Services. We looked at some of the key methods such as startService( ), stopService( ), and bindService( ), which we later implemented in a Service class of our own. We learned about the Service class lifecycle and how it’s played out.
We then took a close look at Android Processes and Threads, as this topic is closely related to Services, and important for an Android Developer to understand. We looked at how you specify a process in your Android Manifest XML file and at the process lifespan.
We learned about the different types of processes and how they are ranked in order of importance by the Android operating system and we learned about how different types of Android components such as Activities and Services fit into the priority ranking system used with Android Processes.
We looked at the tradeoffs between using Threads within an existing class and creating a new Service subclass to do background processing. We also learned about the HandlerThread and AsyncTask classes, which you use if you decide to get more advanced in your Android Programming and utilize Threads in your application components.
Finally, we wrote our own Service subclass, called MusicService.java from scratch. We added user interface elements to our TimePlanet Activity so that we could control the Music Service from our Atomic Clock display screen, which needed some background music anyway.
We learned how to add a <service> XML tag to our AndroidManifest.xml file to declare our Service component for use, and then wrote the Java code to implement the Service class lifecycles methods that were needed to implement our MediaPlayer object and its lifecycle methods that we used to control our background music playback engine.
In the next chapter, we will learn all about the Broadcast Receiver, which can be utilized to send important applications and system related messages around to your Android application components as well as others.