
Layouts and Activities: Using ViewGroup Classes
Now that we have created the Java code in Chapter 3, which generates robust new worlds (WorldGen) for our Hello_World application, we need to start building the front-end for our Android application, what I like to call the user interface design.
The user interface (UI) design, as well as the user experience (UX), and the application content for that matter, is all delivered via the primary screen of the Android consumer electronics device that your target end-user or customer is using to view your Android application. User Experience (UX) is the sum total of the User Interface Design, its usability, and the perceived impact of the content.
In this chapter, we are going to take a closer look at the lowest level, indeed the foundation, for any screen design in Android. This is called the Android Layout Container, and it is implemented in Android using the ViewGroup class. The Android ViewGroup class is a subclass of the Android View class, which is itself a subclass of the Java Object class we learned about in Chapter 3. Luckily, we already understand Java class hierarchies.
I am again going to try to seamlessly meld two objectives in this chapter; enhancing our Hello World app again by adding layout containers and menus, and teaching you how to code menus and screen layouts using XML and all about Android View and ViewGroup class concepts at the same time.
We’ll define a few different types of screen layout containers within our Hello_World app, and give each of them basic user interface elements for now, which later on, we will replace (upgrade) with more advanced user interface elements, graphics, video, and animation in Part 2 of the book. We’ll also learn how to create Android Activities, which we’ll use to hold our layout containers and to define logical areas in our Hello_World app.
Android Screen Layout Containers: The ViewGroup Class
In Android, screen layouts are created, defined, and organized via the Android ViewGroup class, which is subclassed from the more generalized View class. The View class must be imported into every Android application via the familiar import android.view.View; statement.
Because the Android View class manages our screen interface in every way, it ends up having a significant number of subclasses, and most of those View subclasses themselves have even more specialized subclasses, as you will be seeing in this chapter, as well as in the next chapter covering user interface design, and, in general, throughout the rest of this book.
Needless to say, Views are important in Android, as they provide an interface between your app and its end-users. The Android View package is used in the bootstrap (basic) Android application that is created in the New Android Application Project dialogs, because to use the screen for your app, you must have imported the View class to be able to do this.
The Android View class has a large number of specialized subclasses, many of which we discuss in greater detail in Chapter 5. This chapter is dedicated to one very special View subclass called ViewGroup, which allows View subclasses in the form of Widget subclasses (user interface elements) to be organized seamlessly.
ViewGroup is a subclass of View because the Android View class provides those top-level screen management characteristics (size, dimensions, orientation, and similar screen properties) as well as functionality (event processing, focus, etc.) that we will be covering in detail in Chapter 5.
The ViewGroup subclass adds in global screen layout attributes and methods that allow developers to define and fine-tune screen layout organization characteristics and top-level functionality.
Just like the Android View class provides higher-level attributes and functions to its ViewGroup subclass, the ViewGroupbase class provides higher-level screen layout parameter attributes and screen layout creation functions for its own subclasses.
The reason that I mention this here is because the ViewGroup class is not used directly to implement any specific layout container in Android; it can thus be defined or classified as a base class to its many subclasses.
So, just remember that all the different types of screen layout container classes currently available to Android developers to create user interface designs under (with) are actually subclasses of the Android ViewGroup base class.
Android ViewGroup Subclasses: Layout Container Types
Android provides several mainstream layout container types as subclasses of the ViewGroup class. These classes are the ones that you will use in most of your projects, and are the ones which we will cover in this book.
These ViewGroup subclasses are named: RelativeLayout (default layout type, created in the New Android Application Project dialogs), FrameLayout (used for single item layouts), and LinearLayout (for user interface elements that need to conform to a row or column format, such as in-line button strips and top-down lists).
There are some other layout container types that are deprecated, and those we will not cover, because they have been discontinued. Deprecated means discontinued, but still supported (however not recommended) for use, so that older code that uses this deprecated code still functions. Deprecated layout containers in Android and the API Levels at the time that they were deprecated include AbsoluteLayout (Level 3) and SlidingDrawer (Level 17).
There are also some layout container types that are essentially the exact opposite of deprecated, that is, they are so new (API Level 13 and later) that they are not yet finished in their code implementation by Google, and by using them, you risk having to change your code later, when all the features are finally in place. Additionally, these only work in API Levels 13 through 17, and do not support API Levels 3 through 12, which legacy consumer electronics products still support. What we want to focus on in this book are layout containers that work across all Android devices.
API Level 13 (Honeycomb) and later layout containers include Grid Layout, ViewPager, and PagerTitleStrip, and we will not cover these.
Note that we also don’t discuss the FragmentBreadCrumbs layout container, as its complexity is outside the scope of an introductory book on learning Android application development.
The first layout container that we look at is one of the most commonly used, and the Android OS default : the RelativeLayout. Because the RelativeLayout is already set up in your bootstrap Hello_World activity_main.xml file we’ll go ahead and show you how to use it properly.
Relative Layout Positioning: The Android RelativeLayout Class
We will start with the RelativeLayout class, because that is the default layout container that the Eclipse ADT has set up for us in our New Android Application Project series of dialogs. We will use that and learn about RelativeLayouts first, as they are the most commonly used.
The RelativeLayout container is aptly named, as it arranges user interface elements (UI widgets, which are subclassed using the Android View class, which we will learn about in the next chapter) using relative positioning.
You will see how Relative Layouts are created, populated with parameters and then fine-tuned as we start coding our Hello_World app start-up screen user interface elements by using the Android XML mark-up language in the next section of this chapter.
We’ll use our current MainActivity screen Activity as our start-up screen. Because we already have a “default” or initial Earth world defined, we’ll use this on our application home screen to show our end-users where they are currently located—Earth. That way, we don’t have to rewrite any code!
We’ll also show you how to define a menu, so that you can call the other screen (Activity) definitions. We use different types of screen layout containers in those activities, so that you can learn how each is implemented. We cover menus in this chapter because the menu code was already written in Chapter 2, so it is logical to go ahead and implement our menus as early on as possible, so that you learn how to implement menus for your Activity screens. Besides, menus are a part of UI design, right?
Creating a Start-Up Screen: Defining Our RelativeLayout via XML
The first screen (Activity) layout container that we define is our Hello World application start-up screen, which was defined in Chapter 2. The Java code is located in the MainActivity.java and the XML mark-up is in the activity_main.xml, and as it currently exists, it is a RelativeLayout container with a Hello World! text message inside it.
We want to transmute this current start-up screen into an info chart of sorts showing our app end-user current attributes for the World on which the end-user is currently located. We use some Java code and XML mark-up changes (fairly minor ones). When the app first launches this is the Earth object we defined in Chapter 3. We are going to let our users travel between worlds, so we have to make this screen access variable content (rather than fixed text values) right from the get go, making it a bit more difficult. Let’s design our screen output as follows:
Planet Name:            Earth           <planetName instance variable>
Planet Mass:            5,973 YG        <planetMass instance variable>
Planet Gravity:         9.78 m/s        <planetGravity instance variable>
Planet Colonies:        1               <planetColonies instance variable>
Planet Population:      1,000           <planetPopulation instance variable>
Planet Military:        100             <planetMilitary instance variable>
Planet Bases:           1               <planetBases instance variable>
Planet Forcefield:      On              <getForceFieldState() method call>
What this translates into inside our Relative Layout container is eight text fields (on the left) containing eight string constants and eight text fields on the right that access our WorldGen object methods and variables and that can be set via Java code when our user travels to another world.
Even though we cover user interface elements in detail in the next chapter, we will have to cover at least one View subclass (TextView) here to create this Current World Information start-up screen. So let’s click our Eclipse Quick Launch Icon and get started!
Eclipse opens our Hello_World application exactly as we had it configured in Chapters 2 and 3. There should be edit tabs at the top already open for activity_main.xml (res/layout folder), activity_main.xml (res/menu folder), strings.xml (res/values folder), MainActivity.java (src/chapter.two.hello_world folder), and WorldGen.java (src/chapter.two.hello_world folder). Let’s get started by clicking on the strings.xml edit tab.
Creating the String Constants for Our Start-Up Screen
Let’s add our start-up screen info text label constants first, because our TextView widgets in our RelativeLayout container is going to access them. As you can see there are already string constants defined in this XML file for our App name (Hello_World) and Hello_World greeting message, as well as for one menu label (Settings) that we are going to change a bit later on.
Click the editing tab for strings.xml and add in <string> XML tags for the eight world info field labels that we defined earlier in this section. The XML tags should look like this and are also shown in Figure 4-1:
<string name="planet_name_label">Planet Name: </string>
<string name="planet_mass_label">Planet Mass: </string>
<string name="planet_gravity_label">Planet Gravity: </string>
<string name="planet_colonies_label">Planet Colonies: </string>
<string name="planet_population_label">Planet Population: </string>
<string name="planet_military_label">Planet Military: </string>
<string name="planet_bases_label">Planet Bases: </string>
<string name="planet_forcefield_label">Planet Forcefield: </string>

Figure 4-1. Adding our eight start-up screen text constants in the strings.xml file in Eclipse
Note that we have added a space after each semicolon so that our variable data that we will add later on does not touch our label text constant. As programmers we must always be thinking ahead about UX issues such as this.
Adding Text to Our Start-Up Screen UI via <TextView>
Now click the activity_main.xml tab that holds the RelativeLayout XML container, the far left edit tab in Figure 4-1. We don’t need (or want) to center any of these new TextView elements vertically or horizontally, so the first thing we will want to do is to remove those two XML parameters.
Next, let’s add an android:id parameter to the first TextView UI element, right after the opening <TextView> tag. This way once we copy and paste in all of the TextView tags we can identify each of the TextView tags in our RelativeLayout by name, based on how we configure this first one.
This ID is also used so that we can reference each of the UI elements both from Java, as well as in our XML mark-up, and is done using the now familiar android:id XML parameter. The parameter is written like this:
android:id="@+id/textView1"
Finally, change the last parameter in the TextView, android:text to point to @string/planet_name_label that we created previously in our strings.xml file. The completed TextView UI element XML mark-up is shown in Figure 4-2.
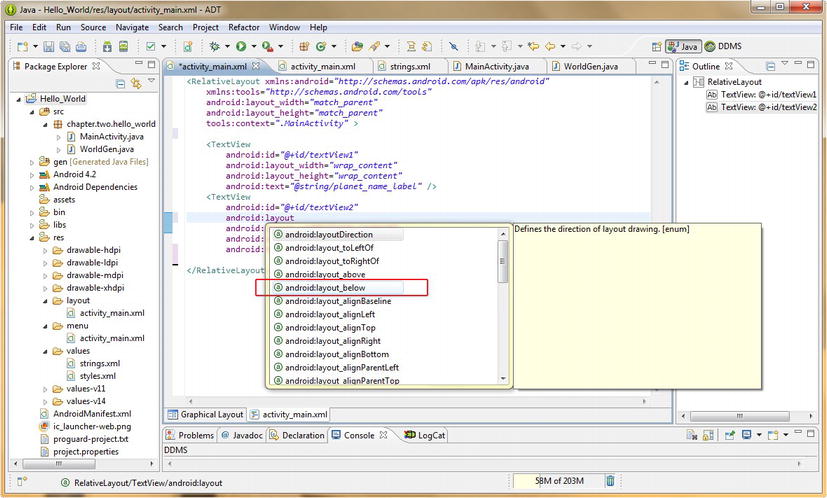
Figure 4-2. Adding TextView XML tag in Eclipse and configuring the Relative Layout Parameter via pop-up dialog
Because there is only one UI element on our Activity screen, there is still no Relative Layout Positioning going on here, so let’s copy and paste this first TextView UI element right underneath itself, so that we have two, and can then explore positioning them relative to each other.
Name the second one textView2 by editing the android:id parameter, as shown in Figure 4-2, and then remember to change the tag’s android:text parameter as well, to point to the planet_mass_label string constant that we defined in the strings.xml file in the values folder earlier.
Next, let’s add our relative positioning parameter by adding a line under the android:id parameter and typing in the word android. Notice that right after you press the colon character that comes after the android part of the parameter name, and before the layout part of the parameter name, you trigger an Eclipse parameter helper dialog, as shown in Figure 4-2.
The XML parameter selector helper dialog always pops up with parameter suggestions, just like we observed in Chapter 2 after we pressed the period key when defining our Java objects.
After you press the colon key, continue typing the word layout and notice that as you type, Eclipse refines the contents of the pop-up helper, based on what it thinks that you are looking for, again shown in Figure 4-2.
After you have finished typing android:layout you then have listed all the possible relative layout parameters that can be used with the RelativeLayout container.
As you can see in Figure 4-2, there are about three dozen of them (there are one dozen showing and because the scroll bar is one-third the length of the height span I am estimating that times three) and you will need to select the fifth one down on this list.
Double-click the android:layout_below parameter to select it for usage (because we want our TextView UI elements to layout below each other). Once this relative layout parameter has been added to the Eclipse XML editing pane, type inside the two quotation characters that are provided to you by the helper utility the @+id/textView1 reference, which is a reference to the first TextView UI element located directly above it.
Note that if you were inside a LinearLayout container, for instance, this parameter pop-up helper dialog would contain parameters that were compatible with the LinearLayout type of Android Layout Container.
Next, we’ll copy and paste six times this second TextView XML construct that we have created using the first TextView XML tag, so that we don’t have to type all the TextView tags and their parameters six more times.
For each of the six copied TextView tags, let’s edit the @string variable in each of the copied TextView tags’ android:text parameter so that they match up with the final (last) six <string> tag constant names that we have defined previously inside our strings.xml file in the values folder.
Finally, let’s edit the android:layout_below parameters for each of the six copied TextView tags, so each points to, or references, the android:id parameter of the TextView UI element that is directly above each of them.
The eight XML tags for our text label constants for our Hello_World app Start-Up screen are now defined inside our activity_main RelativeLayout XML container, and should look like the screen shown in Figure 4-3.

Figure 4-3. Our eight basic TextView XML tags with Relative Layout (layout_below) parameters configured
Note that there are two different ways to close an XML tag. One way is to close each TextView tag with a /> symbol after the tag parameters. This is the way to close a tag that does not have any other tags nested inside of it.
The other way to close an XML tag in the case where there are other tags nested inside of the XML tag, is by closing the opening tag using just a > symbol, and then having the tag name ending with the /> symbol after any nested items inside of that tag. This is the case with our <RelativeLayout> tag here.
We can see these two different tag closing methodologies in action here, in Figure 4-3, with our current Relative Layout tag and the TextView tags that are now nested inside of it.
Now let’s compile and run our Hello_World Android application, to see how our start-up screen looks thus far. Make sure that all the code you wrote is saved (you can use CTRL-S in any tab to Save at any time), and then you can right-click the project folder in the Package Explorer pane on the left, and then select the Run As Android Application menu option.
As you can see in Figure 4-4, the text labels for our start-up screen line up perfectly relative to each other, so our Relative Layout parameters are working well. The only thing we need to do to perfect our User Experience is to move our eight text labels a little bit to the right, so that they are not touching the left edge of the user’s screen.
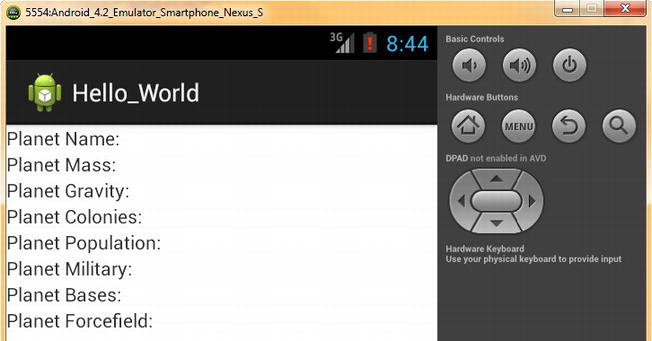
Figure 4-4. Running our RelativeLayout in the Nexus S Emulator, to see how relative positioning works
We’ll do this by using the RelativeLayout container left margin parameter android:layout_marginLeft. This requires we add a single line of XML mark-up to each of our eight TextView tags as follows:
android:layout_marginLeft="5dip"
This moves our text constant labels five device independent pixels (DIP or DP) to the right, creating a straight left margin for our new start-up screen. Add this line of XML mark-up to each TextView, right after the android:id parameter, and then to check your results use the Run As Android App command.
Adding Data to Our Start-Up Screen UI via <TextView>
Now we are ready to add the TextView UI elements that will hold the actual data values for our WorldGen object. We will use some new relative layout parameters that are similar to the ones we just used to complete the left half of this screen’s user interface design.
Again let’s take another shortcut and copy the first TextView tag, rename its ID from textView1 to dataView1 and make some other changes to create our object data variable TextView user interface element tag, as follows:
<TextView
        android:id="@+id/dataView1"
        android:layout_toRightOf="@+id/textView1"
        android:layout_marginLeft="36dip"
        android:layout_width="wrap_content"
        android:layout_height="wrap_content"
        android:text="@string/planet_name_label" />
The first thing we’ve added is an android:layout_toRightOf parameter that tells us that this first TextView UI element that is going to hold our Planet Name variable data value is laid out toRightOf (to the right of) our first Planet Name label constant in our relative layout container.
The second thing that we need to modify is the android:layout_marginLeft parameter, which serves to push the variable data out, away from the label constant. For now, I left the android:text parameter in (we’ll remove it later on in the work process), so that we can line up our variable data in a straight line in the middle of the screen so that it looks professional.
Let’s push out the variable data text (using the Planet name “dummy” text for now) by setting the marginLeft to 36dip, so that it is spaced out a little farther than the longest label constant (Planet Population) on the left side of the screen. This gives us a baseline for lining up the other variable data text UI elements. The XML code is shown in Figure 4-5.

Figure 4-5. Adding our variable data TextView using the android:layout_toRightOf parameter
Now I will show you exactly how I got to this 36 DIP setting value without using the Run As Android App (emulator) a bunch of consecutive times as I refined that parameter, as that work process can be very time consuming!
There is a new feature in the Eclipse XML mark-up editing pane called the Graphical Layout Editor (I often call it the GLE, for short) which can be accessed at the bottom left of the XML editing pane via a small tab, as shown circled in red in Figure 4-6.

Figure 4-6. Using the Eclipse Graphical Layout Editor to preview our Relative Layout parameter settings
Clicking on this GLE tab “renders” the XML code that you have written in a simulation of what the emulator is going to show you when you run that UI Design via your MainActivity Java code. Note that this GLE can also be used to write your XML code for you, using drag-and-drop features that you can see around its perimeter. Because we’re all coders here, I’m going to approach this book strictly from a code writing standpoint, and use this GLE feature primarily as a short-cut for rendering design previews, to save on timely emulator launching cycles during our UI design process.
Again, let’s copy the second TextView tag, rename its ID from textView2 to dataView2 and make some other changes to create our next object data variable TextView user interface element tag, as follows:
<TextView
        android:id="@+id/dataView2"
        android:layout_toRightOf="@+id/textView2"
        android:layout_alignStart="@+id/dataView1"
        android:layout_alignBelow="@+id/dataView1"
        android:layout_width="wrap_content"
        android:layout_height="wrap_content"
        android:text="@string/planet_mass_label" />
We rename the ID to dataView2, make sure that it is toRightOf textView2, set the alignBelow parameter to be below dataView1, and also replace the marginLeft parameter with an android:layout_alignStart parameter.
This new relative layout parameter that we are using aligns the starting (pixel) location of a UI element, and we set it to reference the dataView1 that we just created, so that dataView1 and dataView2 line up perfectly.
For now, we leave the android:text reference set to the same planet mass string that we used in the textView2 tag, although later on we can remove it, as eventually our Java code will set this value, and we will not need it to check alignment (which is why we are leaving it in here for now).
Once we make these changes, shown in Figure 4-7, we can use dataView2 as a template and copy and change it slightly, to create dataViews 3 through 8.
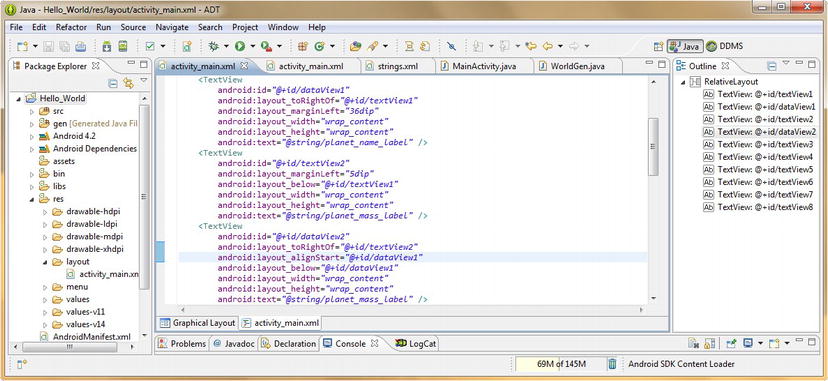
Figure 4-7. Using the android:layout_alignStart parameter to line dataView2 with the left side of dataView1
After we have copied and pasted in TextView tags for dataView3 through dataView8, we can click the Graphical Layout editor tab at the bottom of the screen and see our dummy text variables perfectly aligned, as shown in Figure 4-8.

Figure 4-8. Dummy data text variables lined-up in Graphical Layout view using layout_alignStart parameter
Note that the only relative layout parameter we have any flexibility in changing its value for when we copy it is the android:layout_alignStart parameter. It can be set to reference dataView1 or the data view above it. I used the dataView above it, as it was just easier to add one to each number for each copy of the dataView tag from the previous one that I had copied. That was my work process for copying these dataView tags.
Writing Data into Our Start-Up Screen UI Using Java
Now we need to have our Java code replace these dummy instance variables (this will be done at runtime) with actual object variable data values. This requires that we write a couple of methods in our MainActivity class.
The first method we write will serve to consolidate our onCreate() method, by taking all that object creation code we put in there, back in Chapter 2, and creating a setStartUpWorldValues( ) method to set the values for our initial (default) world object and location in an orderly fashion.
Because we are also writing a setStartUpScreenText( ) method that accesses our earth WorldGen object, we need to move the line of code that creates our WorldGen object up to the top of our MainActivity class, as shown in Figure 4-9, so that all methods inside that class can access it. The line of Java code reads as follows:
WorldGen earth = new WorldGen("Earth", 5973, 9.78);
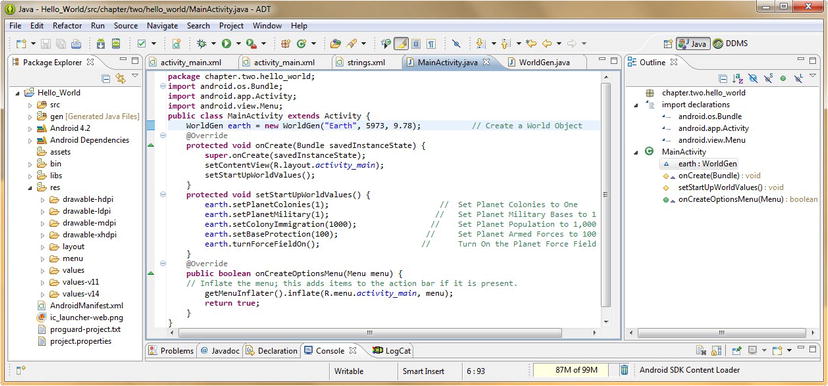
Figure 4-9. Rewriting the WorldGen object creation and configuration code as setStartUpWorldValues( ) method
The rest of the WorldGen method calls that populate our earth WorldGen object with its instance variable data settings now go inside the curly braces for our protected void setStartUpWorldValues( ) method, as shown in Figure 4-9. This method is protected so that other methods in this class (and subclasses), such as onCreate() can access (call) it. It is also declared as void because it performs a task that returns no value. Also note that we’ve copied and aligned our comments along with the code.
Now it’s time to write our second setStartUpScreenText( ) method, which will populate the dataView TextView UI elements with the data from our WorldGen object named earth. This requires two lines of Java code for each dataView TextView object; one to create, name and reference the TextView UI element and a second to set its android:text parameter value to the value of each earth WorldGen object instance variable data field.
To declare and name our first TextView object, we use this line of code:
TextView planetNameValue = (TextView)findViewById(R.id.dataView1);
This declares the object to be of type TextView, names it, and references it to the dataView1 tag that we designed in our activity_main.xml file.
Notice in Figure 4-10 that when we type in the TextView object type, that Eclipse uses a wavy red underline, and when we mouse-over the underlined object type to see why, Eclipse informs us that TextView cannot be resolved to a type and gives us some potential solutions, the most obvious of which is the first Import TextView, because we know from Chapter 2 that we have to import an object class before we utilize it inside of our own code.

Figure 4-10. Coding a setStartUpScreenText( ) method and adding a dataView TextView and its import statement
So click the Import TextView (android.widget package) option, and let Eclipse write our import statement for you, and as you will see in Figure 4-11, it’s now in place and ready for use.

Figure 4-11. Using the Java .setText( ) method call to set our planetNameValue TextView object for dataView1
The second line of code we need to write takes the TextView object we just declared named planetNameValue and uses it to call one of the methods of the TextView class used to set text values. No surprises here, this method is called the setText( ) method. You will notice that after you type in the planetNameValue object name, and type the period character, that Eclipse will bring up its object method selection helper dialog shown in Figure 4-11. Scroll down to the setText(CharSequence text) method listed, and double-click it to add this dot call to this method to your object.
Enter a reference to the earth.planetName object and instance variable data value inside the parentheses for the method call as shown in Figure 4-12. Now let’s code our second two lines of code for the planetMass data.

Figure 4-12. Java code for setStartUpScreenText( ) that populates dataView UI elements with Earth object data
Copy the TextView planetNameValue line of code, and change planetNameValue to planetMassValue and then reference dataView2 instead of dataView1 in the findViewById( ) method call. Then copy the planetNameValue.setText( ) line of code and change the planetNameValue object name to match the planetMassValue object name created in the previous line of Java code.
Because planetMass is an integer data value, we will have to nest a method inside of our .setText( ) method that converts the integer value into a String value. This is done via the .valueOf( ) method of the String class, which is called by nesting the String.valueOf( ) method call like this:
planetMassValue.setText(String.valueOf(earth.planetMass));
This line of Java code nests two method calls, which passes the return value of the String.valueOf(earth.planetMass) method call, which converts the integer value to a String value, over to the planetMassValue.setText( ) method call, which requires a String value as input, all in one very compact (nested) code statement.
The next six lines are all very similar to these two, so let’s take the coder’s shortcut and copy the last two lines of code six times and replace our dataView and planetVariableValue naming conventions accordingly. The result of all this arduous Java coding work is shown in Figure 4-12.
Now let’s run our Hello_World Android application in the Nexus S Emulator and see this start-up screen bear the fruits of our labor. Right-click on the Project folder, and select Run As Android Application and you will see that our XML and Java coding work has produced an impeccable app UI screen that creates a data information screen for the earth WorldGen object that we created earlier and that will serve as the initial Home World for our Hello_World application. This is shown in Figure 4-13.

Figure 4-13. Running the Hello_World app with the dataView TextView UI elements populated with object data
Next, let’s add a menu system to the bottom of our Home (Start-Up) Screen!
Adding a Menu to Our Activity: The Menu Inflater and Menu XML
The first thing that we need to do is to define our start-up screen menu. Menus in Android usually have five or fewer entries, so let’s pick five primary functions that we need to define layout screens (Activities) for later in this chapter. After all, this is the layout design chapter.
Our Hello_World planet generator will need to have screens that allow its users to select a new world, set its attributes, visit that planet (in times of peace), attack that planet (in times of war), and return to the Home (Start-Up) Screen that we’ll call Show Home Planet, in case the user leaves planet Earth, and travels to one of the other planets they create.
Thus, the logical Start-Up (Home) Screen menu selections, along with what Java Activity, XML mark-up filename, and layout container type they would invoke (or call) when the menu item was selected, would be as follows:
Add a New Planet       Call NewActivity.java, activity_new.xml             RelativeLayout
Configure Planet       Call ConfigActivity.java, activity_config.xml       LinearLayout
Travel to Planet       Call TravelActivity.java, activity_travel.xml       FrameLayout
Attack on Planet       Call AttackActivity.java, activity_attack.xml       LinearLayout
Show Home Planet       Stay in MainActivity.java, activity_main.xml        RelativeLayout
Note that we have designed our menu labels to be evenly spaced (the text lines up nicely). This is so that our menu looks as attractive to our end-users as possible, enhancing our application’s user experience or UX.
To add menu items to our MainActivity screen, we will use XML mark-up to define our menu items in a file named activity_main.xml that is located in the menu folder within our res (resources) folder. But, we already have an activity_main.xml file in the layout folder, you are thinking to yourself intelligently. That is correct; however, that file is in the layout folder and thus is a different file than the activity_main.xml file that is also in the menu folder, even though it has the exact same filename.
Each layout container XML definition and menu XML definition for each of your Activity screens should have the same filename, which is really very logical if you think about it for a bit, as each screen (Activity) in your application (if it is an advanced app) will have complex user interface or content elements (layout XML) defined, as well as menu selections (menu XML) defined, for each Activity (functional application area and screen).
Notice that I’m interchanging these screen/Activity terms, at least for a little while, so that you will get used to the lingo of Android. Before we show you how to code separate Activity classes for these screens our menu is going to call, let’s modify the current activity_main.xml file that the New Android Application Project series of dialogs created for us, so that it contains our five menu labels, instead of just the one Settings label.
You should still have the menu folder version of activity_main.xml open in your Eclipse IDE from our work in Chapter 2, if it’s not open in the IDE, simply open the menu folder and right-click the activity_main.xml file and select the Open option from the context-sensitive menu. Then click on that XML edit tab, and copy the <item> tag four more times, to create our five item menu. Before we copy the existing <item> tag, let’s first edit it so it matches up with our first menu item that we designed previously.
Change the android:id from menu_settings to menu_add and the android:title to menu_add_planet and then copy the <item> tag four times underneath the first tag. Change the android:id parameters for menu_add to: menu_config, menu_travel, menu_attack, and menu_home, respectively.
Then change the android:orderInCategory values to: 200, 300, 400 and 500, and android:title parameters to: menu_config_planet, menu_travel_planet, menu_attack_planet, and menu_home_planet, respectively.
Each <item> tag should thus have the same basic format, as follows:
<item android:id="@+id/menu_function"
        android:orderInCategory="Number Value for Order in Menu"
        android:showAsAction="never"
        android:title="@string/menu_string_constant" />
The result of this work process is shown in the final XML menu mark-up in Figure 4-14.

Figure 4-14. Adding our five menu items to the existing activity_main.xml menu definition file in the menu folder
Now we need to add the menu label text constants to our strings.xml file, so click the strings.xml tab at the top of Eclipse next, and edit the tag that is there already for the <string> named menu_settings to turn it into a menu_add_planet <string> tag with the label value: Add a New Planet.
Once you have done that, copy that <string> tag four times, and edit the <string> tags to create four new menu_config_planet, menu_travel_planet, menu_attack_planet and menu_home_planet string constants, as shown in Figure 4-15. Each <string> tag should follow this same basic format:
<string name="menu_add_planet">Add a New Planet</string>
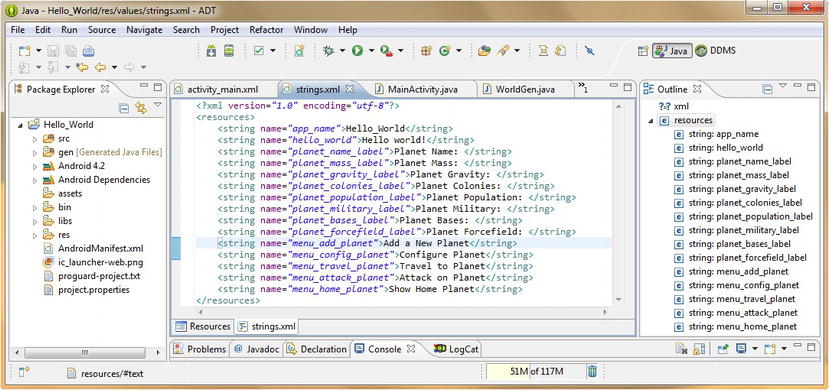
Figure 4-15. Adding our five menu label string constants to the strings.xml file in the values folder
We don’t need to write the Menu Inflater code to create the menu, because the New Android Application Project helper did that for us, however, because we are using it here to create our menu, let’s take a closer look at it now and get that taken care of as well. Here is the Menu Inflater code:
public boolean onCreateOptionsMenu(Menu menu) {
        getMenuInflater().inflate(R.menu.activity_main, menu);
        return true;
}
The onCreateOptionsMenu( ) method is part of the Android Activity class, and it is used to create the options menu for any given Activity. In this particular case, it is our MainActivity subclass of android.app.Activity, which is imported at the top of our MainActivity.java file.
This method passes a Menu object named menu into the method, where it is populated with your menu XML parameters via an inflate( ) method, which references your esourcemenuactivity_main.xml file via the first (inflate from) parameter in the method of R.menu.activity_main and then inflates that data into the second (inflate to object) parameter, which is the menu object declared and passed into the onCreateOptionsMenu( ) method.
The getMenuInflater( ) method calls the inflate( ) method and uses it to populate the MenuInflater object for the Activity. The MenuInflater class is a member of the android.view package (android.view.MenuInflater) and it takes your menu XML definition and instantiates the inflated menu object using those <menu> and <item> tags and their parameters.
Once the getMenuInflater( ).inflate( ) process has been completed without any failures, the onCreateOptionsMenu( ) method exits, and returns a true value, which signifies that a menu resource has been properly implemented.
We can now right-click our project folder and select the Run As Android Application command to compile and run our Java and XML code. Let’s take a look at how our menu looks in action in the emulator shown in Figure 4-16.
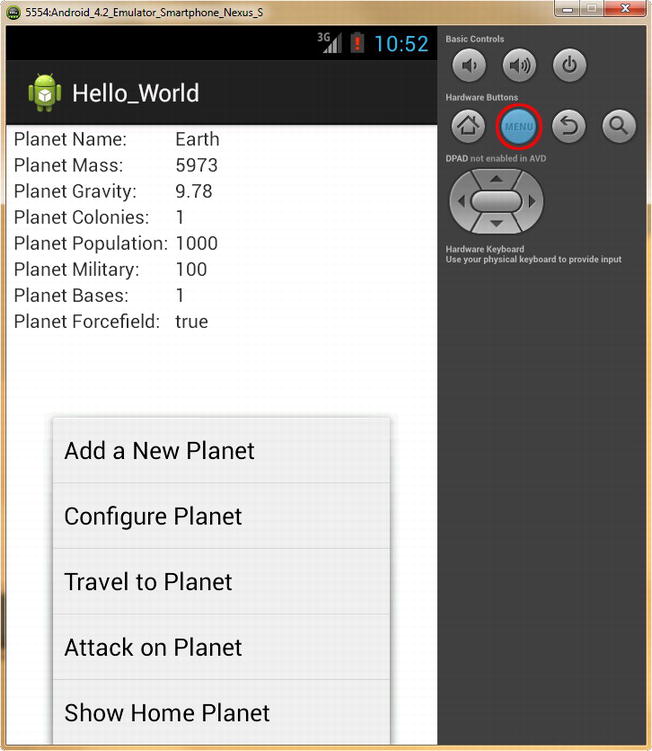
Figure 4-16. Main Activity start-up screen with a functioning menu
Before we can actually implement these menu options in our Java code, we need to create the layout containers (via XML mark-up) and activities (via Java code) for each of them. This is because selecting each of these menu items switches the application into each of these activities.
So let’s create four new Activity Java classes, each with their own custom Layout Container XML definitions, for the first four menu options shown in Figure 4-16 that encompass the major functional areas of our Hello_World Android application.
These new Activities and their layout containers give us plenty of application function screens to work with over the next few chapters in the book, where we will be learning about events, intents, UI widgets, graphics design, and animation in Android.
Defining the Add a New Planet Screen: Creating Android Activities
The first thing we need to do is create a NewPlanet class for our Add a New Planet menu item, so right-click your Hello_World project folder and select the New ![]() Class menu item. We will use the same work process as we did when we created our WorldGen class in Chapter 2, except this time, we will be subclassing the android.app.Activity class, because we are creating an Activity, and not a World Object Generator.
Class menu item. We will use the same work process as we did when we created our WorldGen class in Chapter 2, except this time, we will be subclassing the android.app.Activity class, because we are creating an Activity, and not a World Object Generator.
The primary difference in these two types of classes is that an Activity class does not have a constructor method, whereas a class that generates objects would. This is because Activities are not generated at runtime, and need to be defined in the AndroidManifest.xml file.
In the New Java Class dialog click the Browse . . . button located next to the Package field. Select the chapter.two.hello_world package, and then enter NewPlanet into the Name: field to name our new Activity class. This Activity class is named after what it will allow our end-user to add in a new planet.
Next click the Browse . . . button next to the Superclass field and type Activity (typing just Act gets the same results) to bring up all the Activity-related classes into the selection area.
Select the Activity - android.app package option, and then click the OK button. Leave the other default settings as they are set in the dialog, and click the Finish button. Voila, your NewPlanet.java class is created and opened for editing inside the Eclipse central editing pane area.
Next, we add an onCreate( ) method, and the easiest way to do this is to click the blank line in the new class (between the two curly braces) to select it (it turns light blue) and hold down the Control (Ctrl) key and at the same time press the Spacebar, which is the keystroke sequence needed to bring up the Eclipse ADT method selector helper dialog.
Scroll down halfway in the dialog and find the onCreate(Bundle saveInstanceState) : void method, as shown in Figure 4-17, and double-click that method to add the needed onCreate( ) method into our NewPlanet (class) Activity subclass. Every Activity you create needs to implement an onCreate( ) method so that it can create the Activity in system memory. Once that is accomplished, you can then define an area with which to view your application content, which we will do next.
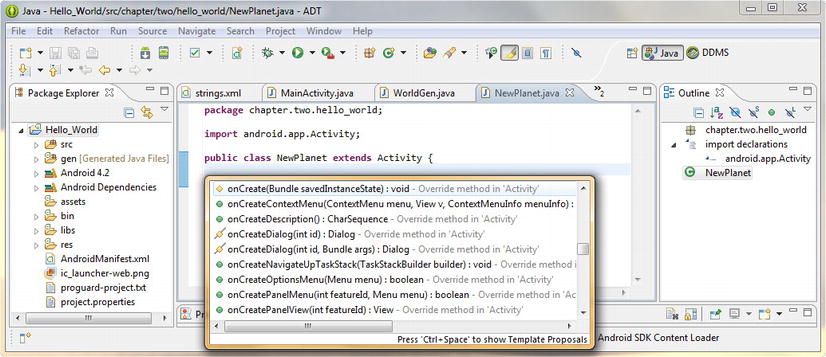
Figure 4-17. The Control-Spacebar keystroke sequence invokes the method selector helper dialog
After the super.onCreate( ) method call, we need to add a line that calls the setContentView( ) method, similar to what is in our MainActivity.java file. In fact, you can take the programmer’s shortcut and cut and paste that line of code, and then modify it to reference the activity_add.xml file that we are going to create next. The code should read as follows:
setContentView(R.layout.activity_add);
Notice that when you do this that Eclipse uses a wavy red underline to flag the activity_add reference, as shown in Figure 4-18, and we already know that this is because the referenced file does not exist yet, so we ignore the error for now, because we are about to create that layout XML file as the next step in this Activity creation work process.

Figure 4-18. Adding the setContentView( ) method call and reference to a not yet created activity_add.xml file
Right-click the Hello_World project folder a second time in the Package Explorer, and then select the New ![]() Android XML File menu option. Select the Layout XML type from the drop-down (if it’s not set that way already) and specify the Hello_World Project. Next add the activity_add file name (first part only, the dialog adds the .xml extension for you) that we are going to use, and select the RelativeLayout layout type from the selection area in the center of the dialog, as shown in Figure 4-19. Then click the Finish button and to create the XML file in the layout folder and opened for you in the central editing pane of Eclipse.
Android XML File menu option. Select the Layout XML type from the drop-down (if it’s not set that way already) and specify the Hello_World Project. Next add the activity_add file name (first part only, the dialog adds the .xml extension for you) that we are going to use, and select the RelativeLayout layout type from the selection area in the center of the dialog, as shown in Figure 4-19. Then click the Finish button and to create the XML file in the layout folder and opened for you in the central editing pane of Eclipse.
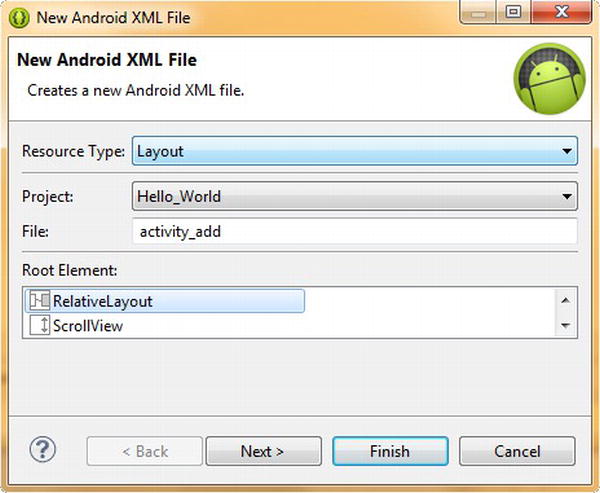
Figure 4-19. Creating a RelativeLayout layout XML file via the New Android XML File dialog
Now let’s add some ImageView user interface elements to the Relative Layout container, so we can later (in the chapter on graphics design) add in some pictures of planets as a visual selection user interface design.
This time we are going to use the Graphical Layout Editor (GLE) to add the first <ImageView> tag, just so that you can see how its drag and drop functions work. Because this is a book for programmers, we are not going to leverage the GLE as much as we would in a book from the Apress Absolute Beginners’ series on how to create Android apps, but you should see how it works, just in case you want to use it in your own work process sometime (other than as an XML code previewing tool or shortcut).
Click the tab to the lower left of the central edit pane and select the Graphical Layout Editor mode. Find and click the Images & Media drawer on the left, so that we can access the ImageViewuser interface elements, or widgets, which we will be learning about in greater detail in future UI Design Chapter 6. Grab the ImageView, as shown in Figure 4-20, and drag it onto the simulated application screen and drop it near the center.

Figure 4-20. Using the Graphical Layout editor pane to create the initial ImageView tag and parameters
Notice that during the drag-and-drop operation that a tool-tip gives you parameter and positioning information in real-time, as you drag your UI element around the screen. Be sure to play around and experiment with this feature, as it is an excellent learning tool to see what parameters are available. After you drop the ImageView UI element, click the XML editing tab (labeled activity_add.xml) at the bottom of the screen and see the XML code that was generated for you. It should look something like this:
<?xml version="1.0" encoding="utf-8"?>
<RelativeLayout xmlns:android="http://schemas.android.com/apk/res/android"
  android:layout_width="match_parent" android:layout_height="match_parent" >
    <ImageView
        android:id="@+id/imageView1"
        android:layout_width="wrap_content"
        android:layout_height="wrap_content"
        android:layout_alignParentLeft="true"
        android:layout_alignParentTop="true"
        android:layout_marginLeft="146dp"
        android:layout_marginTop="164dp"
        android:src="@drawable/ic_launcher" />
</RelativeLayout>
Notice that the ImageView tag is underlined with a wavy yellow line, and if you mouse-over it, it will tell you that you are missing a content description tag, which Android wants to see included to help the disabled. Add a new line and type in android and then a colon and find the android:contentDescription parameter in the dialog that pops up. The XML mark-up should look something like this with a string variable referenced:
android:contentDescription="@string/content_desc_earth"
Next, let’s make a few minor changes to this ImageView tag, before we copy it to create our six world selector UI. Change the android:id to imageEarth, and change marginLeft and marginTop to a 5dp (or 5dip) value. In fact, because both margin values are 5, let’s save ourselves a line of mark-up and simply use android:layout_margin=“5dp” to give us even spacing around our planet images. Notice, for now, that we use the launcher icon in our drawable folder as a placeholder graphic until we create our different world images in the graphic design Chapter 6 a bit later on.
Because we reference content description strings for the sight-impaired in our ImageView tags, let’s add our six planet content description strings next, and get that over with. The format for each <string> tag is
<string name="content_desc_planet">Planet Name</string>
Let’s use the six most common planet names for our string constants: Earth, Mars, Venus, Jupiter, Saturn, and Neptune. See Figure 4-21.

Figure 4-21. Adding the six planet content description string tags to our strings.xml file in the values folder
Now copy the first ImageView tag and paste it underneath, and change the ID to imageMars. Let’s also remove the alignParentLeft and alignParentTop, as these are only needed for the top-left ImageView, to make sure that the alignment for this RelativeLayout starts in the top-left corner of the layout (the Parent container). Next, let’s add an android:align_toRightOf parameter that references the imageEarth ID, because we want the second ImageView aligned right next to (to the right of) the first one. Also change the contentDescription to reference the @string/content_desc_mars.
Copy the second ImageView tag and paste it underneath again. Next change the ID to imageVenus and change the layout_toRightOf parameter to layout_below and reference the imageEarth ID, because we want the third ImageView to be aligned below (underneath) the first ImageView. Also, remember to change the contentDescription tag to reference @string/content_desc_venus.
Copy the third ImageView tag and paste it underneath again. Change the ID to imageJupiter and the layout_below parameter to reference imageMars and add an android:layout_toRightOf parameter referencing imageVenus, so that imageJupiter is below imageMars and to the right of imageVenus. Edit the contentDescription to point to @string/content_desc_jupiter as well.
The first <ImageView> tag aligns itself relative to the parent container and its XML mark-up code would look like the following:
<ImageView android:id="@+id/imageEarth"
        android:layout_width="wrap_content"
        android:layout_height="wrap_content"
        android:layout_alignParentLeft="true"
        android:layout_alignParentTop="true"
        android:layout_margin="5dp"
        android:contentDescription="@string/content_desc_earth"
        android:src="@drawable/ic_launcher" />
Note that once you copy this XML mark-up to create the other needed five <ImageView> tags, that you will have to change certain android:layout parameters to align each ImageView UI element properly, relative to the other UI elements that are around it. This is shown in Figure 4-22.

Figure 4-22. RelativeLayout XML mark-up to define Add a New Planet screen user interface with placeholder graphic
Finally, copy the last two ImageView tags for imageVenus and imageJupiter, and paste them underneath imageJupiter and change their IDs to imageSaturn and imageNeptune respectively. Change their contentDescription references to content_desc_saturn and content_desc_neptune, and their layout_below parameters to reference imageVenus and imageJupiter, respectively. Make sure that the imageNeptune ImageView also has an android:layout_toRightOf parameter, which forces it to align to the right of imageSaturn. The six completed ImageView tags are shown in Figure 4-22.
Defining the Configure Planet Activity: The LinearLayout Container
Next, we are going to create our Configure Planet UI screen, which involves creating another Activity subclass called ConfigActivity.java with a LinearLayout container defined in an activity_config.xml file. Because you have already done this once before I will forego the screenshots and figures as you can reference the previous section for those if needed.
First, right-click the Hello_World project folder and select New ![]() Class and create a Java class for the chapter.two.hello_world package that subclasses android.app.Activity and is named ConfigPlanet. Leave the other default options set and click on Finish.
Class and create a Java class for the chapter.two.hello_world package that subclasses android.app.Activity and is named ConfigPlanet. Leave the other default options set and click on Finish.
Next, add an onCreate( ) method to create the Activity in Android so that it exists. This method is called when you reference (access) the Activity, and creates the Activity in system memory (allocates memory for it at runtime). This is why every Activity needs an onCreate( ) method implemented.
Next, add a setContentView( ) method that references activity_config.xml that we create next to hold our LinearLayout definition, like this:
setContentView(R.layout.activity_config);
Next, right-click the Hello_World project folder again and select the New ![]() Android XML file and create a LinearLayout XML file to define the LinearLayout user interface design. Select resource type: Layout, project: Hello_World, filename: activity_config, and root element: LinearLayout in this dialog (reference Figure 4-19) and click Finish.
Android XML file and create a LinearLayout XML file to define the LinearLayout user interface design. Select resource type: Layout, project: Hello_World, filename: activity_config, and root element: LinearLayout in this dialog (reference Figure 4-19) and click Finish.
Next, add some Button tags inside of our LinearLayout container, so you can see what a LinearLayout does. In a later chapter 5, we’ll wire these up so that they perform the tasks they are supposed to, but for now, we are just going to be concerned with the XML layout file definition. Click on the Graphical Layout Editor tab at the bottom of the XML editing pane (the activity_config.xml tab should be active at the top of the pane), and drag a Button UI element out of the Form Widgets drawer and onto the simulated app screen. Then switch to the XML editing pane and change the android:id value for the Button tag to coloniesButton and then the android:text parameter to reference the @strings/button_name_colonies value which we will create next. This can be seen in Figure 4-23.

Figure 4-23. Filling the LinearLayout with Button UI elements for use with the World Configuration UI screen
Each <Button> tag should have the following parameter mark-up structure:
<Button android:id="@+id/coloniesButton"
        android:layout_width="wrap_content"
        android:layout_height="wrap_content"
        android:text="@string/button_name_colonies" />
Next, copy the Button tag five more times underneath the first tag and edit the ID and Text parameter values to match what each of the button UI elements are going to do. Thus, we change colonies to colonists, bases, military, ffon (forcefield on), and ffoff (forcefield off), respectively.
Next, add six string tags that define the text labels for each button, and which are referenced via the android:text Button tag parameter, like this:
<string name="button_name_colonies">Add Colonies</string>
<string name="button_name_colonists">Add Colonists</string>
<string name="button_name_bases">Add Bases</string>
<string name="button_name_military">Add Military</string>
<string name="button_name_ffon">Forcefield On</string>
<string name="button_name_ffoff">Forcefield Off</string>
I’ll forego the extra screenshot here, but these <string> tags can be seen later in Figure 4-25 (along with the string tags we need to add the attack methods for our AttackPlanet class and Activity subclass).
Next, let’s go ahead and create our TravelPlanet class Activity subclass, as well as a FrameLayout container, so that later we can add digital video of intergalactic travel to the other planets in our application.
Defining a Travel to Planet Activity: The FrameLayout Container
Next, we create our Travel to Planet UI screen, which involves creating another Activity subclass called TravelActivity.java with a FrameLayout container defined in an activity_travel.xml file. Because you have done this before, I’ll skip most of the figures, as you can reference the NewPlanet.java section for those, if you need to, it’s back in the Defining a New Planet Activity Screen section.
First, right-click the Hello_World project folder and select New ![]() Class and create a Java class for the chapter.two.hello_world package that subclasses android.app.Activity and is named TravelPlanet. Leave the other default options set, and then click Finish.
Class and create a Java class for the chapter.two.hello_world package that subclasses android.app.Activity and is named TravelPlanet. Leave the other default options set, and then click Finish.
Next, add an onCreate( ) method to create the Activity in Android so that it exists. This method is called when you reference (access) the Activity, and creates the Activity in system memory (allocates memory for it at run-time). This is why every Activity needs an onCreate( ) method implemented.
Next, add a setContentView( ) method that references activity_travel.xml, which we create next to hold our LinearLayout definition, like this:
setContentView(R.layout.activity_travel);
Next, right-click the Hello_World project folder again, and select the New ![]() Android XML File and create a FrameLayout XML file to use for defining the FrameLayout user interface design. Select resource type: Layout, project: Hello_World, filename: activity_travel, and root element: FrameLayout in this dialog (reference Figure 4-19) and click on Finish.
Android XML File and create a FrameLayout XML file to use for defining the FrameLayout user interface design. Select resource type: Layout, project: Hello_World, filename: activity_travel, and root element: FrameLayout in this dialog (reference Figure 4-19) and click on Finish.
Next, add a VideoView tag inside the FrameLayout container. A FrameLayout is the perfect layout to use with full-screen digital video, as a FrameLayout contains only one single UI element. In a later chapter, we add the digital video assets, but for now, we’re just going to be concerned with our XML layout file definition.
The basic <VideoView> tag XML mark-up is implemented as follows:
<VideoView android:id="@+id/travelVideoView"
                android:layout_width="match_parent"
                android:layout_height="match_parent" />
This <VideoView> XML mark-up is nested inside the <FrameLayout> tag, as shown in Figure 4-24.
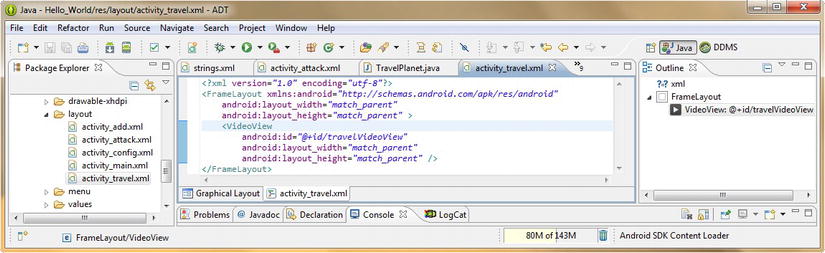
Figure 4-24. Adding a FrameLayout container and VideoView UI element to our activity_travel.xml file in Eclipse
Click the Graphical Layout Editor tab at the bottom of the XML editing pane (the activity_travel.xml tab should now be active at the top of the editing pane), and drag a VideoView UI element out of the Images & Media drawer and onto the simulated app screen.
Next, switch over to the XML editing pane, and change the android:id value for the VideoView tag to travelVideoView. This can be seen in Figure 4.24.
Finally, we add the AttackPlanet.java class Activity subclass, and yet another LinearLayout, which holds ImageButton tags. Now we have a five screen framework set up for our Hello_World application for use during the rest of this book.
Defining the Attack on Planet Activity: Our Second Linear Layout
Next, we create our Attack on Planet UI screen, which involves creating another Activity subclass called AttackActivity.java with a LinearLayout container defined in an activity_attack.xml file. Because you have already gone through this before, I will forego the screenshots and figures, as you can reference the Defining the Add a New Planet Screen section for those, if needed.
First, right-click the Hello_World project folder and select New ![]() Class and create a Java class for the chapter.two.hello_world package that subclasses android.app.Activity and is named AttackPlanet. Leave the other default options set as they are, and click on Finish.
Class and create a Java class for the chapter.two.hello_world package that subclasses android.app.Activity and is named AttackPlanet. Leave the other default options set as they are, and click on Finish.
Next, add an onCreate( ) method to create the Activity in Android so that it exists. This method is called when you reference (access) the Activity, and creates the Activity in system memory (allocates memory for it at runtime). This is why every Activity needs an onCreate( ) method implemented.
Next, add a setContentView( ) method that references: activity_attack.xml, which we create to hold our LinearLayout definition, like this:
setContentView(R.layout.activity_attack);
Next, right-click the Hello_World project folder again and select the New ![]() Android XML File and create a LinearLayout XML file to use for defining the LinearLayout user interface design. Select the resource type: Layout, project: Hello_World, filename: activity_attack, and root element: LinearLayout in this dialog (reference Figure 4-19), and click Finish.
Android XML File and create a LinearLayout XML file to use for defining the LinearLayout user interface design. Select the resource type: Layout, project: Hello_World, filename: activity_attack, and root element: LinearLayout in this dialog (reference Figure 4-19), and click Finish.
Next, add in someImageButton tags inside the LinearLayout container, so we can add some attack icons and features to our Hello_World (or maybe we should we have named it Goodbye_World) Android application.
Note that in a later chapter, we’ll wire these up so that they perform the tasks they are supposed to, but for now, we are just going to be concerned with our XML layout file definition.
Before we add the ImageButton tags, let’s first define the four <string> labels that they will reference. These are shown in Figure 4-25 at the very bottom of the screenshot. They are the last four <string> tags listed in the <resources> parent tag container whose name parameters start with: content_desc.

Figure 4-25. Adding the string tags for our activity_config.xml and activity_attack.xml layout string references
There are four graphical (image or icon) buttons that allow us to initiate four different types of attacks on a planet: Bomb, Invade, Infect, and Laser.
Because graphics in Android (ImageView and ImageButton UI elements) require a Content Description tag to help the visually impaired, let’s add four string constants that reflect these modes of attack in our strings.xml file (values folder) referenced via android:contentDescription, like this:
<string name="content_desc_bomb">Bomb the Planet</string>
<string name="content_desc_invade">Invade the Planet</string>
<string name="content_desc_virus">Infect Planet with Virus</string>
<string name="content_desc_laser">Fire Laser at Planet</string>
Next, click the activity_attack.xml tab at the top and Graphical Layout tab at the bottom, and drag-out an ImageButton UI element (see Images & Media) and select the app launcher icon as a placeholder graphic to use for now. Then go into XML editing mode and change its ID to bombButton and add the string reference @string/content_desc_bomb to point to the string tag just you added. The <ImagButton> mark-up for the tag should look like this:
<ImageButton android:id="@+id/bombButton
             android:layout_width="wrap_content"
             android:layout_height="wrap_content"
             android:contentDescription="@string/content_desc_bomb"
             android:src="@drawable/ic_launcher" />
Copy and paste this three more times below the tag and change the bomb ID reference to invade, infect, and laser as shown in Figure 4-26, and change the contentDescription reference to invade, virus, and laser, respectively.
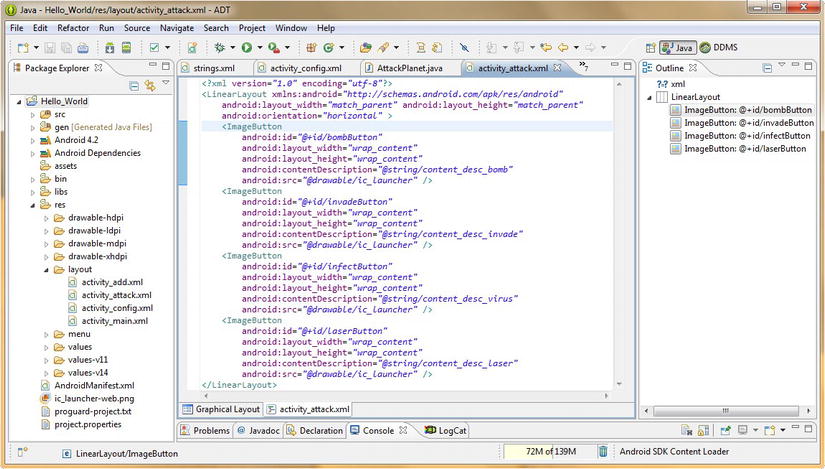
Figure 4-26. LinearLayout XML definition for the activity_attack.xml file for our AttackPlanet.java Activity class
Now that all our Activities and their Layout Containers are defined, the last thing we have to do is to declare these four new Activity screens to the Android OS using <activity> tags in our AndroidManifest.xml file.
Adding our Application Activities to our XML: AndroidManifest.xml
The last thing we need to do to be 100 percent sure that everything that we have done in this chapter compiles and runs cleanly is to add in declarations of our usage of these Activities into the AndroidManifest.xml file. This is done by adding <activity> tags, each of which defines the use of one Activity, as well as provides the Android OS with the name of the Activity via a specific naming convention.
The format for the <activity> tag and required Activity subclass name is
<activity android:name="chapter.two.hello_world.NewPlanet" />
<activity android:name="chapter.two.hello_world.ConfigPlanet" />
<activity android:name="chapter.two.hello_world.TravelPlanet" />
<activity android:name="chapter.two.hello_world.AttackPlanet" />
Here are all four <activity> tags, so you can see what needs to be added to the AndroidManifest.xml file, after the MainActivity class <activity> tag created back in Chapter 2. You can see that the full reference to the class name includes the package and class name.
As you can see in Figure 4-27 our new <activity> tags “throw” no errors or warnings in Eclipse. There was one warning on my android:targetSDKVersion that said it was not the latest version so I changed the value from the 16 API Level Android 4.1.2 JellyBean version that the New Android Application Project helper placed into this <uses-sdk> tag, over to the current 17 API Level Android 4.2.2 Jelly Bean + version. As I mentioned previously, Eclipse ADT can, and will, make some mistakes, which you may need to fix later on!

Figure 4-27. Adding four <activity> tags to Hello_World AndroidManifest.xml file to define each Activity subclass
To be sure that everything we have created in this chapter is in perfect working order (we added lots of impressive Java code and XML mark-up), I’m now going to right-click the Hello_World project folder in the Eclipse Package Explorer, and select the Run As Android Application menu sequence to launch our trusty Nexus S emulator and see whether our application will run.
After a few minutes of loading the emulator and its user interface, and then replacing the previous application screen, this app runs perfectly, and I see the same exact screen that we saw earlier in Figure 4-4.
Sometimes, if the new app version does not appear, you can click the run previous arrow (a left-pointing, swoop-around arrow) in the emulator (on the top-right bank of buttons, in the second row, third button from the left), and it will relaunch the Hello_World app for you (or will at least hurry things up a little bit). Whew! We really got a ton of critical application infrastructure (Activity screens, Functional classes, Layout XML) in place during this chapter. Pat yourself on the back!
Summary
In this chapter, we learned all about Android Layout Containers, including those layout types that are deprecated (no longer in use) and those that have been recently added for API 14 to 17 (Android 4.x) development usage.
We then utilized the three most frequently used Screen Layout Containers that are currently available and recommended for use across all Android API Level (API 3 through 17) Application Development: the RelativeLayout container, the LinearLayout container, and the FrameLayout container.
To practice implementing these mainstream Android screen layout containers using XML mark-up within our ever-evolving Hello_World Android application, we then designed and created four new Activity screens for our application. We then implemented the three different types of Layout Containers inside these four new Android Activity subclasses.
To create all these new application Activity classes, we again used our trusty New ![]() Class menu sequence, to create four Java classes, which we used to support our Layout Containers via Android Activities, which are functional screen areas for an Android application.
Class menu sequence, to create four Java classes, which we used to support our Layout Containers via Android Activities, which are functional screen areas for an Android application.
We named these new Java classes, which subclass the android.app.Activity class, as follows: NewPlanet.java, ConfigPlanet.java, TravelPlanet.java, and AttackPlanet.java. We have now created a handful (five) of our own custom Java classes from scratch, and we’re only in Chapter 4!
We learned how to create an Android Activity subclass and how to implement the necessary onCreate( ) and setContentView( ) methods, which are needed to define the memory and screen areas for each of our Hello_World Activities.
While we were doing all this Java coding and XML mark-up, we were also learning about the Eclipse IDE and how it flags our errors, warns us about conventions that it wants to see implemented, and offers us helper dialogs that make our class, method, and variable selections much easier.
We learned how to use the Graphical Layout Editor (GLE) and how the tabs at the bottom of a the Eclipse central editing pane give us different views of the data, whereas the editing pane tabs at the top of the editing pane allow us to select what code or mark-up we are working with.
Finally, we added several <activity> tags to our AndroidManifest.xml file, so that our four new Activities would be declared for use (and be visible) to the Android operating system. We ran our new app code, and it worked!
In the next chapter, we will start “wiring up” our new Screen Layouts, UI elements, and Activities that we learned about and created in this chapter to our WorldGen class and objects that we created back in Chapter 3. We will use Android Intents and Events, both of which allow Android’s Activities and user interface elements to talk with each other.