
Java for Android Primer: Enhancing Our Hello World Application
In this chapter, we will take the Hello World application that we created in the previous chapter using the New Android Application Project helper, and add in our own Java code to make it much more interesting. At the same time, we are also going to use this chapter to give those readers who are not Java programmers a high-level overview of the various code structures that we will be using in this book via the Java programming language and its objects, variables, methods, classes, packages, modifiers, and so on.
I am going to try and seamlessly meld these two objectives, enhancing our Hello World app and summarizing Java concepts at a high level, into one cohesive chapter that defines the approach and capabilities of Java within the context of our Hello World application. Using Java code, we will add the capability to our Hello World application so it generates new worlds, as well as to colonize and protect them.
Java’s Highest Level: The Application Programming Interface
As with any programming language, the highest level of that language is called the API, or Application Programming Interface, which is the sum-total of the entire programming language itself, in its latest revision, all in one collection or place. As you all know, if you want to develop in any given programming language, you must go and get (and eventually learn) the API for that programming language in order to develop an application under that programming language using its development paradigm.
In this respect, Java is no different than any other programming language. In the rest of this chapter, we’ll discuss the lingo of Java, as well as its various programming constructs, as we did in the previous chapter for the lingo that various modules in Android use. In this way, you will know conceptually what we’re talking about during the remainder of this book.
Organizing the Java API: The Package
Java provides a method of organizing the code in your programming projects into logical modules, or collections of code, called Packages. In the Java programming language, a Package is a collection of Java Classes, which we will learn about in greater detail in the next section of this chapter.
We have already created a package for our Hello_World project in Eclipse, during the New Android Application Project series of helper dialogs that we utilized in Chapter 2. These five dialogs were used to help create our app’s basic Java and XML code foundation for our Hello World application.
Because we created our Hello_World application in Chapter 2 of this book, we logically named our Java package: chapter.two.hello_world and we then declared it at the top of our MainActivity.java file Java code like this:
package chapter.two.hello_world;
Packages are declared at the top of each Java code module that utilizes their classes and methods (more about these soon) contained within those packages. Packages are always declared using Java’s package keyword.
Project package names usually use lowercase characters, and tell the user what the code in the package does. For this reason, we need to use logical package naming conventions that tell other users of our package what it is that the package is, and if possible, what it is that it does.
Note that packages containing functional classes, especially in Android, will sometimes use an uppercase letter on the last name in the package. You will see this often in the Android OS, as classes are named with uppercase letters, such as String, View, Activity, Object, Bundle, and so on.
Our chapter.two.hello_world package that we created earlier in Chapter 2 currently contains one class named MainActivity whose Java source code is located within a file called MainActivity.java located under our project’s source code folder (named src). In this chapter, we will create another all new class from scratch, named WorldGen, which will allow us to create new Worlds (planets) for our Hello World application, while also teaching you the basic Java concepts, just in case you’re not a Java programmer.
As you use more and more of the Android OS features, you will find that package names in Android will always logically reflect what that package is, as well as what it does, and also where that package came from within the Java and the Android OS hierarchy.
Let’s take a closer look at this, for instance, using the Android packages that we have already brought into our Chapter 2 Java code using the Java import statements. These import statements are located in our MainActivity Java code file, just underneath our package declaration statement:
import android.os.Bundle;
import android.app.Activity;
import android.view.Menu;
The import command in Java is used to—you guessed it—import other Java packages. Imported packages are collections of logically bundled-together functional classes that have already been written and tested for you and which are currently available for commercial use within your application.
In the case of Android OS application development, the import statement allows us to use pre-existing Java code (kept in packages) specifically written to support Android OS functionality, which is provided for use within our Android applications, and which we will learn about in much greater detail in this book, as we use more and more of these packages.
One of the most powerful things about Java is that we can import these entire libraries, or packages, of code that have already been written and tested, and then utilize them for our own benefit (even for profit), within our own Android applications, without having to pay nary a penny for that software’s (code) development. It’s a fairly amazing open source software development business proposition, if you think about it.
Let’s take a closer look at those three import statements referencing core Android packages and their classes that were created for us in our MainActivity.java file during the Eclipse ADT New Android Application Project sequence of dialogs that we utilized in Chapter 2.
Reviewing the Java Import Statements
The first one, android.os.Bundle references the Android OS. The middle reference tells us the code is OS related and Bundle in the final part of the package name tells us that this package is a collection of Java classes and methods relating to the Bundle features in Android.
The second import statement, android.app.Activity is also Android related. The second part tell us that it relates to application functionality and the final part of the package name tells us that this package contains a collection of classes and methods that are used to provide the Activity features in Android. This package is an important one, and is used in all Android apps. The next few chapters will focus specifically on Activities.
The final import statement, android.view.Menu is an Android package that relates to the view (screen-related) Android functionality. It supports a large collection of View classes (and subclasses called Widgets, which we will be learning about in the next few chapters). The Android View classes relate to Android View (screen layouts and user interface widgets) features, many of which we’ll be utilizing to enhance our Hello_World user interface design and user experience functionality. But first we need to learn a little bit more about the Java programming language and Java Objects. In this case we are importing the Menu classes and methods from the android.view package so we can implement our menu system.
The Foundation of Java: The Object
Java is an Object Oriented Programming (OOP) Language. Like C++, Java uses programming constructs called objects to model the data and functions used within its programming logic. Java objects are like descriptions of those real-life objects that you see around you in everyday life.
Just like real-life objects you encounter each day, such as automobiles, appliances, computers, buildings, ships, airplanes, and so on, a Java object also features unique attributes and utility (i.e., capabilities that can enhance your everyday life), very similar to those real-life objects that you use each day.
In Java, to “model” or create an object, you will create a Java class that holds that object’s states and behaviors. We’ll learn more about classes in the next section of this chapter, but to understand classes, we must first understand objects, so let’s discuss objects in greater detail here.
The functionality of an object can be described via its behavior; that is, those things that the object can do or perform. Objects gain this functionality via programming constructs called methods, which we will soon learn more about and use in our Hello World app later in this chapter.
Each characteristic of an object can be defined via a state; that is, data that describes an object’s attribute at any given moment in time. Objects gain these attributes via programming constructs called instance variables, which we will learn about and use in our app later in this chapter.
Let’s use our Hello World app as an example, and define some Worlds or Planets, each of will be represented as an object, so that you can see these concepts in action.
First, let’s define some of the attributes or states of our World objects:
- Planet Name—A String data type or text value, for instance, “Earth”
- Planet Mass—An integer value representing Yottagrams; Earth is 5,973 YG
- Planet Gravity—A real or float value for gravity; Earth=9.78 m/s squared
- Planet Colonies—An integer data value, representing a number of colonies
- Planet Population—A 64-bit double value, representing a number of people
- Planet Bases—An integer value, representing the number of military bases
- Planet Military—An integer value, representing the number of military personnel
- Planet Protected—A Boolean value, telling us whether planet forcefield is on
Next, let’s define at least a dozen object behaviors or functions that can be attributed to these new World objects:
- WorldGen—Constructs new Worlds, that is, it generates a new World object
- Set Planet Colonies—Adds any number of new colonies to a planet surface
- Get Planet Colonies—Returns the number of colonies on the planet surface
- Set Planet Military—Adds any number of military bases to planet surface
- Get Planet Military—Returns a number of military bases on planet surface
- Turn ForceField On—Turns on forcefield protecting the planet atmosphere)
- Turn ForceField Off—Turns off forcefield protecting a planet atmosphere
- Get ForceField State—Returns the forcefield status on/true or off/false
- Set Colony Immigration—Adds people into each colony on a planet surface)
- Get Colony Immigration—Return the population currently on planet surface
- Set Base Protection—Adds military to protect Military Bases on a planet
- Get Base Protection—Returns the number of military personnel on a planet
As you can see, these are behaviors or things that each new World object can do, or can change, about its existence and states or characteristics.
As you will also see later on in this book, objects can also contain other objects, in an object hierarchy. This is similar to the folder hierarchy on your system’s hard disk drive, for instance. This allows more complex objects to be built modularly in a more organized and logical fashion.
An example of this concept in our Hello World application example is that WorldGen objects (which we are defining and creating in this chapter) are used with, and add complexity to, the java.lang.Object top-level object, which we will learn more about in the next section of this chapter.
One of the central concepts in Object Oriented Programming (OOP) is the concept of Data Encapsulation, which is where an object’s states or its instance variables can only be changed via its own functions or methods.
The reason for data encapsulation is so that objects are self-contained, and can be created and tested within a vacuum, without being affected by anything else within the overall software package that is being created.
This allows for a modular code development process to be implemented, and is often termed code modularity. Writing code in self-contained code modules allows for bugs and other problems to be isolated more easily, within logically organized functions each developed separately within the overall software development project.
This code modularity lends itself perfectly to maximizing code re-use, and thus allows software development teams to each focus on developing their own modules and functions within the overall software package development process. In this way, everyone’s coding efforts are usable by every other team member, once the code modules are written, tested, debugged, and ultimately are then released for use by all the other team members.
Blueprint for a Java Object: The Class
The primary vehicle in Java for coding the blueprint for a Java object is called the Class, and once a Java Class, or a collection of Classes in the form of a Java Package is released for use, even more complex Classes or Packages can be created using that code via a process called subclassing.
In Java this is an example of the OOP concept called inheritance, where an existing Java class can later be used to create an even more detailed or complicated version of that original class. Other commonly used terms for a subclass are: a child class, a derived class, and an extended class.
The new class that is derived from (or a derivative of) the original class is called the subclass, and the original “parent” class is then termed the superclass. Superclasses can be referenced through their subclasses via the super keyword, which we will see in use throughout this book. Other commonly used terms for a superclass are: parent class or the base class.
This class hierarchy can be seen on the Android developer website at the top of any given Android class description webpage, where a hierarchy of where each Android class originated from is shown, starting with the top level java.lang.Object superclass, and proceeding down through a hierarchy of subclasses, each of which were created to add some additional features and functionality to the superclass above it.
java.lang.Object > Object Subclass > Subclass Subclass > etcetera
So, if you want to see where features have been added to each class level, start at the top at java.lang.Object (where object features originate) and progress down the tree to see what classes were subclassed at each level.
Let’s look at an example of an Android class hierarchy for the Java String data type class. This class originates at the java.lang.Object class, and thus the Android java.lang.String class subclasses from the Object class to add String data type capability to Java and Android. We will use the String data type to define our planetName instance variable for our WorldGen object that we will be creating.
String objects allow an array (collection) of text to be created via the char (character) primitive data type. Thus, String data type objects are really a collection (via an array) of characters (via the char data type), whereas all the other common data types in Java are called primitives or primitive data types. Lowercase string in your code will not represent a String data type to Java, and will be considered an object or variable name, so this is something to be aware of if you are using lots of text.
To summarize, just remember that the top-level java.lang.Object or Java Language Object class is the mother of all Java classes, as it provides the foundation for all Objects in Java, however big or small they might be. Now, let’s move on to learn how to code these Java classes, so that we can use them to spawn or create or instantiate some new Java objects!
Just as a blueprint defines how any given structure will be constructed, so too does a Java class define how an object will be constructed. A Java class is made up of instance variables that hold the object state values, a constructor that constructs each new object, as well as methods that operate on its variables so that the object can have some functionality. It is also important to note that variables defined inside of methods are called local variables, while any variables defined outside of methods but inside of a class structure are called instance variables.
How does one create an object using a class, you might wonder? After the class is coded, which defines the object’s states (instance variables) and its functions (methods), we can utilize that class definition to create an instance of an object. An instance is a single occurrence of that object, and each instantiation or occurrence of that Java object can be a unique and different collection of that particular object’s states or attributes.
Using our Hello World application example from the previous chapter, let’s create a new class that generates new World objects for our existing Hello World application. To declare this class, which we will call WorldGen, we will utilize the following Java syntax:
public class WorldGen { instance variables and methods go between curly brackets }
Just like in any other programming language, the first things that we will want to declare at the top of our Java classes are the instance variables, which we are going to use to hold the attributes or states of our WorldGen objects. In Java, this is done by using the following generalized format:
<data type> then <variable name> then = then <set variable value> then;
So, for object state instance variables that we described in the previous section, we would write the variable description lines of code as follows:
String planetName = "Earth"; (shown only to demonstrate how to set a default value)
int planetMass;
double planetGravity;
int planetColonies;
long planetPopulation;
int planetBases;
int planetMilitary;
boolean planetProtection;
We are using a default value above for the planetName String variable that would apply to planet Earth to show you how to include a default initial value within your class variable declarations. When you include a default value, as it is with any programming language, it is called initializing that variable. Normally, you would declare the variables and set them later via your constructor method, which we will be looking at in the next section.
If you are a programmer (which we are assuming you are), you are already familiar with String (text), integer (non-decimal whole numbers), double (up to 64-bit value real, or decimal, numbers), long (up to 64-bit value high-precision numbers), char and boolean (true/false values) data types.
Now that we have defined our object’s states or instance variables, let’s go ahead and define our object’s behaviors next, using some Java methods.
Defining a Java Object’s Functions: The Method
To define a function or method within your Java class, you would use the following format to name and declare that method in your Java code:
<Modifiers> <Return Data Types> <Method Name> (parameters) {Java code}
Methods generally go after the instance variable declarations in a class (although they don’t absolutely have to, this is simply a convention for better code organization and readability, for other viewers of your code).
For our behaviors or functions that we described earlier, the one WorldGen constructor, and 11 methods, would be declared as follows (we’ll code in their functionality next):
public WorldGen            (String name, int mass, double gravity) {...}
void setPlanetColonies     (int numColonies) {...}
int  getPlanetColonies     () {...}
void setPlanetMilitary     (int numBases) {...}
int  getPlanetMilitary     () {...}
void turnForceFieldOn      () {...}
void turnForceFieldOff     () {...}
boolean getForceFieldState () {...}
void setColonyImmigration  (int numColonists) {...}
long getColonyImmigration  () {...}
void setBaseProtection     (int numForces) {...}
int  getBaseProtection     () {...}
The keyword placed immediately before the method name is called a modifier in Java. Modifiers in Java can be used with classes, methods, or variables. There can be more than one modifier, if needed, to define a class, method, or variable’s characteristics. There are two types of modifiers, access control modifiers, and modifiers which do not define any access control.
There are four levels of access control modification: no modifier (see all the preceding methods, except for the constructor method) where the method or variable is visible to the entire package that it is contained in; the public modifier, which means that any Java class, even classes outside of the package, can use that method or variable; the private modifier, which means that only the class that a method or variable is defined in can use that method or variable; and the protected modifier, which means that the method or variable is visible to the package, as well as to all subclasses which may be created from that class.
There are several other types of modifiers which do not affect access control, such as: static, final, abstract, and synchronized modifiers.
Besides the modifiers, there are also return data types that are declared before a Java method. The void data return type that we are using in so many of our methods signifies that all these methods return no data value back to the calling entity when the void method is called. The other return data types that we are using, int, long, and boolean, return data to the calling entity of that precise primitive data type, respectively.
Now let’s look at adding some functionality to these methods via code that exists inside the curly braces that define the beginning and end of each method. The first WorldGen( ) method is a special type of method called a constructor, and this method code is written as follows:
public WorldGen (String name, int mass, double gravity) {
        planetName = name;
        planetMass = mass;
        planetGravity = gravity;
        planetColonies = 0;
        planetPopulation = 0;
        planetBases = 0;
        planetMilitary = 0;
        planetProtection = false;
}
A Java constructor differs from a method in a number of distinct ways. First of all, it does not use any of the data return types, such as void and int, because it is used to create an object, rather than to perform a function. Indeed, that’s why it’s called a constructor in the first place; because its function is solely to construct or create the new object.
Note that every class that creates Java objects will feature a constructor with the same name as the class itself, so a constructor is the one method type whose name can (and will, always) start with an uppercase letter.
Another difference between a constructor and a method is that constructors cannot have non-access-control modifiers, so be sure not to declare your constructor as: static, final, abstract, or synchronized.
Inside this WorldGen( ) constructor, we take three important parameters for our new planet’s name, mass, and gravity, and set them inside of the constructor method. We will also be initializing the other object instance variables to zero, to create a clean, virgin, unprotected world.
Next, let’s code our other six methods, which perform those functions that modify the state of our world. This provides a number of useful world building capabilities to the users of our Hello_World application.
The first setPlanetColonies( ) method is much simpler than our WorldGen( ) constructor method, and it allows us to add new Colonies to our world object. The Java code for this method is written as follows:
void setPlanetColonies (int numColonies) {
        planetColonies += numColonies;
}
The void data return type that is declared before our setPlanetColonies( ) method name declares what type of value will be returned by this method. In this case, this method does not return any data value at all, so we will declare it as void (or devoid of any data return type or data value).
Also note that our method name begins with a lowercase letter, and uses uppercase letters for words that are internal to the method name. In the computer programming industry, this naming convention is called CamelCase.
Inside our setPlanetColonies( ) method body we will utilize an assignment operator that adds the numColonies integer parameter to the planetColonies instance variable for this object. As programmers, we know that this is a shorthand (fast) way to add the number of colonies parameter passed into the method to the total number of Planet Colonies held in a planetColonies instance variable, which we declared at the head of our WorldGen class.
We’ll do something very similar with the setPlanetMilitary( ) method, which will look like this, once we code it in Eclipse:
void setPlanetMilitary (int numBases) {
        planetBases += numBases;
}
Next, let’s write the turnForceFieldOn( ) and turnForceFieldOff( ) methods, which set the boolean parameter, indicating whether a planet’s protective forcefield is on or off. By default, as we can see from the body of our WorldGen( ) constructor method, we initialize the planetProtection variable to false for a planet when it is initially created (instantiated), so that planets are not initially protected by any forcefield.
void turnForceFieldOn () {
        planetProtection = true;
}
void turnForceFieldOff () {
        planetProtection = false;
}
Now let’s code our setColonyImmigration( ) method, which lets us add Colonists to our World’s Colonies. This method adds the number of Colonists parameter passed over to the method to the planetPopulation count instance variable using the addition assignment operator.
void setColonyImmigration (int numColonists) {
        planetPopulation += numColonists;
}
Finally, let’s code our setBaseProtection( ) method, which lets us add Military Forces to our World’s Military Bases. This method adds the number of forces parameter passed over to it to the planetMilitary count variable using the addition assignment operator.
void setBaseProtection (int numForces) {
        planetMilitary += numForces;
}
Now we are ready to open up our project in Eclipse ADT and create our new WorldGen Java class. We will write all this code that we previously developed into the Eclipse central text editor pane, so we can later use it in our app to create, populate, and protect new worlds.
Coding a Java Class in Eclipse: Creating the WorldGen Class
First we need to fire up Eclipse ADT by clicking the Quick Launch Icon that we set up in Chapter 1, and accept the default workspace folder location for our project, which should be C:/Users/YourName/workspace/ or similar, unless of course you have set it to a different location.
Once Eclipse ADT opens its main IDE window, you will see your Hello World project that we created in Chapter 2. The tabs should still be open for the Java and XML editing panes that we used in Chapter 2.
Because the MainActivity class that we created contains the Java code for starting the app’s Main Activity window (and hence its name), we are going to leverage the modular nature of Java, and create our own separate WorldGen class to generate (spawn) world objects with.
Creating Our New WorldGen Java Class
One of the primary reasons that Java is modular is to allow us to organize code by its logical functionality, so that we can write classes to create our new world objects and have other classes that launch and define our user interfaces and our content Activity screens.
To create a new Java class inside the Eclipse ADT, use the File ![]() New
New ![]() Class menu sequence, which opens up the New Java Class dialog, as shown in Figure 3-1.
Class menu sequence, which opens up the New Java Class dialog, as shown in Figure 3-1.
This New Java Class dialog contains about a dozen fields, checkboxes, and radio buttons that allow us to configure our New Java Class in a similar fashion to what the New Android Application Project dialogs allowed us to do when we configured our new Android application project settings.
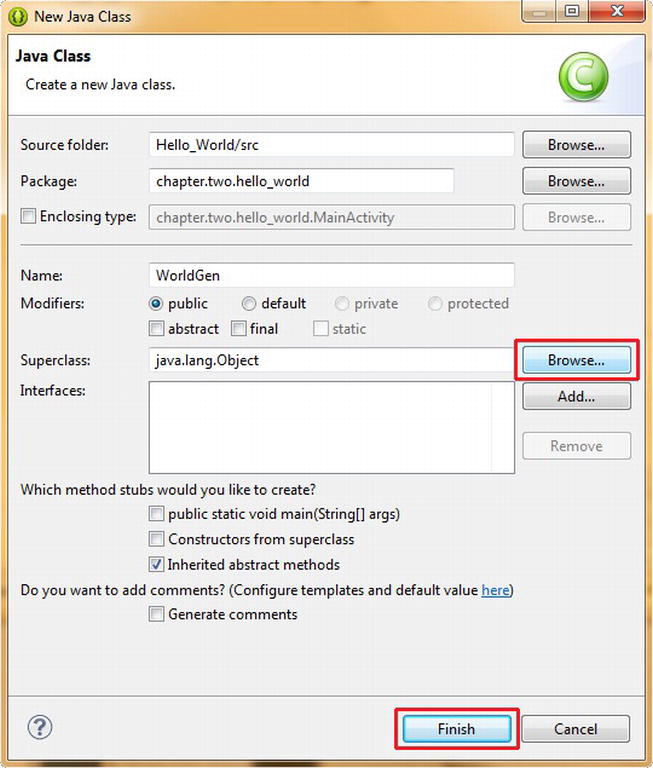
Figure 3-1. Creating our WorldGen class using the New Java Class dialog
When the dialog opens up, you will see that it has populated several of the fields for you automatically; the first two are set correctly, with your package name and the Hello_World source code folder location. The Superclass field is set to your MainActivity class (the dialog will assume that an existing Java class is going to be used as the superclass), and so we will want to set that to the java.lang.Object class instead, because our WorldGen( ) class is going to generate world objects, and not Activities.
First, name your class WorldGen using the Name: field, and then click the Browse . . . button on the right side of the Superclass field, so that we can browse through all the available classes in Android to locate the Java Object class from which we want to subclass our WorldGen class.
This opens the Superclass Selection dialog, where we start typing in the word object in the Choose a type: field at the top of the dialog, as shown in Figure 3-2. After we type in the “o” character, the Matching items: section of the dialog in the center populates, and we can then select (click) the Object item, as shown. Finally, click OK at the bottom, and our java.lang.Object Superclass is defined.

Figure 3-2. Using the Superclass Selection dialog to browse for the java.lang.Object class
After you click OK you are returned to the New Java Class dialog, where you can click Finish to create your new WorldGen( ) Java Class. Eclipse adds the new Java class file, code, and information into all three of its primary panes: the Package Explorer pane on the left, the Code Editing pane in the center, and the Code Outline pane on the right, as shown in Figure 3-3.
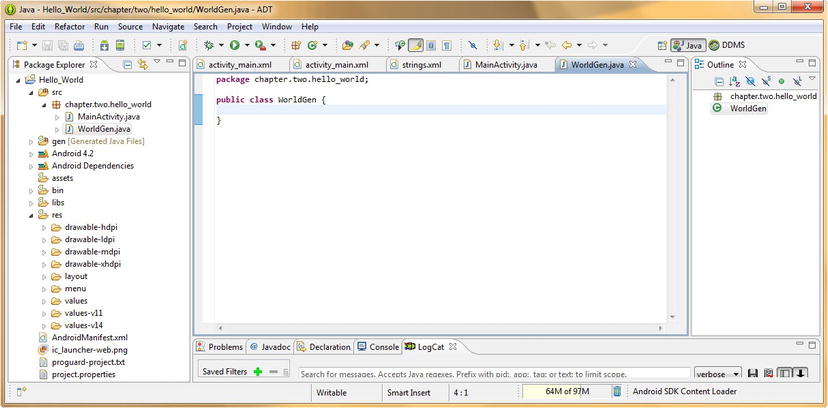
Figure 3-3. Eclipse ADT IDE with empty WorldGen class code structure created via the New Java Class dialog
Notice at the top of the code editing pane that the New Java Class dialog also writes your package Java statement for you, as well as your WorldGen Public Class declaration, which means that we’re ready to add in the Java code that we wrote in the previous section of this chapter.
Note that we made our WorldGen class public, so that any Java class, even Java classes which are not included in our package, could call or invoke our WorldGen object constructor, as well as our WorldGen methods, This allows other Java packages to create new worlds for their apps as well.
We could have also left the public modifier off this class declaration entirely, which would have signified to the Java compiler that only the classes in our chapter.two.hello_world package could generate new worlds. In this particular case, that would have worked just as well for our app, as the MainActivity class is also inside our package. In fact, that might be interesting for you to try as an experiment later on sometime (removing the public modifier) to get some more experience.
Now, let’s type in all the Java code that we created in the previous two sections of this chapter in the Eclipse ADT editing pane in the center of the IDE. Alternatively, as a short-cut you can cut and paste it. Make sure that everything is inside those two curly brackets (also called braces) that define the boundaries of the WorldGen class.
The results are shown in Figure 3-4, and as you can see, Eclipse ADT finds zero errors in our code, and conveniently summarizes all our instance variables, our constructor, and methods in the outline pane on the right.

Figure 3-4. Java code for the WorldGen class entered into the Eclipse ADT Integrated Development Environment
Now that we have written our WorldGen class, we can have code in our other classes utilize the class to create WorldGen (World) objects.
Creating WorldGen Objects Using the WorldGen Class
We’ll do this (for now) inside our MainActivity class, just to show you how it’s done, and then in later chapters, we’ll have this code called via other Java methods and classes, and possibly from some of our new XML user interface elements, such as menus, buttons, text fields, and so on.
Click the MainActivity.java top tab in the Eclipse central editing pane, so that we can switch over to viewing the Java code for our main Activity. We will add in an object declaration using the Java new( ) method, which allows us to create new Java objects.
We will do this in our onCreate( ) method, right after the statements that create our main Activity via the super.onCreate( )method call, and after the setContentView( ) method call, because we will need to have created our Activity, and have set its content view, before we can do anything else.
The format for creating Java objects using a constructor method call is
<Declare Constructor Method> <Object Name> = new <Constructor Method Call>
So, to create a WorldGen object, we declare it (WorldGen), and then name it (earth), and then finally call our constructor method via the new keyword, as shown in Figure 3-5, like this:
WorldGen earth = new WorldGen("Earth", 5973, 9.78);

Figure 3-5. Adding Java code to our MainActivity class to generate a new World object via our WorldGen class
Basically, this line of code should be read like this: I want to declare a WorldGen object named earth and it’s going to be a new object and it needs to use the constructor method called WorldGen with these three parameters (“Earth”, 5973, 9.78) passed over to it, which are defined in its method.
Note in Figure 3-5 that after we type in our code to create the new earth WorldGen object, the word earth is underlined with a wavy yellow line. In Eclipse, this is a warning about that word in the code, and to have Eclipse tell you what it’s warning you about, you can simply place the mouse over the underlined word, and up pops a yellow dialog that tells you what Eclipse thinks the problem is. This also works with the tiny yellow warning icon in the left margin of that line of code.
In this case, the warning reads: The value of the local variable earth is not used and this is because we have just declared it, and have not even had time to use our new earth object yet. So, in this case, we ignore the warning, and type in a second line of code that uses the earth object.
We will do this to show you how an object calls or invokes its methods, but also (just a little bit) we’ll do this to get rid of that pesky little yellow warning icon and wavy underline in Eclipse. On the line right after we create our new earth WorldGen object, let’s use this WorldGen object to invoke one of the WorldGen methods for adding Colonies to our world.
To invoke a method from or on an object, we utilize something called dot notation. In its simplest form, this notation takes the following format:
<Object Name>.<Method Name>(Method Parameter List)
In this case, we will add one new colony to the new WorldGen object earth, via a fairly simple line of Java code, which reads as follows:
earth.setPlanetColonies(1);
As you can see in Figure 3-6, this eliminates the Eclipse warning on the earth object declaration, because that object is now in use, creating new colonies via the setPlanetColonies( ) method. Whew! We now have clean code showing in our IDE. What a relief!

Figure 3-6. Invoking the setPlanetColonies( ) method on our newly created earth WorldGen object in Eclipse ADT
Now let’s utilize the other set attribute related methods to add in the other object configuration settings that will set up our new world with Colonies, Military Bases, Inhabitants, and Soldiers, as well as turning on the forcefield to protect the planet from external attack.
Add a line after the line that sets the planet colonies and type in the object name earth again. Notice that Eclipse underlines the line in red (because it is unused as yet), and that once you press the period character to add the dot notation attachment of a method call, Eclipse opens up a dialog containing all the methods, variables, and other calls that you can make from the earth object via dot notation.
This is shown in Figure 3-7, and is a pretty useful function, as Eclipse is now referencing your own code in its own user interface helper dialogs.

Figure 3-7. Using the Eclipse Object methods Helper Pop-Up to set our other new object characteristics
Find the setPlanetMilitary( ) method in the list, and then double-click it to add it as the next object method call, and then enter a 1 inside of the parameter list parentheses to create (add) a new Military Base for the New World object.
Next, add another line after that one, and again type in the earth object name and a period character and then select the setColonyImmigration( ) method from the pop-up list that appears and set Immigration to 1000 immigrants.
Note that you can also simply type earth.setColonyImmigration(1000); and you can ignore the Eclipse supplied pop-up dialog entirely, as it disappears right after you start to type the method name that you want to reference via the object dot notation.
Next, let’s bring in 100 Soldiers to staff the military base that we earlier added to our world object. On the next line down, type in: earth.setBaseProtection(100); or by type in earth and then a period and select the setBaseProtection method from the dialog.
Finally, add one more line after that, and turn on the planet’s forcefield, using the earth.setForceFieldOn( ); object method call, so that our newly formed planet is now protected on the outside of its atmosphere.
Note that this last method call does not require any parameters to be passed over, so the parentheses are empty, and contain no value. That is because this method is a switch of sorts and simply by calling it, we are flipping the On switch for our planet’s protective forcefield.
Figure 3-8 shows all our new Java code in the MainActivity class for creating our new WorldGen object, as well as for setting its methods in the Eclipse central editing pane (error free) once we’ve typed it all in.
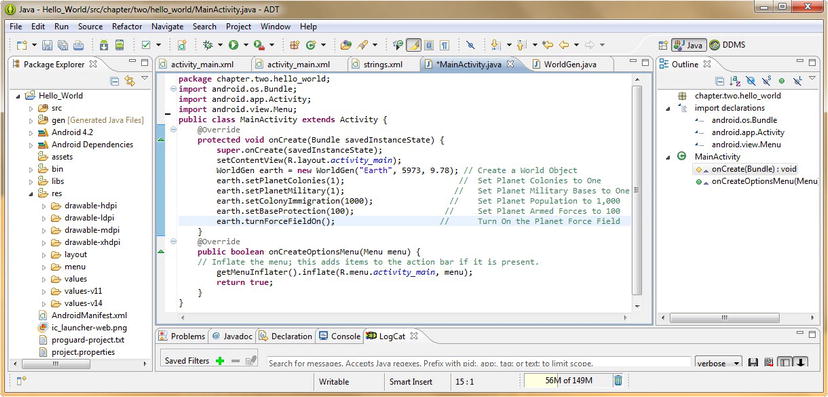
Figure 3-8. Java code in MainActivity.java to create a new WorldGen object named earth and call its set methods
Comments, Warnings and Errors Inside of ADT Eclipse
Note in Figure 3-8 that we have also commented our Java code for creating our new WorldGen object using the double forward slash character sequence.
This is how we add single line comments after each line of code in Java, as you can see in the screen shot in Figure 3-8 of our final object instantiation code.
It is important to try and make your comment text as readable as possible, so try to line up your comments, and clearly separate them from your code. Make your comments as clean and concise as possible, in this way they will benefit other programmers who later try and read your code and decipher what it is that you are doing with it.
It is also important to notice that Eclipse colors your comments green to make them stand out to the viewer. Also notice that Eclipse colors other key Java code for readability as well, such as coloring Java keywords in purple, variable names in blue, and all other code in black.
Warnings are underlined using yellow and potential compiler errors are underlined in red. To see what Eclipse thinks may be wrong, mouse over the underlined text, or click the warning or error icons on either side of that line of code in the main Eclipse code editing central window pane.
Now that we’ve learned about Java objects, classes, methods, and variables, let’s look at one final Java construct called an Interface that allows us to define our Java class for public use and define publicly its methods.
Creating a Java Interface for the Public: The IntWorldGen Interface
The final Java concept that I want to cover in this chapter, even though we are not going to implement it specifically in our Hello World Android application, is that of the Java Public Interface.
Java interfaces have lots of rules, and introduce some new concepts that we have not yet covered in this chapter, such as the abstract and static modifiers, so it’s best to discuss interfaces last. Additionally, we will need to have all our methods coded before we develop public interfaces for any given class, and because we have now completed this, it works out well all the way around. What are interfaces used for, you might wonder.
What a Java Interface Does for Our WorldGen Class
If we were going to release our WorldGen Java class that we created within this chapter in its own package, for all the world to use as their own World Generation Toolkit and for creating their own customized personal Hello World Planet Creation applications, we would then want to define the Java Public Interface for them.
This Java interface would then define precisely how to interface with (what methods to use and how to utilize them) our WorldGen class. We will go ahead and actually do this in this part of the chapter, to show you how this is done, but we will not actually implement (add) these changes to our code that we wrote earlier in this chapter. This is because our WorldGen class was expressly written for our own Hello World Android application use and will not be released to the general public.
If you want to make these changes (make all the methods public, just like the constructor) to the code, and implement this interface, the code will still work, so you can do this as an additional exercise if you want to.
In Java, a public interface to a class is most often used to give users of your class a snapshot of all its methods as well as what types of data values these methods operate on (or with). This is done so that users know what your class methods do, and via what variable data types those things are done. The general format for coding a Java interface is as follows:
<Access Control Modifier List> interface <Interface Name> { ... }
All methods declared within an interface are abstract by definition, that is, they cannot be used directly, but must be subclassed to be used, which is what the abstract modifier signifies.
In a nutshell, abstract classes are classes which are written (meant) to be subclassed, but which cannot be used to create objects directly. To be able to create an object from an abstract class you subclass that abstract class, which makes it into a concrete class (as long as the subclass class is not declared with the abstract modifier before the word class within the subclass’s class declaration). If we made WorldGen abstract like this:
public abstract class WorldGen { ... }
Then to create WorldGen objects we would have to subclass a concrete class from the now abstract WorldGen class, now designed as a WorldGen template:
public class WorldGenPlanets extends WorldGen { ... }
Notice the keyword extends, which is used to subclass WorldGenPlanets from WorldGen. Because there is no abstract modifier in WorldGenPlanets, it is a concrete class and as long as it implements all the WorldGen superclass methods, then it can be used to create WorldGenPlanet objects.
Because all methods declared within an interface are inherently abstract, they do not need to be declared as such using the Java abstract modifier. Similarly, because an interface is intended (again, inherently) to expose these methods to the public, the public access control modifier is also implicitly assumed, and thus also does not have to be explicitly declared.
Finally (no pun intended), all methods declared within a Java interface are inherently declared as final, so the Java final modifier also does not have to be explicitly included. The final modifier makes something, well, final, so that it cannot be modified later, kind of like a lock function.
A variable defined as final is essentially a constant, and is initialized one time only, and it is then fixed from that time onward. Any attempt to modify a final variable in your code triggers a compiler error (or an error notification inside of Eclipse before compile time). Final variables differ from constants in that a constant value is known at compile time, whereas a final variable’s value might not be known at compile time.
Creating a Java Interface for Our WorldGen Class
A quick example of this would be as follows. Say that we had made our planetName, planetMass, and planetGravity instance variables for our WorldGen class set with the final modifier.
If we had set it up this way, then once these variables were set, via any given instance of our WorldGen( ) constructor method, those three instance variables would then be set as final; however, they would not be set as constant values at compile time, but instead they would be set at run-time by each creation of a unique WorldGen object via our public WorldGen( ) constructor method.
A class declared as final cannot be subclassed; examples of Java classes declared as final, so that they cannot be changed, are java.lang.String and java.lang.System. Thus, if we had declared our WorldGen class as:
public final class WorldGen { ... }
Then the code statement we made earlier on this page would not be allowed:
public class WorldGenPlanets extends WorldGen { ... } // This will generate an error!
A method declared as final cannot be overridden (that is, its code cannot be changed, replaced, or enhanced) in any subclass, essentially locking that method and its functionality, so that it cannot be changed later on.
The reason a method might be declared with a final modifier is because it probably contains some critical functionality that should not be changed for any number of reasons, including code stability, function preservation, or consistency maintenance. Needless to say, the final modifier is indeed a useful tool in the Java language for making sure that your code is used properly. In any event, just remember that all methods declared inside of a Java interface are inherently public, abstract, and final.
An interface for WorldGen as it exists currently would be coded like this:
public interface IntWorldGen {
        void setPlanetColonies(int numColonies);
        int  getPlanetColonies();
        void setPlanetMilitary(int numBases);
        int  getPlanetMilitary();
        void turnForceFieldOn();
        void turnForceFieldOff();
        boolean getForceFieldState();
        void setColonyImmigration(int numColonists);
        long getColonyImmigration();
        void setBaseProtection(int numForces);
        int  getBaseProtection();
}
Notice we don’t need a constructor method in an interface definition, only methods are included. You implement a Java interface using this syntax:
public class WorldGen implements IntWorldGen { ... }
The implements keyword carries the constructor method for the class over to the new interface implementation with it, so, in this case, either class name or interface name can be used to create new objects, like this:
IntWorldGen earth = new IntWorldGen("Earth", 5793, 9.78);
Is the same thing as doing this:
WorldGen earth = new WorldGen("Earth", 5793, 9.78);
In other words, once WorldGen implements the IntWorldGen interface, both of these object instantiations will call the WorldGen constructor method.
Summary
In this chapter, we took a closer look at some of the more important Object Oriented Programming (OOP) concepts within the Java programming language. At the same time, to practice implementing these concepts within our Hello_World application code, we applied these concepts to create the WorldGen World Generation Class.
We can use this Java class to take our Hello_World Android application created in Chapter 2 to the next level, once we write some XML mark-up to add in some cool screen layouts, menus, text, buttons, user interface designs, graphic imagery, and animation over the next few chapters.
We first looked at the highest level Java construct, the API or the Application Programming Interface, and then we took a look at the Java Package and how it organizes our project code. We then looked at how packages in Android contain useful Android classes that we may want to import and leverage within our own Hello_World Android application, as well as other applications as we progress through this book.
Next we looked at the concept of the Java object, the foundation of OOP, and a central coding construct within the Java programming language. We learned that Java objects model real-world objects, complete with both attributes (instance variables) and functionality (methods).
The next logical step was for us to look at how we create Java objects using Java classes, which are code constructs that allow us to define instance variables and methods containing local variables.
Drilling down one more level into the class structure we looked at Java methods, and how these methods are created. We wrote a dozen methods, so that we now have a World Generation Toolkit for our Hello_World Android application. I hope you didn’t assume that we were just going to do the run-of-the-mill print “Hello World!” on the screen Hello World app in this book, because we are actually going to do just the opposite and create the most awesome Hello World sample application implementation ever created!
After we learned a bit of Java OOP theory and lingo it was time to fire up Eclipse ADT and actually code our WorldGen class for real. We learned about how Eclipse flags warnings and errors for us in its IDE and how to mouse-over and mouse-click these to find out what Eclipse thinks is wrong with our code. We also learned how to have Eclipse collect our methods and variables for us when we type our object name and then press the period key, as well as how to comment our code for enhanced readability.
Finally, we took a look at Java public interfaces and how they define what methods should we use should we decide to implement an interface for any of our classes, which we will be doing with some of the Android classes later on in this book.
In the next chapter we will start building our screen layouts, menu, and user interface for our Hello_World Android application, but this time we’ll be using XML mark-up code (for the most part) to define these elements.