
Digital Video in Android: Using the VideoView Class
In this chapter, we will take our newfound knowledge of Digital Video concepts, techniques, and formats that we learned in the previous chapter and apply that to actually implement digital video assets in our own Hello_World Android Application.
We will add in new Java code to our TravelPlanet.java Activity subclass to instantiate a MediaController object, so that we can play our video in the VideoView user interface element that we set up in our activity_travel.xml screen layout definition earlier on in this book.
We will cover how to play video that is a different aspect ratio than the source video and how to create and add video transport control user interface elements.
Using Android MediaController Class to Play Video
Because we have already added and configured our VideoView user interface element in our activity_travel.xml file inside of a FrameLayout container, let’s open up our TravelPlanet.java Activity class we created earlier in the book and add the code to actually play our video now that we have the files in the correct resource folder, /res/raw, ready to be played.
The first thing that we need to do to set the stage for playing video is to define a path to where our video files are being stored so that the Android MediaController class can find them, and eventually, play them.
This is done via a Uniform Resource Identifier (URI). URIs are so important in Android development that there is a special class just for defining and utilizing them, called Uri, like the Russian name.
Uri is in the android.net package, since URIs are so often used to access data over the Internet, usually via that HTTP:// moniker we are all used to using. As you will soon see, to access something in Android’s Resource folder, we will be using the android.resource:// path access definition.
The Uri class is a subclass of the java.lang.Object class, so a Uri object path in Java goes through android.net.Uri up through java.lang.Object. You can find out more information about the Uri class if you are interested on the Android Developer website reference section, at the following URL:
http://developer.android.com/reference/android/net/Uri.html
So, let’s define our URI for our digital video file, using the Uri class’s parse( ) method, along with the getpackageName( ) method, which is a part of the Android Context class, which is also subclassed from java.lang.Object.
Creating a Java videoUri Object in the TravelPlanet Activity
Let’s get into adding the code to our TravelPlanet.java Activity class, by adding our first line of Java code that sets up the URI that will be used to reference our video data.
Let’s put the first line of code defining our video’s URI right underneath our Activity’s setContentView(R.layout.activity_travel) method call, which references our Travel to a Planet user interface screen layout definition.
The line of Java code that sets up our Uri object is structured like this:
Uri videoUri = Uri.parse("android.resource://"+getpackageName()+"/"+R.raw.mars270);
This fairly dense line of code defines our Uri object, names it videoUri, and sets it equal to the URI for our mars270.mp4 file, which is located in our /res/raw folder.
It does this via the Uri class .parse( ) method, which is used to construct valid URI objects that the Android OS can understand, and thus implement.
The Uri.parse( ) method outlined here is passed a concatenation (which is done via the Java language + operator) of the location of the file located in android.resource:// with our Hello_World package name and context that is obtained by the getpackageName( ) method, and a path level definer, also known as a forward slash character, and finally, our resource identifier, R.raw.mars270, which is our filename (first part only is used in Android), and the /raw sub-folder, which is under the /res Resource (R) folder.
You can see this line of code in Figure 12-1, its right before the line of code that we already had written in our Activity to define our VideoView.

Figure 12-1. Adding Java code to our TravelPlanet.java Activity to implement MediaController for our VideoView
Because we already have our travelVideo VideoView object defined as well as referenced to our travelVideoView XML user interface element definition, we can use the .setVideoURI( ) method to wire up our newly created videoUri object to our travelVideo VideoView object via the following line of code:
travelVideo.setVideoURI(videoUri);
This is fairly straightforward, we are passing the videoUri object to the travelVideo VideoView object, via its .setVideoURI( ) method, and thereby defining which digital video data file to use for our VideoView as well as where this digital video file is located within our Android project.
Next we need to set up an Android MediaController object to accomplish the digital video file playback, so let’s do that next.
Creating a MediaController Object to Play Our Digital Video
To playback our digital video files in Android we will utilize the Android MediaController class, which is a subclass of Android’s FrameLayout class.
Note that we are using a FrameLayout to contain our VideoView UI element (widget) and remember that the FrameLayout class is subclassed from the ViewGroup class which is itself subclassed from the View class that is subclassed from the java.lang.Object master class.
To create a MediaController object, let’s use our usual object instancing Java code structure, and the new keyword, to create a videoMediaController (named) MediaController object using the following line of Java code:
MediaController videoMediaController = new MediaController(this);
The next thing we have to do is to tell our MediaController object where we want it to play our video. This is done via the .setAnchorView( ) method that defines which Android View object, in this case our VideoView object named travelVideo to which we want to anchor this MediaController object’s functionality. This is accomplished via the following line of Java code:
videoMediaController.setAnchorView(travelVideo);
Now we have told our MediaController object where we want it to play our digital video data, but we still need to tell our travelVideo VideoView object which MediaController object to access to play back the digital video data. This is done via the .setMediaController( ) method, which is called off the travelVideo VideoView object using the following code:
travelVideo.setMediaController(videoMediaController);
Now that our travelVideo VideoView object and videoMediaController object are wired together, all we have to do is call some key methods off our travelVideo VideoView object to control the position (Z-order), Focus, and playback of our digital video data, and we are all done implementing basic video playback inside our Android application.
Controlling Video Playback in Our travelVideo VideoView
Now that our VideoView object and MediaController object are interfaced to each other, we can call some key methods off our travelVideo object to make sure our digital video data is displayed at the front (top) of the screen layer stack, has focus so it can be played, and start the playback.
The first method that we need to invoke, by using dot notation off our travelVideo object, is the .bringToFront( ) method. This ensures that our VideoView is on top of any other user interface elements that may be defined along with the VideoView in its layout container. The Java code to accomplish this looks like this:
travelVideo.bringToFront();
The next thing that we need to do before we start the video playback is to make sure that the VideoView has the Focus, a concept we covered earlier in the book. This is done via the .requestFocus( ) method, which makes sure that the VideoView has Focus by requesting the Focus. In this way, even if the VideoView currently has the Focus, calling this method assures us that we have the focus. This is done via the following line of Java code:
travelVideo.requestFocus();
Finally, we are ready to start the playback of our digital video data, using the .start( ) method, as you may have guessed. This is done via the following line of code called off the travelVideo object via dot notation:
travelVideo.start();
Now it is time to fire up our Nexus S emulator, and test our digital video file playback inside the Android software emulator. Note that it is always better to test digital video file playback on the actual Android hardware devices; however, for this Android book it is not feasible as there are literally thousands of different manufacturers and models out there, which any one of you readers might have.
Because the only baseline that we all have is the latest Eclipse ADT and its various software emulators, we’ll have to use that solution for our tests.
Testing Video Playback in Eclipse ADT’s Nexus S Emulator
Let’s fire up our Nexus S emulator, and when your Hello World Home Screen comes up, click the Menu button in the emulator on the right, and then select the Travel to Planet Activity screen so that we can see our digital video file playback, the result of which is shown in Figure 12-2.

Figure 12-2. Playing the Mars digital video in the Nexus S emulator and testing whether onTouch( ) event still works
As you can see, our digital video retains its 16:9 aspect ratio, even in a 5:3 aspect ratio emulator screen, and when we click the video screen, we are returned to our app Home Screen, with the Going Home Toast message.
So, we now know that our existing Java code from the previous chapters is still working as well. You may have noticed that there is a white strip at the right side of the screen; this is because the background color of the layout container is unconfigured, and defaults to a #FFFFFF or White value. You already know how to change this to a Black color value via the android:background=“#000000” parameter inside of the FrameLayout tag.
You may be wondering: What if I wanted to scale this digital video data to fit the entire display screen? This might be an option, depending on what type of data it is and how sensitive the subject matter would be to uneven scaling, or scaling where the aspect ratio is unlocked.
This planet surface data of Mars that we are using could be scaled without the user detecting a change in the subject material, whereas a full screen face or talking head might look distorted (fat or coneheaded).
There is a way to accomplish this end-result in Android, by putting the VideoView user interface element inside of the RelativeLayout container, instead of using a Framelayout container, which maintains aspect ratio.
The reason that this can be done with the RelativeLayout container and not the FrameLayout container is because these two different layout containers support completely different android:layout parameters.
Scaling a VideoView to Fit a Screen Using a RelativeLayout
Go into your activity_travel.xml file and change the FrameLayout container tag to a RelativeLayout container tag, as shown in Figure 12-3.
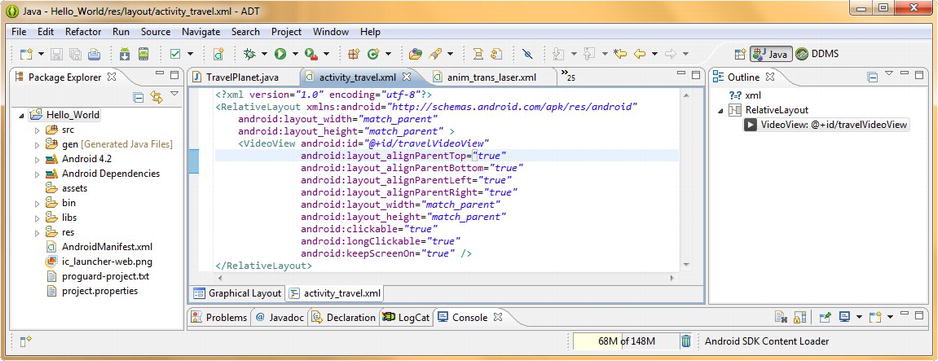
Figure 12-3. Changing our activity_travel.xml screen layout to use Relativelatout container and layout_alignParent tags
The key to making this work in a RelativeLayout container is using the android:layout parameters that align the four different sides of your digital video file with the Parent Container, in this case, a Relative Layout. I have added these four parameters to our VideoView tag, right after the android:id parameter, as shown in Figure 12-3.
The trick is to set all four of the android:layout_alignParent parameters to a value of true, as shown in the following XML mark-up code:
android:layout_alignParentTop="true"
android:layout_alignParentBottom="true"
android:layout_alignParentLeft="true"
android:layout_alignParentRight="true"
This stretches each side of the VideoView container to match the sides of the RelativeLayout container. Because the RelativeLayout tag is set to match_parent in android:layout_width and android:layout_height parameters, the VideoView thus is forced by parameter settings to fill the screen regardless of the correct tendency of Android OS to try to maintain (lock) the digital video aspect ratio. The result is shown in Figure 12-4.

Figure 12-4. Testing our RelativeLayout layout_alignParent tags in Nexus S
Next, we need to test the Travel to a Planet Activity in the Nexus S emulator to be sure everything is working correctly. The digital video plays full screen and touching the screen takes our end-user back to the Home Screen, just as we have coded this functionality earlier in the book.
However there is one significant problem that may not be readily apparent to the Android neophyte, and that is, that touching the video is supposed to bring up the MediaController Transport. A Video Transport is a bank of basic user controls for playing, pausing, or navigating through the digital video content.
Currently, our onTouch( ) event handling is blocking our end-user’s ability to access this Media Controller transport UI element, so, we need to add a Button UI element to our UI and wire it up with an onClick( ) event handler to free up the touchscreen. In this way, Android’s MediaController can display its transport utility when the screen is touched.
Modifying Our UI to Support the MediaController Transport
So, the first thing we need to do is to remove the onTouch( ) Java code, to make sure we can access the MediaController transport controls. The simple way to do this is to use the double forward slash code commenting ability in Java and temporarily comment out this code block, the first line of code looks like this:
// travelVideo.setOnTouchListener(new View.OnTouchListener() {
This is shown in Figure 12-5 along with the other commented code.

Figure 12-5. Remove the onTouch( ) event handling that is interfering with MediaController Transport UI element
As you can see, Eclipse immediately displays warning flags next to the three import statements that are no longer needed, because the commenting of this code has removed it from the “view” of the Eclipse Java compiler.
Because a warning in Eclipse doesn’t prevent us from running our application in the Nexus S emulator, let’s use the familiar Run As Android Application work process, and see if we can get the Media Controller Transport to show up when we touch our video screen.
As you can see in Figure 12-6, we can now access video transport controls, when we touch the screen in our emulator. However, we now have no way to get back to our Home Screen, so we need to add a user interface element to be able to do this. Fortunately, we are only in testing mode in an Android emulator that has a red X close icon in the upper right we can use to exit!
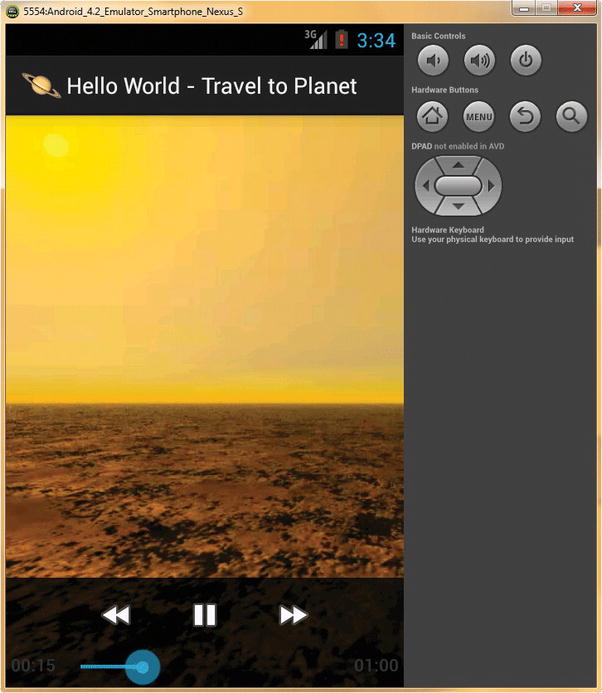
Figure 12-6. Clicking or touching the screen now brings up the MediaController Transport
Next, let’s add a Button user interface element on top of our video at the top right of the screen, which allows our user to exit the Travel to Planet Activity screen and return to our Hello World application Home Screen.
Adding a Button UI Element to Return Us to Home Screen
Find and open your activity_travel.xml editing tab in Eclipse, and add a line of white space under the <VideoView> tag, and then press the < key to invoke the Add a New Tag helper dialog. Find the Button tag, as shown in Figure 12-7, and double-click it to add the tag to the <RelativeLayout> container. Now we’re ready to add parameters to configure our Button tag.
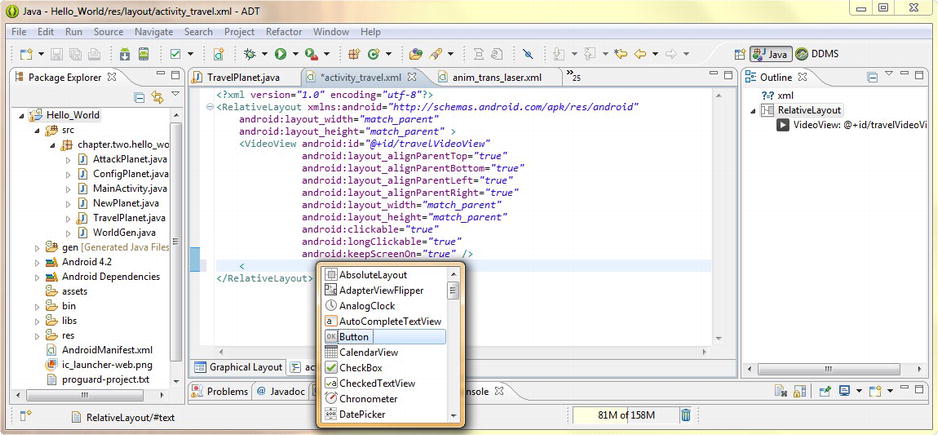
Figure 12-7. Adding a Button user interface element tag to our activity_travel.xml screen layout definition file
First we need to give our Button UI element an ID so that we can reference it in our Java code, so use the android:id parameter and name the button travelButton via the android:id=“@+id/travelButton” parameter mark-up.
Next find your strings.xml file and add a <string> constant for the button named travel_button_caption with a value Return to Home Screen as follows:
<string name="travel_button_caption">Return to Home Screen</string>
Use the android:text parameter to reference this string constant, and also be sure to add the required android:layout_width and android:layout_height parameters, both set to the wrap_content constant value.
Because we want the button at the top right of the screen, out of the way of our video content, let’s use the android:alignParentTop=“true”, as well as the android:alignParentRight=“true” parameters to achieve this end result.
Finally, let’s make our Button background color White and give it a semitransparent alpha value by using an eight character (AARRGGBB) Hexadecimal value for the android:background parameter as follows:
android:background="99FFFFFF"
The XML mark-up for our Button tag so far should look like the following:
<Button android:id="@+id/travelButton"
        android:text="@string/travel_button_caption"
        android:layout_width="wrap_content"
        android:layout_height="wrap_content"
        android:alignParentTop="true"
        android:alignParentRight="true"
        android:background="#99FFFFFF" />
The entire RelativeLayout XML container mark-up is shown in Figure 12-8.
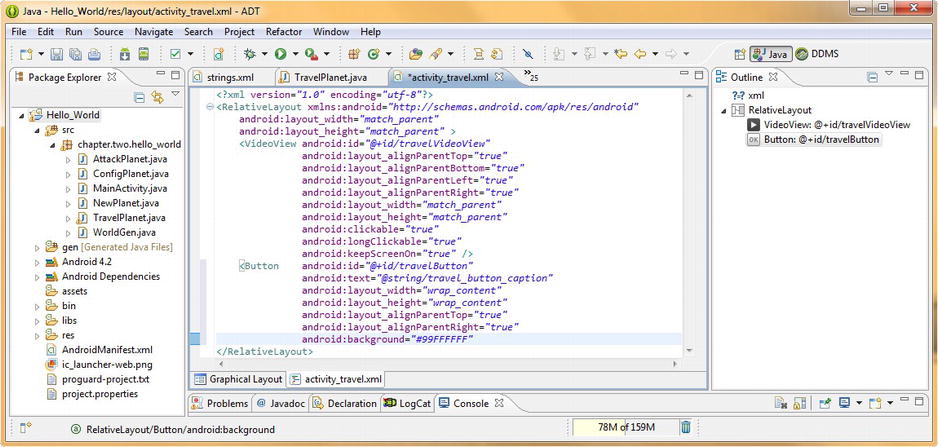
Figure 12-8. Configuring our Button tag parameters to place a UI button on top right of screen and be transparent
Now it’s time to test our application again using the Nexus S emulator and see if we have both a Media Controller Transport UI element, as well as an exit button UI element for our Travel to a Planet Activity screen.
Invoke the Run As Android Application menu sequence and launch the Nexus S emulator. When your application launches, click the Menu button and select the Travel to Planet option, and go to that Activity screen.
As you can see in Figure 12-6 (no need to duplicate screenshots here) the video plays and a click or touch on the screen brings up the transport controls, but the Button UI element is not overlayed on the top-right corner of the video, so something is amiss.
The first thing I did, to see if I could rectify this problem, was to type in android: in the Button tag, to see if I could find a z-order parameter.
A z-order parameter would bring the button to the top of the layer order, so that the button displays on top of the video, like we want it to. Alas, there is no such parameter currently, so we’ll have to figure out another way to get close to the UI results we are looking for with some clever tag parameter work, most likely in both the <Button> and the <VideoView> tags.
Troubleshooting Our VideoView User Interface Design
Let’s take a look at our code and see what can be done to get our top-mounted button visible over the top of our digital video asset. It looks like the android:layout_alignParentTop parameter is pulling the VideoView UI element up to the top of the screen and over the Button UI element.
Because there is no android:z-order parameter available the first thing I tried was to cut and paste the Button tag before the VideoView tag in the RelativeLayout to see whether order in the layout container affected Z-order.
When I tested it in the emulator, not only did this not solve the problem, but it generated a runtime error. I then restored the previous tag order, and looked for another way around this problem. If I can’t put this Button UI element over the top of a VideoView, I will next try to put it directly above, and connected to, the top of the VideoView UI element instead.
The next thing that I tried was to move the android:layout_alignParentTop parameter from the VideoView tag over to the Button tag, and then added an android:layout_below parameter to the VideoView, in the space where I had removed the alignParentTop parameter, so look for the following parameter in <VideoView>:”
android:layout_below="@+id/travelButton"
This is all shown in Figure 12-9.

Figure 12-9. Adding Button tag parameters to place button element at top of screen and center it over VideoView
I then again used my Run As Android Application work process to launch the Nexus S Emulator and see whether that solved the problem, which, as you can see on the left-side of Figure 12-10 it did. However, now our background color and transparency settings don’t match up with the look and feel of our UI.
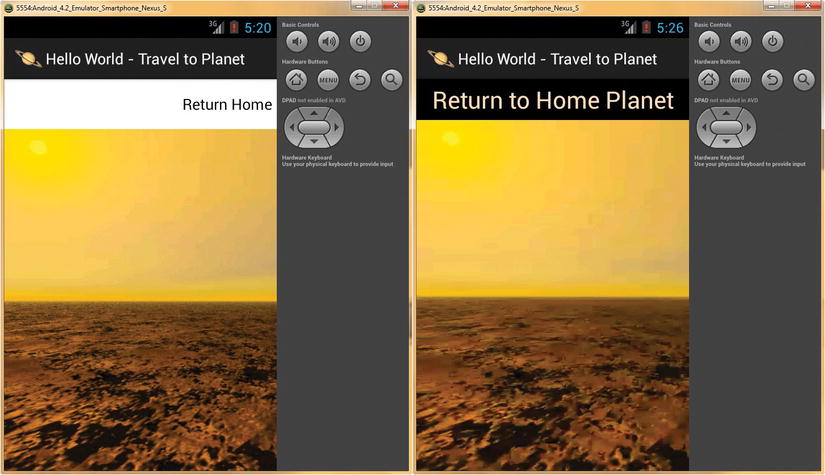
Figure 12-10. Testing and refining our Travel to Planet UI screen Button element over the VideoView UI element
So let’s change our android:background parameter to black or #000000, so that it matches with the other colors used at the top of our application.
Next we need to establish a text color that matches up with our planet Mars atmosphere and provides us with a high level of contrast with the black background color, so let’s use the orange color value #FFDDBB that we used earlier in an android:textColor parameter as shown in Figure 12-9.
Be sure to utilize the Graphical Layout Editor tab, located at the bottom of your XML Editor in Eclipse as you make these changes, so that you can get an idea of what each of these is doing to and for your user interface design. You will notice at this point, for instance, that our text, now that we can actually see it, is actually too small and needs to be larger.
So, let’s add an android:textSize=“28sp” parameter, and make sure our text is nice and large. Remember that text (fonts) use Standard Pixels (SP), as their representation in XML tags, not Density Pixels (DP) as other graphic or user interface elements do. Now we are ready to use our Run As Android Application work process and to check out our new user interface screen in the Nexus emulator. The result is shown on the right side of Figure 12-10, and as you can see our text is now readable and the design matches.
Next, we need to add the Java code to our TravelPlanet.java Activity class so we can instantiate the new Button user interface element thus making it functional, so that our user can click it to return to the Home Screen.
Adding the Return to Home Planet Button to the Java Code
Let’s add a new line of code under our travelVideo.start( ) method call and instantiate our Button user interface element. We’ll name it travelButton and reference it to our XML parameters using the following line of code:
Button travelButton = (Button)findViewById(R.id.travelButton);
Next we’re going to modify the commented-out code in our TravelPlanet.java Activity to change it from a onTouch( ) event handling scenario attached to our VideoView UI element, to an onClick( ) event handling scenario attached to our Button UI element. The commented-out code was shown in Figure 12-5, whereas all the modified code is shown in Figure 12-11.

Figure 12-11. Adding our travelButton Java code to instantiate a button UI element and attach onClick( ) handler
So, change your travelVideo.setOnTouchListener( ) method call a travelButton.setOnClickListener( ) method call, using the following code:
travelButton.setOnClickListener(new View.OnClickListener() {new code goes in here}
The next thing that we need to do is remove the rest of those double slash commenting characters so we can modify the inside of the OnClickListener( ) method, changing our onTouch( ) method and its contents an onClick( ) method instead. The new onClick( ) code should look like the following:
@Override
public void onClick(View v) {
         Toast.makeToast(TravelPlanet.this, "Going Home", Toast.LENGTH_SHORT).show();
         finish();
}
Notice that two of the three warning highlights shown in the Figure 12-5 screenshot have disappeared, now that we have utilized the View and Toast class objects in our new onClick( ) Java code. Because the MotionEvent class is used with the onTouch( ) event handling that we have since removed, you can go ahead and delete this import statement, and your Java code will now be error and warning free, and ready to test in your Nexus S emulator. Use the Run As Android Application menu sequence to run your Hello_World app in the Nexus S emulator, and test the functions, as shown in Figure 12-12.
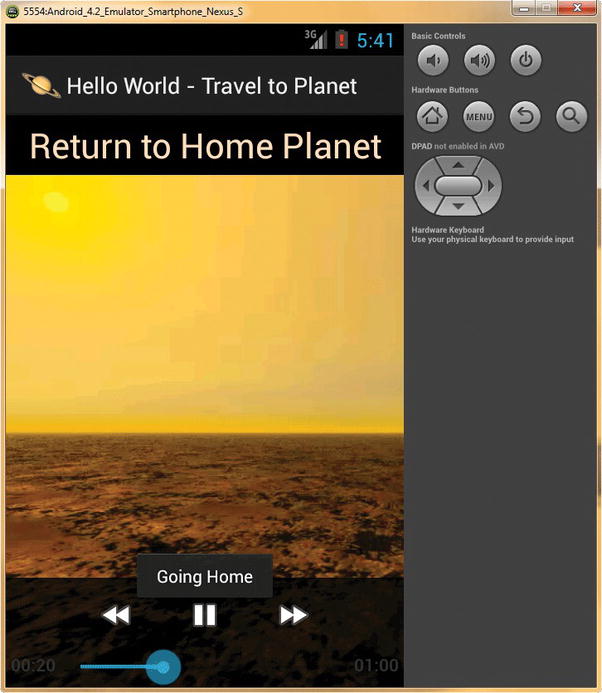
Figure 12-12. Testing our Button user interface element and MediaController transport
The only problem I can see now with the Travel to a Planet Activity user interface screen is a problem (issue) with the User Experience UX Design.
The problem is that the Button UI element we have added at the top of the screen looks like a heading for the screen rather than a Button that can be clicked. This may seem minor to you, but to some users who assume that the top part of the screen is a heading and not a button, this assumption will serve to trap them on this screen with no way to get back to the Home Screen. So let’s fix this one last UX issue, and we’ll be finished here!
Fine-Tuning Our Travel to Planet User Experience Design
To highlight our top-centered Button as being a button and not a caption, we need to put a border around it so that it looks more like a button. The first thing I did was to type in android: inside my Button tag and to look for an android:border parameter in the list of available parameters in the helper dialog. Surprisingly, there was no such option, so I had to instead get creative, and figure something else out that would serve to achieve the same visual end-result. The XML mark-up code is shown in Figure 12-13.

Figure 12-13. Create a Button border effect, using a RelativeLayout background with a Button margin parameter
What I did was to set an android:background=“#FFDDBB” tag parameter for the parent RelativeLayout container. Because our VideoView UI element fills the screen, I can effectively use the background color (which I matched to the android:textColor parameter value) to create a nice border around the button, by also using an android:layout_margin=“4dp” parameter to pull in the black background of the Button UI element enough to let this Relative Layout background color show through, and become a border for my Button!
Now let’s use the Run As Android Application work process, and see whether our button looks and acts more like a button now, instead of a screen caption.
As you can see in Figure 12-14, the button at the top of the Activity user interface screen now looks more like it is a button than a screen caption, and a click on the Button returns the user to the Home Screen, and a click on the digital video shows an Android Media Controller Transport Control Bar, so both are now working perfectly.

Figure 12-14. Testing the Travel to Planet UI Screen and Button with Margin Border
In Chapter 13 we will learn about the other part of video, that is, audio, and how to create, manipulate, compress, encode, optimize, and work with audio for your Android application. After we learn the basic concepts and techniques regarding audio, we’ll start to incorporate it into our app.
Summary
In this chapter covering digital video, we took a closer look at how to incorporate the digital video concepts and assets that we learned about in the previous chapter in our Hello World Android application XML and Java code and user interface and user experience designs.
We learned about the Android MediaController class, which is used to play digital video files in our Android application. We learned how to create a Uniform Resource Identifier object, or URI object, using the Uri class and the Uri.parse( ) method along with the getPackageName( ) method.
Then we wrote the Java code for our TravelPlanet.java Activity class that implemented the MediaController class by instantiating a new object named videoMediaController, and then anchored the MediaController object to the travelVideo VideoView object by using the .setAnchorView( ) method.
We then completed wiring the MediaController to the VideoView by calling the .setMediaController( ) method off our travelView VideoView object using the videoMediaController object reference. Once that was completed, we were ready to set up our digital video playback, using our travelView object.
We called several View class methods to set up our digital video playback, first bringing the View to the forefront, using the .bringToFront( ) method and then making sure it had Focus, by calling the .requestFocus( ) method. Then we started the playback of our MPEG4 digital video file using the .start( ) method and tested our program logic in the Nexus S emulator.
Next, we did some troubleshooting to see why we were not getting the MediaController transport bar on the bottom of our VideoView UI element.
We needed to replace our onTouch( ) event handling with a Button UI element and implement onClick( ) event handling so that our VideoView could trap an onTouch( ) event and bring up the MediaController Transport Control widget.
Finally, we did some fine-tuning to our user interface design, to add some parameters affecting our button coloration, to increase the contrast, and to match the look and feel of the application. We also added a thin border around our Button UI object, so that it did not appear to our end-users as a screen caption, which would have been a user experience design mistake.
In the next chapter, we will learn about the other primary new media genre supported in the Android OS: digital audio. We will learn the core digital audio concepts, design principles, and production techniques behind digital audio, and the file formats and codecs that are used to implement digital audio in our Android Applications. We will learn about the open source audio editing software package Audacity and how to use it to create audio assets for use in our Hello World Android application.