
Building an Android IDE for Version 4.2: Acquiring, Installing, and Configuring an Android Development Environment
The first thing that we need to do before we can learn Android Application Development is to put together a working Android Application Development Environment on our development workstation. Hopefully you have an entry-level quad-core AMD or Intel computer with 4GB or more of DDR memory and Windows 7 or Windows 8; the computer that I will be using for this book is a $398 ACER 64-bit quad-core AMD, running at 3.1GHz with 4GB of DDR3 memory and 1TB hard disk drive and Windows 7 that I picked up at Walmart.
Fortunately for us Android App developers, very powerful 64-bit computers are readily available for a few hundred dollars! If you have a 32-bit computer, that will also work just as well for Android Application Development, because the Android 4.2 Development Environment comes in both 32-bit and 64-bit flavors. Additionally, all the software that we will be using for app development in this book is free for commercial use, also known as open source, so the cost of starting up your own Android Application Software Development business is quite low these days indeed.
If for some reason, you want to use a development environment that predates Android 4.2.2 (which I would strongly recommend against), there is an Appendix at the end of this book that covers the much more involved work process for installing the Android 4.1.2 development environment.
Our Plan of Attack
In this chapter, we will make sure that our system has the very latest versions of the Oracle Java 6 Software Development Kit (Java SDK, also known as the JDK, or Java Development Kit) programming environment, as well as the Android Software Development Environment, which consists of the Google Android Software Development Kit (SDK), Android Development Tools (ADT) Plug-ins for Eclipse, and the Eclipse 4.2 Integrated Development Environment (IDE).
All these installed together at once are cumulatively known as the Android ADT Bundle, which, as of Android 4.2, you can now download all at once, in under 400MB, at the Android Developer website at http://developer.android.com.
Before Android 4.2 Jelly Bean+ (Android API Level 17), developers had to download and install each of these components individually, which was quite tedious. If you want to do it this way, or see what it would be like to have to do it this way (and gain a greater understanding of what is going on between Eclipse and Android SDK and Android ADT) you can see the long-version of the install in Appendix A of this book.
Once our JDK is downloaded and installed, we will then download and install an Android Integrated Development Environment (IDE) called the Android ADT Bundle, the foundation of which is the Eclipse 4.2 Juno for Java EE IDE. Eclipse makes developing Android Apps easier by providing us with a slick Graphical User Interface (GUI) with which we can write, run, test, and debug our Android application code.
Eclipse runs “on top of” the Java Runtime Environment (JRE), because Eclipse is written in Java, and thus it uses the Java Platform to run its own codebase, which makes up the Eclipse IDE user interface and feature set, which you will see (as you progress throughout this book) is quite extensive indeed.
This is the primary reason that we downloaded and installed the Java 6 JDK first, so that the Java SDK and JRE are in place on our workstation. In this way, once we get into installing the ADT Bundle, which is based on Eclipse, Eclipse can easily find the Java Runtime Environment (so that Eclipse can launch and run). Once Eclipse is able to find Java it can use the Java SDK to build the Java programming code foundation for our Android Development Environment, because Android APIs (SDK) are based on the Java 6 APIs (SDK).
Once we have the ADT Bundle downloaded and installed and working smoothly on top of Java 6, we essentially have installed, all in one bundle, the Google Android Software Development Kit (SDK), the Eclipse 4.2.2 IDE, and all the ADT plug-ins needed to develop for Android 4.2.2 API Level 17.
For a bird’s—eye view, if this process were formulated into an equation, it would look something like this:
JDK (Java 6 SDK) + ADT Bundle (Eclipse + Android SDK + ADT Eclipse Plug-Ins) = Custom Android IDE
As part of the Android Bundle installation and configuration for development usage work process (the second major part), we will install some Android Virtual Device (AVD) Emulators, which will live inside Eclipse 4.2, and which will allow us to test our applications on various Android Virtual Devices, such as a Virtual Nexus 7 Tablet, or a Virtual Nexus S Smartphone, or even a Virtual GoogleTV Set. So let’s get started with this process now, so we can get it over with, and start developing apps in the next chapter!
Foundation of Android Programming: Java 6
The foundation of Android Application Development, both from a programming as well as an Integrated Development Environment (IDE) standpoint, is Java 6. Android Applications are written using the Java 6 programming language (and using XML as well, which we’ll get into in more detail in Chapter 2), and Android Apps are developed inside the Eclipse 4.2.2 IDE, which is also written in the Java 6 programming language, and which runs on top of the Java 6 Runtime Environment, also known as the JRE. To put it mildly, the exact order in which you set up the various software components that make up your Android Development Environment is very important, and is the reason for this first chapter.
So that we have both the Java programming language, which we gain access to via the JDK or Java Developer Kit, as well as the Java Runtime Environment (JRE), which is part of the JDK, go to the Oracle TechNetwork and download the latest JDK 6 installation software and install it on your machine. We do this first because Eclipse needs Java to run, that is, Eclipse can be said to run “on top of” the Java platform and language. Android also requires Java, as well as Eclipse, for its Android Developer Tools (ADT) plug-ins, so we install the Java Platform and Java Environment first, then the Android ADT Bundle.
Let’s get started.
Installing the JDK
The first thing we must do is get to the Java SDK download page, and there are two ways to do this; one is generic, one is precise. The generic way, which will always work, even if Oracle changes the location of its Java SDK download page (which it probably won’t), is to use Google Search with the keyword phrase “Java SDK Download”, which should bring up the Oracle TechNetwork Java download URL. The second way is to type the URL for the page directly into the browser. Here is the URL:
http://www.oracle.com/technetwork/java/javase/downloads/index.html
What this points to is the Internet (HTTP) and the Oracle website in their TechNetwork area (folder) in the Java area (sub-folder) for the Java SE or Standard Edition area (sub-sub-folder) in the Downloads area (sub-sub-sub-folder). There are three primary versions of Java: SE or Standard Edition for individual users, EE or Enterprise Edition for large collections of users, and ME or Micro Edition for older mobile flip-phones. Most modern smartphones use Android and Java SE, rather than Java ME. One of the really cool things about Android is that it uses the full Standard Edition of Java (known as Java SE) just like a PC does. This is because Android runs “on top of” a full version of the Linux OS Kernel, so an Android consumer electronics device is essentially a full-blown Linux computer, for all practical purposes.
Once you type in this URL, you arrive at the Java 6 JDK download page, and you need to find the Java 6 JDK download portion of the page, which looks like the (partial) page section shown in Figure 1-1.
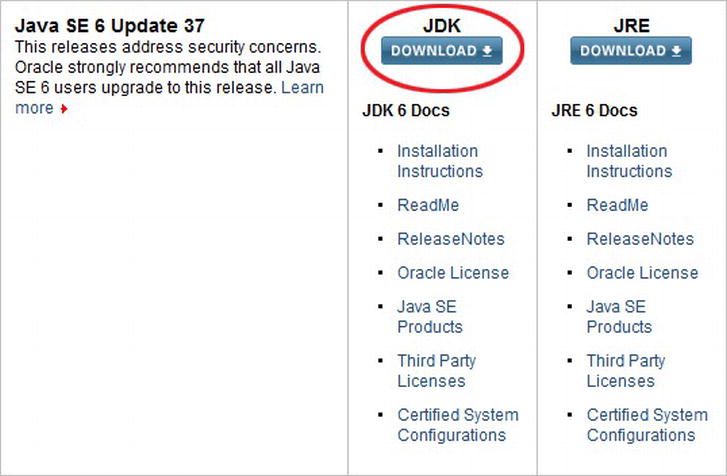
Figure 1-1. The Java SE 6 JDK download section of the Oracle TechNetwork Java SE webpage
Scroll about halfway down the page and click the blue DOWNLOAD button under the JDK (remember, the JDK contains both the JDK and the JRE, so don’t download the JRE at all), as shown in Figure 1-1.
This takes you to the Java 6 JDK download page shown in Figure 1-2, where you first accept the software licensing agreement, and then download either the Windows 32-bit version or the Windows 64-bit version of Java 6.
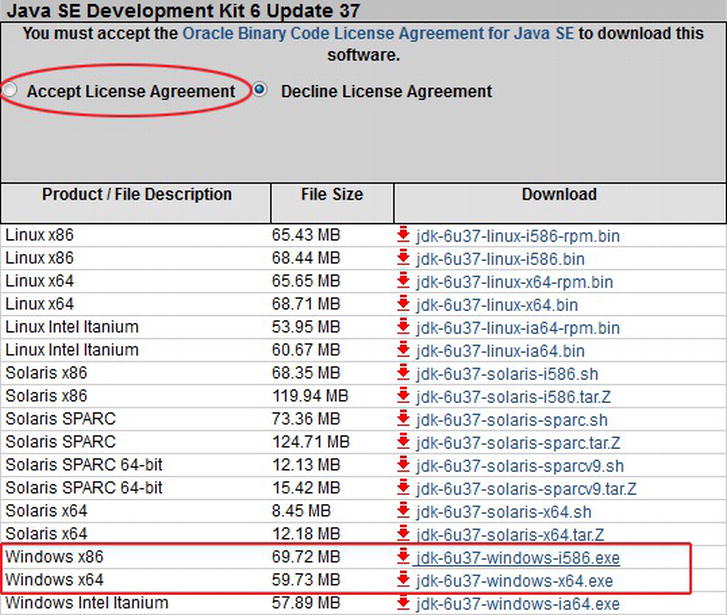
Figure 1-2. Accept the Java 6 License Agreement and download Windows x86 32-bit – or Windows x64 64-bit .exe file
If you are using Linux OS or Solaris OS, you can find 32-bit and 64-bit versions for these operating systems here as well. Note that before you can download the Windows x86 32-bit .exe file or the Windows x64 64-bit .exe file, you must click the radio button selector next to the “Accept License Agreement” option at the top of the webpage section, as shown in Figure 1-2. Once you do this, the download links on the right become bold, and you can click them to download the installation file.
Click the jdk-6u43-windows-i586.exe link (or whatever that latest update revision happens to be) if you have a 32-bit Windows OS such as Windows XP, or the jdk-6u43-windows-x64.exe link (or whatever that latest update revision happens to be) if you have a 64-bit Windows OS such as Windows 7 or Windows 8, and then download the JDK 6 installer file to your Downloads folder on your workstation. Note that you do not need to download both files.
Removing Any Outdated JDKs
Before you install the current Java 6 JDK, you should check your system to make sure that no preexisting (older) versions of Java are already installed on your workstation. This is done in Windows via the Control Panel, which is accessed via the Windows Start Menu. Launch the Control Panel now, and find the icon labeled “Programs and Features” and launch the Programs and Features dialog shown in Figure 1-3.

Figure 1-3. Right-click the existing Java installation, and select Uninstall to remove it from your system
Notice on my workstation that I already have 32-bit Java 6 Update 31 installed. Because I want to install the most recent 64-bit development software possible during this installation process, I am going to uninstall the previous Java 6 Update 31 installation, as well as any older versions of Eclipse and Android (if they exist, which they didn’t on this particular workstation) using the exact same work process.
To do this, you need to select the older version of Java, and then right-click it, and select the Uninstall option, as shown in Figure 1-3. Windows then proceeds to remove the older version(s) of Java (and Eclipse and Android, if needed) from your system.
Next, go into your Downloads folder (or your desktop, or wherever you saved your file download), and double-click the jdk-6u43-windows-i586.exe or the jdk-6u43-windows-x64.exe file to start the Java 6 installation. Accept the default settings for the installation, which should proceed fairly quickly if you have a modern day workstation with a fast hard disk drive and at least 3GB of memory.
Once the Java 6 JDK installation is finished, you will be ready to download and install the Android ADT Bundle. Let’s do that next, so that we have an Android IDE set-up to use for our future Android application development in the rest of the book.
The Android Developer Tools (ADT) Bundle
As of Android 4.2 Jelly Bean, the Android Software Development Kit, or Android SDK, is bundled with the Eclipse IDE and Android Development Tools (ADT) in one large 400MB download called the ADT Bundle.
Downloading the Android ADT IDE
The first thing we must do is get to the Android Developer webpage, and there are again two ways to do this; one generic, the other precise. The generic way, which will always work, even if Google changes the location of its Android Developer webpage (which it probably won’t), is to use Google Search with the keyword phrase “Android Developer Website”, which should bring up the Developer.Android.com website URL. The second way is to type the URL (I suggest that you memorize this URL) for the Android Developer webpage directly into the browser: http://developer.android.com/index.html
.Once you type in the URL, you arrive at the Android Developer website home page, and you need to find the Get the SDK button at the bottom of the page, which looks like the menu shown in Figure 1-4.

Figure 1-4. Selecting the Get the SDK button to go to the Android SDK download page on the Developer.Android.com site
Once you click the Get the SDK button you are taken to the Get the Android SDK page, where you see a large blue button that says: Download the SDK - ADT Bundle for Windows (or it may say for Linux or for Macintosh, if you are currently using those operating systems; the website auto-detects your OS and gives you the proper download link). Click this blue button, as shown in Figure 1-5, to go to the downloads page to get the Android SDK ADT Bundle installer .zip file, which is now available in 32-bit and 64-bit versions.

Figure 1-5. The Download the SDK for Windows ADT Bundle button on the Get the Android SDK page on Developer.Android.com
Once you click the Download the SDK ADT Bundle button, you are taken to the page shown in Figure 1-6 where you can read the licensing agreements for the software packages (Android 4.2.2 SDK, Eclipse 4.2.2, Android Developer Tools, etc.) that you are downloading in the bundled installation.

Figure 1-6. The Agree to Terms and Conditions and Download the SDK ADT Bundle for Windows page on Developer.Android.com
After you click the “I have read and agree with the above terms and conditions” checkbox, and have then selected the radio button for the type of OS (32-bit or 64-bit) that you are running, you can click the Download the SDK ADT Bundle for Windows button and download the appropriate zip file for your OS type.
Because I have a Windows 7 64-bit Quad-Core AMD system, I selected the 64-bit SDK version, which was only recently available as of Android 4.2 API Level 17, also known as Jelly Bean Plus. Before Android 4.2 came out in late November 2012 (over the Thanksgiving holiday believe it or not), Android application developers had no choice but to use a 32-bit development software environment, even if they developed on a 64-bit workstation. So if you like to keep everything 64-bit clean on your 64-bit workstation, you’re in luck! Let’s start the download and get that 400MB file downloading and onto our workstation’s hard disk drive now.
Installing the Android ADT IDE
Once the 400MB download has finished, open your Windows Explorer File Navigation and File Management Utility, and find the .zip file in your system’s Downloads folder. If you can’t find it, put the a partial name of the zip file using wildcard characters in the Search box at the upper right, and select your Computer or C: drive on the left, and Windows Explorer will find the file for you.
Here’s the search string I use: adt-bundle*.zip (an asterisk wildcard expands to fit anything else in filename).
Once you find the adt-bundle-windows zip archive file, right-click it to get a context-sensitive menu of everything that can be done to or with that file, and choose the Extract All . . . option to extract all the files and folders inside of the zip archive onto your hard disk drive. This is shown in Figure 1-7 (circled in red).

Figure 1-7. Right-clicking the adt-bundle zip file in your Downloads folder and selecting the Extract All . . . option
Next you will see an Extract Compressed (Zipped) Folders dialog, asking you to select your destination directory in which to extract the ADT Bundle files and folder hierarchy. As shown in the top dialog in Figure 1-8, the archive extraction utility places the current location of the file into your system Downloads folder as its destination path, which is not surprising, as it really doesn’t know where you want to put these files, so it makes an assumption and puts itself right where the zip file is “standing” currently, so to speak. Let’s change that location, and put the files in a more logical location on our workstation.

Figure 1-8. Changing the extract files destination folder from C:UsersUsernameDownloads to C:adt-bundle-windows
Because we don’t really want our ADT Bundle installed into our Downloads folder (which we use primarily to hold our file downloads), the easiest work process is to move it up to the top or “root” of our C: primary hard disk drive, so let’s click the cursor right in front of the adt-bundle in the filename, and then backspace over the Downloads, (Your User Name Here), and Users sections of the auto-generated pathname.
In this way, you end up with the C: hard drive specifier right in front of the adt-bundle-windows-x86 .zip filename that you just downloaded as your folder name. This installs the ADT Bundle in the Root (top) of your C: drive, on your primary hard disk partition, where you can easily see it and find it anytime that you need to. The resulting path is shown in the lower part of the screen shot in Figure 1-8.
Note that if you wanted to, you could also remove the windows and x86 parts of the folder name and name the folder C:ADT or C:ADT-Bundle if you wanted to, or C:Android_Development_Environment or something similar. Because you are going to find and set-up the Quick Launch Icon for this Application Executable, it doesn’t matter what you call this top-level folder, as long as you can easily locate it.
Once you click the Extract button, you get a small progress dialog, shown in Figure 1-9, which shows you all the 8,740 items (584 megabytes) that are being inflated and copied onto your hard disk drive. After this process is complete, open your Windows Explorer file viewing utility, and find the eclipse.exe, which is the Eclipse 4.2.2 application’s executable file.

Figure 1-9. Extracting the 8,740 files totaling 584MB from the 400MB ADT Bundle zip file
To do this, open the C: drive on the left navigation panel in the Windows Explorer utility, and then look for the adt-bundle-windows-x86 filename that you downloaded, installed, and named, and under that you will find the eclipse folder and its sub-folders, as shown in Figure 1-10. If you used your own custom name, such as ADT_Bundle, then look for whatever name you decided to use for your ADT Bundle folder.
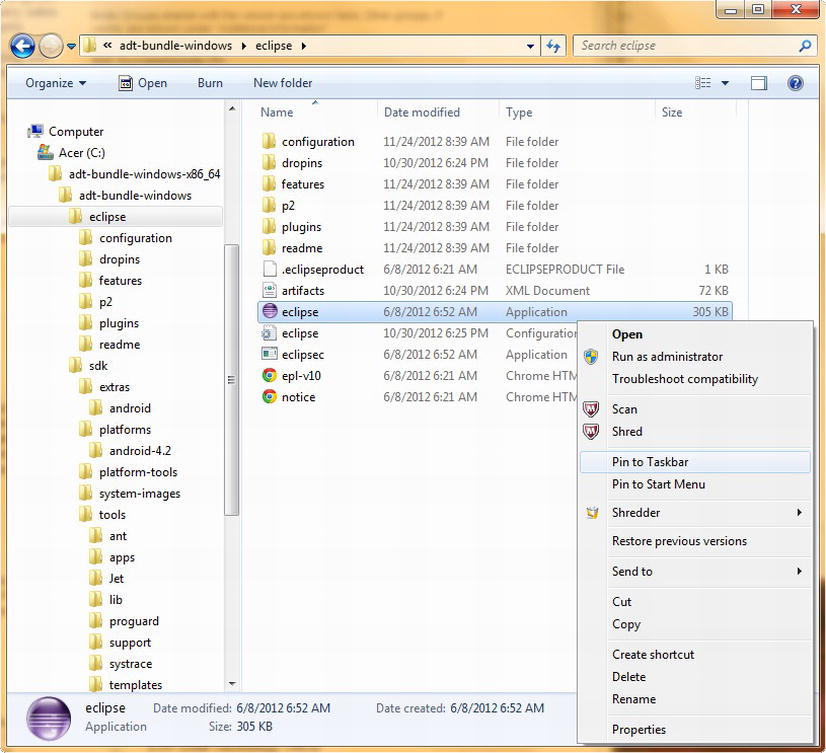
Figure 1-10. Finding the Eclipse Application file in Windows Explorer and right-clicking to invoke the Pin to Taskbar feature
Setting Up a Quick Launch Icon on Your Taskbar
Look for a purple sphere next to the word eclipse with a file type of “application” and that is your Eclipse IDE software executable file. Next, right-click this Eclipse application file to get another context-sensitive menu of commands, and then choose the Pin to Taskbar command in the third section of this menu. This installs Eclipse as a Quick Launch Icon in your Taskbar Program launch area. This work process is also shown in Figure 1-10.
Once you select the Pin to Taskbar command from the right-click menu, the Eclipse 4.2 ADT Bundle purple sphere launch icon appears on your Windows Taskbar. This is usually located at the bottom of the OS screen, but can be docked (via dragging) onto the top, or even the left or the right of the screen. Figure 1-11 shows the Eclipse 4.2 ADT Bundle Launch Icon installed on my Win7 Taskbar along with other professional open source software packages (GIMP, Blender 3D, Audacity, Lightworks, OpenOffice, and Chrome, shown in that order), many of which we’ll be installing later on in this chapter.

Figure 1-11. The Eclipse 4.2 ADT Bundle Launch Icon is shown on the far left side of the Windows Taskbar
Click the Eclipse Quick Launch Icon and make sure Eclipse for ADT fires up; if it does, it means that you have installed Java 6 correctly, and that Eclipse ADT Bundle has successfully found Java, and is using it to run its integrated development environment. The start-up screen is shown in Figure 1-12.

Figure 1-12. Launching the Android Developer Tools version of Eclipse 4.2.2 via your newly installed Quick Launch Icon
It is important to note that as of Android 4.2 Jelly Bean+, that the Eclipse Juno 4.2 start-up screen is now gone, and the new ADT Bundle start-up screen shows that Eclipse is now an integrated part of the 64-bit Android Developer Tools software bundle that we have just installed.
Launching and Configuring the Android Developer Tools IDE
After you launch the Eclipse 4.2 for Android Developer Tools software, the first screen that you see pop up is the Contribute Usage Statistics dialog. You only see this screen the first time you launch the Eclipse ADT Bundle, so select the option that you want for usage statistic sharing now. You can always change your mind (the option chosen) later on, if you like, via the Android ![]() Usage Stats menu sequence.
Usage Stats menu sequence.
I selected the Send Usage Statistics to Google (Yes) option, so that Google can see how I use Eclipse and ADT, and so they can make improvements to the product. You can also select the No option with zero negative repercussions. This dialog is shown in Figure 1-13.

Figure 1-13. Contribute Usage Statistics dialog encountered on initial launch of Eclipse ADT software
Once you make your selection, click the Finish button, and the Eclipse ADT Bundle continues to launch the Android Integrated Development Environment (IDE).
When you launch the Android Developer Tools version of Eclipse 4.2 for the first time, you will see an Android IDE Welcome screen. Everything on that screen we will be covering in the first few chapters of this book, so read it all if you want, and then close it using the X in the right side of the Android IDE Tab at the top. Once you do this, an empty version of the Eclipse IDE then appears, as shown in Figure 1-14.

Figure 1-14. Eclipse 4.2 for ADT on first launch showing empty Package Explorer, Editing, Console, and Outline panes
The first thing that we want to do is to make sure the ADT Bundle that we just installed is completely up to date. We do this via the Help menu, and its Check for Updates command, located near the bottom. Once you have selected this option, you see the dialog shown in Figure 1-15. If there are updated versions of any of the 8,740 files that were installed during your ADT Bundle installation, you will see the Checking for Updates . . . function “fetching” them, and updating the older versions that are on your system currently.

Figure 1-15. Checking for Android software updates online, using the software repositories at Eclipse and Google
Now let’s take a look at how to access the Android SDK portion of the Eclipse ADT Bundle at any time to see what Android API support level is currently installed inside of Eclipse.
The Android SDK Manager Tool
Because we downloaded the Android 4.2 ADT Bundle, we know that this is going to be at least Android 4.2 API Level 17, but let’s now use the Android SDK Manager tool to dive deeper in, and to see what Android SDK support is actually afforded to us. We can access the Android SDK part of the Android IDE at any time via the Eclipse 4.2 Window menu, and its Android SDK Manager option, located in the bottom section of that menu. Clicking this option opens up an Android SDK Manager window, which shows which API Levels (Android OS Versions) we have currently installed (on our system) in our Android IDE. Let’s do that now so that you can see what the ADT Bundle installation actually installed on your PC.
As you can see in Figure 1-16, this includes the Android SDK Tools, the Android SDK Platform Tools, the Android SDK 4.2 Platform, the ARM Processor system image (for testing in the Emulator we’ll be setting up soon), and the Android Support Library. The Android Support Library allows previous versions of Android to be supported, so that we do not necessarily need to download all the other API Levels to support all the hardware devices out there. This is important to note, and is the primary reason why we are only going be to using Android API Level 17 installed during this process in the examples in this book and not download any of the other Android APIs shown in Android SDK Manager at this time.
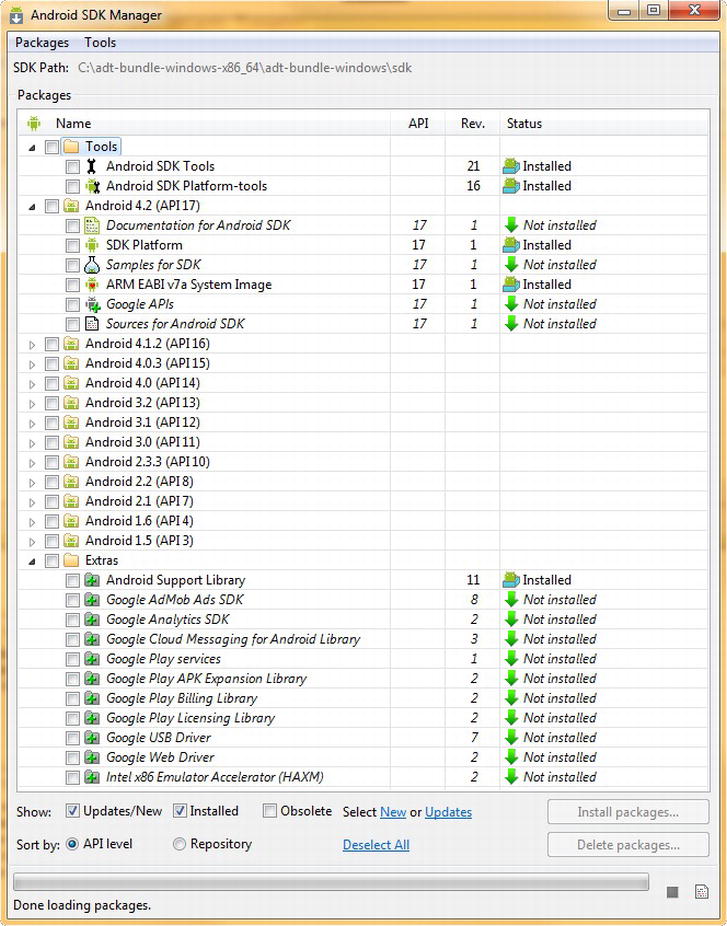
Figure 1-16. Android SDK Manager dialog, showing the libraries and packages installed in the ADT Bundle
In the future, if you absolutely need to develop for other versions of Android, such as 2.3.7 for Amazon Kindle Fire, or 4.0.4 for Amazon Kindle Fire HD, for instance, simply select those Android versions, and click on the Install packages . . . button at the bottom right of the window. I strongly suggest that you do this one API Level at a time, and only for those Android API Levels that you are absolutely sure that you need to develop for, as each involves downloading hundreds of megabytes of files and documentation.
Because we are not going to do anything right now with the Android SDK Manager, click the red X at the top right of the window to close it, and let’s get ready to set-up our emulators for the Android devices for which we are developing. In the next section, we’ll learn how to set up AVD emulators for some of the more popular smartphone, tablet, and GoogleTV consumer electronics devices.
Configuring Android Virtual Devices (AVDs)
The last step in the process to get your Android Development Environment ready for the rest of this book is to set up your Android Virtual Devices (AVDs). An AVD is an emulator that mimics an Android smartphone, tablet, e-reader, iTV Set (GoogleTV) or set-top box consumer electronics product and allows you to test your Android Apps on your workstation.
Having an emulator is desirable because the work process of constantly uploading your application onto an actual physical Android device (hardware) is much more tedious than right-clicking your project and selecting Run As Android Application. That’s not to say that you shouldn’t test your app out once in a while on a real Android hardware device, but the AVD allows you to test as you develop, and with much greater speed and frequency. In this section, we’ll create three such devices: a Nexus 7 tablet, a Nexus S smartphone, and an Android iTV Set.
Because you are already in Eclipse, go into the Window menu, and select the Android Virtual Device Manager option near the bottom. This opens up the Android Virtual Device Manager dialog, which lists your AVDs. You currently have no AVDs set-up, and it says: No AVD available within the central area of the dialog, as shown in Figure 1-17.

Figure 1-17. Android Virtual Device Manager dialog—click the New . . . button to add an AVD
To add a new AVD to your Eclipse environment, click the New . . . button at the top right of the dialog, and open the Create a New Android Virtual Device (AVD) dialog.
Creating Your Nexus 7 Tablet Emulator
The first thing that we want to do is to name our emulator, so enter: Android_4.2_Emulator_Nexus_7 in the Name: field, as shown in Figure 1-18. In the Device: field, use the drop-down menu (via the down arrow) to select the Nexus 7 Tablet option. Then select the Target: for the emulator, which is the API Level for the emulator, which is Android 4.2, or API Level 17, which is the current latest revision of the Android OS.
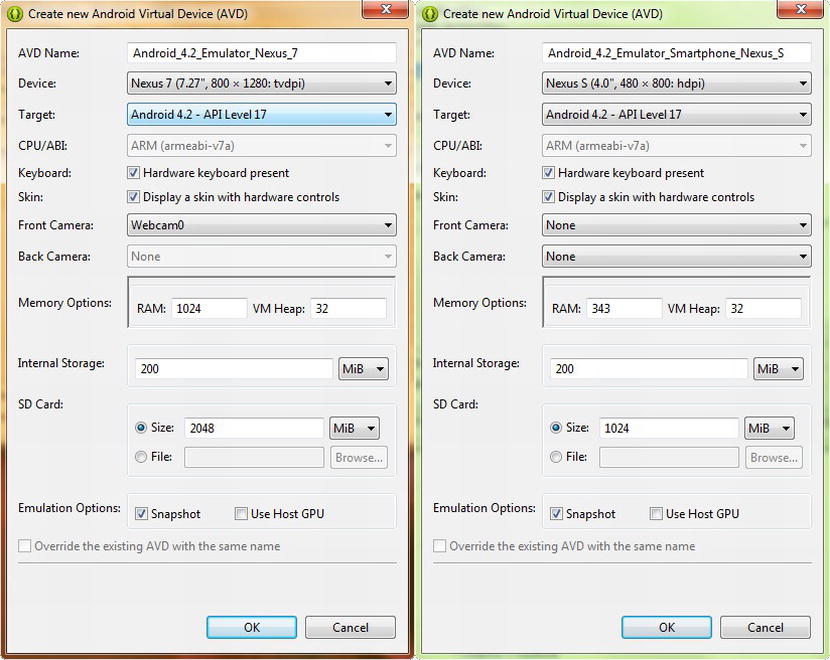
Figure 1-18. Creating a New Android Device (AVD) for a Nexus 7 tablet and a Nexus S smartphone using the AVD Manager
Because the Nexus 7 uses an ARM (armeabi-v7a) processor, this field is automatically set for you, and cannot be changed. Next, check Hardware keyboard present and Display a skin with hardware controls because those options fit the Nexus 7 for users who own the wireless keyboard, which most serious users do.
Set the Front Camera option drop-down to: Webcam if you have a webcam installed on your workstation, otherwise select None. This is a new Android AVD Emulator feature starting with Android 4.2. Note that before Android API Level 17, the Android Emulator (AVD) did not support camera testing of any kind.
The Nexus 7 AVD Profile sets the Memory Options and Internal Storage settings for you, based on the Nexus 7 manufacturer’s hardware specifications. Next, set the SD Card to be a common 2048MB SD card configuration, and check the Snapshot option.
Finally, click the OK button to create the first of three Android 4.2 AVD Emulators, this one for the Nexus 7 Tablet. If you are going to develop for some of the other popular API level tablets, utilize exactly the same work process and add other emulators named Kindle Fire (use Android 2.3.7 API Level 10 and HDPI) or Kindle Fire HD (use Android 4.0.4 API Level 15 and XXHDPI), for instance, if you need to test your applications for delivery on those other specific hardware platforms.
Next, let’s create a Smartphone Emulator for the Nexus S, as shown on the right-side of Figure 1-18, so that we have a smartphone emulator as well as a tablet emulator.
Creating Your Nexus S Smartphone Emulator
The first thing we do is to name the emulator, so enter Android_4.2_Emulator_Nexus_S in the Name field. In the Device field, use the drop-down menu (via the down arrow) to select the Nexus S option. Then select the Target for the emulator, which is again Android 4.2 API Level 17.
Next check Hardware keyboard present and Display a skin with hardware controls because those options fit the Nexus S advanced user and make app testing easier. Set the Front Camera option drop-down to Webcam if you have a webcam on your workstation, otherwise select None.
The Nexus S AVD Profile sets the Memory Options and Internal Storage settings for you, based on the Nexus S hardware specs. Next, set the SD Card to be a common 1024MB SD Card configuration, and check the Snapshot option. Finally, click the OK button to create your second AVD Emulator. We now have two emulators created in our Android Virtual Device Manager window, as shown in Figure 1-19.

Figure 1-19. Android Virtual Device Manager showing two new emulators for the Nexus 7 Tablet and Nexus S Smartphone
The only other type of Android virtual device that we should really create to test our content on in this book is the newest genre of Android device to hit the market—the iTV, or Interactive Television Set.
Creating Your Android iTV Emulator for GoogleTV Support
Android iTV sets run a branded version of the Android OS called GoogleTV and are available as iTV Sets or Set-Top Boxes (STBs) or Home Media Centers (HMCs) or even as USB sticks such as the Philips product.
Fortunately, I just got the new Philips GoogleTV USB stick product to use for an Android application development project for one of my clients. Thus I have the specifications for the product I’ll need to create my own custom AVD device definition specification to use to create an AVD to use for testing.
The first thing I need to do is see whether it is on the list of preconfigured AVDs on the right-side tab labeled Device Definitions, as seen in Figure 1-20. However, the Philips GoogleTV USB stick is not one of them, so we need to go into yet another series of dialogs to add the Philips GoogleTV product to the list of products currently in the AVD Manager Device Definitions dialog. One of the reasons I am adding an iTV emulator to our tablet and smartphone emulators is specifically to show you this work process, as it is hidden even deeper in the AVD Manager than the AVD creation process is.
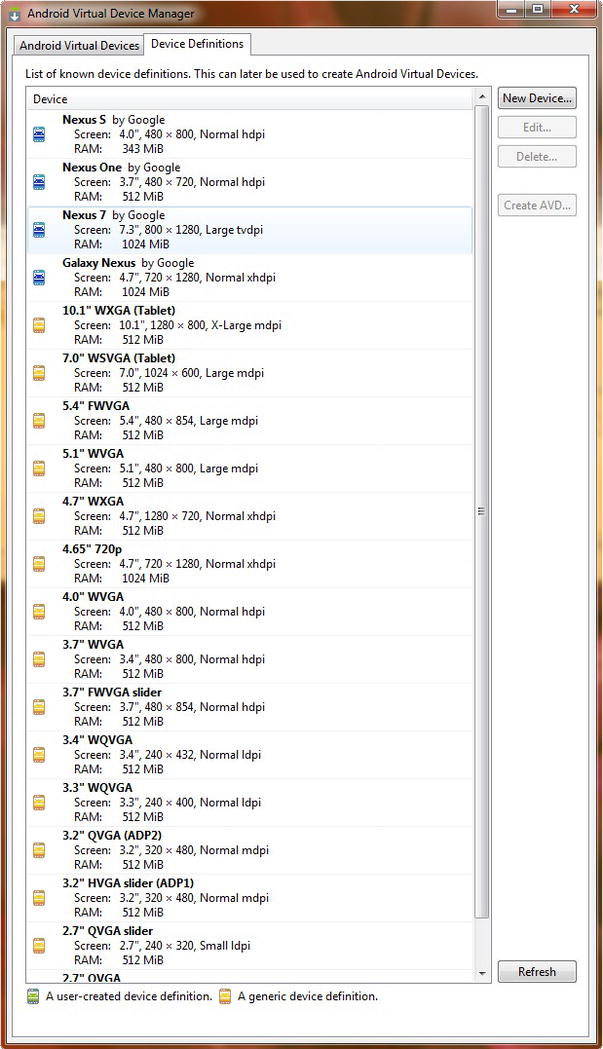
Figure 1-20. The AVD Manager Device Definitions tab, where you can select from predefined AVD devices or create your own
The key to unlocking this New Device Definition work process is, you guessed it, the New Device . . . button, located on the top right of the Android Virtual Device Manager’s Device Definitions tab panel. Click the New Device . . . button, and you get the Create New Device dialog, shown in Figure 1-21.

Figure 1-21. The Create New Device dialog in the Device Definitions tab of the AVD Manager window
The Create New Device dialog lets us create a custom product device definition for the Device Definitions tab in the Android Virtual Device Manager window. Let’s create one for the Philips GoogleTV USB stick now. In the Name: field, place the product name of Philips’ GoogleTV USB stick, and also enter the most common Screen Size: of 42 inches, and its physical pixel resolution of HDTV 1920 x 1080 pixels. Because HDTVs don’t have sensors, leave these four options unchecked, and because the GoogleTV USB stick doesn’t have any cameras, leave these two options unchecked as well. The Philips GoogleTV USB stick product uses a mouse, so select the Input: section option of Trackball.
The product features 1GB of RAM, so enter a 1 in the RAM: field, and select the GiB drop-down menu selection. The product has an extra-large size, so select the xlarge value for the Size: option, and long for the Screen Ratio: option, because HDTVs are widescreen devices. The Pixel Density is 1920 by 1080 pixels regardless of screen size, so select XXHDPI for the Density: setting. Because this product is a USB stick, select Software for the Buttons: option and then enable the Portrait and Landscape mode checkboxes, as shown in Figure 1-21, because the product works well in both of these modes.
After all these new product specifications are entered correctly, you can click the Create Device button at the bottom of the dialog to add the new product definition to the Device Definitions tab of the AVD Manager window, as shown in Figure 1-22.

Figure 1-22. Philips GoogleTV USB Stick added to the AVD Manager Device Definitions list
Now that we have the Philips GoogleTV USB stick product in the Device Definitions tab, we can select it as shown in Figure 1-22 and create a New Android Virtual Device Emulator using this product definition by clicking on the Create AVD… button in the middle of the dialog.
This opens up the Create new Android Virtual Device (AVD) dialog, shown in Figure 1-23, with the proper device settings in the relevant areas of the dialog, much like we observed when we created our AVD Emulators for the Google Nexus products shown in Figure 1-18.

Figure 1-23. Creating a new Android Virtual Device for the Philips GoogleTV USB stick
Notice that ADT names the device for us as AVD_for_Philips_GoogleTV_USB_Stick and that it selects this product for us in the second Device: drop-down menu as well. The Target: default Android 4.2 API Level 17 is also set for us automatically so all we have to do is fill out the Internal Storage and SD Card values, which are both 4GB.
Select the Snapshot option and make sure the Keyboard and Skin options are unchecked, because the product has no keyboard or hardware control features. Notice that our Memory (RAM) setting is correct at 1024 megabytes (1GB), just as we set it earlier in the Create New Device dialog.
Once you are finished filling out all the relevant fields, click OK, and create the AVD for the Philips GoogleTV USB stick. Notice that Philips GoogleTV USB Stick AVD has been added to the AVD Manager main window in Figure 1-24, and we now have AVDs for Smartphone, Tablet, and iTV.

Figure 1-24. The Philips GoogleTV USB Stick is added as an Android Virtual Device
Now that we’re ready for Android App Development, let’s go and find some of the new media tools that we will be using throughout this book to add elements to our apps that will make them stand apart from the crowd. We’ll get the primary new media development software genres of digital imaging (GIMP), digital audio (Audacity), digital video (Lightworks), and 3D (Blender). All these professional-level open source software packages are available on all Windows (XP, Vista, 7 and 8) and Linux platforms.
New Media Tools Used in Android Development
Because we’re in the process of downloading and installing software packages in this first chapter to get all the essential grunt work done that is essential for development, but which is not teaching us any actual Android App Development, let’s also grab all the other powerful open source software that we will need to use in conjunction with the Android Development Environment to create truly memorable, rich media-laden user interfaces (UIs) and user experiences (UXs).
We’ll get all this software download and installation stuff out of the way here in the first chapter and build ourselves a content development workstation that will serve us well for all types of new media content development.
Digital Imaging Software: GIMP 2.8.4
First, let’s install the leading open source digital imaging software package GIMP 2.8.4 for Windows. If you have Photoshop CS6 that’s great, but to make sure all the readers have a professional imaging app, you will need to download and install GIMP because it’s free!
You can find GIMP GIMP.org. At the top right of the page, you will see a Download button as well as a Downloads link (see Figure 1-25), which when clicked takes you to the GIMP 2.8 Downloads page. Next click the download link for the GIMP program version that matches the OS that your system is currently running. For my Windows 7 workstation, I downloaded the .EXE installer for the Windows XP, Vista, Windows 7 and Windows 8 version of GIMP 2.8.4.

Figure 1-25. The GIMP 2.8 Download button and Downloads link located at the www.gimp.org website
Find the .EXE installer file in your Downloads folder, and double-click it to install the software using the suggested defaults. Then, find the file in your Program Files folder, and right-click the Application EXE file, and Pin to Taskbar so it lives in the Launch Icons area of your Taskbar as shown previously in Figure 1-10. You are now one more step closer to creating an extremely powerful new media Android Application Development workstation. Let’s get a leading digital audio editing software package next.
Digital Audio Software: Audacity 2.0.3
Next, let’s install the leading open source digital audio software package, Audacity 2.0.3 for Windows. If you have Reason, SoundForge, or ProTools, that’s great, but to make sure we all have a professional audio engineering app, you will need to download and install Audacity 2.0.3, because it’s also free! You can find Audacity at the SourceForge.net open source website.
Type Audacity in the Search bar on the homepage, and you will find the Audacity.SourceForge.Net software download page, shown in Figure 1-26. On the top left of the page, you will see a Download button that takes you to the download for the software, in my case, the Windows OS version.
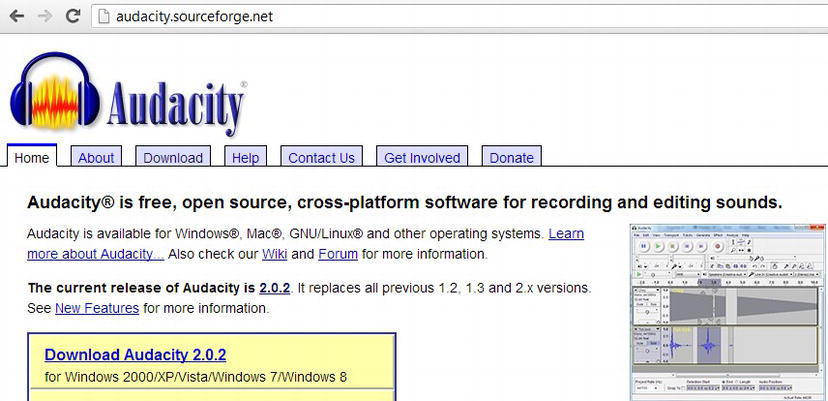
Figure 1-26. The Audacity 2.0.3 Project at SourceForge.Net—Click the Download link for Windows 2000/XP/Vista/Windows7/Windows8
Next, click the download link for the program version that matches the OS of your system, in my case, I downloaded the .EXE installer for the Windows version. Find the .EXE installer file in your system’s Downloads folder, and double-click it and install the software with its defaults.
Next, find the file in its Program Files folder, and right-click the Application EXE file and Pin to Taskbar so that it lives on your Launch Icons area of your Taskbar, as shown previously in Figure 1-10. You are now yet another step closer to creating that uber-powerful new media Android application development workstation right there on your desk.
Digital Video Software: EditShare Lightworks 11
Next, let’s install the leading open source digital video editing software package, EditShare Lightworks 11 for Windows. If you have FinalCut or AfterEffects CS6 that’s great, but to make sure all of us have a professional video editing app, you should download and install Lightworks, because it’s free! You will find Lightworks 11 at www.LWKS.com, and on the top right of the page, you will see a Download button that takes you to the Downloads page as shown in Figure 1-27.

Figure 1-27. The EditShare Lightworks 11 Downloads page for Windows installer
To download this free software you must sign-in or register and then you can click the Download link for the Lightworks program version that matches the OS and Bit-Level of your system.
In my case, I downloaded the .EXE installer for the Windows 7 64-bit version, which is around 100MB.Be sure to download the Release Notes and ReadMe files as well, and read them thoroughly as this is a high-end software package that used to cost thousands of dollars.
Once the download is complete, find the .EXE installer file in your system’s Downloads folder, and then double-click it, and install the software using its default settings. If you are only installing one Lightworks “seat” (one copy, on one machine), set it as number 1 (enter 1 or 001 in the first dialog that appears during install). Note you may need to backspace over the default number in this first dialog and actually type a 1 to get the next step button to come alive (to become not dimmed out and click-able).
Then, find the file in its Program Files folder, and right-click the Application EXE file and Pin to Taskbar so it lives on your Launch Icons area of your Taskbar, as shown previously in Figure 1-10. You are now one more step closer to creating that powerful new media Android application development workstation that you always dreamt about.
3D Modeling and Animation Software: Blender 3D
Finally, let’s install the leading open source 3D modeling, rendering, and animation software package, Blender 3D 2.66 for Windows. If you have Lightwave or Maya, that’s great, but to make sure all of us have a professional 3D application you should download and install Blender 3D because you guessed it again—It’s free!
You can find Blender 3D at www.Blender.org, and on the top left of the Blender home page, you will see a Download menu or, if you prefer, at the top right a Download Blender link that will take you to the Downloads page (see Figure 1-28).
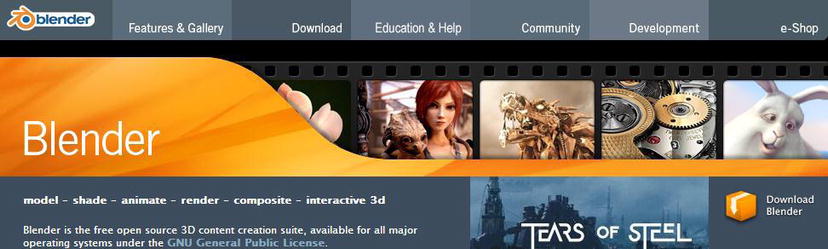
Figure 1-28 . The Blender 3D website located at Blender.Org showing the Download menu (top) and Download Blender link (right)
First, click the Download Blender link and on the Downloads page look for the program version that matches the OS and Bit-Level of your system. In my case, I downloaded the .EXE installer for the Windows 64-bit version. Once the installer file has downloaded, find the Blender .EXE installer file in your Downloads folder, double-click it, and install the software with its defaults.
Next, proceed with the usual work process of finding the file in its Program Files folder and right-click the Application EXE file and Pin to Taskbar so it lives on your Launch Icons area of your Taskbar, as was shown previously in Figure 1-10.
You are now finished creating a comprehensive new media Android Application Development workstation to use throughout this book as well as for your future software development projects. This new media development workstation will allow you to develop highly professional Android applications that feature advanced 3D imagery, digital audio, digital video, and digital imagery. Congratulations! You have just installed open source software that, if you paid for it, would have cost you well over one hundred times what you just paid for this book. Not a bad return on investment!
Summary
In this first chapter, we got all our ducks in a row (or better yet, we got all our Jelly Beans in a row) to prepare for the Android App Development that we are going to do in the remaining chapters in this book.
We acquired and downloaded a gaggle of extremely valuable content production software, for everything from Java to Eclipse to Android, as well as all the leading new media applications for the primary four new media genres: 3D modeling, digital video editing, digital audio editing and digital image editing.
We learned how Eclipse runs on top of Java, and how the Android SDK is integrated into the Eclipse IDE via the ADT Tools plug-ins to create a seamless Android Development Environment. We saw that as of Android 4.2, the ADT Bundle installation is now far easier than it was in the past, and Appendix A confirms this and shows at a deeper level how Eclipse 4.2, Android 4.1 SDK, and all the ADT Plug-ins integrate together seamlessly.
In Chapter 2 we will get right down to business and create our first Hello World App, to see how Android sets up everything using Java and XML along with our new media resources. We’ll learn about the terminology Android uses to describe the different areas and capabilities of an Android Application and even use one of these in the Hello World App that we build later on in the chapter.