
Android Content Providers: Access to Datastores
In this chapter, we will learn about one of the more advanced topics involving the Android operating system: Content Providers. Content Provider means: DataStore. We are familiar with the android.content package, having worked with its classes before, and we are about to get more familiar with the android.database package, as well as the android.provider package.
One of the most prolific Content Providers in the Android operating system is the SQLite database API, which is an integral part of Android. As such, this chapter is also going to cover an inherently advanced topic of SQLite Database Engine, Design Principles and overview of Android Content Provider API implementation.
The reason that this particular chapter’s topic is more advanced than the other topics we have learned about in the previous chapters is the fact that this chapter contains information on two different advanced topics.
The first is SQL and SQLite Database Design concepts, on which Android’s internal ContentProvider is based, and the second covers all the different types of Content Providers that are currently available in Android.
First, we will cover database design concepts at a fairly high level, so that you have the foundational knowledge regarding what we are going to be doing in the rest of the chapter.
Then we will go over the different types of Android Content Providers, as well as their concepts and techniques, and how they need to be accessed via Uniform Resource Identifier (URI) path constructs.
Next we will take a look at the SQL database engine and the Android SQLite database packages and APIs. Finally, we will implement an Android Content Provider in our Hello World application, to see how it all works together.
Database Fundamentals: Concepts and Terminology
As most programmers know already, a database management system, or DBMS, is a highly structured data storage system, or “engine,” which can store valuable data in a tabular format that can be easily accessed and updated. One of the most popular open source DBMS database programming languages in the world is called SQL, which stands for Structured Query Language.
The structured part comes from the fact that databases are arranged into a tabular format, and the query part comes from the fact that these tables of data are designed to be searched for a certain data value. The language part comes from the fact that SQL has evolved into a database programming language that is so complex and involved that there are probably far more books regarding this ageless RDBMS (Relational Database Management System) topic than there are on the Android OS.
For those readers who have never worked with database technology I will go over the fundamentals here, so that we can all be using the same knowledge base. Popular database software packages that you may be familiar with may include Access and FileMaker, and many of you have probably used Excel to store data in tabular format, much like a database does, only more visual.
Data in a relational database such as MySQL is stored using tables, which support both rows and columns of data. This is similar to a spreadsheet like Excel except that databases aren’t usually all visible at once as in a spreadsheet, although you can generate reports that will achieve this end result if you wish once we learn all the programming involved!
Each relational database table column will always contain a similar data type and classification of data within your database record structure, and this is generally called a database field.
This means that conversely, each row in your database table would thus represent one entire data record. So generally when you are writing a database record you will write one entire row or record of data when you first add that record, but when you search a database for information you are generally looking through one of the columns or fields for specific piece of data or information.
If you have a huge amount of data fields (columns) in your database table, you will probably want to have more than one database (table of data) in your database design approach.
In a real world database design, the theory of which is largely beyond the scope of an introductory book, you will want to have more than one single database structure, for both access (search) performance, as well as for organizational reasons. In fact the Android OS uses more than one database structure for its end-user information storage and access, as we will soon see later on in this chapter.
The way to have multiple databases is to have a unique key (unique index) for each record in each of the databases (tables). In that way information for a single data record can span more than one database table, using that key. In Android, this key is called an ID and is always designated via the constant “_ID” in Android’s SQLite databases. For instance, if your key or _ID value is 137, your e-mail information and phone information could be in two different tables but stored under that same key (index) value and thus accurately associated with your Android user account.
MySQL and SQLite: An Open Source Database Engine
MySQL is currently one of the most popular Open Source Relational Database Management System (RDBMS) Engines in the world. If you own your own server hardware, you can download and install MySQL, using the MySQL.com website, and then you could host massive databases of information, with very little software purchasing expenditure.
SQLite is a far smaller version of the MySQL RDBMS Engine designed to work well in embedded hardware such as tablets, smartphones, eBook readers, iTV sets, watches, car dashboards, set-top boxes, home media centers, and other consumer electronics devices commonly referred to as Internet 2.0. It is also interesting to note that SQLite is also in all the HTML5 browsers.
SQLite stands for Structured Query Language Lite, and is the Open Source Database Engine that is included as part of the Android operating system. There is a SQLite API (package) in Android which contains all of the RDBMS functions needed to implement the SQLite API. These are contained within a series of classes and methods in the android.database.sqlite package.
SQLite is designed specifically for embedded systems use similar to JavaME (Micro Edition), and as such, has only a quarter megabyte memory footprint (256KB), which is used to host a relational database engine implementation.
SQLite supports the minimum, standard set of relational database functions and features such as common SQL syntax, database transactions, and prepared statements, which is enough to provide robust database support to Android.
SQLite supports three different data types: TEXT (known as a String value in Java), INTEGER (known as a long value in Java), and a REAL (known as a double value in Java) data type.
When working with SQLite, all other data types must be converted into one of these compatible data types before saving them in the database field.
It is important to note that SQLite does not itself validate any data type that may be written to its fields (table columns) as being actually of a defined data type. This means that you can write an integer into a string column and vice versa. If you want to research SQLite in greater detail, you can do so at the SQLite site, which is located at the following URL:
http://www.sqlite.org/
To use SQLite in Android you construct your SQLite statements for creating and updating your database, which will then be managed for you by Android. When your app creates a database, the database will be kept in a directory that will always utilize the following Android OS database path address:
DATA/data/YOUR_APPLICATION_NAME/databases/YOUR_DATABASE_FILE_NAME
Next we will take a look at the many different types of Android Content Providers as well as how they are accessed via the Android operating system and its android.content package and its classes and methods.
Android Content Providers and Content Resolvers: An Introduction
An Android Content Provider object manages your application’s data access. Android Content Providers are what you would want to use if you wanted to share data across or between different Android applications.
This is usually some sort of structured data set in a database or in a file in system memory, or on the device’s SD Card data storage device, or in preferences (name-value pairs), or even on an external network server.
The general purpose of an Android Content Provider is to encapsulate data in a standardized fashion, while at the same time, providing the Android Developer with some sort of mechanism for enforcing their data security.
Content Providers are the standard Android interface that connects the data in one system process with the Java code running in another process. If you want to access data that is inside a Content Provider, you would use a ContentResolver object within your current application Context to communicate with that Content Provider as a database client.
The ContentResolver class is subclassed from java.lang.Object, and it is a part of the android.content package. If you want to research more detailed information on this class and its constants, constructors, and methods, you can find an entire webpage dedicated to this information at the following URL within the Android Developer website:
http://developer.android.com/reference/android/content/ContentResolver.html
An Android ContentResolver object communicates with a Content Provider object, which as we know would be an instance of a class that implements Android’s ContentProvider superclass.
The Content Provider object is kind of like Android having its own custom database engine that receives data requests from an application component client, and then performs the requested data resolution action inside its own process, returning the result if the requested data can be located.
It’s important to note that developers will not need to code their very own Content Provider subclasses if they do not need to share their data outside their application, which most applications do not need to do.
Scenarios under which you will need to subclass your own Content Provider would include providing custom search suggestions in an application or if you need to copy or paste complex data between your application and other Android applications.
Android includes application specific operating system Content Providers that manage common types of new media data such as audio, video, images, as well as text data such as personal contact information.
You can take a look at the Android predefined Content Provider classes on the developer webpage, which provides the reference documentation for the android.provider package. It is located at the following URL:
http://developer.android.com/reference/android/provider/package-summary.html
The Android OS comes pre-installed with these Content Provider databases. These assist Android users by storing everyday data, such as an end-user’s contact information, daily calendar, phone numbers, and multimedia files.
These application-specific Content Provider classes provide developers with pre-built methods for writing or reading data values to and from these customized Content Providers.
With some restrictions, outlined in the AndroidManifest.xml file as usual, these pre-built Content Provider classes are readily accessible to Android application developers for use in their application features or functions.
Addressing the Content Provider: Using a Content URI
If you want to be able to tell the Android OS what Content Provider you want to access, it is important that you understand the concept of the Content URI. We have used URI objects before, so you are familiar with the function they play in accurately referencing data (content) pathways in Android apps. Content Providers have a special path format, just like HTTP has a special format HTTP:// so too does content have a special format that is very similar (and thus easy for us to remember) and this is:
content://
A complete URI for an Android Content Provider follows this format:
content://Authority/Path/ID
As an example, here is an (imaginary) Hello World Content URI:
content://com.helloworld.universedatabase/planets/earth/1337
In this URI, com.helloworld.universedatabase would be the Data Authority, planets/earth/ is the Data Path, and 1337 is the ID for the Data Record.
A Content URI always contains four necessary parts: The schema to use, in this case, content://; an authority; an optional path to the data; and the ID of the data record that you want to access.
The schema for Content Providers is always the word “content” and a colon and a double forward slash “://” are always attached to the front of the URI and serve to separate the data schema from the data authority.
The next part of the URI is known as the authority for a Content Provider. As you might have expected, an authority for each Content Provider must be unique. An authority naming convention usually follows Java package naming conventions.
Many organizations choose to use a backward dot com domain name of their organization, plus a data qualifier for each content provider that you may publish, so our preceding example would assume that we own the helloworld.com domain name, which, of course, we do not.
Because the Android developer documentation recommends that you utilize the fully qualified class name of your ContentProvider subclass, we might then name our ContentProvider subclass UniverseDatabase.java if we are following this example Content URI.
The third part of the URI standard is the path to the Data, which although optional, use of which is a fairly standard practice, for organizational purposes. We would not put our data in the root folder of our server, but instead we would place it in a planets folder, using sub-folders for each of our planet databases. In the case of our example, a subfolder is Earth.
The Content Provider for Android’s MediaStoredatabase (which we will look at next), for example, uses different path names to make sure that the audio, image, and video files are kept in separate data type locations.
By using different path names, one single Content Provider can accommodate many different types of data that are in some way related, such as the New Media content types, for example, kept in the MediaStore Content Provider.
For totally unrelated data types, it is standard programming practice that you would want to utilize a different Content Provider subclass, as well as different data authority (and path, for that matter) for each database.
The last URI reference specification component is the ID, which as you may have surmised, needs to be numeric. The ID, or _ID in Android, is utilized whenever you want to access a single database record. So as you can see the URI reference specification progresses from the most general or high-level (content://) specification through the authority (server name) down through the pathway to the data (directory path), and ultimately, to the data record itself (ID). This is the logical way to set up any data path in the first place, so I don’t really anticipate you having any problems at all understanding the URI reference specification and its construction.
Android OS Content Providers: Databases That Are Part of the OS
Android provides an android.provider package that contains Java interfaces for all the primary database types that are standard in the Android OS.
These include the databases that are most often used by the Android user, such as the Contacts databases, the Calendar databases, and the MediaStore databases. We’ll go over these and their component parts in this section.
These are used for things like personal management, time management, and multimedia management, the three most often accessed tasks on an Android device, whether it be a smartphone, tablet, eBook eReader or iTV set.
As we learned in the section on database design, these databases are split into logical sub-databases, and referenced as if they were one single data store, by using a key or an index _ID value. As we know, this is done for system performance (memory usage), as well as data access speed and ease of database access reasons.
The Android MediaStore Databases
The MediaStore databases include 9 different new media asset databases, the CalendarContract databases include 11 different Calendar component databases, and the ContactsContract databases include the most databases, with 21 functional databases.
The MediaStore databases include five audio data related databases and one image and one video related database. Table 19-1 shows the MediaStore data provider interfaces, as well as the types of data they access (reference).
Table 19-1. MediaStore Databases in the Android Provider Package and the Type of Data They Contain
| Database | Description |
|---|---|
| MediaStore.Audio.AlbumColumns | Database Columns that represent an album |
| MediaStore.Audio.ArtistColumns | Database Columns that represent an artist |
| MediaStore.Audio.AudioColumns | Database Columns which represent audio files which span more than one database |
| MediaStore.Audio.GenresColumns | Database Columns that represent a genre |
| MediaStore.Audio.PlaylistsColumns | Database Columns that represent playlists |
| MediaStore.Images.ImageColumns | Database Columns that represent an Image |
| MediaStore.Video.VideoColumns | Database Columns that represent a Video |
| MediaStore.Files.FileColumns | Columns for a Master Table for all Media |
| MediaStore.MediaColumns | Common Columns for MediaProvider Tables |
The Android CalendarContract Databases
The CalendarContract databases include 11 Calendar-related databases, each supporting various Calendar functions such as Events, Attendees, Alerts, Reminders, and other similar Calendar-related data support functions.
The reason that the Android operating system provides pre-built support, via its android.provider package for the Android Calendar database access is because it would be logical for applications that want to access these Calendar features to be able to add cool new capabilities to the existing Android Calendar feature set.
Table 19-2 shows the CalendarContract data provider interfaces, as well as the different types of Calendar function data that they access (and thus, which they will allow you to reference directly using a Content Provider).
Table 19-2. CalendarContract Databases in the Android Provider Package and the Type of Data They Contain
| Database | Description |
|---|---|
| CalendarContract.CalendarAlertsColumns | Data Used for Calendar Alerts Function |
| CalendarContract.CalendarCacheColumns | Data Used for Calendar Cache Function |
| CalendarContract.CalendarColumns | Calendar Columns that other URI can query |
| CalendarContract.CalendarSyncColumns | Generic Columns for use by Sync Adapters |
| CalendarContract.ColorsColumns | Data Used for Calendar Colors Function |
| CalendarContract.EventDaysColumns | Data Used for Calendar Event Day Function |
| CalendarContract.EventsColumns | Columns (Joined) from the Events Database |
| CalendarContract.ExtendedPropertiesColumns | Data Used in Calendar Extended Properties |
| CalendarContract.RemindersColumns | Data Used for Calendar Reminders Function |
| CalendarContract.SyncColumns | Sync Info Columns Used by Other Databases |
Next we will take a look at the new Android Contacts database structures, which are now referenced via the ContactsContract moniker (instead of just using Contacts), as of the Android 2.1 (Éclair) operating system version.
The Android ContactsContract Databases
The ContactsContract databases include a whopping 21 Contact data related database tables, which is not so surprising, as these days Contact management includes a myriad of information such as name, phone number, e-mail address, social media presence, status, display name, and so on. Table 19-3 shows the ContactsContract data provider interfaces, as well as the types of data that they access (and thus, which they will reference).
Table 19-3. ContactsContract Databases in the Android Provider Package and the Type of Data They Contain
| Database | Description |
|---|---|
| ContactsContract.CommonDataKinds.BaseTypes | BaseTypes all Typed DataTypes support |
| ContactsContract.CommonDataKinds.CommonColumns | Common Columns across Specific Types |
| ContactsContract.ContactNameColumns | Contact Name & Contact Name MetaData columns, in the RawContacts Database |
| ContactsContract.ContactOptionsColumns | Columns of ContactsContract.Contacts that track the user preference for, or interaction with, the Contact |
| ContactsContract.ContactsColumns | Columns of ContactsContract.Contacts refer to intrinsic Contact properties |
| ContactsContract.ContactStatusColumns | Data Used for Contact's Status Info |
| ContactsContract.DataColumns | Columns (Joined) from the Data Table |
| ContactsContract.DataColumnsWithJoins | Combines all Join Columns returned by ContactsContract.Data Table Queries |
| ContactsContract.DisplayNameSources | DataType used to produce Display Name |
| ContactsContract.FullNameStyle | Constant for Combining into Full Name |
| ContactsContract.GroupsColumns | Data Used for Contact's Grouping Info |
| ContactsContract.PhoneLookupColumns | Data Used for Contact's Phone Lookups |
| ContactsContract.PhoneticNameStyle | Constants for Pronunciation of a Name |
| ContactsContract.PresenceColumns | Additional DataLink Back to _ID Entry |
| ContactsContract.RawContactsColumns | Data Used for the RawContact Database |
| ContactsContract.SettingsColumns | Data Used for Contact's OS Settings |
| ContactsContract.StatusColumns | Data Used for Social Status Updates |
| ContactsContract.StreamItemPhotosColumns | Columns in the StreamItemPhotos Table |
| ContactsContract.StreamItemsColumns | Data Columns in the StreamItems Table |
| ContactsContract.SyncColumns | Columns that appear when each row of table belongs to a specific account |
Next, we will take a look at the concept of deprecation, as it relates to Android databases, since some of you may need to use the old Contacts data structures to support ancient users of Android 2.0, or even 1.5 and 1.6.
Deprecated Content Providers: Deprecated Database Structures
As an Android (and any other type, for that matter) Developer, you need to be highly aware of the concept of deprecation. As you probably know by now deprecation happens when features, including classes, methods, interfaces, constants, or, in this case, databases, in a programming language (and, in this case, in an OS) have been discontinued in favor of newer features and general progress in the feature set (and subsequently, development power) of the programming environment over long periods of time.
The Contacts database is a great example of deprecation, so I am going to cover this topic in its own section just to make sure you understand how important it is to accommodate deprecated features in your programming work process.
If you reviewed the link to the Android Provider package in the previous section, you may have noticed when reviewing all that information that the original Android Contacts database structure was overhauled after API Level 5.
The nine databases that comprised the original Android Contacts database structure were replaced after API 5 with a new database structure called ContactsContract that we covered in the previous section.
Note that you can still use these databases if your Android app OS support goes far enough back, as the API Level 5 is equivalent to Android 2. There is a really informative section in the Android Developer website, which is called the dashboards. This shows you what API Levels, OS Versions, and even the Percentage of Current Market Share for each, so be sure and check this out when you have a moment, it is located at the following URL:
http://developer.android.com/about/dashboards/index.html
What this all means is that if you are supporting any Android device that came out before Android 2.1, that is, any Android 2.0, 1.6, or 1.5 device, then you would need to auto-detect your end-user’s OS version, and provide code that uses the 9 Contacts databases instead of the 21 ContactsContract databases.
If you look at the dashboard in the previous link, you will also note that this support is two-tenths of one percent of the current market share, and that it may well not be worth the coding time and effort that is involved!
Content Provider Access: Adding Permissions in Manifest
The rest of the Android Content Provider information we will learn in the context of our Hello World project, as that is more fun, more productive and gets us working in Eclipse rather than just reading a book.
Open up your Hello_World Android project in Eclipse and right-click and Open the AndroidManifest.xml file, located near the bottom of your Package Explorer pane, as shown highlighted in Figure 19-1. In the central XML editing area click the Permissions tab at the bottom to open up the Android Manifest Permissions Visual Editor, shown in Figure 19-1 before we add permissions.
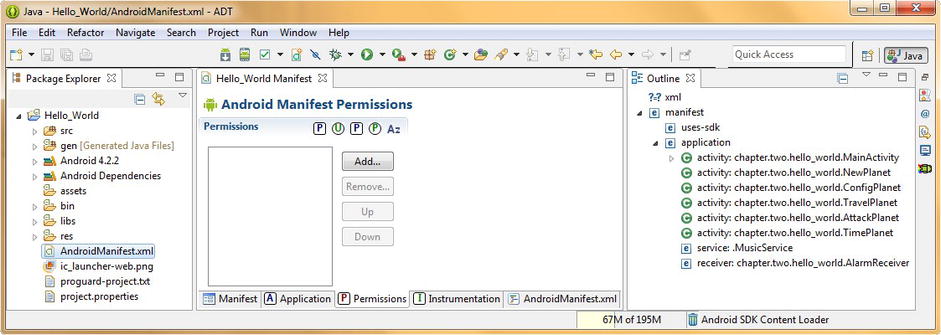
Figure 19-1. Using the Eclipse Permissions Editor tab to access the Android Manifest Permissions Editor
Click the Add… button to open up the dialog shown in Figure 19-2 that allows you to select the type of Permission tag that you want to add to your AndroidManifest.xml file. Select the Uses Permission option and click the OK button to close the dialog and return to the Permissions Editor.

Figure 19-2. The Add Permissions dialog with Permission Types
Now that we have the Uses Permission tag showing in the Permissions Column as shown in Figure 19-3, we want to configure that Uses Permission tag using the Attribute for Uses Permission column on the right. Find the Name drop-down menu and click the down-facing arrow and find and select the android.permission.READ_CONTACTS constant, as shown in Figure 19-3.
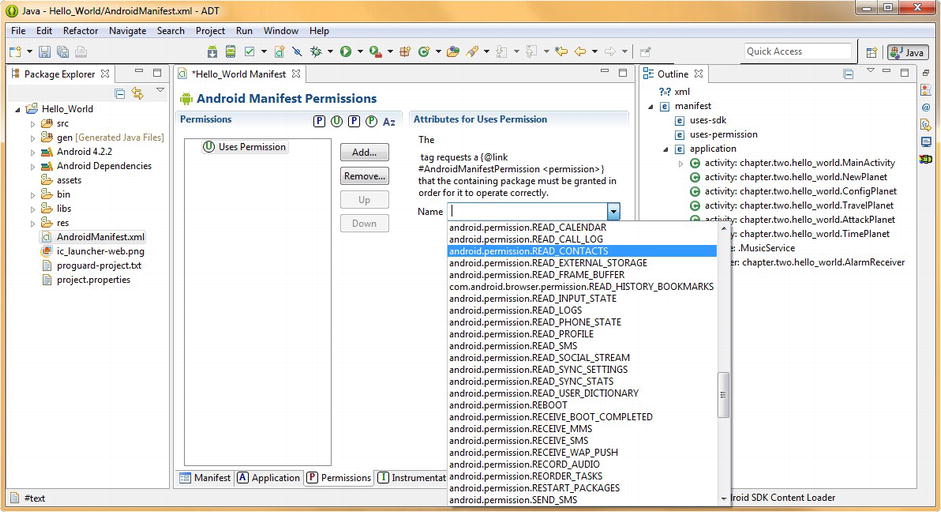
Figure 19-3. Adding READ_CONTACTS Uses Permission Attribute to Uses Permission tag via drop-down menu
Once you select the android.permission.READ_CONTACTS constant you will see that the entry in the Permissions column, on the left side of the screen, will change to reflect the <uses-permission> tag’s new name parameter. At any time, you can see what XML code is being written for you, by clicking the AndroidManifest.xml tab at the bottom of the central XML editing pane.
The READ_CONTACTS permission that we have just added allows us to perform READ ACCESS on the Android CONTACTS database, which you may have guessed.
A READ operation on a database table is referred to in the industry as being a non-destructive database access operation. This is because a READ operation does not change any data within the database, it just “looks at” the data (reads it), and possibly takes the read data and displays it in a user interface, depending on the Java code involved.
Next, we want to add a WRITE_CONTACTS database permission, so again click the Add… button, and select yet another <uses-permission> tag from the same dialog which we saw back in Figure 19-2. Once you click the OK button you will see a Uses Permission tag appear in the Permissions column, right underneath the android.permission.READ_CONTACTS, as shown in Figure 19-4.
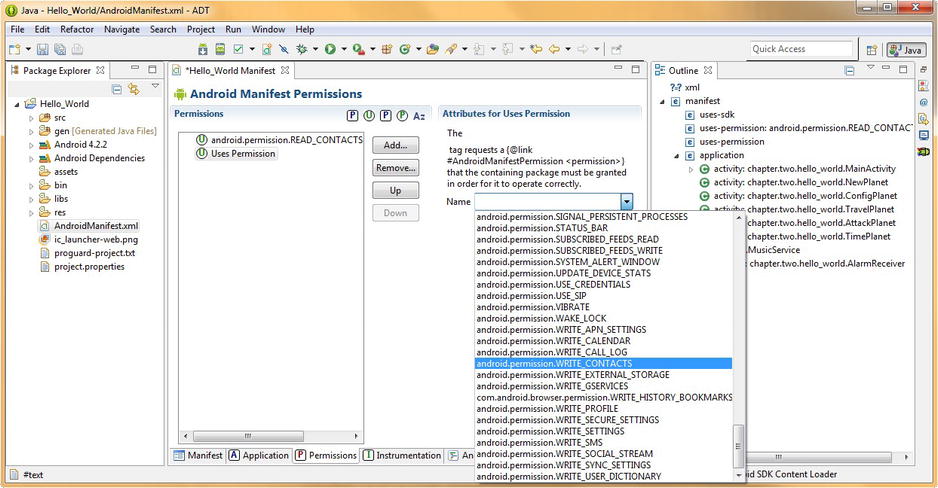
Figure 19-4. Adding a second WRITE_CONTACTS Uses Permission Attribute via the Name drop-down menu
Next drop-down the Name menu and find an android.permission.WRITE_CONTACTS parameter and select that for your second <uses-permission> tag. To see the XML code that was written for you, click the AndroidManifest.xml tab shown in Figure 19-5.
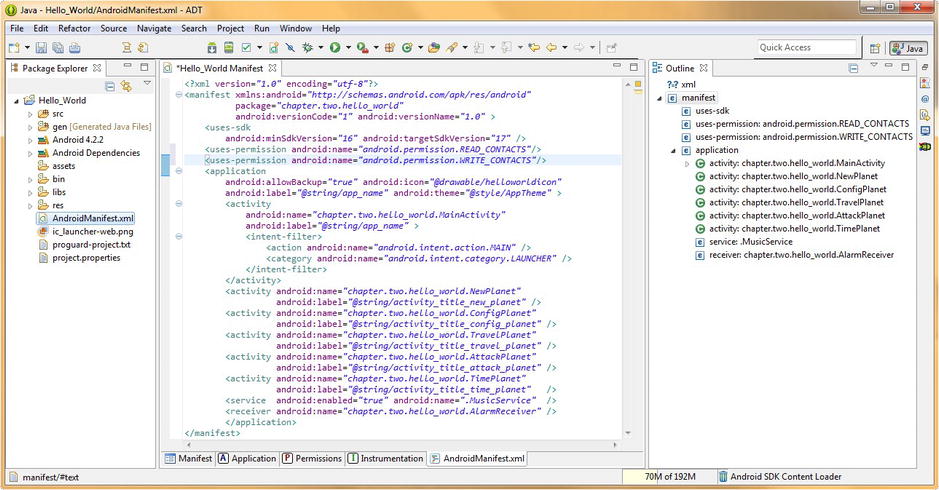
Figure 19-5. The AndroidManifest.xml file tab showing the XML mark-up for the two uses-permission tags
It is important to note that to get the Permissions column to update from the Uses Permission icon to the WRITE_CONTACTS parameter, you must either click the Add… button, if you are adding more permissions, or click the AndroidManifest.xml tab, and then click the Permissions tab again to refresh the Permissions Editor Visual Editor and show the correct entry in the Permissions column on the left as shown in Figure 19-6.
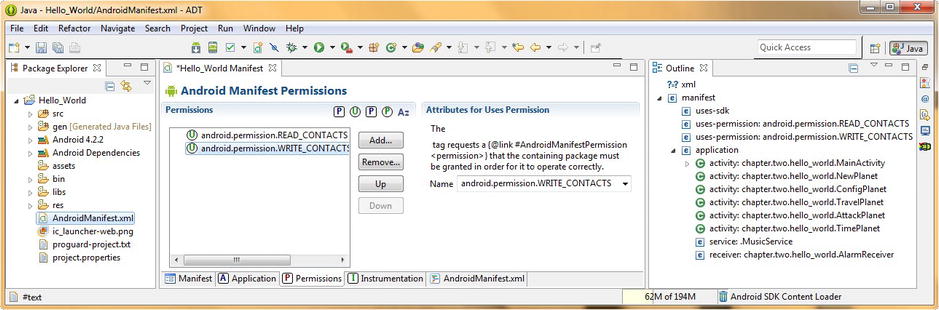
Figure 19-6. Eclipse Android Manifest Permissions Visual Editor showing the twp database access permissions
Now that we have set-up our Permissions to Read and Write to the Contacts database, we can create our AlienContact.java Activity subclass that will hold our user interface design and our Make Alien Contact functionality.
Content Provider Activity: Creating an AlienContact Class
Let’s create our tenth (and final) Java class in our Hello_World Android application, by right-clicking the project source (/src) folder, and selecting the New ![]() Class menu sequence to bring up the familiar New Java Class helper dialog inside Eclipse as shown in Figure 19-7.
Class menu sequence to bring up the familiar New Java Class helper dialog inside Eclipse as shown in Figure 19-7.
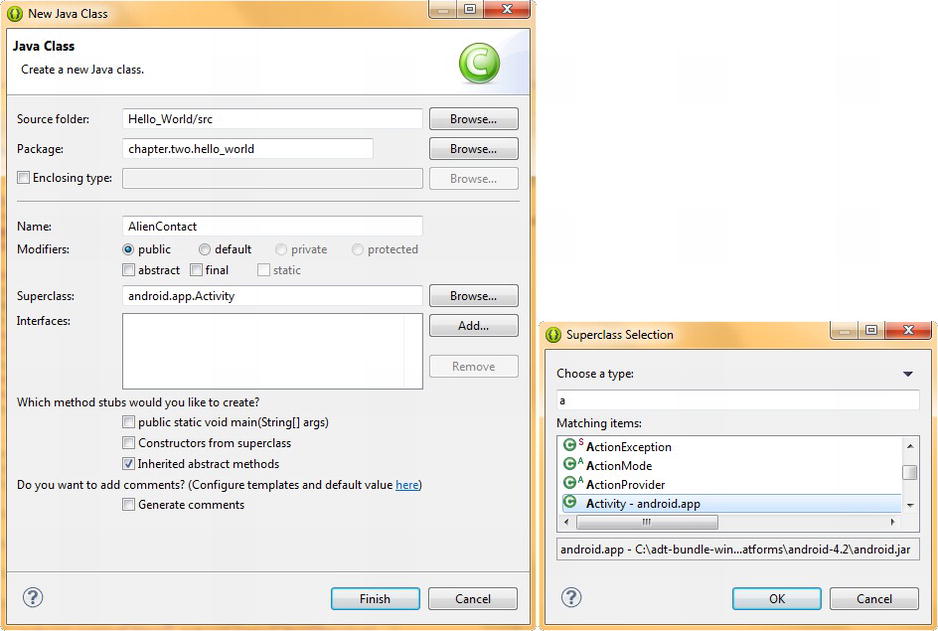
Figure 19-7. Creating a New Java Class called AlienContact.java with a Superclass type of android.app.Activity
The source folder and package data fields should already be filled out for you using your current Android project information, so let’s name this new Java class AlienContact, because it’s going to use the Contacts database to allow us to keep track of our Alien Contact on any new world we encounter.
Next click the Browse… button next to the Superclass field, so that we can specify an Activity Superclass type for our AlienContact.java Activity subclass. Once the Superclass Selection dialog appears, you can type in an “a” character in the top Choose a type field, and then find the Activity - android.app entry in the Matching items section of the dialog.
Once you click the OK button, your Superclass field should be set to the android.app.Activity package of classes, which implements all these Android Activity features in your new Java class. Once this is set you can click the Finish button to generate the code in Eclipse.
Next we will add our .onCreate( ) method basic code to create the Activity, and use the .setContentView( ) method to define a new activity_contact.xml user interface XML definition we will write to define our Activity screen.
We’ll also define our Activity inside of our AndroidManifest.xml file, and give it an android:label parameter so that it has an Activity screen title.
Content Provider Activity: Prepare the AlienContact Class
Add your usual protected void onCreate(Bundle savedInstanceState) method with a call to super.onCreate(savedInstanceState); as we have done in previous chapters, and then also add a setContentView( ) method referencing the activity_contact.xml file, which we will create next. Here’s the code:
@Override
protected void onCreate(Bundle savedInstanceState) {
    super.onCreate(savedInstanceState);
    setContentView(R.layout.activity_contact);
}
The new AlienContact.java Activity subclass and onCreate( ) method is shown in Figure 19-8. Notice the reference to our activity_contact.xml UI definition, which we are going to create next, is red error highlighted. Because we know that this reference is going to be defined and put in place soon, we can safely ignore this error in our Java code in Eclipse for now.
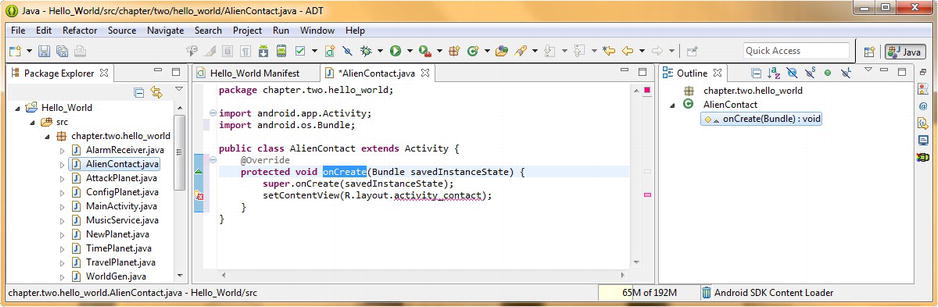
Figure 19-8. Creating our onCreate( ) method and referencing an activity_contact.xml UI layout container definition
Next, we need to define our AlienContact Activity in our Android Manifest XML file, using an <activity> tag and android:label parameter, as we have done before to give our UI screen a title, as shown in Figure 19-9. Here is the XML mark-up that we will be adding at the bottom of our AndroidManifest.xml file:
<activity android:name="chapter.two.hello_world.AlienContact"
          android:label="@string/activity_title_alien_contact"  />
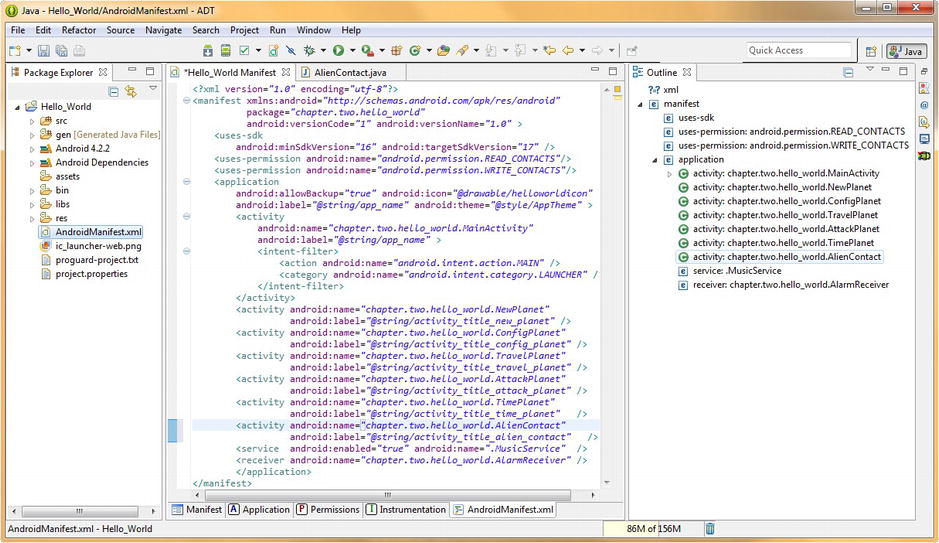
Figure 19-9. Adding the XML mark-up to add a new AlienContact Activity subclass to our AndroidManifest.xml
Now we are ready to create our Activity user interface screen XML file, which we will call activity_contact.xml following the Android convention.
Content Provider User Interface: Creating activity_contact.xml
Right-click the /res/layout folder in your project hierarchy in the Package Explorer pane of Eclipse, and select the New ![]() Android XML File menu sequence. This launches the New Android XML File helper dialog, which is shown in Figure 19-10.
Android XML File menu sequence. This launches the New Android XML File helper dialog, which is shown in Figure 19-10.
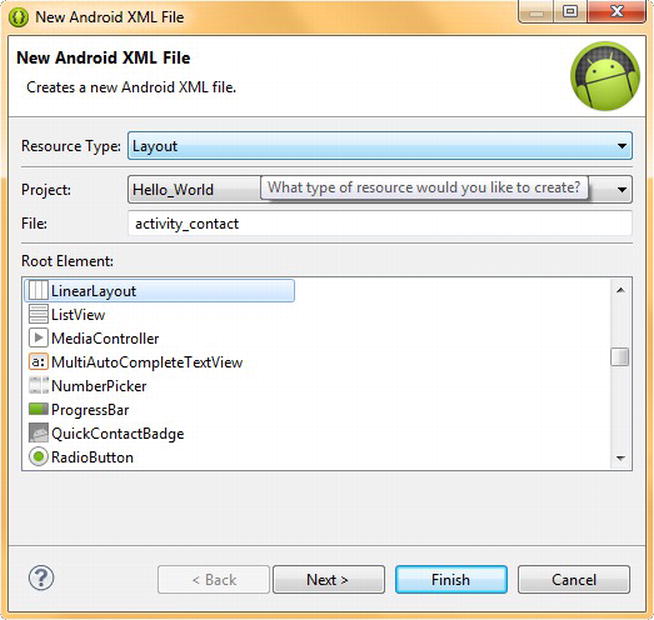
Figure 19-10. Using a New Android XML File dialog to create our activity_contact.xml file
Select a Resource Type of Layout and a Project setting of Hello_World, and then name the file activity_contact and finally select a Root Element type of LinearLayout for your user interface design container.
The next thing that we will need to do is to add some string constants to our strings.xml file using the <string> tag. First, let’s add the Activity screen title (label) string tag using the following XML mark-up:
<string name="activity_title_alien_contact">Hello World - Alien Contacts</string>
Next, let’s add the three Alien Contact UI Button labels that we need to reference in our XML UI mark-up that we are going to write next. These would be written as follows and are shown at the top part of Figure 19-11.
<string name="find_alien_button_value">List Aliens in this Galaxy</string>
<string name="add_spock_button_value">Add Spock to my Alliance</string>
<string name="add_worf_button_value">Add Worf to my Alliance</string>

Figure 19-11. Adding the Activity screen title and user interface Button element <string> tags in strings.xml file
Next we need to add the Button tag elements inside our parent LinearLayout container tag as well as adding parameters to the LinearLayout to add in a background space image, so that our user interface looks professional, and matches up with the rest of the application design we have used thus far.
The first user interface Button tag utilizes an android:id parameter set to findAliens, and features a text color of yellow or #FFFFAA and references the string constant that we created previously.
Additionally, we utilize an android:layout_marginTop parameter set to 40dp to push our UI elements down from the top of the UI screen design a little bit, and an android:layout_gravity parameter set to center so that our UI elements center nicely in the middle of the screen design.
Finally, make sure that you have your default android:layout_width and height parameter set to wrap_content. Your Button XML looks like this:
<Button android:id="@+id/findAliens"
        android:text="@string/find_alien_button_value"
        android:textColor="#FFFFAA"
        android:layout_marginTop="40dp"
        android:layout_gravity="center"
        android:layout_width="wrap_content"
        android:layout_height="wrap_content" />
This first user interface Button element, as well as the next three, which we are going to generate using copy and paste operations to quickly create the remainder of our XML mark-up for this user interface design, are shown in Figure 19-12. Once we copy this XML definition and paste it three more times underneath itself we can modify the parameters to create new UI element tags for our buttons that will Add Aliens and Exit the Activity.
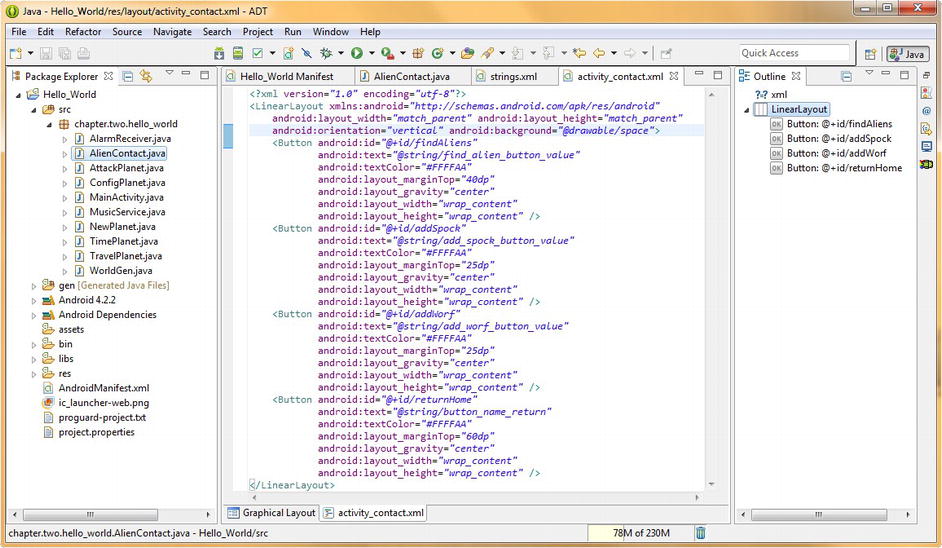
Figure 19-12. Writing XML mark-up to add four Button user interface elements into our LinearLayout container
Let’s do that now; copy and paste the findAliens (ID) Button tag three more times underneath itself, and change the android:id parameter from findAliens to addSpock, addWorf, and returnHome, respectively.
Next, change the android:layout_marginTop parameter to be 25dp for the addSpock and addWorf Button tags, and to 60dp for the returnHome Button.
We will leave the android:textColor parameter set to #FFFFAA or Yellow, and the android:layout_gravity parameter set to center and finally, the android:layout_width and height parameters set to wrap_content so that all our Button user interface elements are formatted uniformly.
Next let’s use the Graphical Layout Editor tab at the bottom of the XML editing pane and see how our new user interface design looks. Because our last Button element that we edited was the returnHome Button, it should be selected in the view because that is where our cursor is in the XML text editing tab.
The visual results can be seen in Figure 19-13, and our design seems to look quite professional, and matches up well with our other five Activity screen designs. That means we are done with our XML user interface design mark-up, and we can proceed to work on our Java code to implement the functionality of our user interface design. We will be using Button objects along with their event handling methods, which will eventually contain our Java code which will access the Contact database structures stored inside of the Android operating system.
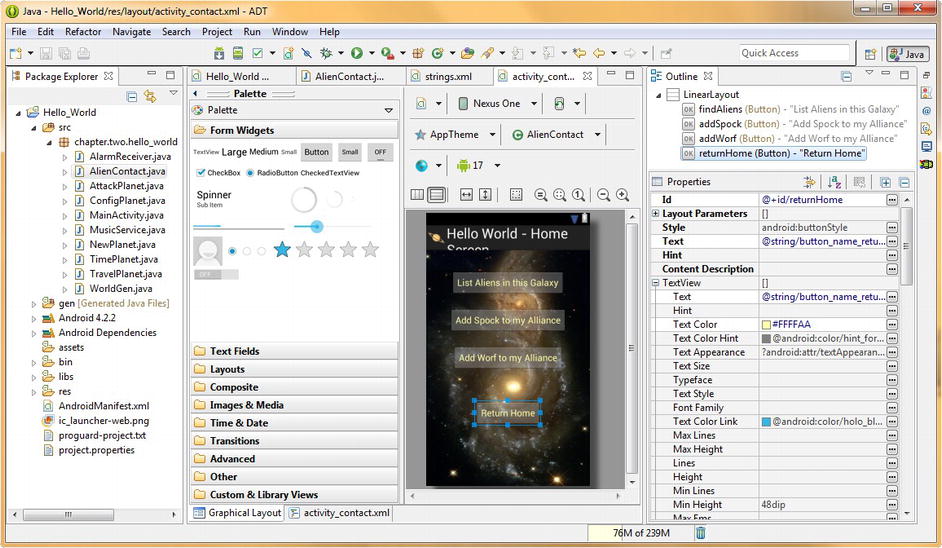
Figure 19-13. Previewing our activity_contact.xml user interface design in the Eclipse Graphical Layout Editor
Next let’s go back into our AlienContacts.java editing tab in Eclipse and add in the lines of code to instantiate each Button object and then attach event handling logic to it so we have a framework to trigger our database operations with.
Coding User Interface Elements in the AlienContact Class
First we need to write our first aliensButton Button object Java code for object creation and event handling and then we can copy it three more times underneath itself and create the other three user interface buttons.
The Java code to do this is shown in Figure 19-14 and has been copied to create Button objects for our aliensButton, spockButton, worfButton, and homeButton user interface elements, using the following Java code block:
Button aliensButton = (Button)findViewById(R.id.findAliens);
aliensButton.setOnClickListener(new View.OnClickListener() {
   @Override
   public void onClick(View v) {
      finish();
   }
}
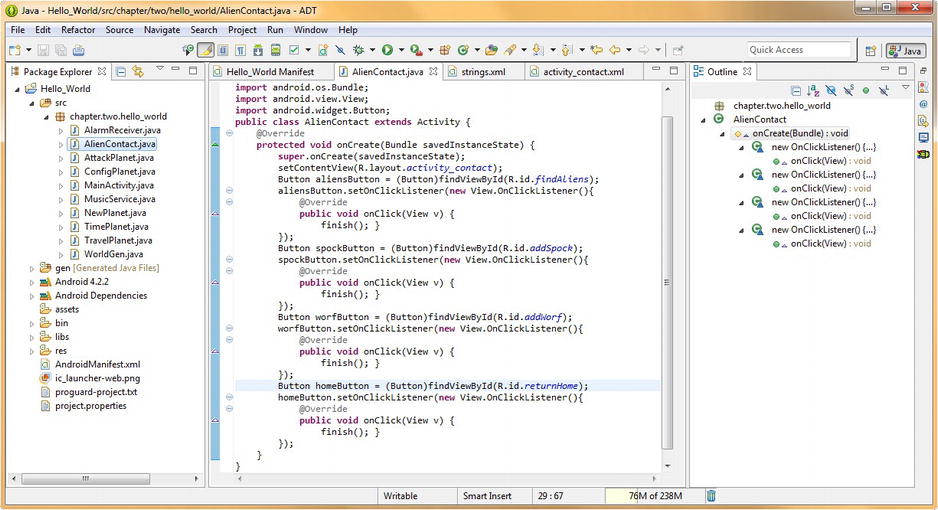
Figure 19-14. Adding Java code for our Button UI elements and their onClick( ) event handling methods
We are using a finish( ) method call inside our onClick( ) event handling code block so that each button has a function (returns us to Home Screen) until we replace it with database related code later on in the chapter. This makes testing the Java code as we go along easier and error-free.
If you like you can use your Run As Android Application work process to launch the Nexus S emulator and see the user interface screen in all its glory and click each button to return to the app Home Screen.
Next we will code the aliensButton object so that it calls a listAliens( ) method which lists all the aliens in our Galaxy using the Toast class, so that all the alien names are broadcast to our user interface screen.
Using a ContentResolver: Coding Our listAliens( ) Method
The first thing that we need to do is to replace the finish( ) method call in our aliensButton event handling code block with a listAliens( ) method call. When you do this Eclipse uses a wavy red underline to highlight the fact that this method does not exist, as is shown in Figure 19-15.

Figure 19-15. Adding listAliens( ) method call and Create method 'listAliens( )' in type 'AlienContact' helper option
Also shown in Figure 19-15 is the helper dialog that comes up when your mouse is held over this error highlighting, as well as the empty method that Eclipse writes for you when you select the second option named Create method ‘findAliens( )’ in type ‘AlienContact’ and voila! Look at the bottom of your editing screen: the empty listAliens( ) method has appeared!
Now it is time to write our first database related Java code to access the Contacts database that we have requested permission to use in our Android Manifest XML file. In this case we’ll initially be using the READ_CONTACTS permission, because we are going to read the Contacts database and then list all the Aliens in our Galaxy Alliance on the user interface screen.
First we use the Android Cursor class, used to navigate through database tables, and create a Cursor object named AlienCur (I was tempted to name this object alienCurse but resisted). In the same line of code we can load this Cursor object with the database table we want to traverse using the getContentResolver( ) method, using the following single line of Java code:
Cursor alienCur = getContentResolver().query(ContactsContract.Contacts.CONTENT_URI, null, null, null, null);
This calls the ContentResolver class getContentResolver( ).query( ) method, which accepts parameters for the database URI that you want to query, as well as projection, selection, arguments, and sort order. Since we are just reading through the entire Contacts database, we are not going to use any of these other database access specifier parameters, and thus we use the null value (which serves as an unused indicator) in that parameter slot.
Now that we have created our alienCur Cursor object and loaded it with the database content that we want it to traverse and read, we can construct a Java while statement to read through all the records (fields) in this database table. Because we want the Cursor object to .moveToNext( ) or move to the next record while the while loop is still valid, we start off with:
while (alienCur.moveToNext()) { our while loop processing Java code goes in here }
Inside of the while loop, we have two Java statements, which process the database contents during the time that the while loop is running (valid). This is defined by the while loop’s condition, which specifies that the contents of the while loop should be executed while the loop can still MoveToNext (while there is another record to READ in the database table).
The first line of code creates a String object named alienName to hold the data we are about to read and then sets it equal to the operation that actually reads the data from the database table using the Cursor object we created in the first line of code. The Java code to do this is as follows:
String alienName =
alienCur.getString(alienCur.getColumnIndex (ContactsContract.Contacts.DISPLAY_NAME_PRIMARY));
We set our alienName String object equal to a result from the .getString( ) method, called on the alienCur Cursor object, which gets its results from the .getColumnIndex( ) method that is called on the alienCur Cursor object.
As you can see, the parameter given to the Cursor object .getColumnIndex( ) method call specifies the data column (field) held in the primary display name database record. This is referenced by using the DISPLAY_NAME_PRIMARY constant, which is itself referenced via the ContactsContract database, and is located in the Contacts table. This is shown in Figure 19-16.
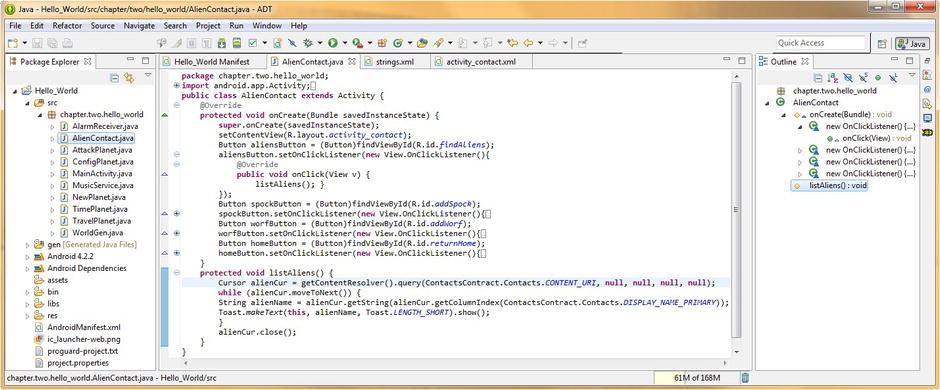
Figure 19-16. Coding a listAliens( ) method accessing the ContactContracts database using getContentResolver( )
Now that we have the data that we want to display, in the String format that we need it to be in, we can simply call the Toast object, via its .makeText( ) method, and display the data to our new user interface screen.
We will do this by using the following familiar line of Java code, which chains the .makeText( ) and the .show( ) methods one after the other off the Toast object. like this:
Toast.makeText(this, alienName, Toast.LENGTH_SHORT).show();
After entering the closing bracket, which ends our while loop definition, we’ll finally need to close (remove the Cursor object from system memory) the alienCur Cursor object, which is currently holding our database data.
This Cursor object can potentially take up a significant amount of system memory, by the way, so it is quite important that when we are done, we use the Cursor class’s .close( ) method to clear the Cursor object that we have defined out of the system memory.
This is done using one simple method call off the alienCur object. This is done using Java dot notation, and is shown in the following Java code:
alienCur.close();
Now we’re ready to add Aliens to our Android emulator’s Contact database, so that we can test the Permissions, Java code, and XML mark-up which we have just written in the previous sections.
Adding Alien Contacts to the ContactsContract Database
Assuming that you still have Eclipse open, launch the Android emulator, by using the Window ![]() Android Virtual Device Manager menu sequence. This work process launches the Nexus S emulator, without having the emulator load and run your Hello World application automatically.
Android Virtual Device Manager menu sequence. This work process launches the Nexus S emulator, without having the emulator load and run your Hello World application automatically.
It is also important to note here that if for some reason a Run As Android Application work process for any reason does not launch Android’s emulator functionality, that this is the way to “hard launch” the Android emulator.
When the Android Virtual Device Manager dialog appears, select the Nexus S emulator option from the list of emulators we set up earlier in this book, and click on the Start… button.
When the Launch Options dialog appears, uncheck the Launch from snapshot, as well as the Save to snapshot option, and click the Launch button.
This then brings up the Starting Android Emulator dialog as well as a progress bar that shows the emulator being loaded and launched. Once it launches, you can then close the Android Virtual Device Manager dialog.
What you will see when the Nexus S emulator launches is a Smartphone Start Screen emulator, shown in Figure 19-17 on the left side of the screenshot.

Figure 19-17. Using the Contact Database Icon (second from left bottom icon) to create new contact
The utility for managing your Contacts database is so important that it is right there on the bottom left of your Smartphone Start Screen, indicated by a little talking head inside of a blue contact sheet icon simulation.
Click this icon to launch your emulator’s Contact Management Utility, which is shown on the right-hand side of Figure 19-17.
Click the top button to Create a new contact in your Smartphone (emulator) Contacts database. This brings up a dialog that informs you that because you are using an emulator, the new contact information that you are about to enter will not be backed up since you are not using a real phone.
In case you want to use the emulator to create real contact database information that can be accessed by your real Android Smartphone account, the dialog then asks you if you want to add an account that would back up the contacts that you enter in the emulator on-line.
Because we are just using this as a testing application for the Contacts database code that we are learning about in this chapter, we are going to select the button option on the left that says “Keep Local,” so that the information that we enter is stored on our workstation’s hard disk drive, and not “in the cloud” as it were.
This Keep Local dialog is shown in Figure 19-18, and once we select the Keep Local option, we will see the Contact Management user interface.
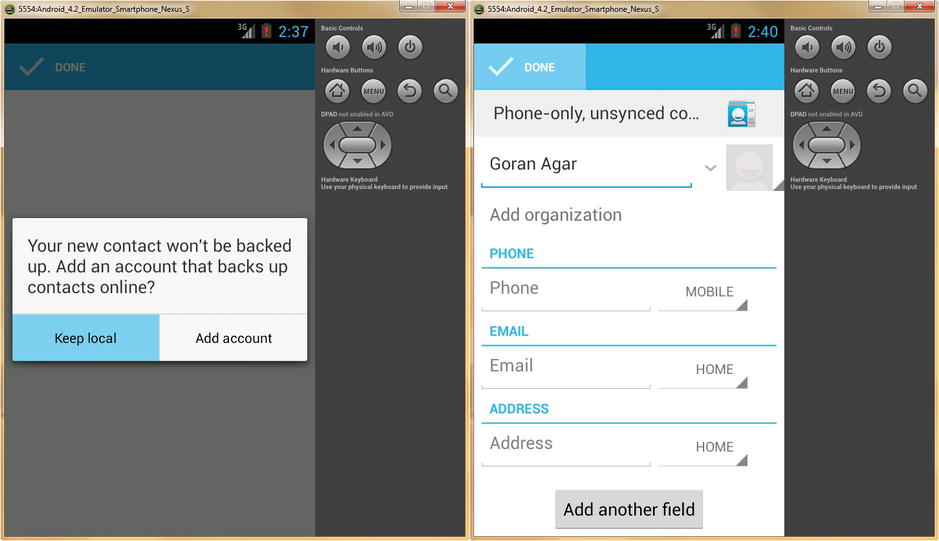
Figure 19-18. Keeping our Contacts Database local and adding a new alien named Goran Agar to the database
Once the Contact Management screen appears, as shown on the right side of Figure 19-18, we will enter our first alien name, Goran Agar, one of the Jem Hadar race, featured on the popular Star Trek series.
Once you enter Goran Agar’s name on the dark blue line located at the top of the user interface screen, click the light blue Done button located right above and to the left of the text entry field, as shown in Figure 19-18.
To see the entry you have just entered in your contacts database, click the left-facing arrow at the top of the screen and you will be brought to the Contacts database listing screen shown in Figure 19-19 on the left.
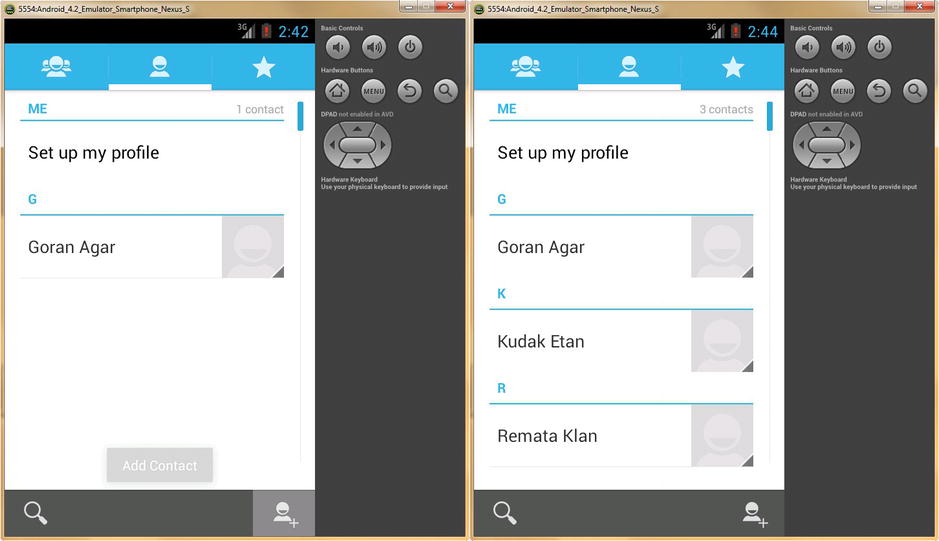
Figure 19-19. Viewing added alien contact, and repeating the work process to add Kudak Etan and Remata Klan
On the bottom right of the Contacts database listing screen, which, at this point in time, only shows our alien friend Goran Agar, if you look closely, you will see a square gray icon of a head with a + symbol next to it. This allows you to add another contact to your Contact database, so click this icon now, and we will add some more aliens to our Galaxy Alliance.
Add two more aliens from the Jem Hadar race, named Remata Klan and Kudak Etan, using the same work process as outlined previously. Once you do this, the Contact Database List Screen should look like it does in the right side of the screenshot shown in Figure 19-19.
Now we have enough aliens in our Alien Contacts database to test our app!
Before we test our AlienContact.java Activity we need to be able to access it from our Home Screen options menu, so let’s do that next so that we can test our listAliens( ) method now that we have the data in the (Alien) Contacts database to do this.
Adding the AlienContact Activity to the Home Screen Menu
The first thing we need to do to add a new options menu entry is to create a <string> constant in our strings.xml file for the menu label.
Following the format for our other menu string constants, let’s create a menu_contact_planet named <string> tag with the menu label value of Make Alien Contact, and place it in the strings.xml file under our other menu string constants, as shown in Figure 19-20. Your XML mark-up for the <string> tag should look like the following:
<string name="menu_contact_planet">Make Alien Contact</string>
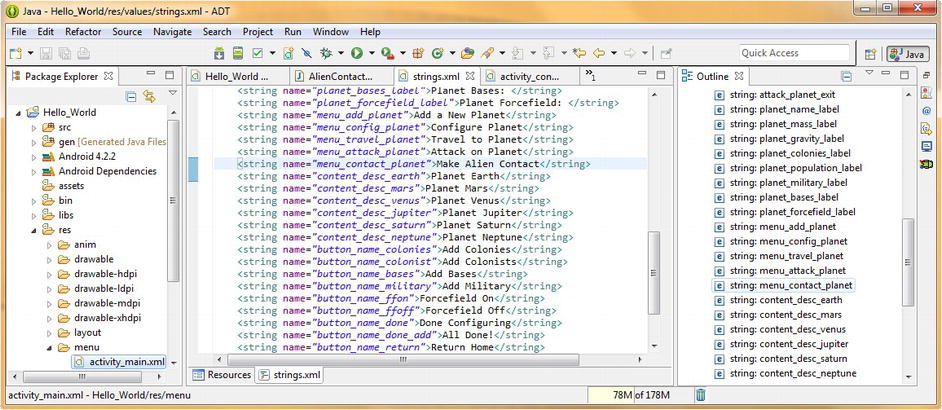
Figure 19-20. Adding a fifth menu item label Make Alien Contact named menu_contact_planet to our strings.xml
Once this is done, we will be ready to change the placeholder fifth menu item entry in our activity_main.xml file in our /res/menu subfolder with the Make Alien Contact menu option that will call our AlienContact.java Activity subclass. Remember that there are two activity_main.xml files for our application, one in /layout for UI, and one in /menu for menu design.
Right-click the activity_main.xml file, in the /res/menu folder, and select the Open option (or select the filename in the Package Explorer and then hit F3). Edit the last placeholder item in the file to have an android:id setting of menu_contact and edit the android:title parameter to reference @string/menu_contact_planet, as is shown in Figure 19-21.
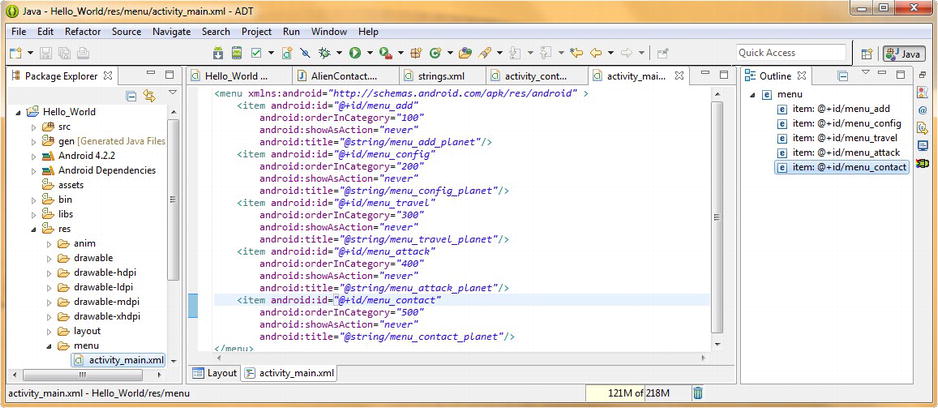
Figure 19-21. Changing our fifth menu <item> placeholder tag to menu_contact to access Make Alien Contacts
Because our onCreateOptionsMenu( ) method already inflates our menu XML file definition, the next thing that we logically need to do is to modify our onOptionsItemsSelected( ) method, and add a case statement that handles the menu_contact ID and that launches our AlienContact.java Activity subclass.
Open your MainActivity.java Activity in the Eclipse central editing pane and close up all the methods except for onOptionsItemSelected( ) as shown in Figure 19-22. Then, add a case R.id.menu_contact: statement that creates an intent_contact Intent object, and sets it to call the new AlienContact class. Finally, call the .startActivity( ) method, using this Intent object, then use break; to exit this section of the case statement.
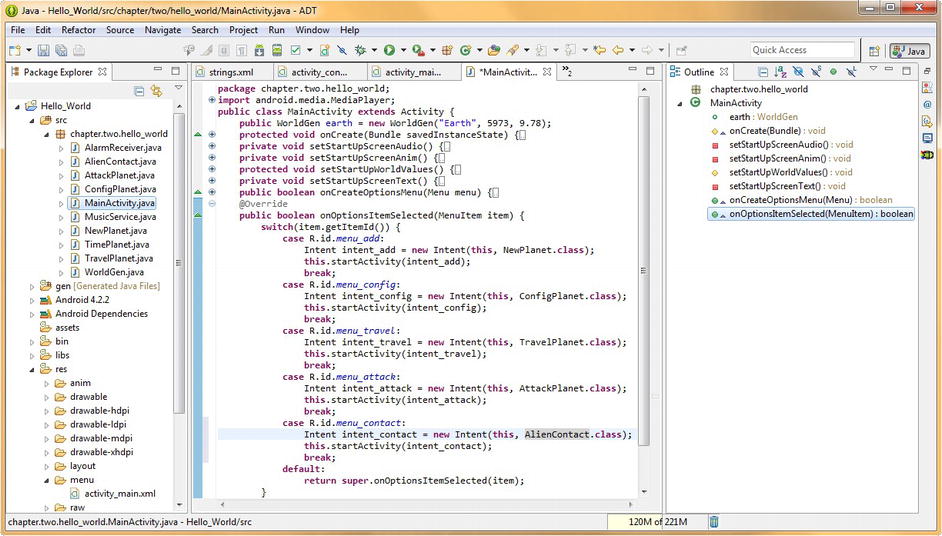
Figure 19-22. Adding a menu_contact entry in the switch( ) method case statement to open AlienContact Activity
The fifth menu item case statement code should look like the following:
case R.id.menu_contact:
    Intent intent_contact = new Intent(this, AlienContact.class);
    this.startActivity(intent_contact);
    break;
Now that we have enabled our user (and ourselves) to start the AlienContact.java Activity subclass, we can test our activity_contact.xml user interface design and our Java code that implements it, as well as the ContentResolver that will read our Alien Contacts database entries that we just created in the previous section.
Right-click your Hello_World project folder and then select the Run As Android Application menu sequence, or, if you prefer, utilize the Window ![]() Android Virtual Device Manager work process we used earlier in the chapter to launch the emulator.
Android Virtual Device Manager work process we used earlier in the chapter to launch the emulator.
Testing the listAliens( ) Method in the AlienContact Activity
Once the Nexus S emulator launches, find the Hello_World icon (Saturn) and launch the app. If you used the Run As Android Application menu sequence, this will be done automatically for you.
Once the Hello_World Home Screen appears, click the Menu button on the top right of the emulator, and bring up the options menu that we just created, as shown on the left-hand side of Figure 19-23.
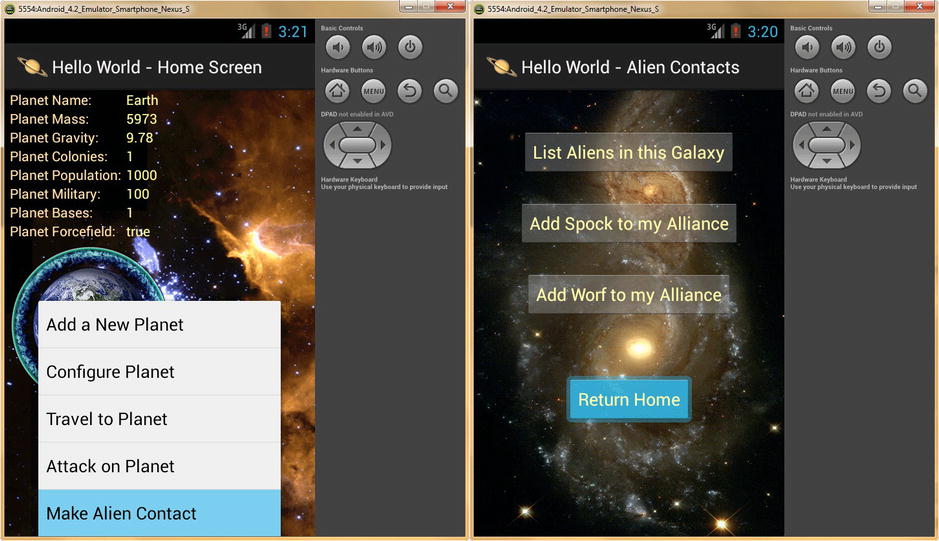
Figure 19-23. Select Make Alien Contact menu item to launch AlienContacts Activity Test Return Home Button
Select the Make Alien Contact menu item at the bottom of the menu and open the Alien Contacts Activity user interface screen shown on the right-hand side of Figure 19-23.
Click the Return Home button as well as the Add Spock and Add Worf buttons and make sure that they call the finish( ) method and take you back to the Hello_World app Home Screen.
Once you have tested those, click the Menu button in the emulator again, and enter the AlienContact.java Activity subclass, so we can test the List Aliens in this Galaxy button and make sure that it is traversing through our Alien Contacts database, using the Cursor object, and listing all our Alien Contacts from the elite Jem Hadar intergalactic race.
When you click the List Aliens in this Galaxy button as shown on the left-hand side of Figure 19-24, you will see the Toast messages appear at the bottom of the user interface screen, listing all three of the Jem Hadar race members in your Alien Contacts database.

Figure 19-24. Testing the List Aliens method using the List Aliens in this Galaxy Button and its Toast messages
The Toast message for Goran Agar is shown on the bottom right-hand side of the screenshot in Figure 19-24 so our ContentResolver Java code is working perfectly. Next, let’s write another Java method called addToAlliance( ), which shows us how to use the Android ContentValues class to enable us to add new Alien Contacts to our Alliance Database, by using our own custom Java code, rather than having to use the Android OSes’ Contact Management Utility.
Android ContentValues: Code an addToAlliance( ) Method
Open up the AlienContact.java editing tab in Eclipse and replace the finish( ) method calls in the onClick( ) event handlers for the spockButton and worfButton code blocks with method calls to the new addToAlliance( ) method that we will be writing. The format for this method call passes a String parameter like this addToAlliance(String Value) so the line of Java code would look like this:
addToAlliance("Spock");
Once you have added addToAlliance( ) method calls for Spock and Worf, we need to code the protected void addToAlliance(String newAlien) method.
The first thing that we do in our addToAlliance( ) method is to construct a ContentValues object named alienContact using the Java new keyword, using the following single line of Java code:
ContentValues alienContact = new ContentValues();
After that, we can load the alienContact ContentValues object with the newAlien parameter String data that we passed into the method. We do this by using the .put( ) method, called off of the alienContact ContentValues object, with the first parameter directing where we want the data to be placed, and the second parameter being the data itself to be placed into that field. This is shown in Figure 19-25 near the bottom of the screen.
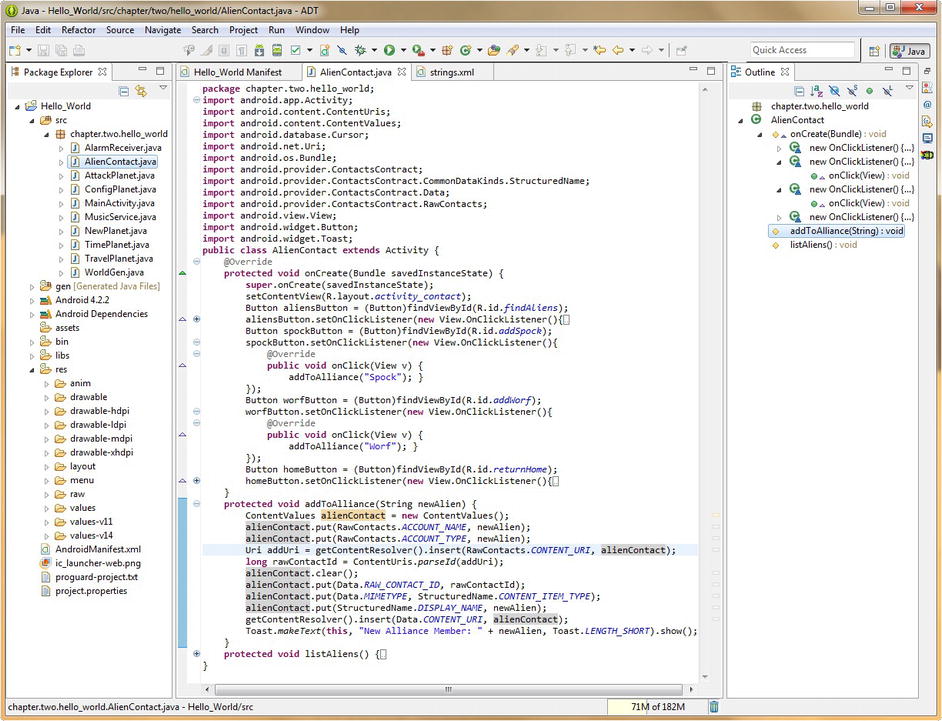
Figure 19-25. Coding our addToAlliance( ) method to access the ContentValues class to add Aliens via .put( )
As you can see, this is done for the ACCOUNT_NAME and ACCOUNT_TYPE columns (data fields) in the RawContacts database table that we want to specify in the ContentValues object, by using the following two lines of Java code:
alienContact.put(RawContacts.ACCOUNT_NAME, newAlien);
alienContact.put(RawContacts.ACCOUNT_TYPE, newAlien);
Then we create a Uri object named addUri, and set that equal to the result of a getContentResolver.insert( ) method call, using the parameters for the database to WRITE to (insert data) and the data to be written. This is the RawContacts database, specified using the RawContacts.CONTENT_URI constant and the alienContact ContentValues object, now loaded with our newAlien String data. This is done using the following single line of Java code:
Uri addUri = getContentResolver().insert(RawContacts.CONTENT_URI, alienContact);
Next we create a long variable named rawContactId, and set it equal to the result of a ContentUris.parseId(addUri) method call, which puts the addUri Uri object into long value format compatible with the .put( ) method we are about to call. This is done using the following single line of Java code:
long rawContactId = ContentUris.parseId(addUri);
Remember that as you type in this new database WRITE operation Java code, any Android class that you call or use, such as ContentValues, ContentUris, or ContentResolver that has not already been imported, that is, an import statement written for it at the top of the class (which, as you have seen, Eclipse will readily do for you) will be highlighted with a wavy red line underneath the offending method call.
Now that we have our database ID in the correct (long) numeric format in our variable rawContactId, we can now use the .clear( ) method to clear our alienContact ContentValues object, so that we can use it again, to WRITE more data values into the other databases which are interrelated with the Android Contacts database. The line of Java code should look like this:
alienContact.clear();
This is why database coding in Android is difficult; as I mentioned at the beginning of this chapter, it has to do more with the intricacy of how the database hierarchy is set up than the Java code that is used to access (or to write) the data. You are about to see that here, as we discuss how the rawContactId is used to write the same data you wrote into the RawContacts database table into the related Data and StructuredName database tables.
First we need to put the rawContactId value into the Data.RAW_CONTACT_ID database table, using the .put( ) method via this single line of Java code:
alienContact.put(Data.RAW_CONTACT_ID, rawContactId);
Then we need to put the data value that is in the CONTENT_ITEM_TYPE data column of the StructuredName database table into the MIME_TYPE data column in the Data database table, using the following line of Java code:
alienContact.put(Data.MIME_TYPE, StructuredName.CONTENT_ITEM_TYPE);
Then we need to put our newAlien String object (alien name) into the DISPLAY_NAME data column of the StructuredName database table, like this:
alienContact.put(StructuredName.DISPLAY_NAME, newAlien);
Finally we can insert all this data related to the RawContacts database that we have set up into the Data database table using the CONTENT_URI and alienContact ContentValues object that we have been building over the past several lines of code. We will again accomplish this by using our trusty getContentResolver( ).insert( ) method call, using the following Java code:
getContentResolver.insert(Data.CONTENT_URI, alienContact);
Now we are ready to Toast the end-user and tell them what we have just done so that they are aware that the newAlien has been added to the RawContacts (and Data) database table as a New Alliance Member. This is done using the following line of code, which chains two methods together:
Toast.makeText(this, "New Alliance Member: " + newAlien, Toast.LENGTH_SHORT).show();
Let’s test our new addToAlliance( ) Java method via our AlienContact.java Activity inside the Android Nexus S emulator, to see if our new alliance members, Spock and Worf, are being added to the Alien Contacts database.
Launch the Nexus S emulator, and when the Hello_World Home Screen appears, click the Menu button, and select the Make Alien Contact menu option.
Once that Activity screen appears, click your Add Spock to my Alliance and Add Worf to my Alliance buttons, and make sure that the Toast messages appear at the bottom of the user interface screen. Looking great so far!
Now, all that we have left to do is to confirm that the Alien Contact data has indeed been properly added to the Android Contacts databases, as if we had done it using the Contact Management Utilities, which we used earlier.
If we wrote our database code correctly, then our new Alien Contacts data will be in the Android Contact Management Utility when we enter it next, just as if we had added it directly using that utility. If we did not write our database structures correctly, the data will not appear there.
Exit your Hello_World application and return to the Smartphone emulator Home Screen and click the Contact Management icon on the bottom left of the screen as we did earlier in the chapter. When your (alien) contacts list appears, you will see when you scroll down that Spock and Worf are now present and correctly alphabetized in your Contacts database listing!
Note that you can also use your List Aliens Button in your app to test to make sure these two aliens have been added as well if you like.
Summary
In this final chapter, we took a close look at one of the most complex and detailed areas in the Android OS: Data Access, Content Providers, and SQL Database Management Systems. This is a topic that really requires its own separate book, so pat yourself on the back, for a learning job well done.
We first took a look at database terminology and fundamentals, so that we are all on the same page. We learned about SQL and database tables and data rows (records) and data columns (fields) and how data is accessed via an ID or Key or Index.
We then took a look at the open source MySQL database technology, and the memory efficient version of this open source DBMS engine that is a part of the Android OS called SQLite. We learned about the SQLite data types and the caveats of working with SQLite inside of the Android OS.
Next we took an overview of Android Content Providers and Android Content Resolvers, and the different types of places that the Android OS can access stored data from, including preferences, memory, SD card, internal file system, internal SQLite databases, and remote data servers.
We then took a look at how data is accessed inside a database table using a Content URI. We looked at the different sections or parts of the Content URI structure, and put together some sample URIs and finally took a look at the conventions for using a Content URI inside of the Android OS.
Next we took a look at the most prominent Content Provider Java Interfaces which are exposed as part of the Android OS for the Contacts, Calendar and MediaStore functions that are so often used by users. We listed the various sub-tables for those databases and then took a look at deprecated databases that were used before Android 2.1.
Finally it was time to add Content Provider functionality to our own Hello World Android application. We added permissions to our AndroidManifest.xml file using the Visual Permissions Editor in Eclipse and then created an AlienContact.java Activity and all of the string constants, user interface designs, menu design and methods that were needed to implement reading and writing to a built-in Android Contacts database structure.
Finally, we learned about the Android Contact Management Utility so that we could test our database code and created methods that READ our Alien Contact database and WRITE new Aliens into our Alien Contacts database.
Congratulations, you have now finished the extensive introduction to the Android OS and many of its key features, packages, methods, and classes. Now be sure and practice what you have learned here, and build upon it by reviewing all the latest information on the Android Developer website.