
Android Vector Animation: Procedural Animation via XML Constructs
In this second chapter covering animation, we will learn about the “other” type of animation in Android, the type that uses code, rather than pixels, to produce its magic. This type of code-based animation is commonly called procedural animation and involves things like ranges and pivot points.
There are several procedural animation terms used in the industry. If you hear the term tween animation, it is referring to a procedural way of creating animation. This is because tweening is actually interpolation, or dividing the number of frames you want your animation to span, between the start and end values, or range, for that animation’s calculation.
We’ll get into the math for interpolation and other procedural animation concepts such as pivot points in the next section. Another term that you may hear for procedural animation is vector animation. A vector is a ray or line, but the general concept is that the animation is created by using mathematical constructs rather than using collections of rasters (pixels).
Vector and raster are two completely different approaches; raster is data heavy, whereas vector is data compact. The reason for this is because text (math) compresses well, and arrays of pixels (and frames) simply do not. Vector uses more CPU resources (while it does the calculations), whereas raster uses more storage or bandwidth resources (transferring data). This is because a mathematical vector needs to be rendered to the display screen, which means the math is turned into graphical elements, usually motion graphics, or 2D animation.
So, Adobe Illustrator (or InkScape) is a vector imaging software package, whereas Adobe Photoshop (or GIMP 2) is a raster imaging software package.
Procedural Animation Concepts: Rotation, Scale, and Translation
Let’s start out by learning about some of the concepts involved in vector imaging and animation. First of all, there are two primary types of vector platforms, 2D or two dimensional (flat) vector graphics, such as we find in Illustrator or InkScape, and 3D or three dimensional (volumetric) vector graphics, such as what we find in 3D modeling software like Blender 3D.
Note Concepts that we’ll cover in this section of the chapter apply to both 2D and 3D imaging and animation. Both use vectors; 2D vectors in 2D, and 3D vectors in 3D, and both 2D and 3D involve the core concepts of translation (movement), rotation, and scaling. In 2D these concepts involve the X and Y axes, and in 3D, these involve the X, Y, and Z axes.
There is a Z concept in 2D animation, but it is not a Z axis, but rather a Z order. Z order in 2D is more like layers in digital imaging, it involves what layer order each 2D (flat) layer is in, and whether it is front of or behind other 2D layers. Z order is a number that orders the layers in a 2D composite, and defines what is in front of, and what is behind, a given 2D layer. Changing Z order in real-time can create flip-book special effects.
Translation in 2D involves movement along the X and Y axes, and it is the most basic of the three transformations that can be done in 2D animation. Translation is defined by the starting point of the movement, the amount of that movement, in pixels or percentages, and the direction of movement, along either the X or the Y axis, or some relative combination of both.
Rotation in 2D involves the rotation around a given pivot point, and it is defined by degrees, the direction (positive or negative) of that rotation, and the pivot point (center) location of the rotation. Because there are 360 degrees in a full circle, rotational mathematics involves this 360 number specifically, just like FPS calculations involve the number 1000 (a number of milliseconds in a second).
Scale in 2D involves the size of a given shape defined by a decimal number relative to the current size of the shape. For instance, a 0.5 scale would be half of the current size and a 2.0 scale would be twice the size of the current shape. Like translation, scaling has an X and a Y component to it, if the values are the same, the scaling can be said to be uniform scaling, if they are not the same, the scaling is said to be non-uniform scaling.
Interestingly you can also define a pivot point in your scaling operation, which allows skewed scaling where your scaling operation can be influenced by the placement of the pivot point. On irregular shapes, this can give a more precise level of control over the resulting shape-warping effects of the scaling operation. Given that sometimes the 2D shapes being scaled are bitmap images, some very interesting results can be obtained using a pivot point placement that is not at the center point of the image.
Implementing Rotational Animation: The Attack Bomb UI Icon
Let’s start out implementing procedural animation by animating a static image on our attack a planet user interface screen so that it looks like an animated icon. We’ll rotate our bomb ImageButton UI element, so it is animated along with our virus ImageButton, which we frame animated in the previous chapter. Because we created an alpha channel for the bomb image, this gives us a seamless 2D effect with our space image background.
Right-click your project resource folder, then select the New ![]() Android XML File menu option sequence. Select a Resource Type: of Tween Animation in Project: set Hello_World and then name the file anim_rot_bomb, short for animation rotation bomb image. Next select the Root Element of <rotate> and finally click the Finish button, as shown in Figure 10-1.
Android XML File menu option sequence. Select a Resource Type: of Tween Animation in Project: set Hello_World and then name the file anim_rot_bomb, short for animation rotation bomb image. Next select the Root Element of <rotate> and finally click the Finish button, as shown in Figure 10-1.
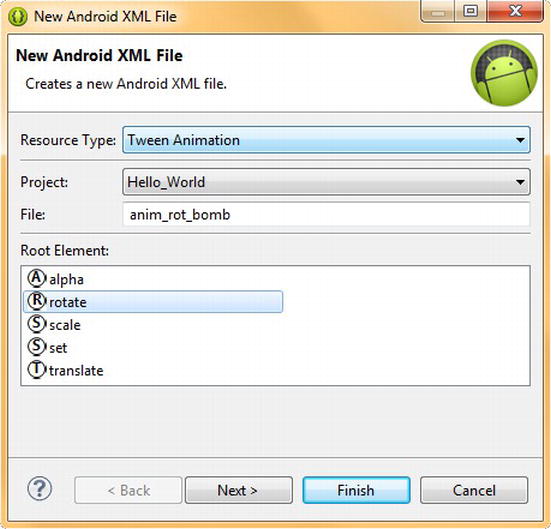
Figure 10-1. New Android XML file for Tween Animation (rotation)
This opens up a blank XML file with the <rotate> tag, which we populate with parameters for what we want our rotation process to entail.
First delete the </rotate> end-tag, because this is not going to be a parent (container) tag. Split the <rotate> opening tag into a <rotate on one line, and then add an ending or closing tag symbol /> on the next line, as shown in Figure 10-2.

Figure 10-2. Adding rotation animation parameters via the android: parameter helper dialog inside of Eclipse
Also shown in Figure 10-2 is our little trick of typing android: to get a parameter helper dialog with a list of parameters that will be usable in the <rotate> tag. You should always utilize this technique to invoke and study available parameters before you use a tag, and we will try and use as many of these parameters in this example, to show you what they all will do.
The first thing we need to add is an xmlns:android parameter that references the http://schemas.android.com/apk/res/android URL so that any parameters that we add can be validated with the current specification that is located on the Android website. Until you add this initial XML Naming Schema (XMLNS) reference any parameter you add will be marked with a red X error because it cannot be verified as a proper parameter. This is because the android: that is appended before each parameter equates to the URL defined herein.
The most important thing to define in a rotation animation is the rotation parameters themselves, in degrees, using the android:fromDegrees and the android:toDegrees parameters. Since we want full circle seamless animation for our attack bomb icon, we will use from 0 to 360 in these settings to obtain a full seamless rotation of the bomb image.
The next two settings that we add establish the center point, or pivot point, of this rotation, using X and Y coordinates. In Android, your pivot point is established using a percentage, from 0% to 100% into the 2D image from the upper-left corner of the image. By making this a percentage it doesn’t matter how many pixels our image is, and this thus accommodates the wide range of resolution images that we need to support the many types of Android devices on the market these days.
Because we want the image to rotate around its center point, we will use a setting of 50% for the android:pivotX parameter, and a setting of 50% for the android:pivotY parameter as well. If the image (and alpha) is not centered to the pixel perfectly, there may be some wobble. Note that this is more easily fixed in this XML mark-up (i.e., by using settings of 49% and 51% to slightly move the pivot diagonally) than by going back onto GIMP and counting border pixels above and to the side of the bomb image.
The next thing we need to do is to set an interpolation method for our 2D animation by using an android:interpolator parameter, with an interpolator constant that is defined in the Android OS internal resources R. pathway.
Currently, the Android OS supports 13 interpolator constants. Each of the interpolator constants accesses an Interpolator class subclass in Android.
Each of these Interpolator subclasses apply a mathematical curve to the animation frame rate that adjusts the transition speeds between each animation frame to achieve more complex and realistic motion effects.
If you want to research these interpolator methods in detail, there is an entire page dedicated to them on the Android Developer website located at:
http://developer.android.com/reference/android/view/animation/Interpolator.html
The interpolator that we need to use here is a linear interpolator, which gives us a nice even movement along all parts of our animation. We will be using other interpolator constants throughout this chapter, so you can see what they do and how they look when applied to your 2D animation settings. If you want to see all the R.interpolator constants in one place, go to:
http://developer.android.com/reference/android/R.interpolator.html
To apply an interpolator constant, we will reference it from the Android OS resource (R) bucket using @android (the OS) along with :anim (animation resources) and /linear_interpolator (the path to that constant) like this:
android:interpolator="@android:anim/linear_interpolator"
Next we need to define the Repeat Count for the animation. This is done via an android:repeatCount parameter, which takes either an integer value (a number of loops to complete value) or the predefined infinite constant.
The infinite constant is used only if there is a UI element that needs to animate forever, such as a user interface button or a UI design element.
Because our attack bomb ImageButton image icon falls into this category, we will use an android:repeatCount=“infinite” parameter to achieve this end-result.
Finally, we need to define the cycle duration for the animation, that is, the time over that one loop of the procedural animation is to occur.
Animation cycle duration is defined using the android:duration parameter, with the exact time that each loop of the animation is to span (animation speed) defined in milliseconds. Let’s start out with a fast value of 2000 milliseconds, or one second per 180 degrees of rotation, and later on, if this is too fast, we can increase its value to 8000 milliseconds or more.
Now we have implemented the <rotate> tag parameters that we need to define our bomb rotation 2D animation (using about half the available parameters, which are shown in Figure 10-2) and we can implement the animation in Java next. The XML tag and its parameters should contain the following mark-up:
<?xml version="1.0" encoding="utf-8"?>
  <rotate
    xmlns:android="http://schemas.android.com/apk/res/android"
    android:fromDegrees="0"
    android:toDegrees="360"
    android:pivotX="50%"
    android:pivotY="50%"
    android:interpolator="@android:anim/linear_interpolator"
    android:repeatCount="infinite"
    android:duration="2000"
  />
Figure 10-3 shows the completed anim_rot_bomb.xml file in Eclipse.

Figure 10-3. Configuring <rotate> tag’s rotational definition parameters for the anim_rot_bomb.xml file in Eclipse
Adding Java Code for the Rotation
Our Java code for the animation trigger is logically defined within the AttackPlanet.java file because that class controls the Activity screen for attack functions. Click the number in the top right of the Eclipse editing pane, drop down the open files menu, and select: AttackPlanet.java.
The first thing that we need to do in our Java code is to add a line of space under our .setContentView() method call, so that we can declare an Animation object, using the Android Animation class. Name this Animation object rotateBomb and reference the anim_rot_bomb XML like this:
Animation rotateBomb = AnimationUtils.loadAnimation(this, R.anim.anim_rot_bomb);
Notice that declaring an animation and loading a procedural XML definition is done a bit differently, by declaring and naming the Animation object on the left side of the equal sign, and calling the .loadAnimation( ) method via dot notation off of the AnimationUtils class. The AnimationUtils class uses its loadAnimation method to reference the current context (this) and the animation XML definition in anim_rot_bomb.xml in its second parameter.
When you type in this line of code, Eclipse red underlines the classes for which you need to define import statements, and you can click these and select the link that has the IDE do this for you, if you prefer.
Now that we have set up an Animation object to perform this animation for us, all we have to do is to wire it to our bombButton UI object and start the animation, which again we accomplish in one compact line of Java code.
bombButton.startAnimation(rotateBomb);
This has our bombButton ImageButton object call its startAnimation method and passes it over the rotateBomb Animation object that we just created in the line of code directly above it. As you can see in Figure 10-4, it only takes two very dense lines of Java code to implement a procedural animation since all the heavy lifting defining what we want the animation to do has been off-loaded to XML. This allows designers to focus on the UI and animation design so that the Java coders do not have to. Pretty genius stuff!

Figure 10-4. Adding an Animation object named rotateBomb and assigning it to bombButton via .startAnimation()
Next, let’s get a little bit more complicated, and combine some procedural (vector) animation with our existing frame-based (raster) animation in our attack virus icon ImageButton UI element. In this way, you can see how to use an optimal combination of both the vector and raster animation worlds, to obtain an advanced end-result, using a relatively small amount of Java and XML code and only a half-dozen digital image assets (frames).
Implementing Scalar Animation: The Pulsing Attack Virus UI Icon
We start out creating another procedural animation XML file just like we did back in Figure 10-1, only this time we select the <scale> root element for our XML file, instead of the <rotate> element. This is because we are going to make our attack virus pulse or flex, in addition to its current frame-based virus movements. Let’s name this XML file anim_scale_virus.
Now we again separate the <scale> tag into <scale and /> and delete the </scale> closing tag, as well as add our xmlns:android parameter to reference the DTD (document type definition) online via the usual URL.
Now we use the android: work process to bring up the Eclipse helper dialog listing all the <scale> element tag parameters, so we can peruse what this tag can (and will) do for us. This is all shown in Figure 10-5.

Figure 10-5. Creating our anim_scale_virus.xml and using the android: parameter helper dialog with <scale> parameters
The first and primary parameters that we’re going to set-up in the <scale> tag are the android:fromXScale and android:toXScale parameters. Since we want to pulse our virus we will scale it from 100% (its default or current size) down to 75%, and then back again. Thus we need to set our fromXScale parameter to 1.0 (or 100% in decimal representation), and set our toXScale parameter to 0.75 (or 75%, as expressed as a decimal representation).
Because we want to scale our virus uniformly or evenly across both the X and Y axes, we set our android:fromYScale and android:toYScale parameters with the exact same numeric values.
As I mentioned earlier in the chapter, scales can be made to scale with a directional skew by setting a pivot point X and Y values, which we set here to familiarize you with the parameter, but since we want the virus to flex evenly on its center we center our pivot point using 50% values in both the X and Y pivot parameters.
Now it’s time to set an animation interpolator using android:interpolator, and we will use an accelerate_decelerate interpolator here to get a little bit more fancy, and give a little character to our virus’s flexing motion.
Next we set the length of a single loop of our scale animation using the android:duration parameter set to 3000 milliseconds, or 3 seconds. We need a smooth, slow scale so this should be a good starting value that we can tweak (increase) later if needed for a more realistic effect.
Now all we have to do is set our repeat parameters and we will be ready to implement the scale animation definition in our Java code. There are two repeat parameters that we are going to use for this scale animation, the android:repeatCount, which we have seen before and we are going to again set to infinite, and the android:repeatMode which is new to us and which we are going to set to reverse.
RepeatMode has two constants in Android, the reverse constant we are using here, which causes a pong animation effect and makes our virus flex, and the restart constant, which creates a seamless loop and is the default value or setting. Thus, if you leave the android:repeatMode parameter out, or undeclared, your animation will loop seamlessly, if you have included an android:repeatCount parameter set to infinite. Your XML mark-up should look like this:
<?xml version="1.0" encoding="utf-8"?>
   <scale
      xmlns:android="http://schemas.android.com/apk/res/android"
      android:fromXScale="1.0"
      android:toXScale="0.75"
      android:fromYScale="1.0"
      android:toYScale="0.75"
      android:pivotX="50%"
      android:pivotY="50%"
      android:interpolator="@android:anim/accelerate_decelerate_interpolator"
      android:duration="3000"
      android:repeatCount="infinite"
      android:repeatMode="reverse"
   />
Figure 10-6 shows the completed tag.
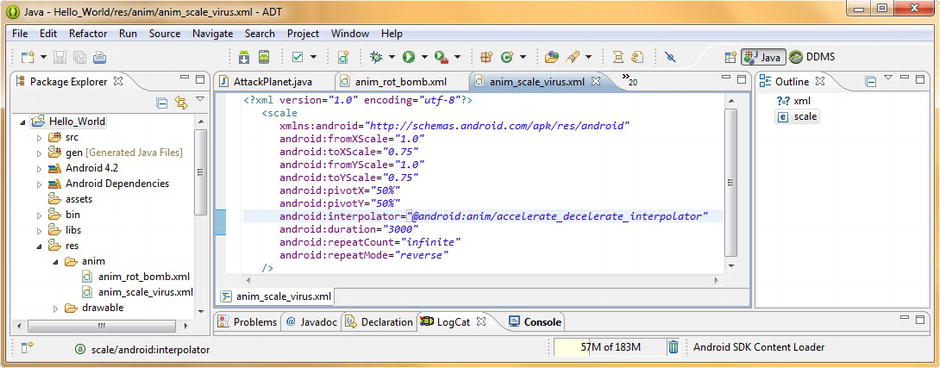
Figure 10-6. Configuring <scale> tag’s scaling definition parameters for the anim_scale_virus.xml file in Eclipse
Adding Java Code for the Scaling
Now it’s time to implement the scale Animation object in our AttackPlanet Java code. Add a line of space under the infectButton ImageButton object declaration and copy the two lines of code above it, Animation rotateBomb and bombButton.startAnimation( ) and paste them into that space.
Next change the Animation name to scaleVirus and set the infectButton startAnimation( ) method to call this scaleVirus Animation object, using the following two lines of Java code:
Animation scaleVirus = AnimationUtils.loadAnimation(this, R.anim.anim_scale_virus);
infectButton.startAnimation(scaleVirus);
This Java code implementing the scaleVirus is shown in Figure 10-7.
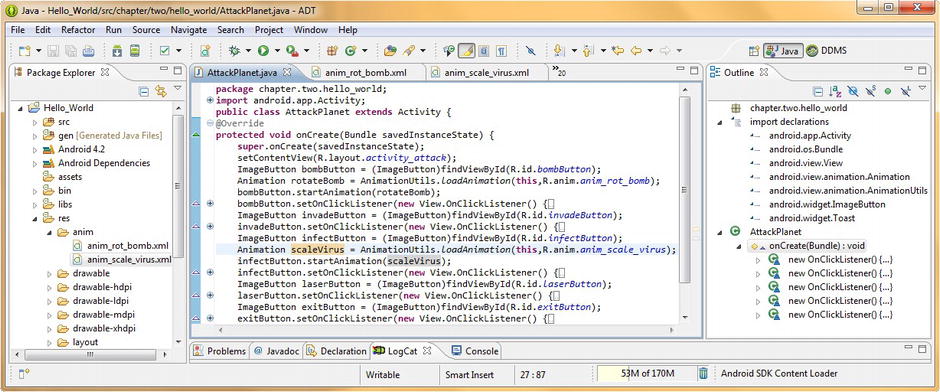
Figure 10-7. Adding an Animation object named scaleVirus and assigning it to infectButton via .startAnimation( )
Finally we will use the Run As Android Application work process to see our new level of animation detail on our attack virus ImageButton, which now flexes in size, as well as frame animating. Experiment with interpolator settings and change the way the virus flexes, so you start to familiarize yourself with the 13 different interpolator constants in Android, and the different effects they provide on the motion curves within your animation.
Next, we will animate the alpha channel for our soldier, so that we can beam him down to the planet surface to properly invade the planet.
Implementing Alpha Channel Animation: Beam Me Over to a Planet
Next let’s beam our soldier forces down to a planet surface for our attack invade icon by using the <alpha> root element shown in the Tween Animation XML dialog, which is shown in Figure 10-1. Right-click on your Hello_World project folder, and select the New ![]() Android XML File dialog, and name the new XML file: anim_alpha_invade, after selecting: Tween Animation from the Resource Type: drop-down menu and setting the Hello_World project and then selecting the <alpha> root element.
Android XML File dialog, and name the new XML file: anim_alpha_invade, after selecting: Tween Animation from the Resource Type: drop-down menu and setting the Hello_World project and then selecting the <alpha> root element.
Once you set everything, and click the Finish button, you will get the open XML file in Eclipse, and you can set up your <alpha> tag. Just like we did before for the <rotate> and <scale> tags, let’s set up the tag to take our parameters by splitting the tag into <alpha and /> components, and adding your xmlns:android parameter and URL, as shown in Figure 10-8. Then, to see what parameters the <alpha> tag provides us, type in android: and pop up the parameter helper dialog.

Figure 10-8. Creating our anim_alpha_invade.xml and android: parameter helper dialog with <alpha> parameters
The first alpha parameter that we want to add is the android:fromAlpha parameter, which takes an integer value between 1 (100%, or opaque) and 0 (0%, or completely transparent). Because we want to animate our soldier visibility from opaque to transparent, we’ll set the initial value to 1.0.
Next, we’ll add the android:toAlpha parameter, which specifies what alpha value we want to animate to. We will set this to 0, which indicates fully transparent, just like a #AARRGGBB setting of 0 does in the A channel.
Next, we need to specify a method of frame motion interpolation, using the now familiar android:interpolator parameter, which we will also set to the accelerate_decelerate setting, to achieve a realistic fade-out transporter effect. If you like, you can play around with some of the other 12 motion curve constant settings to better familiarize yourself with them.
Next, let’s set the android:duration parameter to 4000 milliseconds (or 4 seconds), to give us a nice slow fade-out. Since we don’t want the soldier fading in and out constantly, we’re going to try out a new parameter, the android:startOffset parameter, set to 5000 milliseconds, to add in a five second delay on each animation cycle, so that the soldier remains visible (solid), for more time than he is transparent (transported to the planet). You can set these two parameters to taste, to fine-tune the effect timing.
Next, we set our alpha channel animation repeat parameters, with the android:repeatCount again set to infinite, and the android:repeatMode set to reverse, so that the soldier fades back in (return from the planet) in much the same way that he faded out, as shown in the following mark-up:
<?xml version="1.0" encoding="utf-8"?>
  <alpha
    xmlns:android="http://schemas.android.com/apk/res/android"
    android:fromAlpha="1.0"
    android:toAlpha="0.0"
    android:interpolator="@android:anim/accelerate_decelerate_interpolator"
    android:duration="4000"
    android:startOffset="5000"
    android:repeatCount="infinite"
    android:repeatMode="reverse"
  />
This is also shown in the Eclipse IDE code editor in Figure 10-9.

Figure 10-9. Configuring <alpha> tag’s alpha fade definition parameters for anim_alpha_invade.xml file in Eclipse
Adding Java Code for the Alpha Animation
Now it’s time to add in your Java code that creates the needed alphaInvade Animation object and wires it up to the invadeButton via a .startAnimation method. This is done via the following line of code:
Animation alphaInvade = AnimationUtils.loadAnimation(this, R.anim.anim_alpha_invade);
As we have seen before, this dense line of Java code declares an Animation object, names it alphaInvade, and then loads it with our anim_alpha_invade XML <alpha> animation definition via a call to the .loadAnimation( ) method that is accessed off the AnimationUtils object using dot notation.
Now all we have to do is to wire the alphaInvade Animation object into the invadeButton UI object via the .startAnimation( ) method, which is now done using the following simple but powerful line of Java programming code:
invadeButton.startAnimation(alphaInvade);
Note that you could have also done all this coding by using a copy and paste operation on the two lines of code we already wrote for one of the other attack icon UI elements and Animation object calls above this one.
Now that all our XML mark-up has been assimilated into our Java coding, as shown in Figure 10-10, it is time to use our Run As Android Application work process, and see our attack soldier fade into space and come back.
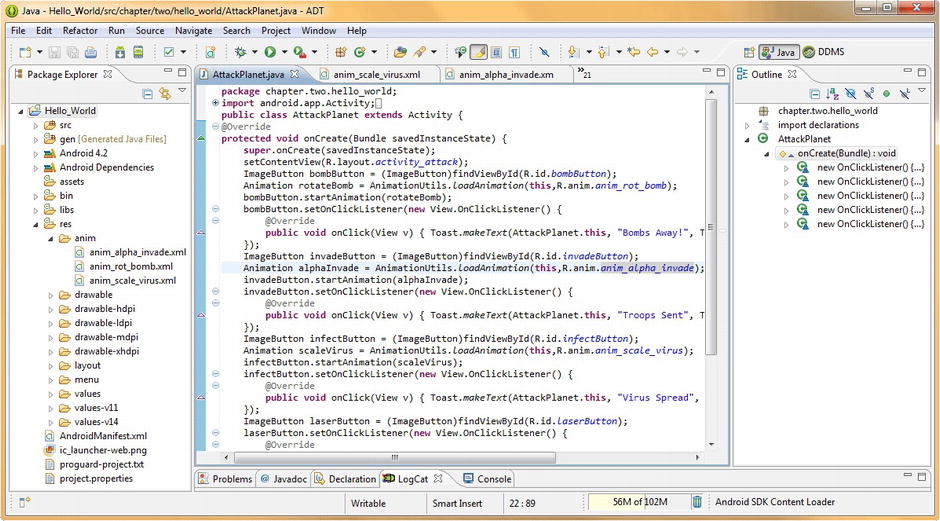
Figure 10-10. Adding Animation object named alphaInvade, and assigning it to invadeButton via .startAnimation( )
Although this is pretty cool in and of itself, I’m not satisfied with it, because what’s a transporter beam effect, without the beam part? So we need to take this effect to the next level, which means doing what we did with our attack virus by combining both bitmap (frame or raster) and procedural (vector or code-based) animation together to create a more robust effect.
Combining Bitmap and Procedural Animation
To produce a convincing animation (one where the repeating or looping part cannot be easily noticed by the viewer) we need to use about a dozen frame bitmaps which I named beam64frame0.png through beam64frame11.png and also optimized to PNG8 indexed color so that all 48 resolution DPI version frames total only 190KB or an average of less than 4KB per frame.
We left an alpha channel on both sides of the animation, so that the beams animation can play behind the soldier (optimally inside a background layer of the ImageButton UI element) and not show through the alpha channel (the transparent areas) of the soldier image, which will be held inside the foreground layer (android:src). In this way, when we alpha-fade out the image of the soldier, this beams animation special effect shows, both as part of the soldier fade-out process, and as its own effect once the soldier image is gone (and while the soldier image is not there).
The first thing we need to do is to copy all our four dozen beam frame animation assets into their proper /res/drawable-dpi/ project folders, as shown in Figure 10-11.
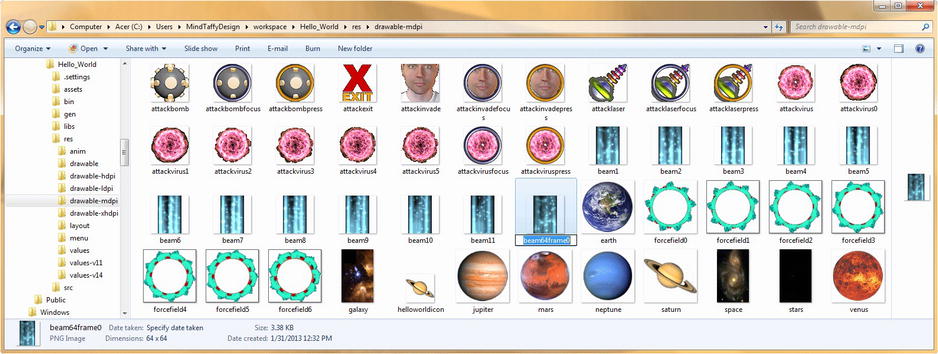
Figure 10-11. Copying our transporter special effect animation frames into our drawable-dpi folder and renaming
This work process should be familiar to you by now, so let’s get a bit more practice at it, and copy your 96 pixel frames into /drawable-xhdpi, the 80 pixel beam frames into /drawable-hdpi, the 64 pixel beam frames into /drawable-mdpi, and the 48 pixel beam frames into /drawable-ldpi.
Next we will rename these files to be beam0.png through beam11.png so we have a simpler filename to reference in our XML. We do this by removing the resolution indicator number and the word frame for each of the 48 files (12 in each of the resolution density folders).
Next, we need to right-click the project resource drawable folder, and use our New > Android XML File helper dialog work process shown earlier in the chapter in Figure 10-1, as well as in Chapter 9, in Figure 9-1. Don’t forget to use the F5 or Refresh work process once you have added these files outside of the Eclipse environment, so that your project can “see” them.
Set your Resource Type: to Drawable, and then select the Root Element: of <animation-list>, and finally, name the file anim_effect_beam, as that is what it is going to be, an animation effect named beam, and click Finish.
Next, add the frames for this transporter beam effect to the XML file that is created for us.
Configuring the Animation in XML
We want the effect to be seamless so we are going to use a pong animation effect and bounce back and forth between frame zero and frame 11, so frames 1 through 10 will all be used twice in the XML code.
Note that we are not duplicating frames zero or eleven as this would cause a pause in the animation, and give away its frame boundaries to the viewer by a playback hesitation during the seamless animation loop. We want to utilize a fairly slow frame rate of 8 FPS to get a slow shimmering effect, and since 8 divides into 1000 a total of 125 times, our android:duration value will be 125 milliseconds, denoted in XML as android:duration=“125”.
The XML mark-up for one of the <item> tags is shown here. All 22 <item> tag lines of XML mark-up will follow the same format as the following:
<item android:drawable="@drawable/beam0" android:duration="125" />
The XML code that configures our beam animation frame access and order is shown in Figure 10-12. We start with beam0, and go through beam11 and then back down to beam1, using an 8 FPS setting for each. This set-up gives us a nice, even, seamless transporter beam pong animation special effect.

Figure 10-12. Adding transporter beam special effect frames in a pong configuration to anim_effect_beam.xml
Next, we need to reference the anim_effect_beam.xml file, via the first part of its name in the android:background parameter of our attack invade ImageButton, so that it animates behind the foreground source image inside that UI element. Because we have crafted our alpha channels carefully, the background effect will only be visible when the foreground image fades out, as well as during the fade created by the <alpha>. This creates a transporting effect that we are looking for, by combining these two key types of animation in Android, along with a minimal amount of digital image assets.
Remember that the foreground source image is actually a multi-state image XML definition file that we named attack_invade.xml, referenced inside of the android:src parameter. This shows that we’re waxing pretty complicated here, using an XML-based frame animation compositing special effect in our UI element background plate, along with XML-based multi-state image button definitions in our UI element foreground plate, as shown in Figure 10-13. Here is the XML mark-up for the invadeButton that is shown in the figure:
<ImageButton
  android:id="@+id/invadeButton"
  android:background="@drawable/anim_effect_beam"
  android:layout_width="wrap_content"
  android:layout_height="wrap_content"
  android:contentDescription="@string/content_desc_invade"
  android:layout_margin="8dp"
  android:src="@drawable/attack_invade" />
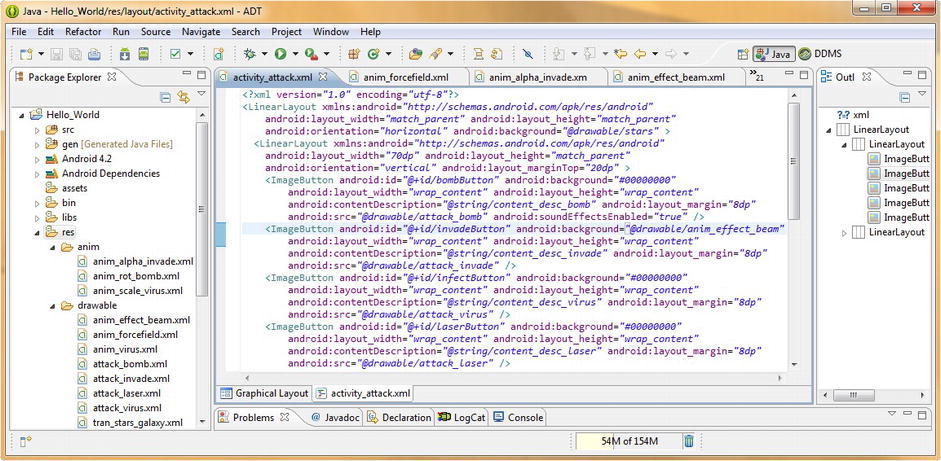
Figure 10-13. Inserting an anim_effect_beam reference into the android:background element of our ImageButton
If for some reason this special effect set-up using a single UI element is too complicated for Android to pull off, or isn’t supported, or it doesn’t work for some reason, we’ll set-up this effect to show you the concept of Z-order using two user interface elements located in the same screen area.
Let’s take a look at our effect using the Run As Android Application work process. Once the application launches, click the menu button, and select the Attack a Planet Activity screen, and then watch the Invade icon.
Notice the soldier fades to black as before, but the background animation is not visible, so either it is not supported, or more likely, the alpha fade is being applied to the entire user interface element, and not just to its foreground image component.
Implementing a Background Behind a Fade
The next thing we should try is to use the android:background parameter, which is part of the <alpha> tag’s parameters, shown in Figure 10-8. This parameter should allow us to implement a background behind our fade, so add this parameter to the parameters we show in Figure 10-9, and set it to reference the anim_effect_beam and remove the android:background parameter from the ImageButton tag parameters shown in Figure 10-13.
Use the Run As Android Application work process again, and test the effect yet again in the Attack a Planet Activity screen. Because the background effect does not remain after the soldier fades out, we will need to implement it via a separate UI element, an ImageView, which is used to hold images for just such a purpose.
Add an ImageView tag before the invadeButton ImageButton tag and set it to an android:id of invadeEffect and set its android:background parameter to the anim_effect_beam to reference our frame animation special effect. Be sure to add the android:layout_width and android:layout_height parameters set to wrap content and the android:layout_marginLeft set to 8dp to align.
The 8dp left margin pushes your background image into place behind the invadeButton UI element, so the effect lines up with the soldier. Be sure and include an android:contentDescription parameter set to reference the @string/content_desc_invade constant, or Eclipse will give you a warning.
Once you have added this ImageView tag between the first two ImageButtons, we must change and add a couple of parameters in our invadeButton, because a LinearLayout, as you might remember, lines things up in rows or columns, and for this reason, this ImageView will push our ImageButton UI elements down one notch each, unless we make parameter changes to adjust for this.
The alternate option to these UI parameter changes is to recode the entire screen layout container as a RelativeLayout container, which, as you will soon see in the next section, makes Z-ordering alpha channel compatible UI elements much easier. For now, we’ll do this the easier of the two ways.
The most critical thing that we need to adjust is the pixel spacing of the invade icon ImageButton, so it covers up the invadeEffect ImageView. We do this so our transporter effect plays behind our multi-state ImageButton.
Remove the android:layout_margin=“8dp” that had put 8dp of pixel spacing around our button, and add an android:layout_marginLeft=“8dp” that pushes the ImageButton out from the side of the screen, lining it up with those other ImageButton icons.
Next, add an android:layout_marginTop parameter, set to —54,—yes, that’s negative fifty-four as shown in Figure 10-14. This pushes our invade icon ImageButton up and over the top of our invadeEffect ImageView, which contains our transporter beam special effect animation. Here is what the XML mark-up will look like for this <ImageButton> tag at this point:
<ImageButton
  android:id="@+id/invadeButton"
  android:background="#00000000"
  android:layout_marginTop="-54dp"
  android:layout_width="wrap_content"
  android:layout_height="wrap_content"
  android:src="@drawable/attack_invade"
  android:contentDescription="@string/content_desc_invade"
  android:layout_marginLeft="8dp" />
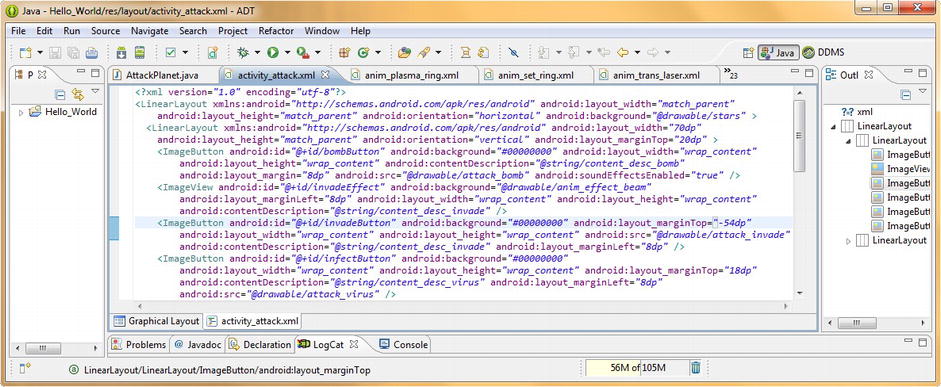
Figure 10-14. Adding an ImageView UI element to our activity_attack.xml to hold our transporter beam effect
The final Eclipse editing pane content for the new <ImageButton> XML mark-up is shown in Figure 10-14.
To pull the rest of the ImageButton icons up, and back into place, remove the android:layout_margin=“8dp” from the infectButton ImageButton tag just below the invadeButton and add an android:layout_MarginTop=“18dp”, to space the other icons back down, and an android:layout_marginLeft=“8dp” as well.
Adding Java Code for the Animation
Now it’s time to implement the ImageView object and the AnimationDrawable object in our Java code, so that we can implement our transporter effect.
Declare an ImageView object named invadeEffect, and set it equal to the invadeEffect UI tag defined in our XML file, by using the findViewById( ) method, using the following line of Java code, as shown in Figure 10-15:
ImageView invadeEffect = (ImageView)findViewById(R.id.invadeEffect);
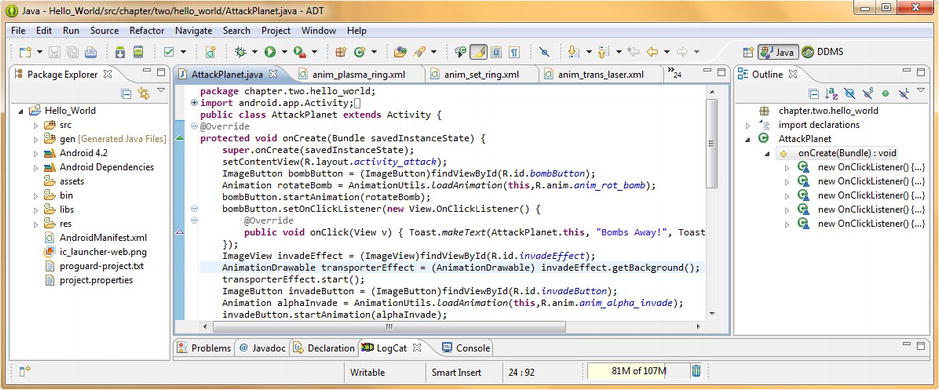
Figure 10-15. Adding the invadeEffect ImageView and transporterEffect AnimationDrawable to AttackPlanet.java
Then declare an AnimationDrawable object named transporterEffect using the .getbackground( ) method by using the following line of Java code:
AnimationDrawable transporterEffect = (AnimationDrawable) invadeEffect.getBackground();
Next, call the .start( ) method for the transporterEffect AnimationDrawable object by using the following line of Java code:
transporterEffect.start();
Now we are ready to see our final effect implemented in our application, by using the Run As Android Application work process. Fire up the Nexus S emulator, and click the menu button, and select the Attack a Planet menu selection that takes you to our Activity screen.
As you can see, when our soldier now fades out, via our <alpha> procedural animation there is a transporter beam frame animation that is incorporated into this special effect, making it a much more realistic transporter beam space travel effect.
Note that we accomplished this using only 190KB of total assets along with a few lines of Java code and a couple dozen lines of XML mark-up. If we had to do this effect via digital video or frame animation alone, it would have taken ten times more data footprint to pull off with similar quality.
Implementing Complex Animation: XML <set> Parameter Grouping
The next thing we’re going to do is to create a complex animation by using rotate, scale, and alpha tags together, in a single animation set. This is done using the <set> tag, as you might have guessed, since you’ve already seen this <set> root element option in several screen shots before.
An animation set is like a group, so these <set> tags allows you to group animation types together, and even to sub-group them if needed by nesting sets inside of other sets, creating sub-sets of increasingly complex animation or special effects.
We are going to implement a much simpler forcefield animation around our planet that uses only three frames of 2D image animation and then rotate, scale, and fade this raster animation data to produce a more complex and data compact planet forcefield effect.
To do this, we must first copy and rename the ring320frame0.png through ring320frame2.png files (and other resolution density versions) into the drawable-dpi folders, and rename them as ring0.png through ring2.png using the usual work process shown in Figure 10-11. After you copy all 12 files, right-click on the drawable folder, and select the New > Android XML File dialog, and create a Drawable XML container with an <animation-list> root element, and name it anim_plasma_ring and finally hit the Finish button. Don’t forget to utilize the F5 or Refresh work process as well, so that your drawable assets are visible to Eclipse.
Add in three <item> tags referencing the ring0, ring1, and ring2 assets and set a duration for each of 166 milliseconds, which animates your forcefield ring twice each second (6 times 166 equals 1000). Each <item> tag that you add should have the following XML mark-up format:
<item android:drawable="@drawable/ring0" android:duration="166" />
The final XML mark-up is shown in the Eclipse XML editing pane in Figure 10-16.
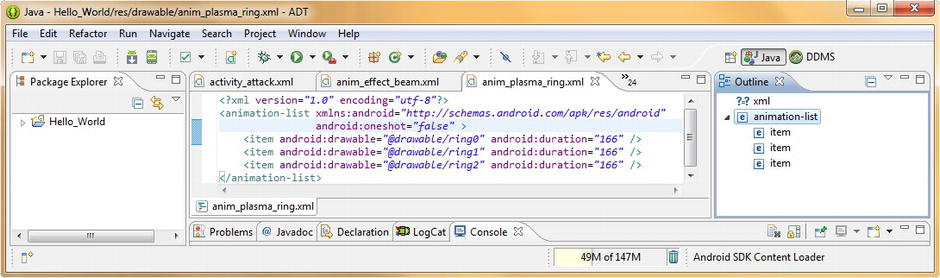
Figure 10-16. Creating an anim_plasma_ring frame animation XML definition for use with our complex animation
Then go into your activity_main.xml file, and change your ImageView tag android:background parameter to reference @drawable/anim_plasma_ring as shown in the following XML mark-up:
<ImageView
  android:id="@+id/imageEarth"
  android:src="@drawable/earth"
  android:padding="24dp"
  android:background="@drawable/anim_plasma_ring"
  android:layout_width="wrap_content"
  android:layout_height="wrap_content"
  android:layout_below="@+id/textView8"
  android:contentDescription="@string/content_desc_invade" />
This is shown in Figure 10-17, and once you change your XML mark-up to include the new android:background parameter referencing your new anim_plasma_ring drawable, we will be ready to implement our animation set, which will further rotate your background as it animates, and scale it in and out around the planet, while the entire animation fades in and out slightly.
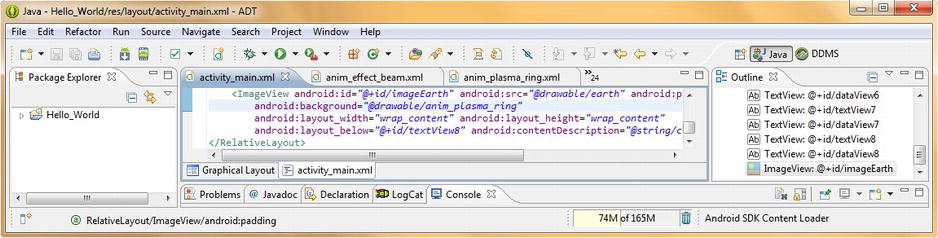
Figure 10-17. Referencing the new anim_plasma_ring frame animation in our activity_main.xml file ImageView
Now we can right-click the drawable folder and select our New ![]() Android XML File menu sequence and create a Tween Animation XML Resource Type, and name it anim_set_ring and then select the <set> root element and click the Finish button as shown in Figure 10-18.
Android XML File menu sequence and create a Tween Animation XML Resource Type, and name it anim_set_ring and then select the <set> root element and click the Finish button as shown in Figure 10-18.
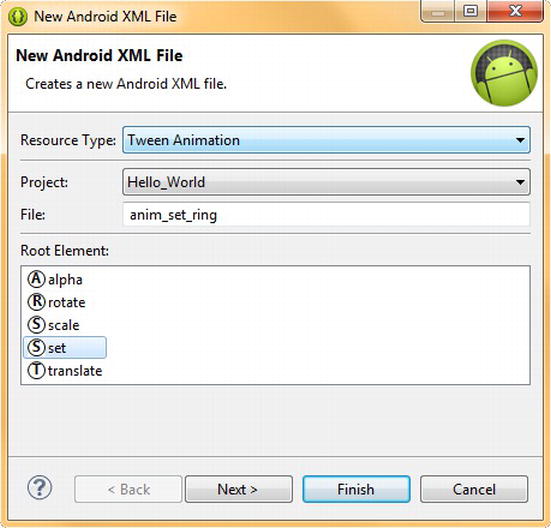
Figure 10-18. Creating an anim_set_ring <set> complex animation structure using the New Android XML File dialog
Next, go into the empty <set> animation file, and type the < character as shown in Figure 10-19. This brings up the tag selector dialog, and we can then select the <rotate> tag for its inclusion in our animation <set>, since we will set-up our rotational animation parameters first. Order does not matter as a <set> serves to group the animations together so that they are processed in parallel, or all at the same time as each other, and not in order, which would be called serial animation (or one after the other).

Figure 10-19. Adding a <rotate> child tag to our <set> parent tag using the helper dialog accessed via the < key
Be sure and add the xmlns:android parameter to your <set> tag to reference the http://schemas.android.com/apk/res/android URL, so that all these tags and parameters that we put inside of our <set> tag validate and do not throw Red-X errors inside of the Eclipse XML editing pane.
Let’s set our rotation android:fromDegrees parameter to 0 (zero), and set our android:toDegrees parameter to 360, so we get a seamless ring rotation.
Next let’s set our android:pivotX and android:pivotY parameters to 50% to center our rotation in the center of the animated ring element. We will use a nice even linear interpolation since we are looping the animation, and a slow duration of 10,000 milliseconds, or 10 seconds total rotation.
For our repeat parameters, we will use the android:repeatCount=“infinite” and the android:repeatMode=“restart” parameters so that we can achieve a seamless loop that continues forever.
We can turn this forcefield effect on and off using visibility parameters later on in our Java code, so we want our forcefield to animate forever, as far as all these animation set parameters are concerned. The XML mark-up for the <rotate> tag inside of the parent <set> tag should look like the following:
<?xml version="1.0" encoding="utf-8"?>
<set xmlns:android="http://schemas.android.com/apk/res/android">
  <rotate android:fromDegrees="0"
          android:toDegrees="360"
          android:pivotX="50%"
          android:pivotY="50%"
          android:interpolator="@android:anim/linear_interpolator"
          android:duration="10000"
          android:repeatCount="infinite"
          android:repeatMode="restart"  />
</set>
You can see our completed <rotate> tag parameters shown in Figure 10-20.

Figure 10-20. Adding a <scale> child tag to our <set> parent tag using the helper dialog accessed via the < key
As you can see in Figure 10-20, we have again utilized the < key to bring up the tag selector dialog, and we are now selecting a <scale> tag to add in our scaling parameters to add image scaling this complex animation set.
We will start with the most important android:fromXScale=“1.0”, or, full scale (original bitmap graphics elements pixel dimension), and scale down to an android:toXScale=“0.75” or three-quarters of original size scaling.
Because we want a uniform (aspect ratio maintained) scaling, we will use the same parameters for the android:fromYScale and android:toYScale parameters as well. As we learned previously in the book, aspect ratio is maintained, and spacial distortion is reduced, by scaling an image or animation frames by an equal amount on both of our X and Y axes or dimension (H & W sides).
Since we want to scale the forcefield ring evenly in and out, we set our android:pivotX and android:pivotY parameters to a value of 50%, which puts the scaling origin directly in the center of the bitmap image (or in this case, a frame-based raster animation) that we are scaling down and then back up again using the next four parameters that we’re going to add.
Because we want to scale smoothly and evenly, we want to add a linear interpolator via the android:interpolator=“@android:anim/linear_interpolator” parameter. To get a slow scaling effect, we set our android:duration parameter to 10,000 milliseconds (10 seconds) to obtain a more realistic effect.
Finally we set our repeat parameters to define how our scaling will perform over time. We want the effect to continue forever, so we set the android:repeatCount parameter to infinite. Because we want the scaling effect to pulsate slowly in and out around each planet, we set the android:repeatMode to reverse, so that the scaling reverses itself.
The XML mark-up so far should look like the tags and parameters shown here:
<?xml version="1.0" encoding="utf-8"?>
<set xmlns:android="http://schemas.android.com/apk/res/android">
  <rotate android:fromDegrees="0"
          android:toDegrees="360"
          android:pivotX="50%"
          android:pivotY="50%"
          android:interpolator="@android:anim/linear_interpolator"
          android:duration="10000"
          android:repeatCount="infinite"
          android:repeatMode="restart"  />
  <scale  android:fromXScale="1.0"
          android:toXScale="0.8"
          android:fromYScale="1.0"
          android:toYScale="0.8"
          android:pivotX="50%"
          android:pivotY="50%"
          android:interpolator="@android:anim/linear_interpolator"
          android:duration="10000"
          android:repeatCount="infinite"
          android:repeatMode="reverse"  />
</set>
The final scale tag is shown in Figure 10-21.
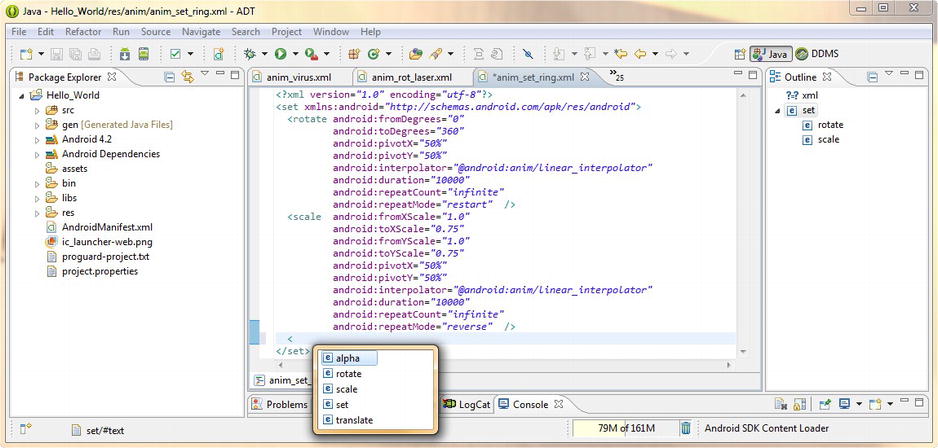
Figure 10-21. Adding an <alpha> child tag to our <set> parent tag using the helper dialog accessed via the < key
Finally, we add our <alpha> procedural animation tag using the < key, as shown in Figure 10-21, along with our completed <scale> tag parameters.
Adding an Alpha Procedural Animation
The <alpha> tag has the fewest total parameters, as it is just controlling a fade effect, in this case from 100% opaque to 50% transparent or halfway there, to show some of the stars or galaxy background imagery. Since forcefields are usually somewhat transparent, why break with convention!
Start by using the android:fromAlpha parameter, to set our source imagery (or animation in this case) transparency level to 100% by using a value of 1.0. Next use the android:toAlpha set to a value of 0.5 or 50% transparent to get a realistic translucency effect for our forcefield ring animation.
Next let’s set our android:interpolator parameter to linear, to give us a nice smooth even linear interpolation for our fade (blend) alpha values. This is a parameter that you could probably play around with interpolator constants with and try to get a more dynamic transparency changing effect.
Because we want to match the duration of this effect to the other two scale and rotation effects, we will use an android:duration parameter and set it to 10000 milliseconds. Again, since a fading effect does not need to sync as closely with the rotate and scale effects, you could also play around with this numeric value, to get a more realistic forcefield pulse effect.
Finally we set our repeat parameters, setting the android:repeatCount parameter to infinite and the android:repeatMode parameter to reverse, so that this fade-out turns around and becomes a fade-in after it gets to the end of the animation cycle. The XML markup should look like the following:
<?xml version="1.0" encoding="utf-8"?>
<set xmlns:android="http://schemas.android.com/apk/res/android">
  <rotate android:fromDegrees="0"
          android:toDegrees="360"
          android:pivotX="50%"
          android:pivotY="50%"
          android:interpolator="@android:anim/linear_interpolator"
          android:duration="10000"
          android:repeatCount="infinite"
          android:repeatMode="restart"  />
  <scale  android:fromXScale="1.0"
          android:toXScale="0.8"
          android:fromYScale="1.0"
          android:toYScale="0.8"
          android:pivotX="50%"
          android:pivotY="50%"
          android:interpolator="@android:anim/linear_interpolator"
          android:duration="10000"
          android:repeatCount="infinite"
          android:repeatMode="reverse"  />
  <alpha  android:fromAlpha="1.0"
          android:toAlpha="0.5"
          android:interpolator="@android:anim/linear_interpolator"
          android:duration="10000"
          android:repeatCount="infinite"
          android:repeatMode="reverse"  />
</set>
The XML editing pane in Eclipse should look like the screen shown in Figure 10-22.
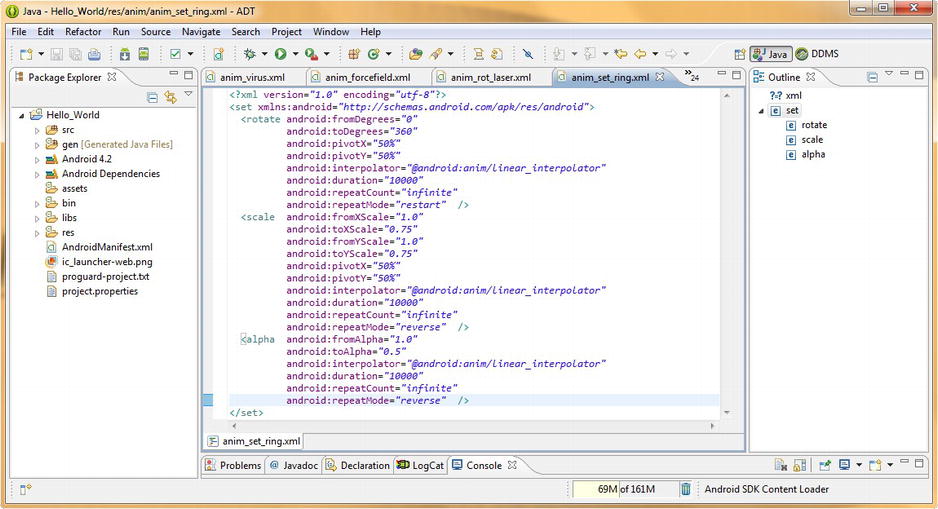
Figure 10-22. Completing our <set> parent tag containing complex animation parameters for rotate, scale, alpha
Next, we need to implement this new forcefield animation into our Home Screen user interface screen via the current XML RelativeLayout container. We give this animated user interface element its own ImageView tag, using an android:id parameter set to planetEffect.
We are setting it up this way because if we apply this scale animation to our original imageEarth ImageView with the anim_plasma_ring.xml referenced as its background component, the entire UI element will be rotated, scaled, and blended, and in this case, we want the planet image to be left alone.
In fact we saw this same consideration in the previous section of the book where we needed to separate our procedural animation effect to process its own UI element container for much the same reasons.
Next, include the required android:layout_height and android:layout_width parameters, both set to wrap_content, and the android:contentDescription parameter, which is also required by Android for any image-related tag.
Next we’ll add our relative positioning tag, android:layout_below, and we will reference the @+id/textView8 that our imageEarth ImageView references as we want this planetEffect ImageView to be in the exact screen location that the imageEarth ImageView occupies. Also be sure that your android:src parameter references the @drawable/anim_plasma_ring XML file that contains our <set> complex procedural animation definition. The XML mark-up looks like the following:
<ImageView
         android:id="@+id/planetEffect"
         android:src="@drawable/anim_plasma_ring"
         android:layout_width="wrap_content"
         android:layout_height="wrap_content"
         android:layout_below="@+id/textView8"
         android:contentDescription="@string/content_desc_earth"
/>
The final XML is shown in Figure 10-23.
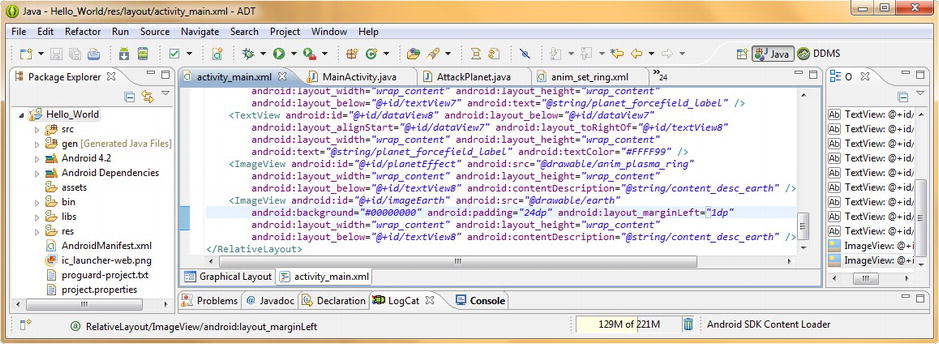
Figure 10-23. Add ImageView XML tag with an ID of planetEffect and anim_plasma_ring source reference
Now let’s adjust our imageEarth ImageView tag parameters to make sure that the planet imagery both lines up with, and composites with, our procedural animation contained inside the planetEffect ImageView UI element. Set your android:padding to 24dp and fine-tune the centering of the planet image in the effect using your android:layout_marginLeft parameter set to 1dp. Make sure the ImageView is transparent by using an android:background parameter set to #00000000 as shown in the following XML mark-up:
<ImageView
         android:id="@+id/imageEarth"
         android:src="@drawable/earth"
         android:background="#00000000"
         android:padding="24dp"         android:layout_marginLeft="1dp"
         android:layout_width="wrap_content"
         android:layout_height="wrap_content"
         android:layout_below="@+id/textView8"
         android:contentDescription="@string/content_desc_earth"
/>
The results are shown in Figure 10-23, and we’ll be ready to write our Java code that implements these ImageView UI elements together to create a planet forcefield effect using only 200KB of digital image data footprint.
Adding Java Code for the Animation
Now all we have to do to implement this new forcefield animation scenario is to change our Java code to implement the new ImageView holding our forcefield ring animation and to remove the ImageView object that was holding the old forcefield animation, as shown in Figure 10-24.
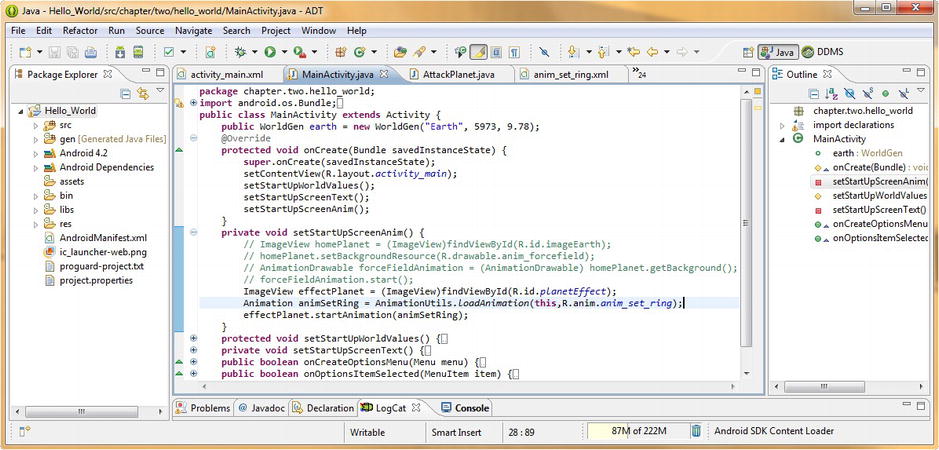
Figure 10-24. Add effectPlanet ImageView, set it to reference animSetRing Animation object via .startAnimation( )
As you can see in the old Java code in Figure 10-24, which I left by using the double-slash commenting feature, to eliminate these lines of code from consideration by the compiler, but to also remain for our own use (a handy use of this feature you may wish to consider using yourself) as a learning reference so that you can compare the before and after Java code scenario.
The first line of code is essentially the same as it was before; declaring the effectPlanet ImageView object and then setting it to an XML definition using the findViewById( ) method. The Java code should look as follows:
Imageview effectPlanet = (ImageView)findViewById(R.id.planetEffect);
The rest we get done in only two lines of code, one which declares the procedural animation object and another that wires it to the effectPlanet ImageView and starts the animation running.
To declare a procedural animation object we will use the Android Animation class, and instantiate an Animation object and name it in the same line of code that we utilize to load it with an XML animation definition using the .loadAnimation( ) method that is called off an AnimationUtils object by using dot notation. This can be done in one line of Java code, as follows:
Animation animSetRing = AnimationUtils.loadAnimation(this,R.anim.anim_set_ring);
What this is saying to the Android OS and compiler is: I’d like to create an Animation object named animSetRing and, in the current context, load it using the AnimationUtils class with the animation data that I have defined in the anim_set_ring.xml file. Once this is done, we start the animation.
The .startAnimation( ) method is called off the effectPlanet ImageView object, which we set-up two lines of Java code preceding, and is passed over an Animation object, that we also just created, using one short line of code:
effectPlanet.startAnimation(animSetRing);
Now it’s time to see our new planetary forcefield in action. Right-click the project folder and use the Run As Android Application work process to launch the Hello World Android application in your Nexus S emulator.
Once the application is running, you can see the planet Earth ImageView at the bottom of the Home Screen along with the new forcefield animated user interface element, as shown in Figure 10-25. The forcefield animated user interface element is now animating between the three different image composite frames, as well as rotating, scaling, and fading all at the same time, using procedural animation XML mark-up that we have written to control dozens of attributes of this user interface element.
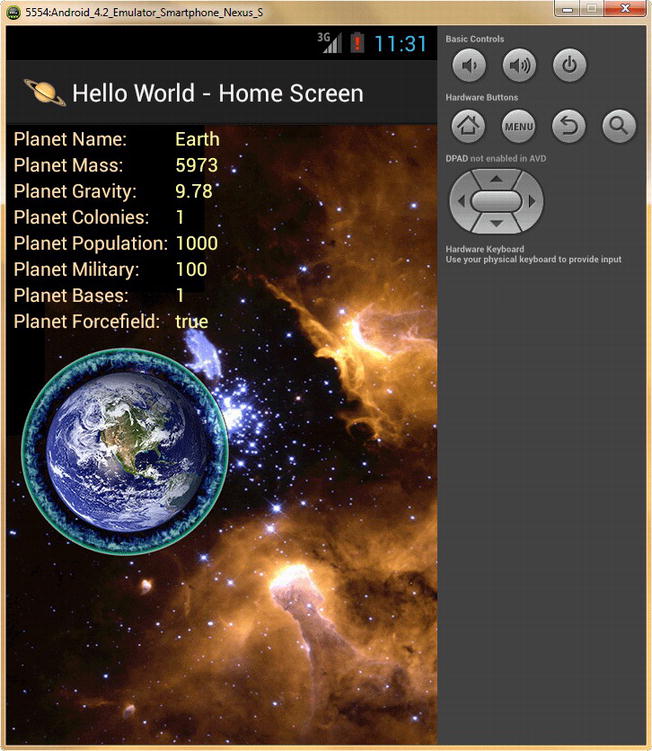
Figure 10-25. Running our new Home Screen and special effects
Next, we’ll finish up by implementing procedural animation for the last of our Attack Planet ImageButton icons: the deadly but beautiful LaserCannon.
Implementing Motion Animation: The XML <translate> Parameter
Finally, just to make sure all the root elements in Android which are utilized for procedural animation are covered using hands-on examples in this chapter, we will now create a realistic firing kickback pulse for our LaserCannon ImageButton icon in our Attack Planet Activity user interface.
Let’s right-click on our drawable folder and select New ![]() Android XML File and create a new Tween Animation XML container named anim_trans_laser, and then select a translate option, so it contains a <translate> root element.
Android XML File and create a new Tween Animation XML container named anim_trans_laser, and then select a translate option, so it contains a <translate> root element.
Since the XML file is only going to have one tag, follow the work process where we delete the </translate> closing tag and then turn the <translate> opening tag into a <translate and /> to prepare this tag for the addition of parameters that configure our translation animation operation.
If you like, you can type android: to see all the 15 possible parameter options for the <translate> tag, as shown here in Figure 10-26.
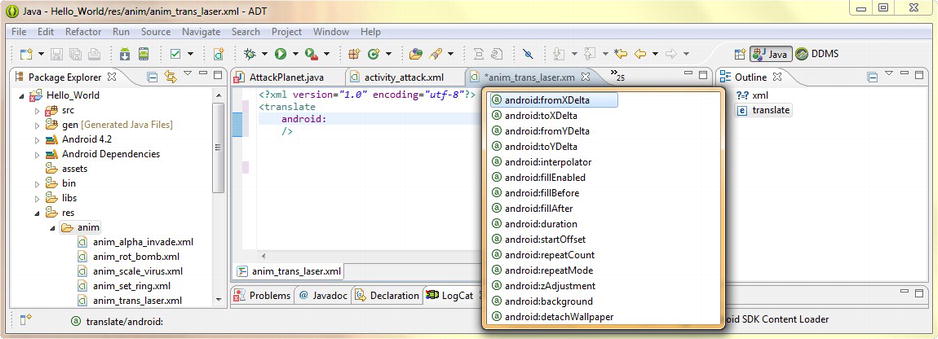
Figure 10-26. Adding a <translate> root element to our anim_trans_laser and invoking parameter helper dialog
Our most important parameters are the ones that tell our animation how to move the object on the screen: the android:fromXDelta and android:toXDelta parameters. These Delta parameters take percentage values, and because we’re just going to simulate a short, pulsing backfire for our laser cannon, we will set these two parameters to go from 0% (defines where they’re located currently) to —10% (a short distance backward along the negative X axis).
Because we want our movement to be along a diagonal line, we will also set our Y axis parameters to 0% and 10%, so that the amount of movement will be equal, and perfectly diagonal (45 degrees, just like our laser cannon).
You can play around with these four values to adjust the magnitude and the direction of the effect, and to get a feel for how the parameters operate.
Next, we want to set up our interpolator, which, for a pulsing LaserCannon kickback is an important attribute. Fortunately, there is a perfect bounce interpolator for just this sort of effect application, so let’s add in our android:interpolator=“@android:anim/bounce_interpolator” so that we can get this realistic motion curve effect put into place.
Because this animation is going to feature a short, quick burst of motion energy, we will use an android:duration parameter of only 80 milliseconds, so that the movement is quick and sharp. On the other hand, we don’t want the LaserCannon firing that often, so we will use the android:startOffset parameter set to 8000 milliseconds, so that the LaserCannon does not pulse too often, and end up disturbing our end-users visually.
Finally, we will need to set our repeat parameters, so let’s set up the android:repeatCount to infinite and the android:repeatMode to restart so that the LaserCannon pulses a kickback burst in the same way every time. The XML mark-up for the tag should look like the following:
<?xml version="1.0" encoding="utf-8"?>
<translate
    xmlns:android="http://schemas.android.com/apk/res/android"
    android:fromXDelta="0%"
    android:toXDelta="-10%"
    android:fromYDelta="0%"
    android:toYDelta="10%"
    android:interpolator="@android:anim/bounce_interpolator"
    android:duration="80"
    android:startOffset="8000"
    android:repeatCount="infinite"
    android:repeatMode="restart"
/>
The final tag is shown in Figure 10-27.

Figure 10-27. Adding the translation animation parameters to our XML file to make the laser cannon pulse fire
Finally, we need to go into our AttackPlanet.java Activity class and add in the Java code that will set all this into motion (no pun intended).
Adding Java Code for the Translation
This should all be getting pretty familiar by now, after all, practice makes perfect, so let’s begin by instantiating our Animation object and naming it translateLaser and then loading our animation from the XML file named anim_trans_laser.xml using the AnimationUtils class loadAnimation( ) method via the following line of Java code, as shown in Figure 10-28:
Animation translateLaser = AnimationUtils.loadAnimation(this,R.anim.anim_trans_laser);

Figure 10-28. Coding translateLaser Animation object and using .startAnimation( ) method to wire it to laserButton
Then we can call the .startAnimation( ) method with translateLaser off of our laserButton ImageButton object, using the following line of Java code:
laserButton.startAnimation(translateLaser);
Once this is all in place (see Figure 10-28) we can use our Run As Android Application work process and launch our Nexus S emulator and see our LaserCannon pulsing!
Once the application starts, hit the menu button, and select the Attack a Planet menu option, and go into your user interface screen, and watch the LaserCannon kickback, recoiling from its laser firing sequence. Remember that due to the startOffset parameter, you will have to wait 8 seconds for the first translation animation to “kick in!” Now our Attack a Planet UI screen is fully animated, and is ready for end-user consumption.
Summary
In this chapter, we learned about how to implement procedural animation in Android. We learned that this type of animation uses code and algorithms, rather than bitmaps, just like frame-based animation uses, and we learned about the major concepts and components of vector animation, and vector imagery for that matter, rotation, translation and scale. We also took a look at how to animate alpha channel values.
We then proceeded (no pun intended) to add procedural animation to both static and animated bitmap imagery in our current Hello World application, adding scale to make our virus pulse more realistically, rotation to our bomb image to make it animated, alpha channel blending to our invasion soldier to implement an impressive transporter beam effect and translation to our laser cannon to make it recoil as if it had shot out a laser pulse.
We also looked at how to create a more complex animation set, by using a <set> tag to group the various types of procedural animation tags to form more complex animation definitions, where all these components are being processed by Android at the same time, in parallel.
In the next section of the book, we will learn about and implement more complex new media elements, such as digital audio and digital video, into our Hello_World application. In the next chapter we’ll learn about digital video concepts, digital video editing, and digital video compression.