Handrail Armatures for a Grand Staircase |
Stephen Lars Klein |
The grand staircase for the Yale School of Drama’s spring 1997 production of A Ride Across Lake Constance (see Figure 1) was designed to impress. But the staircase was more massive than complicated: only its handrails presented an unusual technical challenge. Beginning as straight sections along the top landings and upper staircases, they curved in broad, sweeping descents that began at the mid-landing and ended in tight volutes at the bottom.
Building curved handrails from ordinary scenic materials is usually difficult and time-consuming. Fortunately, the cross-section of this particular handrail was a simple oval closely resembling one of the pre-formed handrails that Julius Blum & Co., Inc. sells as Colorail®. See Figure 2. A Colorail® handrail has two parts: an armature and a sleeve. The armature is a custom-fitted and installed length of steel or aluminum stock. Julius Blum & Co., Inc. sells several styles of armatures, but designs the sleeves to fit over commonly used bar stock shapes. The solid-color PVC sleeves, when heated, can easily be molded around the armatures. After cooling, the sleeves conform to the shape of their armatures.

FIGURE 1: THE LAKE CONSTANCE STAIRCASE
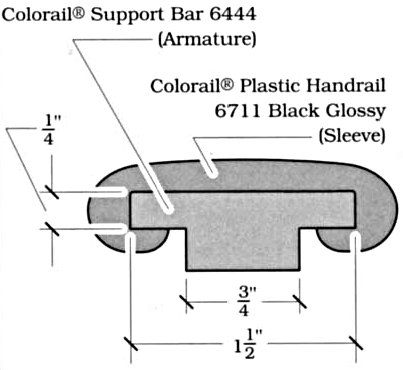
FIGURE 2: HANDRAIL CROSS SECTION
TWO ARMATURE DESIGNS
Since the Colorail® sleeves would completely hide the armatures we built, we let the handrails′ geometry influence material choice. Lengths of ¼″ × 1 ½″ steel bar worked well along the upper landings and the upper straight-run staircases. But rather than try to bend that same bar around the handrail’s compound curves, student Robin MacDuffie developed an open-framework armature consisting of two lengths of ¼″ × ¼″ steel bar held 1″ apart by steel tabs. The steps he followed in laying out a table jig to build the sweeps of handrail are described in Figure 3.
With the jig complete, Robin screwed plywood blocks on the inside of arc b and the outside of arc c and then bent pre-cut lengths of square stock around them. After clamping the steel in place, he welded the lengths of square stock together with short tabs of ⅛″ × 1″ bar stock spaced about 8″ apart. With the same approach and a smaller jig, he made the volute. Since the staircase was symmetrical, one pair of jigs produced handrails for both sides of the unit.

FIGURE 3: JIGGING UP FOR THE UGE SWEEPS
HANDRAIL INSTALLATION
Installation proceeded quickly at first. After lagging the 1″ tube steel balusters to the staircase, we clamped the straight bar-stock armatures to the balusters of the straight-run staircases and upper landings and welded the pieces together.
The large sweeps went on almost as quickly as the straight bar stock. Hand pressure and a number of C-clamps were enough to persuade the sweeps to follow the staircase’s rise. After aligning the square stock with the top of a baluster as in Figure 4, Robin tack-welded that joint and moved on to the next.
The volutes were also quick and easy. After welding them to the ends of their sweeps, Robin used a pry bar to develop their “drops” and to align them with the stage floor. The results are shown in Figure 5.
In fact, only one section of the handrail — the transition between the straight bar stock and the sweeps — was at all time-consuming. The transition pieces had to be built in place because jigging them up would have been more troublesome than worthwhile. However, the ¼″ square stock was too stiff to be bent by hand. To solve this problem, Robin made a model for the square stock out of ¼′ round stock, which is quite easy
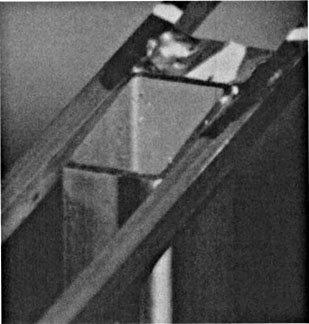
FIGURE 4: SWEEP JOINT READY FOR WELDING
to bend by hand. He then used a Hossfeld Bender to make the square stock match his round-stock model. Figure 6 shows the resulting transitional pieces in place, ready to be welded to the the stage right balusters.

FIGURE 5: VOLUTE ARMATURE

FIGURE 6: TRANSITION PIECE
Applying the Colorail® sleeve was as simple, fast, and fun as Julius Blum & Co., Inc.’s catalog had promised. Feeding the PVC through a heat-gun-powered heating sleeve made it quite pliable, and it stayed easy to work with for many minutes. Even so, the volutes proved troublesome: the sleeve’s “plastic memory” would not allow it to stay wrapped around such a tight curve. Rather than risk leaving it permanently dented by spring clamps, we wrapped wide strips of muslin around it like first-aid bandages to help it hold its shape until it could cool enough to stay in place.
CONCLUSION
The twin-bar armatures made these railings strong enough for a person to slide down, and though developed specifically to work with Colorail®, they could easily be modified for use with other “overcoats”. Those who would use the techniques outlined here are advised to plan their jigs carefully. Simple plan-view jigs like the ones we used make no allowance for staircase rise and will not produce good results for steeper stairs or for handrails with tight sweeps.
On the other hand, any type of jigging may be a form of overkill. If round stock can be hand bent for a model, why can’t it be hand bent to work as the finished rails in at least some cases?
Colorail® sleeves and armatures are available from
Julius Blum & Co., Inc.
P.O. Box 816
Carlstadt, NJ 07072
201-438-6003, 800-526-6293, fax: 201-438-6003