Pinless (and Painless) Pipe Pockets |
Elisa R. Griego |

FIGURE 1: SQUARING THE DROP

FIGURE 2: MARKING THE TRIM LINE
Shop carpenters who balk at sewing hems or pipe pockets in soft goods should find this article helpful. The two methods described here require little or no pinning, probably the most tedious and time-consuming part of any large sewing project. Aside from a sewing machine, the only tools needed are a fabric pencil, a snap line, and a tape measure. While only the “three-snap” method is suitable for opaque fabrics, those who are working with semi-transparents may use either the “three-snap” or the “four-snap” method. Either can save considerable time.
FIRST THINGS FIRST: DEFINING A STRAIGHT POCKET
If you’re working with a piece that has horizontal seams, you can probably trust the bottom selvage as a good reference in measuring for a pocket. If you have doubts, though, or if you’re working with a seamless piece or one with vertical seams, here’s an easy way to insure that a hem or pipe pocket will be both straight and perpendicular to the sides of the piece.
Lay the goods out flat and face down, taking care to avoid stretching the fabric as you work. Fold 2′ or 3′ of the bottom end back on the rest of the piece, lining up the edges of the fabric as shown in Figure 1. The fold is perpendicular to the sides of the goods. Open the ends of the fold just enough to mark its location on the back of the goods with a fabric pencil. Now unfold the goods. If the end of the piece were left too uneven, bulky flaps of fabric could fill the pocket. Measure down from the fold marks to establish a Trim Line (see Figure 2) as close to the bottom end of the goods as possible. Make sure that the distance (T) between the trim line and the fold marks is the same at both vertical edges. Snap the Trim Line and cut off any excess fabric, leaving the trim line clearly visible.
THE THREE-SNAP METHOD (ALL FABRICS)
Note: these dimensions produce a 3″ hem.
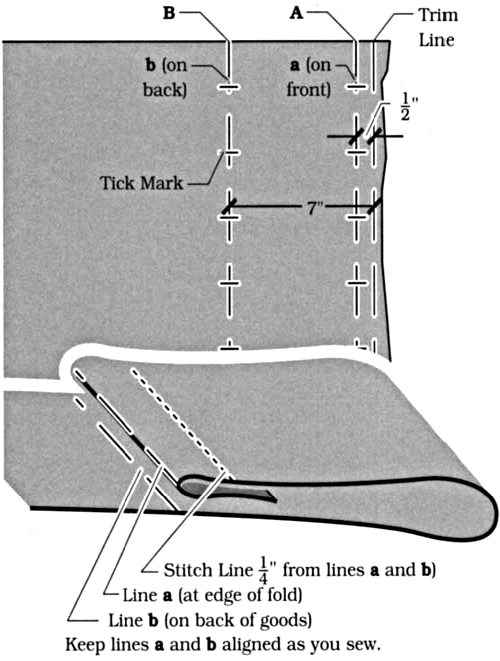
Using a fabric pencil on one vertical edge (side) of the goods, lay in marks A and B at ½″ and 7″ from the Trim Line, respectively, as in Figure 3. Lay in corresponding marks A’ and B’ on the opposite vertical edge of the piece.
Using a chalk color with minimal contrast to the fabric (blue chalk on black fabric, for instance, or red on natural or white fabric), snap line b between marks B and B’ on the back of the goods. Then fold the fabric back and snap line a on the front of the goods between marks A and A’. Use no more chalk than is necessary. Draw tick marks at regular intervals along both these lines. They will warn you about fabric “creep” during sewing.
If you must bundle the marked goods for transport to a different location for sewing, keep in mind that you’ll be sewing with the fabric good side down. Use Figure 3 as a guide for stitching, and keep the tick marks aligned as shown to prevent fabric creep.

FIGURE 3: THE THREE-SNAP METHOD
THE FOUR-SNAP METHOD (SCRIMS AND OTHER SEMI-TRANSPARENTS ONLY)
This method uses a similar alignment procedure to produce a 3″ hem. It requires a little more preparation, but it provides guides for the stitches themselves. The notes refer to Figure 4. On one of the vertical edges (sides) of the goods, draw marks A, B, and C at ⅜″, 1⅛″, and 7 ⅛″, respectively, from the Trim Line. Draw corresponding marks A’, B’, and C’ on the opposite vertical edge. Using a chalk of greater color contrast than that suggested for the three-snap method (e.g., red chalk for black fabric and blue for natural or white), snap line a and line c (at ⅜″, and 7⅛″, respectively) on the back of the goods, then fold the fabric back to snap line b on the front. To prevent the chalk from marking the lower layer of fabric, you may want to separate the two layers with a strip of brown paper before making this last snap. Snapping line b on the front guarantees that all three lines will be face up (and therefore more easily seen) during sewing. As with the three-snap method, mark perpendicular tick marks along the snap lines at regular intervals. As you sew, align all three snap lines and the tick marks and let your needle follow the stacked lines. Be particularly careful to correct for fabric creep.

FIGURE 4: THE FOUR-SNAP METHOD (FOR SEMI-TRANSPARENTS ONLY)
FINAL COMMENTS
Powdered charcoal snap lines might be more appropriate than chalk in some cases. On the other hand, chalk certainly “stays put” better than charcoal — something to keep in mind if the goods must be bundled and moved before sewing. In any event, the results of these methods are certainly comparable to more traditional methods and they take far less set up and sewing time than those that require the use of pins.
