A No-Weld Spiral Staircase |
David A. Griffith |
Though center-column spiral staircases are structurally simple, they are not particularly easy to build. The fact that they are generally made of metal makes them especially challenging for any shop not equipped for welding. As a university Technical Director faced with this problem, I turned to physics lab technicians for help. With their advice (and the use of some of their equipment) my carpenters turned out a sturdy 10′-tall spiral staircase that uses plywood and PVC pipe instead of metal as the main components. Other non-welding shops should find the design described here just as useful as I did.
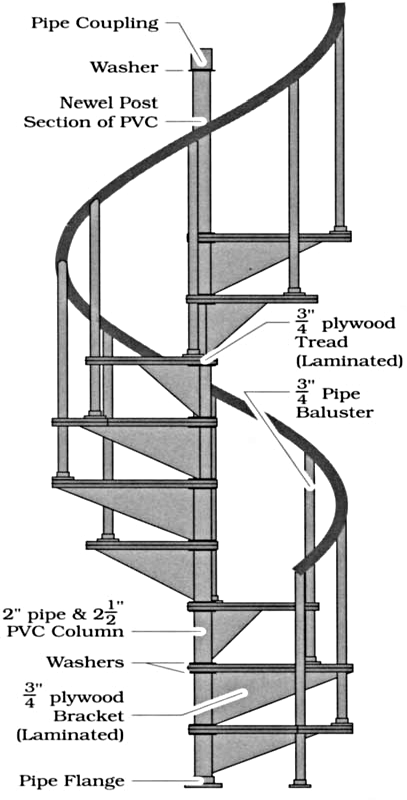
FIGURE 1: PARTS & MATERIALS
CONSTRUCTION
Figure 1 identifies the parts and materials this staircase uses. The treads are made of double layers of ¾″ AC plywood glued and stapled together, and drilled at their inside ends to fit the core of the staircase’s column. A plywood bracket stiffens each tread. These brackets, cut as right triangles and mounted in ½″dados in the bottoms of the treads, bear against the staircase’s column. Like the treads themselves, the brackets are two-layer laminates of ¾″ AC plywood.
Along their outside edges, each tread is joined to the next lower tread by a ¾″-pipe baluster. The balusters screw into flanges bolted to the tops of the treads, and, where each one passes through a hole near the nosing of the next-higher tread, it is fixed in place by an 8d duplex-nail tread-pin.
The core of this staircase’s central column is a length of 2″ schedule 40 black pipe, and the sleeves that surround that core are lengths of 2½″ PVC. For the original model of this staircase, we used schedule 80 PVC, laboriously reaming out each sleeve on a lathe. I have since learned, however, that schedule 40 PVC would have worked just as well, and its use would completely have eliminated all machining.
The sleeves in this staircase are not permanently fastened to the treads. Unlike their counterparts in metal staircases, they are independent components whose basic functions are to maintain a consistent rise, and to help the treads stand straight out from the central column. During assembly, the column’s 2″ schedule 40 black pipe is screwed tightly into the flange that will ultimately connect it to the floor. Next, the first PVC sleeve is slid over the pipe, followed by an unusually large steel washer, then the bottom tread, and another oversized washer, in that order. The sequence of adding sleeve, washer, tread, and washer, illustrated in Figure 2, continues until the last tread is in place and topped by a washer.

FIGURE 2: ASSEMBLY & INSTALLATION NOTES
In our staircase, the top 3″ of the column served as a newel post for the staircase. A final section of PVC sleeved over the pipe above the top tread and washer was cut just long enough to leave room for one last washer and the pipe coupling that served as the newel’s cap.
INSTALLATION
During installation, the pre-assembled column and treads are stood up and the column is lagged to the floor and secured at its upper end. The lowest tread is then rotated into its playing position and fitted with its baluster, which is fed through the hole in the tread’s nosing and screwed into a flange. Next, the duplex-nail tread-pin, pictured in Figure 3, is inserted into the edge of the tread and through the baluster. Lagging the baluster’s flange to the stage floor completes the installation of the first tread, a sequence of operations that is repeated with each of the other steps. After all treads and balusters have been fastened together, the newel-cap coupling at the top of the column is tightened, compressing all the treads, washers, and PVC sleeves and stiffening the whole unit.

FIGURE 3: TREAD-PIN DETAIL
CONCLUDING COMMENTS
The design of the handrail for spiral staircases I will leave to others. The original model of this design used flexible PVC tubing, a material too flexible to be satisfactory, even though the balustrade of ¾ pipes offered enough in the way of actor safety. I was very pleased with the rest of the design. It played well, trucked easily, and continues to store compactly under some shelves in the scene shop, ready to be used again.