
Appendix B. Interoperability
A few lucky souls have the luxury of building their applications using only WPF, ignoring the long history of Windows presentation frameworks that have come before. Unfortunately, the rest of us have presentation logic built up in Win32, Microsoft Foundation Classes (MFC), Windows Forms, ActiveX, and HTML that we’d like to keep, whether that means bringing new WPF-based controls into our existing application or bringing in existing controls built with other frameworks into our new WPF applications.
There are two gaps of interoperability that we have to worry about. The first is the core abstraction that defines the regions of functionality we’d like to use as a host or as a control: the HWND versus the WPF element. Raw Win32 applications are built in terms of HWNDs, as are MFC, Windows Forms, and ActiveX-based applications. HTML applications are built in terms of pages, which are served up with an instance of the Web Browser ActiveX control and which host other ActiveX controls as content. On the other side of this gap, we have the WPF element, which is a new thing that breaks the long tradition of Windows-based presentation stacks by not being HWND-based.
The second interoperability gap is characterized as native versus managed code. Raw Win32, MFC, and even HTML applications and controls are native whereas both Windows Forms and WPF are managed. Bridging the native/managed gap requires the Platform/Invoke (P/Invoke) capabilities of .NET.
Whether you have to cross one or both of these bridges depends on what techniques you need to bring to bear in hosting or being hosted. For example, moving between Windows Forms and WPF requires us to worry about HWNDs versus WPF elements, but the code for both of these presentation stacks is managed, which eases the journey. On the other hand, hosting a WPF control in an MFC dialog requires keeping in mind the coding conventions of both a specific managed library (WPF) and a specific native library (MFC), as well as the specifics of making them work together, most often with C++/CLI (the latest version of Microsoft’s C++ that supports .NET).
WPF and HWNDs
Whether the existing code you’re integrating with WPF is managed or not, it’s going to be HWND-based if it was built on Windows. If you run a normal Windows application, like Calc, it will be composed of a parent window and several child windows. If you run the developer tool Spy++ and examine Calc, you’ll see that the buttons and the calculation display are all windows, as shown in Figure B-1.

Each window in Figure B-1 is an instance of the HWND type exposed by the User API, which is what has put the “windows” in Windows since 1985 (when Microsoft Windows version 1.0 was released). The top-level window, 00530862, is the parent window for the child button and the edit box windows that make up the calculator UI.
If you run Spy++ against the WPF calculator sample in the SDK, you’ll see a very different picture, as shown in Figure B-2.

In Figure B-2, notice that there’s a top-level window (001E0954), but no “+” to click on to drill into the WPF calculator’s child windows because there is none. In fact, the only visible HWND in the entire application is the one provided for the main window. Every child on the main window is a Visual, not an HWND, and is managed directly by WPF. By default, only top-level window elements get HWNDs (this includes menus, pop ups, tool tips, and combo box drop downs so that they can extend past the main window’s borders if necessary).
The lack of HWNDs in WPF leads to somewhat of a problem for
interoperability between WPF and the Windows applications that have come
before it. If you want to host an HWND in WPF, whether it’s the edit
control provided by Win32 or the TextBox class provided by Windows Forms,
you’re going to first need to introduce an HWND into the WPF tree to
serve as the control’s parent, which is exactly what the HwndHost is for.
The HwndHost class is an
abstract class that provides much of the functionality required to
interop with HWND-based windowing, including message hooks, measuring,
positioning, keyboard handling, and, of course, the ever-important
window procedure (WndProc) into which all windowing messages
come.
Hosting a Windows Form Control in WPF
On top of this core functionality of the HwndHost class, deriving classes handle
details germane to their specific framework. As of this writing, WPF
exposes only one such specialization: the WindowsFormsHost class from the System.Windows.Forms.Integration namespace and
the WindowsFormsIntegration assembly.
The WindowsFormsHost class has
properties for background, font, and tab index properties to provide
integration at those points with WPF. Example B-1 shows how to
declaratively add a WindowsFormsHost
element to a Window.
<!-- Window1.xaml -->
<Window ...>
  <Grid>
    <WindowsFormsHost />
  </Grid>
</Window>
Example B-1 creates an
instance of the WindowsFormsHost
control, which introduces an HWND into WPF’s tree, as shown in Figure B-3.
With an HWND injected into the WPF tree, we can now host a control
from the HWND-based UI framework with which WPF integrates best: Windows
Forms. For example, after adding a reference to the System.Windows.Forms assembly to the project,
we can host a DataGridView control,
as shown in Example B-2.
<!-- Window1.xaml -->
<Window ...
  xmlns:wf="clr-namespace:System.Windows.Forms;assembly=System.Windows.Forms">
  <Grid>
    <WindowsFormsHost>
      <wf:DataGridView x:Name="gridView" />
    </WindowsFormsHost>
  </Grid>
</Window>
Here we’ve mapped in the System.Windows.Forms namespace so that we have
access to the DataGridView control.
We’ve also named the control in the same way that you would any element
in WPF, which gives us programmatic access to the DataGridView from our code, as Example B-3 shows.
// Window1.xaml.cs
...
public class Person {...}
public class People : System.Collections.Generic.List<Person> { }

public partial class Window1 : Window {
  public Window1(  ) {
    InitializeComponent(  );

    gridView.DataSource = new Person[] {
      new Person("Tom", 11),
      new Person("John", 12),
      new Person("Melissa", 37)
    };
  }
}
In Example B-3, we’re
using normal Windows Forms data binding by setting the data source to a
collection of Person objects. Because
both WPF and Windows Forms are managed, we can call from one to the
other without any special considerations. Figure B-4 shows the hosted
DataGridView control in
action.

In the case of the DataGridView
control, you can go even further when taking advantage of XAML, as Example B-4 illustrates.
<!-- Window1.xaml -->
<Window ...
  xmlns:wf="clr-namespace:System.Windows.Forms;assembly=System.Windows.Forms"
  xmlns:local="clr-namespace:HostingAWinFormsControl">
  <Grid>
    <Grid.Resources>
      <local:People x:Key="Family">
        <local:Person Name="Tom" Age="11" />
        <local:Person Name="John" Age="12" />
        <local:Person Name="Melissa" Age="37" />
      </local:People>
    </Grid.Resources>
    <WindowsFormsHost>
      <wf:DataGridView DataSource="{StaticResource Family}" />
    </WindowsFormsHost>
  </Grid>
</Window>
Notice that in Example B-4, we’ve mapped our
local namespace into the XAML so that we could create our collection
declaratively. With this in place, we can set the DataSource property of the DataGridView to this named resource with no
special consideration for Windows Forms. In fact, as far as the DataSource property is concerned, it’s just
being handed a preinitialized collection, which is what it needs to
drive its data binding implementation; it has no idea that the
collection was declared in XAML and couldn’t care less. It’s not the
case that every Windows Forms control “won’t care” that it’s being
created in XAML, but sometimes you get lucky.
Tip
The WindowsFormsHost can hold
only a single child control, so if you want to host more than one
Windows Forms control inside a single WindowsFormsHost, you can do so by creating
a custom Windows Forms User Control and use that as a container for
your Windows Forms controls. This allows you the benefits of the
Windows Forms Designer for visual layout of the Windows Forms controls
inside the User Control and separates you from the limitations of XAML
when accessing Windows Forms controls.
You should know that there are a number of limitations with the integration between HWND-based Windows Forms and WPF, which we discuss at the end of this appendix. However, the ability to host an existing Windows Forms control in WPF can be a huge timesaver if you’ve got working code that you’d like to put to immediate use inside WPF. Still, hosting Windows Forms controls inside a WPF host is only half the story; you may also want to host WPF controls in a Windows Forms host, which is what we’ll discuss next.
Hosting a WPF Control in Windows Forms
Hosting a WPF control in Windows Forms is much the same as hosting
a Windows Forms Control in WPF: we
need a host. In WPF, we needed a host that was an element that could fit
into WPF, but that also provided an HWND for use by the Windows Forms
control. In Windows Forms, we need a Windows Forms Control-derived class so that it can fit into
a container’s Controls collection.
For that, we have the ElementHost
class, also from the System.Windows.Forms.Integration namespace and
the WindowsFormsIntegration
assembly.
The ElementHost class derives
from ContainerControl to enable
hosting other Windows Forms controls. The element host knows about
HWNDs, how to size and paint itself, and how to handle keystrokes and
focus. As an example, let’s say we’ve got a form all laid out in the
Windows Forms Designer, as shown in Figure B-5.

In Figure B-5, we’ve got a form with two group boxes: one with a Windows Forms button laid out on the left using the Windows Forms Designer and one blank on the right, all ready for a WPF button to be added at runtime, which is what the code in Example B-5 does.
// Form1.cs
...
using System.Windows.Forms.Integration;

public partial class Form1 : Form {
  public Form1(  ) {
    InitializeComponent(  ); // group boxes created in here

    // Create WPF button
    System.Windows.Controls.Button
      wpfButton = new System.Windows.Controls.Button(  );
    wpfButton.Content = "WPF Button";
    wpfButton.Click += wpfButton_Click;

    // Host the WPF button
    ElementHost host = new ElementHost(  );
    host.Left = 39;
    host.Top = 72;
    host.Width = 165;
    host.Height = 40;
    host.Child = wpfButton;

    // Add the element host to the groupbox
    rightGroup.Controls.Add(host);
  }

  // Handle the WPF button's Click event
  void wpfButton_Click(object sender, System.Windows.RoutedEventArgs e) {
    System.Windows.MessageBox.Show("Hello from WPF!", "Hello");
  }
}
To compile Windows Forms code with WPF added, you’ll need to add
the WPF assemblies to your project, including at least WindowsBase, PresentationCore, and PresentationFramework. Also, because you’re
integrating Windows Forms and WPF as before, you’ll need to add a
reference to the WindowsFormsIntegration assembly.
With the appropriate assemblies referenced, Example B-5 creates a WPF
Button from the System.Windows.Controls namespace. However, as
there’s a Button class in the
System.Windows.Forms namespace too,
you’ll have to be explicit when mixing WPF and Windows Forms code. After
creating the button, setting its properties, and handling its Click event, we create an instance of the
ElementHost class. Then we add the
button to the host and the host to the group box, and we’re all set to
see our WPF button right next to the Windows Forms button, as shown in
Figure B-6.

Figure B-6 doesn’t show much benefit from going to the trouble of hosting a WPF control in a Windows Forms application, but we could update the code to use one of the features that make WPF special, as we do in Example B-6.
System.Windows.Controls.Button wpfButton =
  new System.Windows.Controls.Button(  );
...
wpfButton.Background =
  new System.Windows.Media.LinearGradientBrush(
    System.Windows.Media.Colors.White,
    System.Windows.Media.Colors.Red,
    new System.Windows.Point(0, 0),
    new System.Windows.Point(1, 1));
...
This gives us something a bit fancier, as Figure B-7 shows.

Although there is not yet any designer support for hosting WPF elements in a Windows Forms form, the code-based basics are still the same (i.e., setting properties, calling methods, and handling events). In addition, notice that the font family, size, and weight are the same for both buttons, even though we didn’t do anything font-specific in the creation of our WPF control. This is because the concept of ambient properties in Windows Forms is mapped to the concept of inherited properties in WPF, giving us a consistent look and feel (unless we choose to override it).
Hosting WPF in Native HWND Apps
Things can get a bit wackier when hosting a managed WPF control in a native Windows application, like a raw Win32 application or an MFC application. The first barrier to entry is that WPF is managed .NET code, whereas your non-Windows Forms HWND applications are likely written in native C/C++. There are various ways to interact programmatically between native and managed code (e.g., P/Invoke) and COM (the Component Object Model). For example, one way to use a WPF element in a native HWND-based application is to host the WPF element in a custom Windows Forms User Control and use the support in MFC 7.1+ for hosting Windows Forms controls.[121]
However, your smoothest interoperability experience is to use Visual Studio 2005’s capability to switch your native C++ application to a managed one. For example, consider an MFC application, like the simple one shown in Figure B-8.

To compile this application as managed code, right-click on the project in the Solution Explorer, choose Configuration Properties → General, and set the “Common Language Runtime support” option to “Common Language Runtime Support /clr.” Compiling this sample MFC application and running it yields the same behavior as Figure B-8 (in fact, Figure B-8 is the managed version—fooled ya . . . ). Once the application is compiled as a managed application, you can reference managed assemblies to bring in ADO.NET, System.XML, Indigo, Windows Forms, and of course, WPF.
For example, maybe we want the About box in our simple MFC sample
to have some fancy WPF control in it. To start, you’re going to need to
add the WPF assemblies to your project. The simplest way to do that is
to right-click on your MFC project in the Solution Explorer and choose
References. This will bring up the project’s property pages prenavigated
to the Common Properties → References section, where you can add the
WindowsBase, PresentationCore, PresentationFramework, and System assemblies, as shown in Figure B-9.
If this were a normal Win32 application, complete with a WinMain function, I’d tell you to add a
managed attribute to it so that your main thread was marked as an STA
thread, as shown in Example B-7.
#include "stdafx.h"
...
[System::STAThreadAttribute]
int APIENTRY _tWinMain(...) { // MFC apps don't have these...
  ...
}
The STAThreadAttribute
attribute is required on the UI thread for .NET-based UI stacks (i.e.,
Windows Forms and WPF). However, because MFC applications don’t have a
custom WinMain (MFC implements the
WinMain method for you), that means
you need to go another route to mark your entry point as STA-threaded.
To do this, set the Configuration Properties → Linker → Advanced → CLR
Thread Attribute property to “STA threading attribute
(/CLRTHREADATTRIBUTE:STA)” in your project’s properties.
With the appropriate thread settings, we can now create a WPF
control host suitable as an HWND child to host our WPF control. The host
class is called HwndSource and is
part of WPF in the System.Windows
namespace. The C++/CLI code in Example B-8 creates a WPF
button and hosts it in an instance of HwndSource.
HwndSource^ CreateWpfOkButton(
  HWND hwndParent, int x, int y, int width, int height) {

  // Create a fancy WPF OK button
  Button^ wpfButton = gcnew Button(  );
  wpfButton->Content = "OK";
  wpfButton->Background =
    gcnew LinearGradientBrush(
      Colors::White, Colors::Red, Point(0, 0), Point(1, 1));

  // Host the button in the border to fill in the background
  Border^ wpfBorder = gcnew Border(  );
  wpfBorder->SetResourceReference(Border::BackgroundProperty,
               System::Windows::SystemColors::ControlBrushKey);
  wpfBorder->Child = wpfButton;

  // Host the border in an HwndSource and return the host
  HwndSourceParameters params;
  params.ParentWindow = IntPtr(hwndParent);
  params.WindowStyle = WS_CHILD | WS_VISIBLE;
  params.PositionX = x;
  params.PositionY = y;
  params.Width = width;
  params.Height = height;
  HwndSource^ src = gcnew HwndSource(params);
  src->RootVisual = wpfBorder;

  return src;
}
Example B-8 shows a
helper function that uses the C++/CLI syntax enabled by the CLR setting
we enabled earlier.[122] The helper creates an instance of a WPF Button, and then creates an instance of a
Border to host the button. The
Border object’s Background property is set to a resource
reference to the brush for the dialog background color (called the
“control” color for programmers and the “3D Object” color for Vista
users[123]). With the resource reference set (which is the same as
using a DynamicResource markup
extension in XAML), if the user changes the color, the border around the
button will update as appropriate. Without the border, the button will
be surrounded with black, which ruins the whole “integration” experience
we’re going for. The border hosts the button, and the border in turn is
hosted by an instance of the HwndSource via the RootVisual property. Using the helper function
in the About box’s OnInitDialog
method, we replace the native OK button with our managed WPF button, as
shown in Example B-9.
BOOL CAboutDlg::OnInitDialog(  ) {
  // Get position of the native OK button relative to the About box
  HWND hwndParent = this->GetSafeHwnd(  );
  HWND hwndOkButton = ::GetDlgItem(hwndParent, IDOK);
  RECT rect = { 0 };
  ::GetWindowRect(hwndOkButton, &rect);
  // The violence inherent in the system...
  ::MapWindowPoints(0, hwndParent, (POINT*)&rect, 2);

  // Hide the native OK button
  ::ShowWindow(hwndOkButton, SW_HIDE);

  // Create and show the WPF button
  HwndSource^ srcWpfButton = CreateWpfOkButton(
    hwndParent,
    rect.left,
    rect.top,
    rect.right - rect.left,
    rect.bottom - rect.top);

  // Handle the Click event
  Button^ wpfButton = (Button^)((Border^)srcWpfButton->RootVisual)->Child;
  wpfButton->Click += MAKE_DELEGATE(RoutedEventHandler, okButton_Clicked);

  ::ShowWindow((HWND)srcWpfButton->Handle.ToPointer(  ), SW_SHOW);
  return TRUE;
}

void CAboutDlg::okButton_Clicked(Object^ sender, RoutedEventArgs^ e) {
  EndDialog(IDOK);
}
After doing some pedestrian Win32 dialog math to find the location
of the native OK button relative to the client area of its parent and
hiding it, we create our managed WPF button using the helper function
and hook up its Click event to a
member function of the CAboutDlg
class that closes the dialog just like our native OK button was
doing.
We construct the click handler with the MAKE_DELEGATE macro that VC++ provides to help
map a native member function to a managed delegate. To make this work,
we need to bring in the msclrevent.h header file and add a DELEGATE_MAP to our CAboutDlg class declaration, as Example B-10 illustrates.
// stdafx.h
...
#include <msclrevent.h>

// MfcHostingAnWPFControl.cpp
...
class CAboutDlg : public CDialog {
  ...
public: // VS05b1 requires the delegate map to be public
  BEGIN_DELEGATE_MAP(CAboutDlg)
    EVENT_DELEGATE_ENTRY(okButton_Clicked, Object^, RoutedEventArgs^)
  END_DELEGATE_MAP(  )
};
Figure B-10 shows the result.

One final note: although it’s also possible to host HWND controls inside WPF applications, custom HWND controls have largely gone the way of the dodo in favor of ActiveX controls and Windows Forms controls (and hopefully, someday soon, WPF controls).
WPF and ActiveX Controls
For hosting ActiveX controls, WPF relies completely on Windows Forms and its capability to host ActiveX controls. In other words, hosting ActiveX controls inside WPF is a matter of hosting a Windows Forms user control in your WPF element that itself hosts the ActiveX control of your dreams.
If you want to go the other way—that is, hosting WPF as an ActiveX control—you can do so by hosting a WPF control on a Windows Forms User Control as described earlier, because a Windows Forms control can be hosted as an ActiveX control, although this is technically supported only in MFC 7.1+.[124]
WPF and HTML
Unlike ActiveX or Windows Forms controls, WPF elements cannot be hosted directly on an HTML page (i.e., there’s nothing to support this kind of thing in HTML), as shown in Example B-11.
<html>
  <body>
    <h1>WPF doesn't support anything like this!</h1>
    <object
      id="wpfctrl"
      classid="wpfctrl.dll#wpfctrl.MyWpfControl"
      width="100"
      height="100">
    </object>
  </body>
</html>
You can get around this issue again by hosting a WPF control on a custom Windows Forms User Control. Or, if you’ve got a WPF XBAP as described in Chapter 11, you can host it as a frame as shown in Example B-12.
<html>
  <body>
    <h1>WPF supports this!</h1>
    <iframe src="MyWpfApp.xbap"></iframe>
  </body>
</html>
The downside of this approach is that the WPF application cannot provide any programmatic interface (e.g., properties, methods, or events) to the surrounding HTML, like an ActiveX control would.
To go the other way and host HTML inside WPF is a matter of bringing either the COM or the Windows Forms Web Browser control into your WPF app and feeding it HTML. Or, if the HTML is available via a URL, you can navigate to it on a navigation host, as Example B-13 illustrates.
<Page ...>
  <Grid>
    <TextBlock>
      Check out
        <Hyperlink
          NavigateUri="http://sellsbrothers.com">sellsbrothers.com</Hyperlink>.
    </TextBlock>
  </Grid>
</Page>
Because the link references HTML, the WebBrowser control will be brought in
automatically to host the content, as Figure B-11 shows.

For much more on the topic of navigation, see Chapter 11.
Limitations of WPF/HWND Interop
As useful as WPF’s integration with other presentation technologies is, because WPF’s approach to rendering and composition is radically different from the way Win32 UIs have previously worked, there are some limitations to how you can mix the two. Essentially, the new features that WPF offers do not translate back into the old world. The old UI technologies still have the same limitations they always did, even when being hosted by a WPF application.
Airspace
The most important thing to understand is the principle of airspace: within any single top-level window, each pixel belongs to exactly one technology. So, a single pixel must belong either to WPF or to Win32.[125]
One of the upshots of the airspace principle is that the clip
region of a UI element does not apply to any HWND-based children. This
is a nonobvious restriction, and it applies because clipping is a
composition feature. (Internally, it depends on a UI element and all
its children being rendered, and then having the rendered output
clipped. A Win32 element cannot render into the internal intermediate
buffers that WPF uses to perform clipping.) For example, here we’re
nesting three Windows Forms controls inside a clipped WPF Grid:
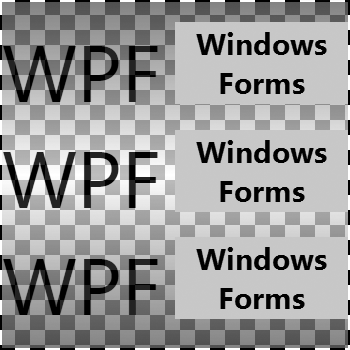
<Grid ...>
  ...

  <Grid.Clip>
    <StreamGeometry>M174,0 348,174 174,348 0,174 z</StreamGeometry>
  </Grid.Clip>
  <!-- properly clipped -->
  <Rectangle ...>...</Rectangle>

  <!-- properly clipped -->
  <TextBlock ...>
    WPF<LineBreak />
    WPF<LineBreak />
    WPF
  </TextBlock>

  <!-- not clipped -->
  <wfi:WindowsFormsHost ...>
    <wf:Label ... Text="Windows Forms" />
  </wfi:WindowsFormsHost>

  <wfi:WindowsFormsHost ...>
    <wf:Label ... Text="Windows Forms" />
  </wfi:WindowsFormsHost>

  <wfi:WindowsFormsHost ...>
    <wf:Label ... Text="Windows Forms" />
  </wfi:WindowsFormsHost>

</Grid>
Figure B-12 shows
a WPF Grid clipped to a diamond
with three Windows Forms controls drawn inside, but they are not
clipped.

You could set the Region
property of the Windows Forms controls so that they are clipped to the
same shape as the WPF element. However, be careful with this—you might
end up making the join between Win32 and WPF more visible. Win32
enables controls to be arbitrary shapes with its region facility, but
this is accurate only to the nearest pixel—any given pixel in a window
is either inside a particular control or not. For certain shapes, this
can give rise to visible “jaggies” around the edges of the shape. A
WPF clip region, on the other hand, can be any Geometry, and Geometrys define shapes in a
pixel-independent fashion. WPF renders the boundaries of clipped
elements with anti-aliasing to reduce jaggies, so the boundary of the
clip region would alternate between smooth and jagged as you went
between WPF and Win32 elements.
Also, keeping a WPF clip in sync with a Win32 region isn’t straightforward—you need to build the region yourself. Because this requires a lot of effort, and the results may be of disappointing quality, it’s probably best to prevent this if you can. Try to avoid UI designs that require this.
Another consideration associated with airspace is that HWNDs always appear to be on top of WPF content. Consider Example B-14.
<Grid ...>
  ...

  <!-- z-order = 0 -->
  <Rectangle ...>...</Rectangle>

  <!-- z-order = 1 -->
  <TextBlock ...>
    WPF<LineBreak />
    WPF<LineBreak />
    WPF
  </TextBlock>

  <!-- z-order = 2 -->
  <wfi:WindowsFormsHost ...>
    <wf:Label ... Text="Windows Forms" />
  </wfi:WindowsFormsHost>

  <!-- z-order = 3 -->
  <wfi:WindowsFormsHost ...>
    <wf:Label ... Text="Windows Forms" />
  </wfi:WindowsFormsHost>

  <!-- z-order = 4 -->
  <wfi:WindowsFormsHost ...>
    <wf:Label ... Text="Windows Forms" />
  </wfi:WindowsFormsHost>

  <!-- z-order = 5 -->
  <Ellipse ... />

  <!-- z-order = 6 -->
  <TextBlock ...>
    On Top
  </TextBlock>
</Grid>
As shown in Figure B-13, the red rectangle in Example B-14 contains the text “On Top” because it is at the top of the Z stack. The pink circle is directly behind it, and in front of everything else. The text labels on the left have been correctly obliterated because WPF rendered those. However, the Windows Forms controls on the right have rendered above the rectangle and the circle, despite the fact that in the XAML, they appeared beneath them in the Z order.

The Windows Forms controls are in front of the WPF controls, in spite of the Z order, because HWNDs use a strategy for dealing with Z order that’s different than WPF. WPF uses the painters algorithm: all UI elements are (logically speaking) painted onto a single target canvas, starting from the elements at the back and working forward to the ones at the front. Win32, on the other hand, doesn’t support transparency, nor does it support anti-aliasing at control boundaries, so it can use a much simpler approach: it assumes that for the region occupied by a particular HWND, the only control that needs to do any rendering is the one that owns the HWND. This causes two problems.
The first problem is that HWNDs tend to fill in their own background, so you can’t see what’s behind them (although there are ways around that, as we’ll see). Second, you can’t position WPF elements on top of HWNDs. This is a direct consequence of the airspace principle, combined with the different ways that WPF and Win32 deal with Z order.
Further, if an animated feature attempts to move in front of a Win32-based element, it will end up appearing behind it, as the ellipse disappearing behind the Windows Forms content shows in Figure B-14.
Figure B-14 is just another manifestation of the Z order problem that is shown in Figure B-13.
Another basic issue with WPF/HWND interop is that although WPF
elements offer an Opacity property
that allows them to be made partially or completely transparent, any
Win32 elements that may be children of the UI element in question
ignore this property. For example, the following constructs a
checkerboard background, and then everything else is contained by a
partially opaque Grid placed on top
of the background:
<Page.Background>
  <DrawingBrush ...>...</DrawingBrush>
</Page.Background>

<Grid ... Opacity="0.8">
  ...
  <!-- opacity set by parent honored -->
  <Rectangle ...>...</Rectangle>
  <TextBlock FontSize="80" VerticalAlignment="Center">
    WPF<LineBreak />
    WPF<LineBreak />
    WPF
  </TextBlock>

  <!-- opacity set by parent ignored -->
  <wfi:WindowsFormsHost ...>
    <wf:Label ... Text="Windows Forms" />
  </wfi:WindowsFormsHost>

  <wfi:WindowsFormsHost ...>
    <wf:Label ... Text="Windows Forms" />
  </wfi:WindowsFormsHost>

  <wfi:WindowsFormsHost ...>
    <wf:Label ... Text="Windows Forms" />
  </wfi:WindowsFormsHost>

</Grid>
Figure B-15 shows the results.
This Grid has its Opacity set to 0.8. Consequently, all the
WPF features—the gradient fill and the three lines of text—have
rendered with partial transparency. However, the three Windows Forms
controls, which are also elements of this same Grid, have rendered completely
opaque.
Windows Forms has always offered a form of pseudotransparency,
where a control could ask its parent to render itself into the child
area before the child began to render. This allowed the appearance of
transparency for simple designs (although it was fairly easy to
construct a design for which this did not work correctly—anything with
overlapping peer controls would produce wrong-looking results). The
WindowsFormsHost element offers a
similar feature:
<Grid Margin="2">
  ...

  <Rectangle Grid.ColumnSpan="2">...</Rectangle>

  <TextBlock FontSize="80" VerticalAlignment="Center">
    WPF<LineBreak />
    WPF<LineBreak />
    WPF
  </TextBlock>

  <wfi:WindowsFormsHost ... Background="Transparent">
    <wf:Label TextAlign="MiddleCenter"  Text="Windows Forms" />
  </wfi:WindowsFormsHost>

  <wfi:WindowsFormsHost ... Background="Transparent">
    <wf:Label TextAlign="MiddleCenter"  Text="Windows Forms" />
  </wfi:WindowsFormsHost>

  <wfi:WindowsFormsHost ... Background="Transparent">
    <wf:Label TextAlign="MiddleCenter"  Text="Windows Forms" />
  </wfi:WindowsFormsHost>

  <Ellipse Fill="#afaa" Grid.ColumnSpan="2" />
</Grid>
If you set the WindowsFormsHost object’s Background to Transparent, it works out what WPF would
have rendered where the Windows Forms control is, and then provides
that as its background, as Figure B-16 shows.

Unfortunately, this is not a complete solution. In this example, the Windows Forms controls are at the same place in the Z order as the three lines of WPF text: they are in front of the background, but behind the semitransparent circle. But as you can see, the Windows Forms controls have been rendered in front of the circle, unlike the WPF text. Still, although the opaque appearance has now gone, there is a cost to this: this form of rendering runs noticeably slower than the normal style.
You can sidestep a number of these airspace issues by using
multiple top-level windows, as each one gets its own HWND. WPF opens
new top-level windows for pop ups of any kind, which avoids the “Win32
is always on top” issue we’ve seen in this appendix. Win32 elements
appear at the top of the Z order of their containing top-level window,
but because pop ups like Menus and
ToolTips get their own top-level
windows, they can appear above even these Win32 elements.
Also, because WPF supports use of a transparent client area in
top-level windows, you can render shaped and/or partially transparent
WPF features on top of Win32 elements by putting them in a second
window that sits on top of the first one and has its AllowsTransparency property set to True. Such a window will be completely
transparent in its client area except for areas containing a WPF
element. You could even use this to run an animation that is overlaid
on top of Win32 elements.
However, be aware that transparent top-level windows have performance issues: in Windows XP and Windows 2003, such windows will be rendered in software. Due to a limitation in DirectX on those versions of Windows, it is not possible for WPF to render a transparent window with hardware acceleration. And, although Windows Vista can use hardware acceleration with transparent windows, the results can still be substantially slower than with normal windows under both Windows XP and Windows Vista.[126]
Transforms, Events, and Nested Interop
In addition to airspace and Z-order issues, WPF’s ability to apply transforms such as rotation and skews to any UI element does not apply to hosted Win32-based elements. Scaling is a special case: the Windows Forms host can apply scale transforms to its content, because Windows Forms itself has some scaling support built in. But because Win32-based components are generally intrinsically incapable of supporting such transforms, there’s no way WPF can magically imbue them with such capabilities.
Also, the use of interop introduces some inconsistencies in the
input events you see. When the mouse goes over a non-WPF element, you
will stop seeing mouse events, and IsMouseOver for the containing element will
return false, even though the mouse is inside a child of the element.
Likewise, if a hosted Win32 element has the keyboard focus, you will
not see keyboard or focus events bubbling out to the containing WPF
element.
Finally, nested interop is not supported. This means that if you have, say, a Windows Forms control that uses interop to host WPF content, this Windows Forms control cannot be hosted via interop inside a WPF app. This would mean WPF wrapping Windows Forms wrapping more WPF, and this nesting is not supported.
For more information on the limitations of WPF interop, I recommend the SDK article “WPF and Win32 Interoperation Overview.”[127]
[121] * Hosting a Windows Forms control in an MFC v7.1 application is described in “Windows Forms: .NET Framework 1.1 Provides Expanded Namespace, Security, and Language Support for Your Projects,” written by Chris Sells and printed in MSDN Magazine, March 2003 (http://msdn.microsoft.com/msdnmag/issues/03/03/windowsforms/default.aspx or http://tinysells.com/87).
[122] * For more information on the C++/CLI syntax in VS2005, I recommend starting here: http://msdn.microsoft.com/msdnmag/issues/06/00/purec/default.aspx (http://tinysells.com/97).
[123] † Start → Control Panel → Personalization → Windows Color and Appearance → Open classic appearance properties for more color options → Advanced.
[124] * If you need to explore this space, “Hosting Windows Forms Controls in COM Control Containers” at http://www.ondotnet.com/pub/a/dotnet/2003/01/20/winformshosting.html is a place to start (http://tinysells.com/94).
[125] * Or DirectX, but that’s beyond the scope of this book.
[126] * Hardware versus software rendering performance does depend on your hardware, however, as Seema Ramchandani points out at http://blogs.msdn.com/seema/archive/2006/10/25/layered-windows-sw-is-sometimes-faster-than-hw.aspx (http://tinysells.com/98).