
Chapter 11. Navigation
One of the mantras of the WPF team was “best of Windows, best of the Web,” which drove much of the innovation in the platform. In the preceding chapter, we looked at windows in a very Windows-centric way, but there’s one innovation that the Web has made popular that we haven’t discussed: navigation between content one page at a time.
NavigationWindow
The idea of navigation in WPF is that instead of showing multiple
windows in a cascading style—a popular Windows application style used in
the preceding chapter—we show pages of content inside a single frame,
using standard navigation metaphors, like the Back and Forward buttons,
to go between pages. If you want to build an application that does this,
you can derive from the NavigationWindow class instead of the Window class and navigate to any WPF content
you like (see Example 11-1).
<!-- Window1.xaml -->
<NavigationWindow ...
  x:Class="NavigationBasics.Window1"
  Title="NavigationBasics" />

// Window1.xaml.cs
...
using System.Windows.Navigation; // home of the NavigationWindow

public partial class Window1 : NavigationWindow {
  public Window1(  ) {
    InitializeComponent(  );

// Navigate to some content
    Navigate("Hello, World.");
  }
}
In Example 11-1, we’ve defined a custom
NavigationWindow that sets its
initial content to a string using the Navigate method, which works as you’d expect
(Figure 11-1).

Notice in Figure 11-1
the presence of the Back and Forward buttons, as well as the little
triangle. These controls are provided and enabled/populated as
appropriate based on the navigation history. In this case, we’ve
navigated only once, so the navigation buttons are disabled (there’s
nowhere to go backward or forward to). The thing that navigates to our
content, displays it, and shows the navigation controls is called a
navigation host. The NavigationWindow is one of the three
navigation hosts we’ll discuss in this chapter.
Pages
If we want to get a little fancier than a string, we can create
multiple Pages of content, which is specifically what
the Page class was invented for (see
Example 11-2).
<!-- Page1.xaml --><Page... x:Class="NavigationBasics.Page1"Title="Page 1"WindowTitle="Welcome to Page 1"> <TextBlock VerticalAlignment="Bottom"><Hyperlink NavigateUri="Page2.xaml">Click to see page 2</Hyperlink></TextBlock></Page>// Page1.xaml.cs... using System.Windows.Controls; // home of the Page public partial class Page1 :Page{ public Page1( ) { // Initialize page from XAML InitializeComponent( ); } }
To get the basic skeleton of a new Page class, you can right-click on your
project in the Visual Studio 2005 Solution Explorer, choosing Add → New
Item, and select Page (WPF). Example 11-2 was started that way,
adding the WindowTitle, the Title, and the content. The WindowTitle is what shows up in the caption of
the navigation host. The Title
property is what shows up in the history drop-down. If you don’t set a
page’s Title property, it will be
composed for you as WindowTitle
(foo.xaml), which isn’t particularly friendly.
The content in Example 11-2 uses a Hyperlink, which is a nice little element that
handles clicking for navigation applications.[70] We’re setting the NavigateUri property to point to the page
resource we’d like it to load for us. The NavigateUri supports the normal URI format
(e.g., a URL to an HTTP file on the Web), as well as the pack URI format
described in Chapter 12. Page two of our content is
another custom Page class defined in
XAML, as shown in Example 11-3.
<!-- Page2.xaml -->
<Page ...
    x:Class="NavigationBasics.Page2"
    Title="Page 2"
    WindowTitle="Welcome to Page 2">
<Button Name="backButton"
            VerticalAlignment="Center" HorizontalAlignment="Center">
    Click to go back to page 1
  </Button>
</Page>

    // Page2.xaml.cs
    ...
    public partial class Page2 : Page {
        public Page2(  ) {
            InitializeComponent(  );

            // Handle the button Click event
            backButton.Click += backButton_Click;
        }

        void backButton_Click(object sender, RoutedEventArgs e) {
            // The Page class provides direct access to navigation services
            this.NavigationService.GoBack(  );
        }
    }
Example 11-3 looks pretty much
like Example 11-2, except
that in this case, we’re assigning the hyperlink a name in the XAML so
that we can handle the Click event
and handle the “go back” navigation as though the user had clicked the
Back button (which is enabled as soon as the user has navigated to
another page). To navigate programmatically, each navigation host
provides a navigation service. The navigation
service is responsible for fulfilling navigation requests,
tracking history, providing events for handling navigation events (e.g.,
Navigating, Navigated, NavigationFailed, etc.), as well as methods of
navigating history (e.g., GoBack,
GoForward, Navigate, etc.).[71] To access the navigation service associated with a
dependency object, you can use the static GetNavigationService method of the NavigationService class:
public Page2(  ) {
  ...
  void backButton_Click(object sender, RoutedEventArgs e) {
// get the page's navigation service
    NavigationService
      navService = NavigationService.GetNavigationService(this);
    navService.GoBack(  );
  }
}
As a shortcut, the Page class
provides the NavigationService
property. In addition, the Page class
supports the set of navigation commands (as described in Chapter 4) on the NavigationCommands class (e.g., BrowseBack, BrowseForward, Refresh, etc.). You can use the commands to
eliminate the need for any Click
event handler code in our example Page 2, as shown in Example 11-4.
<!-- Page2.xaml -->
<Page ...
    x:Class="NavigationBasics.Page2"
    Title="Page 2"
    WindowTitle="Welcome to Page 2">
  <Button Command="NavigationCommands.BrowseBack"
            VerticalAlignment="Center" HorizontalAlignment="Center">
        Click to go back to page 1
  </Button>
</Page>

// Page2.xaml.cs
...
public partial class Page2 : Page {
  public Page2(  ) {
    InitializeComponent(  );
  }
}
With our content hosted in pages, we can use the URI trick, shown in Example 11-5, to navigate to the first page from the navigation window.
// Window1.xaml.cs
...
public partial class Window1 : NavigationWindow {
  public Window1(  ) {
    InitializeComponent(  );

// Show first page
   this.Navigate(new Uri("Page1.xaml", UriKind.Relative));
  }
}
In fact, the desire to define an entire application as a set of
pages and to simply navigate to the first page without any muss or fuss
is something that the Application
object’s StartupUri property supports
directly, removing the need for a main window to host page content at
all (see Example 11-6).
<!-- App.xaml -->
<Application ... StartupUri="Page1.xaml">
  <!-- no need for a main window at all -->
</Application>
In the case of a standalone Windows application, the application
will create a NavigationWindow for
you and navigate to the page specified by the StartupUri property, as Figure 11-2 shows (after we’ve
navigated to the second page).[72]

Notice that setting the Title
property on each Page has resulted in
the name of the page instead of the WindowTitle property.
Tip
Although setting the StartupUri property is a useful shortcut if
your application’s main window is going to be navigation-based,
nothing is stopping you from using NavigationWindow-like dialogs to build
wizards, even if your main window is not navigation-based. The WPF
factoring of NavigationWindow
allows it to be used like any other window.
Loose XAML
If you’re willing to limit what you put in your XAML (e.g.,
removing all code-behind files, including the x:Class declaration), stick to only XAML
filenames as navigation targets, and so on, you can double-click on
XAML files in the shell and navigate between them. Example 11-7 is an updated Page2.xaml to start navigation directly
from the shell.
<!-- Page2.xaml -->
<Page ...
    x:Class="NavigationBasics.Page2"
    Title="Page 2"
    WindowTitle="Welcome to Page 2">
  <TextBlock VerticalAlignment="Bottom">
    <Hyperlink NavigateUri="Page1.xaml">
      Click to go back to page 1</Hyperlink>
  </TextBlock>
</Page>
Notice that I am no longer using a Button here. This is because the navigation
commands don’t work from loose XAML and because I have no code-behind
file in which to handle the Click
event myself. Double-clicking on Page1.xaml and then clicking on the link
yields Figure 11-3.

Due to these limitations, navigating between pages of loose XAML is largely a novelty. Instead, if you want to host your pages in the browser, you’ll want to package them into an XBAP, discussed later in this chapter.
Fragment Navigation
If you’re navigating to a page with a great deal of content (for example, a document such as one could construct using the techniques in Chapter 14), you might want to navigate not just to a page, but to a specific section of a page. You can do this with fragment navigation, which you can perform by composing the URI with a trailing fragment identifier, like so:
content.xaml#fragmentName
The fragment name maps to a named element on the target page. For instance, consider Example 11-8, which shows a piece of XAML that defines a longish chunk of text.
<Page x:Class="NavigationToFragments.Page2" ...>
  ...
  <ScrollViewer>
    <TextBlock TextWrapping="Wrap">
      <TextBlock Name="topic1">
        <TextBlock ...>Topic 1</TextBlock>
        <TextBlock>Lorem ipsum dolor sit amet, ...</TextBlock>
      </TextBlock>
      <TextBlock Name="topic2">...</TextBlock>
      ...
    </TextBlock>
  </ScrollViewer>
</Page.
Example 11-8 includes some named elements. We can refer to these names from a table of contents (see Example 11-9).
<Page x:Class="NavigationToFragments.Page1" ...>
  <TextBlock>
    <Hyperlink NavigateUri="Page2.xaml#topic1">Topic 1</Hyperlink>
    <Hyperlink NavigateUri="Page2.xaml#topic2">Topic 2</Hyperlink>
    ...
  </TextBlock>
</Page>
When navigation is performed against a fragment URI and the section is contained in a navigation target that supports scrolling, the section’s content will be brought into view (or at least as much as will fit into the navigation host), as shown in Figure 11-4, after Topic 4 has been scrolled into view.

For those of you familiar with HTML name fragment navigation, note that the similarity of mechanism is not a coincidence. Because navigation in both WPF and HTML is based on URIs and the URI syntax supports fragments, we get the same syntax for both.[73]
Page Lifetime
As you begin to string several pages together, you may begin to wonder about the lifetime of a page. For example, consider a very simple guessing game that lets you guess a number, and if you don’t get it in one guess, you lose. The idea is that you can have multiple guesses by backing up and trying again. The implementation of our first page isn’t surprising, as you can see in Example 11-10.
<!-- Page1.xaml -->
<Page ...>
  <StackPanel Margin="10">
    <Label>Please guess a number between 0 and 2147483647:</Label>
    <TextBox Name="guessBox" />
    <TextBlock>
      (shh... the answer is <TextBlock Name="answerBox" />.)
    </TextBlock>
    <TextBlock HorizontalAlignment="Right">
      <Hyperlink NavigateUri="Page2.xaml">Guess</Hyperlink>
    </TextBlock>
  </StackPanel>
</Page>
// Page1.xaml.cs
...
public partial class Page1 : Page {
int answer = (new Random()).Next(  );

  public Page1(  ) {
    InitializeComponent(  );
    answerBox.Text = answer.ToString(  );
  }
  ...
}
In the XAML, we’re laying out the elements in a straightforward way, naming the guess and answer text boxes so that we can manipulate them. (Also, notice that we put the answer on the page so that we can see what’s happening to the page’s state as we navigate around.) In the code, when the page is created, we generate a random number, keep it in the page’s state for subsequent guesses, and populate the text box. Figure 11-5 shows the results of showing the first page, navigating to the second page, and then navigating back.

You’ll notice that the answer the second time the first page is
shown is different from the answer the first time. This is because, as
a memory usage optimization, the navigation services of WPF do their
best to keep the smallest amount of data associated with each page as
they can get away with. In our case, because we’re navigating between
pages using a URI, the navigation services keeps the URI,[74] throwing away the page object itself (and all of the
visuals associated with the page). What this means for us, of course,
is that every time the user navigates to the first page, a new
Page1 object is created, generating
a new answer and making it even more difficult for the user to
guess.
If you’d like to track the lifetime of a Page, you can do so with the Loaded and Unloaded events, shown in Example 11-11.
public partial class Page1 : Page {
  int answer = (new Random()).Next(  );

  public Page1(  ) {
    Debug.WriteLine("Page1 constructed");
    InitializeComponent(  );
    answerBox.Text = answer.ToString(  );
    Loaded += Page1_Loaded;
    Unloaded += Page1_Unloaded;
  }

  void Page1_Loaded(object sender, RoutedEventArgs e) {
    Debug.WriteLine("Page1_Loaded");
  }

  void Page1_Unloaded(object sender, RoutedEventArgs e) {
    Debug.WriteLine("Page1_Unloaded");
  }
}
For example, the navigation sequence in Figure 11-5 looks like this:
Page1 constructed
Page1_Loaded
Page1_Unloaded
Page1 constructed
Page1_Loaded
One other thing that you’ll notice about Figure 11-5 is that although the answer was
regenerated along with the Page1
object, the answer text box state was properly restored the second
time the first page is shown. This is because the WPF navigation
services provide all kinds of different ways to keep state between
page navigations while still maintaining the optimization of not
actually keeping the page:[75]
Adding to your page a custom dependency property marked with the
FrameworkPropertyMetadataOptions.Journalflag. Several of the WPF controls, includingTextBox, use this mechanism so that they can restore their state between navigations.Implementing the
IProvideCustomContentStateinterface on your page, either with or without a correspondingCustomContentStateobject.
For large applications of navigation, you should absolutely take advantage of this navigation optimization (provided by default). Otherwise, the user could just keep navigating around in your application, adding pages to the history that he may never get back to, even though the visuals associated with those pages continue to take up memory.
However, for simpler applications, if you would like to turn off
this optimization, you can with a flip of the KeepAlive switch (see Example 11-12).
<!-- Page1.xaml -->
<Page ...
    KeepAlive="True"> <!-- keep the page between navigations -->
  ...
</Page>
The KeepAlive flag defaults
to false, which means that the navigation history will attempt to
destroy the page object (and all of the associated visuals) if it can,
providing the hooks I listed to keep track of state between
navigations. However, in certain cases, the navigation optimization
can’t be applied. For example, if we call the Navigate method with an object instead of a
URI, the navigation service doesn’t know how to re-create the object,
so it caches it instead, which has the same effect as setting KeepAlive to true manually, as we did in
Example 11-12.
Keeping data between navigations to a single page is only part of the story. If you’re going to implement the second page that checks the answer, we’ll need to pass it and the user’s current guess from the first page.
Passing Data Between Pages
It’s easy enough to define our Page2 class with a couple of properties to
accept incoming data, as shown in Example 11-13.
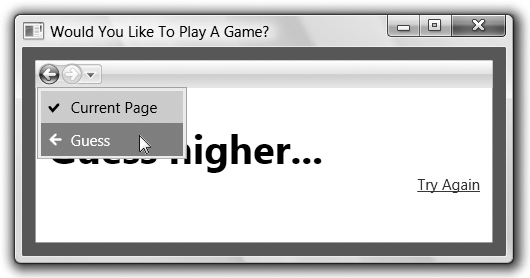
<!-- Page2.xaml --> <Page ...><!-- KeepAlive not set --><StackPanel Margin="10"> <TextBlock> You guessed: <TextBlock Name="guessBlock" /> </TextBlock> <TextBlock FontSize="32" FontWeight="Bold" Name="resultBlock" /> <TextBlock HorizontalAlignment="Right" VerticalAlignment="Bottom"> <Hyperlink Name="tryAgainLink">Try Again</Hyperlink> </TextBlock> </StackPanel> </Page>// Page2.xaml.cs... public partial class Page2 : Page { public Page2( ) { InitializeComponent( ); Loaded += Page2_Loaded; backButton.Click += backButton_Click; playAgainLink.Click += playAgainLink_Click; } int answer; public int Answer { get { return answer; } set { answer = value; } } int guess; public int Guess { get { return guess; } set { guess = value; } } void Page2_Loaded(object sender, RoutedEventArgs e) { guessBlock.Text = guess.ToString( ); if( answer == guess ) { resultBlock.Text = "You win!"; } else if( answer < guess ) { resultBlock.Text = "Guess lower..."; } else { resultBlock.Text = "Guess higher..."; } } void backButton_Click(object sender, RoutedEventArgs e) { // Let them guess again NavigationService.GoBack( ); } void playAgainLink_Click(object sender, RoutedEventArgs e) { // Start a new game NavigationService.Navigate(new Uri("Page1.xaml", UriKind.Relative)); } }
In Example 11-13, we’re defining two properties to be passed in from the first page—the answer we’re looking for and the current guess.[76] When the page is loaded, we use those values to populate the UI.
You’ll also notice that we’re not setting KeepAlive to anything in Page2.xaml. By default, it’s False, but that setting will be ignored
because we’re navigating to the page as an object and not as a URI
(see Example 11-14).
// Page1.xaml.cs
...
public partial class Page1 : Page {
  ...
  void guessLink_Click(object sender, RoutedEventArgs e) {
Page2 page2 = new Page2(  );
    page2.Answer = answer;
    page2.Guess = int.Parse(guessBox.Text);
    NavigationService.Navigate(page2);
  }
}
Figure 11-6 shows the state of an incorrect guess, and Figure 11-7 shows the history after a couple of successes.


The technique of passing in parameters directly to a new page
object works fine, especially when you’ve got several instances of the
same object to keep track of. However, sometimes you’d like to keep
more “global” state (i.e., state that spans even multiple instances of
a particular page type). For example, it would be inconvenient to have
to pass the count of games played through every single page, not least
because we’d have to stop navigating to the first page by URI, instead
passing in a parameter. For these situations, WPF has provided the
Properties dictionary on the
Application, shown in Example 11-15.
// Page2.xaml.cs
...
public partial class Page2 : Page {
  ...
  void Page2_Loaded(object sender, RoutedEventArgs e) {
    guessBlock.Text = guess.ToString(  );

    if( answer == guess ) { resultBlock.Text = "You win!"; TrackWin(  ); }
    else ...
  }

  // NOTE: uniqueness testing to make sure that every won game
  // is only tracked once is left as an exercise to the reader
  // (Send answers to [email protected]...)

  void TrackWin(  ) {
    IDictionary properties = Application.Current.Properties;
    if( !properties.Contains("GamesWon") ) { properties["GamesWon"] = 0; }
    properties["GamesWon"] = (int)properties["GamesWon"] + 1;
  }
}
In Example 11-15,
we’re tracking the number of games won by using a key of GamesWon and incrementing it on every win.
The Properties dictionary is an
object-to-object mapping, so you can keep whatever you want in there.
By using a string, and a short one at that, we’re risking the
possibility of stepping on someone else’s data, which is the problem
with global data in general.
Page Functions
In the world of standard Windows applications, if you want to ask the user a quick question without disturbing the rest of your careful arrangement of visuals and windows, you simply pop up a modal dialog and ask ‘im. However, in the world of navigation-based applications, external windows of any kind are considered rude at the very least (remember the pop-ad craze of the early 2000s?) and verboten in the worst case (XBAPs don’t allow pop-up windows). So, the question is, how do we ask the user a quick question, returning him to whence he came, none the worse for wear? The answer is page functions.
A page function is a page that you call like a function, passing in input and getting output as desired. When the page function returns, the return value is provided to the calling page, where it can pick up where it left off. You can think of page functions as the modal dialog equivalent in navigation-based applications.
As a simple example, let’s imagine that we wanted the user to say the magic word before she is allowed to play the guessing game. The UI for our page function looks like Figure 11-8.

Our page function to ask the user for the magic word looks like a page, but with a few minor differences, as shown in Example 11-16.
<!-- MagicWordPageFunction.xaml -->
<PageFunction ... x:TypeArguments="sys:String">
  <StackPanel Margin="10">
    <Label>What's the magic word?</Label>
    <TextBox Name="wordBox" />
    <TextBlock HorizontalAlignment="Right">
      <Hyperlink Name="playLink">Play</Hyperlink>
      <Hyperlink Name="quitLink">Quit</Hyperlink>
    </TextBlock>
  </StackPanel>
</PageFunction>
The skeleton for Example 11-16
was generated in Visual Studio 2005 by right-clicking on the project,
choosing Add → New Item, selecting PageFunction (WPF), entering a
name, and clicking the OK button. Notice that Example 11-16 has a PageFunction element at the root to match
the PageFunction<T> base
class name. However, because the PageFunction<T> class is generic, we
set the x:TypeArguments property to
the type argument to use to construct the generic PageFunction<T> type.[77] The type passed will be the type of the result from our
page “function call.” The code needs to have a matching type argument,
as shown in Example 11-17.
// MagicWordPageFunction.xaml.cs
...
public partial class MagicWordPageFunction : PageFunction<string> {
  public MagicWordPageFunction(  ) {
    InitializeComponent(  );
    playLink.Click += playLink_Click;
    quitLink.Click += quitLink_Click;
Loaded += MagicWordPageFunction_Loaded;
  }

  string magicWord;
  public string MagicWord {
    get { return magicWord; }
    set { magicWord = value; }
  }

  void playLink_Click(object sender, RoutedEventArgs e) {
    // Check to see if the magic word is the right one
    if( wordBox.Text == magicWord ) {
        OnReturn(new ReturnEventArgs<string>(wordBox.Text));
        Application.Current.Properties["MagicWordEntered"] = wordBox.Text;
    }
  }

  void quitLink_Click(object sender, RoutedEventArgs e) {
  OnReturn(null); // Cancel
  }

  void MagicWordPageFunction_Loaded(object sender, RoutedEventArgs e) {
    if( Application.Current.Properties.Contains("MagicWordEntered") &&
        (string)Application.Current.Properties["MagicWordEntered"] == magicWord ) {
      // No need to re-enter the magic word for subsequent games
      OnReturn(new ReturnEventArgs<string>(magicWord));
    }
  }
}
In addition to taking in the magic word to check for as a
property (just like our page example earlier), we’re checking the word
the user enters when she clicks on the Play link. If the word is
sufficiently magic, we return from the page function by calling the
OnReturn method provided by the
PageFunction<T> base class,
passing the word the user entered so that the caller of the page
function can inspect it. This is the page function equivalent of
setting a modal dialog’s DialogResult to true, and will trigger the
page function to remove itself from the history and return to the
caller.[78] In addition, we’re storing the magic word the user
entered into the application’s Properties function so that she won’t have
to enter it again (as you’ll see).
On the other hand, if the user clicked the Quit link, we call
OnReturn, passing null to indicate
the equivalent of the user clicking the Cancel button on a modal
dialog, also returning to the caller.
Finally, so that the user doesn’t have to enter the magic word
more than once—no matter how many times the page function is navigated
to in the application’s lifetime—in the page function’s Loaded event, we check for the presence of
the magic word in the application’s Properties collection, calling OnReturn right away if the user has already
entered it.
Calling the page function from a “zeroth” page I’ll show you presently looks like Example 11-18.
// Page0.xaml.cs
...
public partial class Page0 : Page {
  ...
  void playLink_Click(object sender, RoutedEventArgs e) {
    MagicWordPageFunction fn = new MagicWordPageFunction(  );
    fn.MagicWord = "please";
    fn.Return += fn_Return;
    NavigationService.Navigate(fn);
  }

  void fn_Return(object sender, ReturnEventArgs<string> e) {
    // Get the navigation service from the sender
    // (the current page's hasn't yet been restored and
    // this.NavigationService is null
    NavigationService
      navService = ((PageFunctionBase)sender).NavigationService;

// User canceled
    if( e == null ) {
      navService.Navigate(new Uri("QuitterPage.xaml", UriKind.Relative));
    }
    // Double-check the magic word
    else if( e.Result == "please" ) {
      navService.Navigate(new Uri("Page1.xaml", UriKind.Relative));
    }
  }
}
At the click of a hyperlink, we create an instance of the page
function, passing in the preferred magic word,[79] subscribing to the Return event (for the page equivalents of
both “OK” and “Cancel”), and navigating to the page function just as
though it were a normal page (and in fact, Page is in the inheritance hierarchy of the
PageFunction<T>
class).
In the Return event handler,
the first thing we do is grab the current navigation service from the
sender. Unfortunately, at this point in the action, the NavigationService property of the page
function caller hasn’t yet been set, so we have to rely on the one
from the page function itself (the sender). Next, we check to see
whether the ReturnEventArgs<T> (where T is String in our case) event argument is null.
If it is, the page function called OnReturn passes null, and we should respond
appropriately. On the other hand, if the return event argument isn’t
null, we can check the Result
property for the data passed to OnReturn. In our example, we double-check
that it was indeed the magic word we were looking for and navigate to
the first page of our guessing game.
Figure 11-9 shows a nominal navigation session.

Clicking the Play link on the Welcome page causes the magic word
page function to show and take its answer. When that returns, the
Welcome page navigates to the first page of our guessing game. Notice
that the history in Figure 11-9
doesn’t show the magic word page function at all. Further, because the
magic word page function keeps track of whether the magic word was
already entered and short-circuits itself as appropriate, if we were
to go back to the Welcome page and click the Play link again, the
magic word UI would never show, the Return event handler would be fired
immediately, and the user would go directly to the guessing
page.
Frames
Thus far, we’ve spent a lot of time talking about the NavigationWindow, how it handles navigation,
and how it integrates with pages and page functions. However, the
navigation window is but one navigation host. A navigation host in WPF is anything that
provides navigation support. Besides the navigation window, which
provides top-level window navigation support, WPF also provides the
Frame, for contained navigation
support. For example, nothing is stopping us from hosting our guessing
game in a frame, which is itself contained by something else, as shown
in Example 11-19.
<!-- Window1.xaml -->
<Window ...>
  <Border BorderBrush="Green" BorderThickness="10">
  <Frame Source="Page1.xaml" />
  </Border>
</Window>
In Example 11-19, we’re hosting
a Frame in a window, but you can host
it equally well in a page. The main property you’ll care about on the
Frame class is the Source, which indicates where you’d like to
start navigation. Figure 11-10
shows the results of making one guess on the history for the
frame.
Frames are useful when you’d like to add navigation to part of
your window (or to multiple parts), but you don’t want the entire window
dedicated to it. For example, your average web site is composed of a set
of content that goes inside a navigation frame, including menus,
graphics, and so on. The Frame
element is one way to implement the content inside the outer navigation
frame.
XBAPs
The final navigation host that WPF provides is an internal class
called RootBrowserWindow. Like
NavigationWindow and Frame, the RootBrowserWindow knows how to host content
for navigation. However, RootBrowserWindow does it by integrating with
versions 6 and later of Internet Explorer[80] in order to implement XAML Browser Applications (XBAPs).
An XBAP is a WPF application with these
characteristics:
Hosted in IE6+ like loose XAML pages (although they’re compiled), whether at the top level or inside an IFRAME. In fact, you’re meant to be able to click back and forth between HTML and XBAPs without knowing that you’re doing so (except that the XBAP pages are “better”).
No custom top-level windows. You must use the
RootBrowserWindowprovided and no other custom top-level windows (e.g., custom dialogs).Runs in partial trust that can’t be elevated by users like normal ClickOnce applications.
Can be deployed like ClickOnce “online-only” applications. The standard ClickOnce “offline/online” deployment is available if your main window is a
NavigationWindow, but it won’t be hosted in Internet Explorer.
You can get a new XBAP application skeleton in Visual Studio 2005
by choosing the “XAML Browser Application (WPF)” project template. It
will give you a standard navigation application without any window
definition, just a page. The chief difference between an XBAP and a
standard navigation-based application is the HostInBrowser property set in the project
file:
<Project ...>
  <PropertyGroup>
    <HostInBrowser>true</HostInBrowser>
    ...
  </PropertyGroup>
  ...
</Project>
In addition, an XBAP’s ClickOnce manifests must be signed to build, which will be set up for you when you use Visual Studio 2005’s project template. In fact, for the purposes of testing and debugging, you can execute an XBAP directly from Visual Studio 2005 (using Debug → Start Debugging or Debug → Start Without Debugging) to see it running inside the browser without first publishing, as shown in Figure 11-11.

Notice that after a guess, the IE7 history looks pretty much like we’d expect from both the navigation window and the frame.
XBAP Publication and Deployment
The publication of an XBAP happens exactly like the publication of a WPF application via ClickOnce, as discussed in the Chapter 2. (I’ll wait here while you refresh your memory.) Right-clicking on your XBAP project and choosing Publish brings up the Publish Wizard, which leads you through the publication process. Unlike the Publish Wizard for standalone ClickOnce applications, this time you won’t get a publish.htm, but here’s a template to get you started:
<html>
<head><title>Welcome to XBAP Fun!</title></head>
<body>
  <a href="http://localhost/XbapGame/XbapGame.xbap
">XBAP Fun!</a>
</body>
</html>
Notice that the link to your XBAP ends in .xbap, unlike a standalone ClickOnce application, which ends in .application. Further, if you surf to this publish.htm file and click on the link, you’ll get the download progress as you expect, but then nothing else (no security dialog) before the application shows itself. In fact, XBAPs are true “one-click” deployment, regardless of whether you’ve run the application before.[81] In addition, because we’re surfing to it via URLs, the histories of both XBAP and HTML are merged, as shown in Figure 11-12.

XBAPs are your “best of the Web, best of Windows” WPF deployment mode of choice (assuming you can live with the limitations laid out earlier).
Navigation to HTML
To further drive home the integration between WPF navigation and Internet Explorer, if you navigate to an HTML URL inside of a navigation host, the core OLE control that hosts HTML in IE will be used to show the content. For example:
<TextBlock>
    <Hyperlink
        NavigateUri="http://sellsbrothers.com">sellsbrothers.com</Hyperlink>
</TextBlock>
If you do this from within a standalone application using the navigation window or frame hosts, the HTML page will become part of the history along with everything else. If you do this within an XBAP, however, a new instance of IE will be spun up to handle the navigation (it’s just too weird to host IE inside an XBAP hosted inside IE).
Where Are We?
Building on base Window
functionality, the NavigationWindow
forms the core of most standalone navigation-based applications, with
Frame for navigating content while
controlling the chrome, and RootBrowserWindow for providing XBAP Internet
Explorer 6+ navigation integration.
[70] * We describe the Hyperlink element and its role as part of
the WPF text object model in Chapter 14.
[71] * For a wonderful picture of the navigation events and when they happen, I recommend the SDK topic “Navigation Overview,” available at http://msdn2.microsoft.com/en-gb/library/ms750478.aspx#navigationservice(http://tinysells.com/92).
[72] * In the case of an XBAP, the
application will not create a NavigationWindow, as it doesn’t have the
permissions in partial trust to do so. Instead, it will create
another navigation host that knows how to show your pages just like
a page of HTML in Internet Explorer 6+, as you’ll see later, in the
"XBAPs" section.
[73] * The URI syntax is defined by RFC 2396 and is available at http://www.ietf.org/rfc/rfc2396.txt (http://tinysells.com/96).
[74] * The navigation service also keeps any data associated with navigation-aware controls using a mechanism we’ll see in a moment.
[75] * The various techniques for keeping state between page navigations are discussed in detail in the SDK topic “Navigation Overview,” available at http://msdn2.microsoft.com/en-gb/library/ms750478.aspx#navigationservice(http://tinysells.com/92
[76] * Giving the Page2 class a constructor that takes
arguments instead of passing them in via properties would work as
well.
[77] * The x:TypeArguments property is XAML’s nod
to generics and works only on elements at the root of a XAML
document.
[78] * It often makes the most sense
for a page function’s page to be removed from the navigation
history when it returns, just like a modal dialog removes itself
from the screen. However, if you’d prefer to leave it in, you can
set the page function’s RemoveFromJournal property to false (it
defaults to true).
[79] * You were perhaps expecting “abracadabra”?
[80] * Only IE7+ has an integrated navigation UI.
[81] * Of course, that “one click” works only if your XBAP doesn’t try to get more permissions than it’s been awarded, in which case, you can click all day long and it still ain’t gonna run.