
Chapter 6. Simple Data Binding
The purpose of most applications is to display data to users and, often, to let them edit that data. Your job as the application developer is to bring the data in from a variety of sources that expose their data in object, hierarchical, or relational format. Regardless of where the data comes from or the format it’s in, there are several things that you’ll most likely need to do with the data, including showing it, converting it, sorting it, filtering it, grouping it, relating one part of it to another part, and, more often than not, editing it. Without some kind of engine for shuttling data back and forth between data sources and controls, you’re going to be writing a great deal of code. With WPF’s data binding engine, you get more features with less code, which is always a nice place to be.
Without Data Binding
Consider a very simple application for editing a single person’s name and age, as shown in Figure 6-1.

Figure 6-1 can be implemented with some simple XAML, as shown in Example 6-1.
<!-- Window1.xaml -->
<Window ...>
  <Grid>

    ...
    <TextBlock ...>Name:</TextBlock>
    <TextBox Name="nameTextBox" ... />
    <TextBlock ...>Age:</TextBlock>
    <TextBox Name="ageTextBox" ... />
    <Button Name="birthdayButton" ...>Birthday</Button>
    </Grid>
    </Window>
We can represent the data to be shown in our simple application in a simple class (see Example 6-2).
public class Person {
  string name;
  public string Name {
    get { return this.name; }
    set { this.name = value; }
  }

  int age;
  public int Age {
    get { return this.age; }
    set { this.age = value; }
  }

  public Person(  ) {}
  public Person(string name, int age) {
    this.name = name;
    this.age = age;
  }
}
With the Person class, Example 6-3 shows a naïve implementation of the
UI of our application.
// Window1.xaml.cs
...
public class Person {...}

public partial class Window1 : Window {
  Person person = new Person("Tom", 11);

  public Window1(  ) {
    InitializeComponent(  );

     // Fill initial person fields
    this.nameTextBox.Text = person.Name;
    this.ageTextBox.Text = person.Age.ToString(  );

    // Handle the birthday button click event
    this.birthdayButton.Click += birthdayButton_Click;
  }

  void birthdayButton_Click(object sender, RoutedEventArgs e) {
    ++person.Age;
    MessageBox.Show(
      string.Format(
        "Happy Birthday, {0}, age {1}!",
       person.Name,
       person.Age),
     "Birthday");
  }
}
The code in Example 6-3 creates a
Person object and initializes the
text boxes with the Person object
properties. When the Birthday button is pressed, the Person object’s Age property is incremented and the updated
Person data is shown in a message
box, as shown in Figure 6-2.

Our simple application implementation is, in fact, too simple. The
change in the Person Age property
does show up in the message box, but it does not show up in the main
window. One way to keep the application’s UI up-to-date is to write code
that, whenever a Person object is
updated, manually updates the UI at the same time:
void birthdayButton_Click(object sender, RoutedEventArgs e) {
  ++person.Age;
  // Manually update the UI
  this.ageTextBox.Text = person.Age.ToString(  );

  MessageBox.Show(
    string.Format(
      "Happy Birthday, {0}, age {1}!",
      person.Name,
      person.Age),
    "Birthday");
}
With a single line of code, we’ve “fixed” our application. This is a seductive and popular road, but it does not scale as the application gets more complicated and requires more of these “single” lines of code. To get beyond the simplest of applications, we’ll need something better.
Object Changes
A more robust way for the UI to track object changes is for the
object to raise an event when a property changes. The right way for an
object to do this is with an implementation of the INotifyPropertyChanged interface, as shown
in Example 6-4.
using System.ComponentModel; // INotifyPropertyChanged
...
public class Person : INotifyPropertyChanged{
  // INotifyPropertyChanged Members
  public event PropertyChangedEventHandler PropertyChanged;

  protected void Notify(string propName) {
    if( this.PropertyChanged != null ) {
      PropertyChanged(this, new PropertyChangedEventArgs(propName));
    }
  }

  string name;
  public string Name {
    get { return this.name; }
    set {
      if( this.name == value ) { return; }
      this.name = value;
      Notify("Name");
    }
  }

  int age;
  public int Age {
    get { return this.age; }
    set {
      if(this.age == value ) { return; }
      this.age = value;
      Notify("Age");
    }
  }

  public Person(  ) {}
  public Person(string name, int age) {
    this.name = name;
    this.age = age;
  }
}
In Example 6-4,
when either of the Person
properties changes (due to the implementation of the Birthday button
Click handler), a Person object raises the PropertyChanged event. We could use this
event to keep the UI synchronized with the Person properties, as shown in Example 6-5.
// Window1.xaml.cs
...
public class Person : INotifyPropertyChanged {...}

public partial class Window1 : Window {
  Person person = new Person("Tom", 11);

  public Window1(  ) {
    InitializeComponent(  );

    // Fill initial person fields
    this.nameTextBox.Text = person.Name;
    this.ageTextBox.Text = person.Age.ToString(  );

    // Watch for changes in Tom's properties
    person.PropertyChanged += person_PropertyChanged;

    // Handle the birthday button click event
    this.birthdayButton.Click += birthdayButton_Click;
  }

  void person_PropertyChanged(
     object sender,
     PropertyChangedEventArgs e) {

     switch( e.PropertyName ) {
       case "Name":
       this.nameTextBox.Text = person.Name;
       break;

       case "Age":
       this.ageTextBox.Text = person.Age.ToString(  );
       break;
    }
  }

  void birthdayButton_Click(object sender, RoutedEventArgs e) {
    ++person.Age; // person_PropertyChanged will update ageTextBox
    MessageBox.Show(
      string.Format(
        "Happy Birthday, {0}, age {1}!",
       person.Name,
       person.Age),
     "Birthday");
  }
}
Example 6-5 shows an example of
a single instance of the Person
class that’s created when the main window first comes into existence,
initializing the name and age text boxes with the initial person
values and then subscribing to the property change event to keep the
text boxes up-to-date as the Person
object changes. With this code in place, the Birthday button Click event handler doesn’t have to manually
update the text boxes when it updates Tom’s age; instead, updating the
Age property causes a cascade of
events that keeps the age text box up-to-date with the Person object’s changes, as shown in Figure 6-3.

The steps are as follows:
User clicks on button, which causes
Clickevent to be raised.Click handler gets the age (11) from the
Personobject.Click handler sets the age (12) on the
Personobject.Person Ageproperty setter raises thePropertyChangedevent.PropertyChangedevent is routed to event handler in the UI code.UI code updates the age
TextBoxfrom “11” to “12.”Button click event handler displays a message box showing the new age (“12”).
By the time the message box is shown with Tom’s new age, the age text box in the window has already been updated, as shown in Figure 6-4.

By handling the PropertyChanged event, we ensure that when
the data changes, the UI is updated to reflect that change. However,
that solves only half the problem; we still need to handle changes in
the UI and reflect them back to the object.
UI Changes
Without some way to track changes from the UI back into the object, we could easily end up with a case where the user has made some change (like changing the person’s name), shows the object’s data (as happens when clicking the Birthday button), and expects the change to have been made, only to be disappointed with Figure 6-5.

Notice in Figure 6-5 that the Name is “Thomsen Frederick” in the window,
but “Tom” in the message box, which shows that although the UI has
been updated, the underlying object has not. To fix this problem, we
need only watch for the Text
property in our TextBox object to
change, updating the Person object
as appropriate (see Example 6-6).
public partial class Window1 : Window {
  Person person = new Person("Tom", 11);

  public Window1(  ) {
    InitializeComponent(  );

    // Fill initial person fields
    this.nameTextBox.Text = person.Name;
    this.ageTextBox.Text = person.Age.ToString(  );

    // Watch for changes in Tom's properties
    person.PropertyChanged += person_PropertyChanged;

    // Watch for changes in the controls
    this.nameTextBox.TextChanged += nameTextBox_TextChanged;
    this.ageTextBox.TextChanged += ageTextBox_TextChanged;

    // Handle the birthday button click event
    this.birthdayButton.Click += birthdayButton_Click;
  }

  ...

  void nameTextBox_TextChanged(object sender, TextChangedEventArgs e) {
    person.Name = nameTextBox.Text;
  }

  void ageTextBox_TextChanged(object sender, TextChangedEventArgs e) {
    int age = 0;
    if( int.TryParse(ageTextBox.Text, out age) ) {
      person.Age = age;
    }
  }
  void birthdayButton_Click(object sender, RoutedEventArgs e) {
    ++person.Age;

    // nameTextBox_TextChanged and ageTextBox_TextChanged
    // will make sure the Person object is up-to-date
    // when it's displayed in the message box
    MessageBox.Show(
      string.Format(
        "Happy Birthday, {0}, age {1}!",
       person.Name,
       person.Age),
     "Birthday");
  }
}
Figure 6-6 shows
the name changes in the UI correctly propagating to the Person object.

Now, regardless of where the data changes, both the Person object and the UI showing the
Person object are kept
synchronized. And although we’ve gotten the functionality we wanted,
we had to write quite a bit of code to make it happen:
Window1constructor code to set controls to initial values, converting data to strings as appropriateWindow1constructor code to hook up thePropertyChangedevent to track thePersonobject’s property changesPropertyChangedevent handler to grab the updated data from thePersonobject, converting data to strings as appropriateWindow1constructor code to hook up theTextBoxobject’sTextChangedevent to track the UI changesTextChangedevent handlers to push the updatedTextBoxdata into thePersonobject, converting the data as appropriate
This code allows us to write our Birthday button Event handler safe in the knowledge that all
changes are synchronized when we display the message box. However,
it’s easy to imagine how this code could quickly get out of hand as
the number of object properties or the number of objects we’re
managing grows. Plus, this seems like such a common thing to want to
do that someone must have already provided a simpler way to do this.
And in fact, someone has; it’s called data binding.
Data Binding
Our manual code to keep the data and the UI synchronized has the
effect of manually binding together two pairs of properties, each pair
composed of one property on the Person object and the Text property on a TextBox object. In WPF, data binding is the act of registering two
properties with the data binding engine and letting the engine keep them
synchronized, converting types as appropriate, as shown in Figure 6-7.

Bindings
We can register two properties to be kept in sync by the data
binding engine using an instance of a Binding object, as shown in Example 6-7.
<TextBox ...>
  <TextBox.Text>
     <Binding Path="Age" />
  </TextBox.Text>
</TextBox>
In Example 6-7,
we’ve used the property element syntax introduced in Chapter 1 to create an instance of the Binding markup extension class and
initialize its Path property to
Age. This establishes the
synchronization relationship with the Text property of the TextBox object. Using the binding markup
extension syntax (also introduced in Chapter 1), we can shorten Example 6-7 to the code
snippet shown in Example 6-8.
As an even shorter cut, you can drop the Path designation altogether and the Binding will still know what you mean (see
Example 6-9).
I prefer to be more explicit, so I won’t use the syntax in Example 6-9, but I won’t judge if you like it. As an example of something more exotic, Example 6-10 sets more than one attribute of a binding.
<TextBox ...>
  <TextBox.Foreground>
    <Binding Path="Age" Mode="OneWay" Source="{StaticResource Tom}"
                Converter="{StaticResource ageConverter}" />
  </TextBox.Foreground>
</TextBox>
We’ll see what all of these Binding properties mean directly. You might
also be interested in how to pack multiple binding attribute settings
using the shortcut syntax. To accomplish this, simply comma-delimit
the name-value pairs, using spaces and newlines as convenient (see
Example 6-11).
<TextBox ...
  Foreground="{Binding Path=Age, Mode=OneWay, Source={StaticResource Tom},
                    Converter={StaticResource ageConverter}}" />
Table 6-1 shows
the list of available properties on a Binding object, many of which you’ll see
described in more detail later in this chapter.
Meaning | |
BindsDirectlyToSource | Defaults to |
Converter | An implementation of
|
ConverterCulture | Optional parameter
passed to the |
ConverterParameter | Optional
application-specific parameter passed to the |
ElementName | Used when the source of the data is a UI element as well as the target. Discussed later in this chapter. |
FallbackValue | The value to use in case retrieving the value from the data source has failed, one of the parts of a multipart path is null, or the binding is asynchronous and the value hasn’t yet been retrieved. |
IsAsync | Defaults to |
Mode | One of the |
NotifyOnSourceUpdated | Defaults to |
NotifyOnTargetUpdated | Defaults to |
NotifyOnValidationError | Defaults to |
Path | Path to the data of the
data source object. Use the |
RelativeSource | Used to navigate to the data source relative to the target. Discussed later in this chapter. |
Source | A reference to the data source to be used instead of the default data context. |
UpdateSourceExceptionFilter | Optional delegate to
handle errors raised while updating the data source. Valid
only if accompanied by an |
UpdateSourceTrigger | Determines when the
data source is updated from the UI target. Must be one of the
|
ValidationRules | Zero or more
derivations of the |
XPath | XPath to the data on
the XML data source object. Use the |
The Binding class has all
kinds of interesting facilities for managing the binding between two
properties, but the one that you’ll most often set is the Path property.[26] For most cases, you can think of the Path as the name of the property on the
object serving as the data source. So, the binding statement in Example 6-8 is creating a binding between
the Text property of the TextBox and the Age property of some object to be named
later, as shown in Figure 6-8.

In this binding, the TextBox
control is the binding target, as
it acts as a consumer of changes to the binding source, which is the object that
provides the data. The binding target can be any WPF element, but
you’re only allowed to bind to the element’s dependency properties
(described in Chapter 1.
On the other hand, you can bind to any public CLR property or
dependency property on the binding source object.[27] The binding source is not named in this example
specifically so that we can have some freedom as to where it comes
from at runtime and so that it’s easier to bind multiple controls to
the same object (like our name and age text box controls bound to the
same Person object).
Commonly, the binding source data comes from a data context.
Implicit Data Source
A data context is a place
for bindings to look for the data source if they don’t have any other
special instructions (which we’ll discuss later). In WPF, every
FrameworkElement and every FrameworkContentElement has a DataContext property. The DataContext property is of type Object, so you can plug anything you like
into it (e.g., string, Person, List<Person>, etc.). When looking for
an object to use as the binding source, the binding object logically
traverses up the tree from where it’s defined, looking for a DataContext property that has been
set.[28]
This traversal is handy because it means that any two controls with a common logical parent can bind to the same data source. For example, both of our text box controls are children of the grid, and they each search for a data context, as shown in Figure 6-9.

The steps work like this:
The binding looks for a
DataContextthat has been set on theTextBoxitself.The binding looks for a
DataContextthat has been set on theGrid.The binding looks for a
DataContextthat has been set on theWindow.
Providing a DataContext value
for both of the text box controls is a matter of setting the shared
Person object as a value of the
grid’s DataContext property in the
Window1 constructor, as shown in
Example 6-12.
// Window1.xaml.cs
using System;
using System.Windows;
using System.Windows.Controls;

namespace WithBinding {
  public partial class Window1 : Window {
    Person person = new Person("Tom", 11);

    public Window1(  ) {
    InitializeComponent(  );

    // Let the grid know its data context
    grid.DataContext = person;

    this.birthdayButton.Click += birthdayButton_Click;
  }

  void birthdayButton_Click(object sender, RoutedEventArgs e) {
    // Data binding keeps person and the text boxes synchronized
    ++person.Age;
    MessageBox.Show(
       string.Format(
         "Happy Birthday, {0}, age {1}!",
        person.Name,
        person.Age),
       "Birthday");
    }
  }
}
So, although the functionality of our app is the same as shown in Figure 6-6, the data synchronization code has been reduced to a binding object for each property in the XAML where data is to be shown and a data context for the bindings to find the data. There is no need for the UI initialization code or the event handlers that copy and convert the data (notice that no code has been elided from Example 6-12).
To be clear, the use of the INotifyPropertyChanged
implementation is a required part of this
example. This is the interface that WPF’s data binding
engine uses to keep the UI synchronized when an object’s properties
change. Without it, a UI change can still propagate to the object, but
the binding engine will have no way of knowing when the object changes
outside of the UI.
Tip
It’s not quite true that the binding engine will have
no way of knowing when a change happens on an
object that does not implement the INotifyPropertyChanged interface. Another
way it can know is if the object implements the
PropertyName Changed events as proscribed in .NET 1.x
data binding (e.g., SizeChanged,
TextChanged, etc.), with which
WPF maintains backward compatibility. Another way is a manual call
to the UpdateTarget method on the
BindingExpression object
associated with the Binding in
question. For example:
BindingOperations.GetBindingExpression(
  ageTextBox, TextBox.TextProperty).UpdateTarget(  );
Without rebinding or setting the data again manually, the call
to UpdateTarget is your only
option if the data source provides no notifications and you have no
access to the source code. However, it’s safe to say that an
implementation of INotifyPropertyChanged is the recommended
way to enable property change notifications in WPF data
binding.
Data Islands
Although our application is attempting to simulate a more complicated application that, perhaps, loads its “person data” from some serialized form and saves it between application sessions, it’s not hard to imagine cases where some data is known at compile time (e.g., sample data like our Tom).
As discussed in Chapter 1, XAML is a
language for describing object graphs, so practically any type with a
default constructor can be initialized in XAML (the default
constructor is needed because XAML has no syntax for calling a
nondefault constructor).[29] Luckily, as you’ll recall from Example 6-4, our Person class has a default constructor, so
we can create an instance of it in our application’s XAML, as shown in
Example 6-13.
<Window ... xmlns:local="clr-namespace:WithBinding">
  <Window.Resources>
    <local:Person x:Key="Tom" Name="Tom" Age="11" />
  </Window.Resources>
  <Grid>...</Grid>
</Window
Here we’ve created an “island” of data (sometimes called a
data island) inside the window’s
Resources element, bringing the
Person type in using the clr-namespace syntax described in Chapter 1.
With a named Person in our
XAML code, we can declaratively set the grid’s DataContext instead of setting it in the
code behind programmatically, as shown in Example 6-14.
<!-- Window1.xaml -->
<Window ... xmlns:local="clr-namespace:WithBinding">
  <Window.Resources>
    <local:Person x:Key="Tom" Name="Tom" Age="11" />
  </Window.Resources>
  <Grid DataContext="{StaticResource Tom}">
    ...
    <TextBlock ...>Name:</TextBlock>
    <TextBox ... Text="{Binding Path=Name}" />
    <TextBlock ...>Age:</TextBlock>
    <TextBox ... Text="{Binding Path=Age}" />
    <Button ... Name="birthdayButton">Birthday</Button>
  </Grid>
</Window>
Now that we’ve moved the creation of the Person object to the XAML, we have to update
our Birthday button Click handler
from using a member variable to using the data defined in the resource
(see Example 6-15).
public partial class Window1 : Window {
  ...
  void birthdayButton_Click(object sender, RoutedEventArgs e) {
     // Get the Person from the Window's resources
    Person person = (Person)this.FindResource("Tom");

    ++person.Age;
    MessageBox.Show(...);
  }
}
In Example 6-15, we’re using
the FindResource method (introduced
in Chapter 1 and detailed in Chapter 12) to pull the Person object from the main window’s
resources. With this minor change, the result is brought again into
parity with Figure 6-6.
Explicit Data Source
Once you’ve got yourself a named source of data, you can be
explicit in the XAML about the source in the binding instead of
relying on implicitly binding to a DataContext property set somewhere in the
tree. Being explicit is useful if you’ve got more than one source of
data (e.g., two Person objects).
Setting the source explicitly is accomplished with the Source property in the binding, as shown in
Example 6-16.
<!-- Window1.xaml -->
<Window ...>
  <Window.Resources>
    <local:Person x:Key="Tom" ... />
    <local:Person x:Key="John" ... />
  </Window.Resources>
  <Grid>
    ...
    <TextBox Name="tomTextBox"
      Text="
        {Binding
          Path=Name,
          Source={StaticResource Tom}}" />

    <TextBox Name="johnTextBox"
      Text="
        {Binding
          Path=Name,
          Source={StaticResource John}}" />
    ...
  </Grid>
</Window>
In Example 6-16,
we’ve bound two text boxes to two different Person objects, setting the Source property of the Binding object to each person
explicitly.
Binding to Other Controls
As another example of using explicit data sources, WPF provides
for binding one element’s property to another element’s property. For
instance, if we wanted to synchronize the brush used to draw the
Birthday button’s text with the foreground brush of the age text box
(this will be handy later when we change the age text box’s color
based on the person’s age), we can use the ElementName property of the Binding object, as shown in Example 6-17.
<TextBox Name="ageTextBox" Foreground="Red" ... />

<!-- keep button's foreground brush in sync w/ age text box's -->
<Button ...
  Foreground="{Binding Path=Foreground, ElementName=ageTextBox}"
  >Birthday</Button>
Now, no matter what means we use to change the foreground brush’s color of the age text box—via binding, code, or triggers (as we’ll see in Chapter 8)—the button’s foreground brush will always follow.
Value Conversion
In Example 6-17, we’ve bound the foreground brush of the Birthday button to whatever the foreground brush is for the age text box, but our text box never changes color, so neither will the Birthday button. However, we might decide that anyone over age 25 is hot, so should be marked in the UI as red.[30] When someone ages at the click of the Birthday button, we want to keep the UI up-to-date, which means we’ve got ourselves a perfect candidate for data binding—something along the lines of Example 6-18.
<!-- Window1.xaml -->
<Window ...>
  <Grid>
    ...
    <TextBox
      Text="{Binding Path=Age}"
      Foreground="{Binding Path=Age, ...}"
      ...
    />
    ...
  </Grid>
</Window>
In Example 6-18, we’ve
bound the age text box’s Text
property to the Person object’s
Age property, as we’ve already
seen, but we’re also binding the Foreground property of the text box to the
same property on the Person object.
As Tom’s age changes, we want to update the foreground color of the
age text box. However, because the Age is of type Int32 and Foreground is of type Brush, a mapping from Int32 to Brush needs to be applied to the data
binding from Age to Foreground. That’s the job of a value
converter.
A value converter (or just
“converter” for short) is an implementation of the IValueConverter interface, which contains
two methods: Convert and ConvertBack.
The Convert method is called
when converting from the source data to the target UI data (e.g., from
Int32 to Brush). The ConvertBack method is called to convert back
from the UI data to the source data. In both cases, the current value
and the type wanted for the converted data are passed to the
method.
To convert an Age Int32 into
a Foreground Brush, we can
implement whatever mapping in the Convert function we feel comfortable with
(see Example 6-19).
[ValueConversion(/*sourceType*/ typeof(int), /*targetType*/ typeof(Brush))]
public class AgeToForegroundConverter : IValueConverter {

  // Called when converting the Age to a Foreground brush
  public object Convert(object value, Type targetType, ...) {
    // Only convert to brushes...
    if( targetType != typeof(Brush) ) { return null; }

    // DANGER! After 25, it's all downhill...
    int age = int.Parse(value.ToString(  ));
    return (age > 25 ? Brushes.Red : Brushes.Black);
  }

  public object ConvertBack(object value, Type targetType, ...) {
    // Should not be called in our example
    throw new NotImplementedException(  );
  }
}
In Example 6-19, in addition to
deriving from IValueConverter,
we’ve also applied the optional ValueConversion attribute. The ValueConversion attribute is useful for
documenting the expected source and target types for developers and
tools, but it is not enforced by WPF, so don’t expect it to catch
values that don’t match the source or target types. The part that is
required for our example is the implementation of Convert, where we hand out the brush that’s
appropriate for the age being displayed. Because we haven’t provided
any facility to change the Foreground brush being used to display the
age, there’s no reason to do anything useful in the ConvertBack method—it won’t be
called.
Tip
I chose the name AgeToForegroundConverter because I have
specific semantics I’m building into my converter class that go
above simply converting an Int32
to a Brush. Even though this
converter could be plugged in anywhere that converted an Int32 to a Brush, I might have very different
requirements for a HeightToBackgroundConverter, for
example.
Once you’ve got a converter class, it’s easy to create an
instance of one in the XAML, just like we’ve been doing with our
Person object (see Example 6-20).
<!-- Window1.xaml -->
<Window ... xmlns:local="clr-namespace:WithBinding">
  <Window.Resources>
    <local:Person x:Key="Tom" ... />
    <local:AgeToForegroundConverter x:Key="ageConverter" />
  </Window.Resources>
  <Grid DataContext="{StaticResource Tom}">
    ...
    <TextBox
      Text="{Binding Path=Age}"
      Foreground="
        {Binding
          Path=Age,
          Converter={StaticResource ageConverter}}"
      ... />
    ...
  <Button ...
    Foreground="{Binding Path=Foreground, ElementName=ageTextBox}"
    >Birthday</Button>
  </Grid>
</Window>
In Example 6-20, once we
have a named converter object in our XAML, we establish it as the
converter between the Age property
and the Foreground brush by setting
the Converter property of the
binding object.Figure 6-10 shows the result
of our conversion.

In Figure 6-10,
notice that as Tom’s age increases past the threshold, the converter
switches the foreground brush from black to red. This change happens
when the Age property changes.
Because WPF detects the change, you do not need any explicit code to
force the color change, just as with any other kind of data binding.
Notice also that the foreground color of the Birthday button matches
the age text box’s color, because we’re using element binding to keep
them in sync.
Editable Value Conversion
In addition to value conversion from the underlying data type to
some other type for display, like our age-to-foreground-brush
converter, you may also use value conversion for editing convenience.
For example, although the Age
property is automatically converted for us between an Int32 and a String in base 10, maybe your users would
prefer base 16 (who wouldn’t?!). Enabling editing in base 16 is a
matter of converting to and from a string in hexadecimal format, as
shown in Example 6-21.
public class Base16Converter : IValueConverter {
  public object Convert(
    object value, Type targetType, ...) {
    // Convert to base 16
    return ((int)value).ToString("x");
  }

  public object ConvertBack(
    object value, Type targetType, ...) {
    // Convert from base 16
    return int.Parse(
      (string)value, System.Globalization.NumberStyles.HexNumber);
  }
}
Hooking up this value converter works just like before, but this
time we’re converting the Text
property of the TextBox instead of
the Foreground property:
<TextBox ...
  Text="
    {Binding
      Path=Age,
      Converter={StaticResource base16Converter}}" />
Figure 6-11 shows the base-16 converter in action.

One thing you’ll notice in our Base16Converter implementation of IValueConverter is that we haven’t guarded
against a user entering something that can’t be interpreted as a
hexadecimal number. If he does, the resulting exception is not handled
by WPF, but is instead shown to the user as an unhandled exception.
Although you can spend your time writing code to catch conversion
errors, what you’ll really like to do is catch those errors before
they ever get to the value converter, and instead communicate them to
your users. For that, you’ll be best served by validation
rules.
Validation
A validation rule is some
code for validating a piece of data in the target before it’s used to
update the source. The validation code is realized as an instance of a
class that derives from the base ValidationRule class (from the System.Windows.Controls namespace) and
overrides the Validate method. A
built-in validation rule called ExceptionValidationRule (see Example 6-22) provides some measure of
protection against a user intent on entering data outside the range
supported by our age-to-foreground value converter.
<Window ... xmlns:local="clr-namespace:WithBinding">
  <Window.Resources>
    ...
      <local:AgeToForegroundConverter x:Key="ageConverter" />
    </Window.Resources>
  ...
  <TextBox ...
    Foreground="
      {Binding
        Path=Age,
        Converter={StaticResource ageConverter}}">

  <TextBox.Text>
    <Binding Path="Age">
      <Binding.ValidationRules>
        <ExceptionValidationRule />
      </Binding.ValidationRules>
    </Binding>
  </TextBox.Text>

</TextBox>
In Example 6-22, we’re using
the shortcut markup extension binding syntax to bind the Foreground property to the Age (via the age-to-foreground value
converter), but using the longhand syntax to bind the Text property to the Age so that we can create a list of
validation rules. These validation rules will be executed in order
when the target property changes. If they all succeed, the object is
updated and everyone’s happy. If one of the rules fails, WPF
highlights the offending data to make it easy to see what to fix, as
shown in Figure 6-12.

As nifty as the red outline around the offending text box is, it still doesn’t let the user know what’s wrong (i.e., the error message associated with the exception isn’t shown). To do that, we need to look under the hood a bit.
When a validation result indicates invalid data, a ValidationError object is created that
contains an object meant to describe the error, ideally for display by
the UI. In the case of the ExceptionValidationRule, this “error
content” object contains the Message property of the Exception the validation rule catches. To
gain access to those errors, you can listen to the ValidationError attached event, which you
can set up as shown in Example 6-23.
// Window1.cs
...
public Window1(  ) {
  InitializeComponent(  );

  this.birthdayButton.Click += birthdayButton_Click;

  // Listen for the validation error event on the age text box
  // (you can do this in XAML by handling the Validation.Error
  //  attached event on the ageTextBox)
  Validation.AddErrorHandler(this.ageTextBox,
    ageTextBox_ValidationError);
}

void ageTextBox_ValidationError(
  object sender, ValidationErrorEventArgs e) {

  // Show the string pulled out of the exception by the
  // ExceptionValidationRule
  MessageBox.Show(
    (string)e.Error.ErrorContent, "Validation Error");
}
...
    <!-- Window1.xaml -->
    ...
    <TextBox Name="ageTextBox" ...>
      <TextBox.Text>
        <Binding Path="Age" NotifyOnValidationError="True">
          <Binding.ValidationRules>
            <ExceptionValidationRule />
          </Binding.ValidationRules>
        </Binding>
      </TextBox.Text>
    </TextBox>
    ...
In Example 6-23,
we’re calling the static AddErrorHandler method on the Validation class so that when a validation
event happens on the age text box, we’ll get a notification. In that
event handler, we can access the Error.ErrorContent property to get to the
string provided by the validation rule. This event fires, however,
only if the NotifyOnValidationError
property is set to True on the
Binding (the default is False).
With this event handler in place, we get our message box when there’s a validation error, as shown in Figure 6-13.

And although “Input string was not in a correct format” is the
message in the exception that the Parse method of the Int32 class throws when there’s a parse
error, I think we can do better—especially if we’d also like to set a
range on the numbers that our users can enter for age.[31]
Custom validation rules
To make sure that our person’s age is within a certain range,
we simply derive from the ValidationRule class and override the
Validate method, as shown in
Example 6-24.
public class NumberRangeRule : ValidationRule{
  int min;
  public int Min {
    get { return min; }
    set { min = value; }
  }

  int max;
  public int Max {
    get { return max; }
    set { max = value; }
  }
  public override ValidationResult Validate(
    object value, System.Globalization.CultureInfo cultureInfo) {
    int number;
    if( !int.TryParse((string)value, out number) ) {
      return new ValidationResult(
        false,
        "Invalid number format");

    }

    if( number < min || number > max ) {
      return new ValidationResult(
        false,
        string.Format("Number out of range ({0}-{1})", min, max));
    }

    //return new ValidationResult(true, null); // valid result
    return ValidationResult.ValidResult; // static valid result
                                         // to save on garbage
  }
}
In this case, we’re creating a custom class with two public
properties that describe the valid range of a number (specifically,
an integer). The result of the validation is always an instance of
the ValidationResult class. The
most important part of the ValidationResult is the first argument to
the constructor, which indicates whether the data is valid (true) or
invalid (false). After that, we’re free to pass whatever we want as
a CLR object. In our example, we check whether the string can be
parsed into an integer and is within our range, passing back
False and an error string if it’s
not. Otherwise, we pass back True. (Because a valid result has little
need for error detail, the ValidationResult class provides the static
ValidResult property—a ValidationResult constructed by passing
True and null—which you should
use instead of creating a new ValidationResult object for a valid
result.)
To hook up our validation rule, we put it to the Binding object’s ValidationRules collection instead of the
ExceptionValidationRule, as shown
in Example 6-25.
<TextBox ...
  Foreground="
   {Binding
     Path=Age,
     Converter={StaticResource ageConverter}}">
  <TextBox.Text>
    <Binding Path="Age">
      <Binding.ValidationRules>
        <local:NumberRangeRule Min="0" Max="128" />
      </Binding.ValidationRules>
    </Binding>
  </TextBox.Text>
</TextBox>
Now, when there’s a problem with the data, we get a message such as those shown in Figure 6-14 and Figure 6-15.

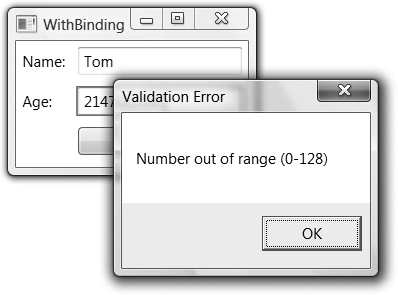
And so, although we now have nicer, more meaningful messages for our user when he enters invalid data, I am not a fan of the message box for validation error reporting (it stops the very activity you’re trying to enable). Instead, I prefer a tool tip, as in Example 6-26.
void ageTextBox_ValidationError(
  object sender, ValidationErrorEventArgs e) {

  // Show the string created in NumberRangeRule.Validate
  ageTextBox.ToolTip = (string)e.Error.ErrorContent;
}
At first, this code works just peachy keen, as shown in Figure 6-12.

When there’s a validation error, the message is shown in the tool tip on the control that’s holding invalid data. The problem is, once the user has corrected the data, the tool tip continues to hang around, as shown in Figure 6-17.

Unfortunately, there’s no ValidationSuccess event that lets us clear
the error message from the tool tip. What we really want is to
update the tool tip based on the changing validation error data,
whether it’s in error or success, which sounds like a job for data
binding. However, before we can do that, we need to take a closer
look at Path syntax.
Binding Path Syntax
When you use Path=Somethingin
a Binding statement, the
Something can be in a number of formats,
including the following commonly used variants:[32]
Path=PropertyBind to the property of the current object, whether the property is a CLR property, a dependency property, or an attached property (e.g.,
Path=Age).Path=(OwnerType.AttachedProperty)Bind to an attached dependency property (e.g.,
Path=(Validation.HasError)).Path=Property.SubPropertyBind to a subproperty (or a sub-subproperty, etc.) of the current object (e.g.,
Path=Name.Length).Path=Property[n]Bind to an indexer (e.g.,
Path=Names[0]).Path=Property/PropertyMaster-detail binding, described later (e.g.,
Path=Customers/Orders).Path=(OwnerType.AttachedProperty)[n].SubPropertyBind to a mixture of properties, subproperties, and indexers (e.g.,
Path=(Validation.Errors)[0].ErrorContent).
So far, we’ve been using the Path=Property syntax, but if we want to get
at an error on the validation errors collection, we’ll need to use a
mixed path that includes an attached property, an indexer, and a
subproperty, as shown in Example 6-27.
<TextBox
  Name="ageTextBox" ...
  ToolTip="{Binding
             ElementName=ageTextBox,
             Path=(Validation.Errors)[0].ErrorContent}">
  <TextBox.Text>
    <Binding Path="Age">
      <!-- No need for NotifyOnValidationError="true" -->
      <Binding.ValidationRules>
        <local:NumberRangeRule Min="0" Max="128" />
      </Binding.ValidationRules>
    </Binding>
  </TextBox.Text>
</TextBox>
In Example 6-27,
the tool tip has been bound to the first error from the attached
property Errors collection. When
there are no errors, the tool tip is empty. When there is an error,
the ErrorContent property (which,
you’ll recall, we pack with an error string in NumberRangeRule.Validate) is used to
populate the tool tip. We no longer need to set the NotifyOnValidationError property or handle
the ValidationError event because
as the Errors collection changes,
the binding makes sure that the tool tip is kept up-to-date. In other
words, we use data binding to the ToolTip property on the age text box to
report a validation error on the Text property. When the collection of errors
is null, the binding engine will automatically null out the tool tip,
giving us the empty tool tip on success that we so deeply
desire.
Relative Sources
One thing you may find a bit onerous in Example 6-27 is the use of the
explicit ElementName to bind to
another part of the target as the data source. Wouldn’t it be nicer if
you could just say, “Bind to myself, please?” And in some cases, you
may not have a name for the thing to which you’d like to bind (e.g.,
to fulfill queries like “Bind to the Border that’s the parent or
grandparent [or great-grandparent] of me” or even “Bind to the
previous bit of data in the list instead of the
current bit of data”). All of these are available
with the use of the RelativeSource
property of a binding, shown in Example 6-28.
<TextBox ...
  ToolTip="{Binding RelativeSource={RelativeSource Self},
                    Path=(Validation.Errors)[0].ErrorContent}">
In Example 6-28, we’re using the
Self designator to use the TextBox currently serving as the data
binding UI target as the data source, so that we can bind to the
validation errors collection associated with it to compose the tool
tip. For more information about Self and the other relative sources—FindAncestor, Previous, and TemplatedParent (which is also discussed in
Chapter 9)—I recommend the SDK
documentation.[33]
Update Source Trigger
If you’ve been following along, you may have noticed that
validation, and therefore the pushing of the updated data into the
underlying object, doesn’t happen until the age text box loses focus.
On the other hand, you may decide that you’d like validation et al. to
happen immediately when the control state changes, long before the
focus is lost. This behavior is governed by the UpdateSourceTrigger property on the Binding object:
namespace System.Windows.Data {
  public enum UpdateSourceTrigger {
    Default = 0, // updates "naturally" based on the target control
    PropertyChanged = 1, // updates the source immediately
    LostFocus = 2, // updates the source when focus changes
    Explicit = 3, // must call BindingExpression.UpdateSource(  )
  }
}
The desfault value of UpdateSourceTrigger is UpdateSourceTrigger.Default, which means
that the trigger for updating the data source is based on the target
property (e.g., the trigger for the Text property of the TextBox is LostFocus). If you’d like to force another
kind of behavior, you can set it on the Binding, as shown in Example 6-29.
<TextBox ...>
  <TextBox.Text>
    <Binding Path="Age" UpdateSourceTrigger="PropertyChanged">
      ...
    </Binding>
  </TextBox.Text>
</TextBox>
In this case, instead of waiting for the focus to be lost to do validation, it happens on each character entered.
Debugging Data Binding
You may have noticed that our age text box’s binding options have gotten fairly involved:
<TextBox ...
  Foreground="{Binding Path=Age,
                       Source={StaticResource Tom},
                       Converter={StaticResource ageConverter}}"
  ToolTip="{Binding RelativeSource={RelativeSource Self},
                    Path=(Validation.Errors)[0].ErrorContent}">
  <TextBox.Text>
    <Binding Path="Age" UpdateSourceTrigger="PropertyChanged">
      <Binding.ValidationRules>
        <local:NumberRangeRule Min="0" Max="128" />
      </Binding.ValidationRules>
    </Binding>
  </TextBox.Text>
</TextBox>
There’s a lot going on here and it would be easy to get some of it wrong. For example, if we had a background in journalism, we might have used one-based indexing instead of zero-based indexing to access the first error in our list of validation errors when setting up the binding for the tool tip:
<TextBox ...
  ToolTip="{Binding RelativeSource={RelativeSource Self},
                    Path=(Validation.Errors)[1].ErrorContent}">
  ...
</TextBox>
In this case, as in most others, the WPF data binding engine will simply swallow the error so as not to disturb our user friends.[34] So, how are we to find it? Well, you need only check the debug output to see the error shown in Example 6-30, and all will be revealed.
System.Windows.Data Error: 12 : Cannot get '' value (type 'ValidationError') from'(Validation.Errors)' (type 'ReadOnlyObservableCollection'1')BindingExpression:Path=(0).[1].ErrorContent; DataItem='TextBox' (Name='ageTextBox'), target element is 'TextBox' (Name='ageTextBox'), target property is 'ToolTip' (type 'Object') TargetInvocationException: 'System.Reflection.TargetInvocationException: Exception has been thrown by the target of an invocation. --->System.ArgumentOutOfRangeException: Index was out of range. Must be non-negativeand less than the size of the collection.Parameter name: index
In this case, we can see that the index is out of range, giving us a clue as to how to fix it. The data binding debug output provides all kinds of helpful hints like this, and you should check it if eyeballing your data binding expressions doesn’t yield the source of the issue.[35]
Where Are We?
Data binding is about keeping two values synchronized. One value, the target, is a dependency property, typically on a UI element. The other, the source, is a CLR property—the result of an XPath expression, a dependency property, or a dynamic property used by objects like those provided by ADO.NET that don’t know what the data is going to be until runtime. By default, as either the target or the source changes, the other value is updated, but you can control that with the alternate binding modes (e.g., one-way, one-time, etc.). As data changes, type conversion happens automatically if a converter is available, although you can take full control of the conversion and validation process if you so choose, doing things like restricting data ranges and converting data formats, or even automatically showing errors in tool tips. You might think that WPF data binding is powerful with these features, and you’d be right, but we’ve just touched on the bare essentials associated with bindings to properties on a single object. When you’ve got a list of objects as your data source, you’ve got all kinds of other facilities, which is the subject of the next chapter.
[27] * WPF data binding sources can
also expose data via implementations of ICustomTypeDescriptor, which is how
ADO.NET’s data sources are supported.
[28] † Actually, data binding doesn’t
do any searching at runtime. Instead, it relies on the fact that
the DataContext property is
inheritable, which means that the WPF property system itself
implements the scoping/searching behavior described here.
(Inheritable dependency properties are described in Chapter 18.)
[29] * If you want to get fancy, you
can create a TypeConverter that
can accept a string as input or a markup extension as well, but
generally the default constructor route is the easiest way to
provide XAML support for your custom types.
[30] * Or, anyone over 25 is in more danger of dying and red means “danger”—whichever makes you more likely to recommend this book to your friends . . .
[31] * On August 4, 1997, the world’s
oldest person so far, Jeanne Louise Calment, died at age 122,
having taken up fencing at age 85 and outlived the holder of her
reverse-mortgage. Although I firmly believe that Ms. Calment is
showing us the way to a richer, longer life, it’ll be a while yet
before we need the full range supported by the Int32 class (2,147,483,647 years
young).
[32] * The Windows Platform SDK has a more complete list of the WPF binding path syntax variants, including escaping rules, on a page titled “Binding Declarations Overview,” available at http://msdn2.microsoft.com/en-us/library/ms752300.aspx#path_syntax(http://tinysells.com/65).
[33] * A good place to continue your exploration of relative sources is the “RelativeSourceMode Enumeration” page in the Windows Platform SDK, which is available at http://msdn2.microsoft.com/en-us/library/system.windows.data.relativesourcemode.aspx(http://tinysells.com/66).
[34] * The swallowing of errors like these lets us declare data bindings before the data is actually available, simplifying our programming chores considerably in this area.
[35] * For more on the data binding
debug output, see the SDK documentation for the PresentationTraceSources class at http://msdn2.microsoft.com/en-us/library/system.diagnostics.presentationtracesources.aspx
or http://tinysells.com/79 and Mike Hillberg’s
most excellent blog posting on this subject at http://blogs.msdn.com/mikehillberg/archive/2006/09/14/wpftracesources.aspx
or http://tinysells.com/78.