
Securing Files on the System
Several programs come with their own security features for file encryption. Sometimes the encryption is strong, and other times it is weak. As an example, Microsoft Office allows you to password-protect files. This protection is supposed to prevent people from opening the file unless they know the password. (However, there have been cracking tools to get around password protection on these files.) As shown in Figure 12.17, Microsoft Word XP offers password protection of Word documents. You can access this through Word by selecting Tools, Options, Security.
Figure 12.17. Microsoft Word XP security features.

Word enables you to set separate passwords for opening the file and modifying it. By setting a “password to open,” Word encrypts the document with an encryption method that you choose. The default is the standard Office 97/2000 compatible encryption, which is easily cracked with tools that are available on the Internet. Luckily, the new version of Microsoft Office XP comes equipped with stronger encryption options for programs such as Word and Excel. If you want strong encryption, click the Advanced button in the dialog box shown in Figure 12.17, and select one of the RC4 encryption types, such as RC4, Microsoft Enhanced Cryptographic Provider, v1.
It is good to know about the encryption features in various programs. However, using individual programs such as Word and Excel to encrypt files can quickly become cumbersome and hard to manage when many files with different passwords are stored all over your hard drive. You can solve this problem by using programs that are geared specifically toward file encryption.
In this section, we will walk through installing and using a low-cost and easy-to-use software program that allows you to encrypt files on your computer. Table 12.3 lists several of these programs. These are third-party programs that you can add to your system. As we discussed in Chapter 10, Windows 2000 has native encryption capability with EFS. These third-party programs work by allowing you to create what can be referred to as an encrypted disk. The encrypted disk is a storage place for files of your choice. Any files that you store in the encrypted disk will be secured with professional strength encryption. You will only be able to read or use these files when you unlock the encryption and mount the encrypted disk.
| Product | Available From |
|---|---|
| Jetico BestCrypt | www.jetico.com |
| PGP Freeware | www.pgpi.com |
Differentsoftware implementations provide you with various means of encrypting files on your system. Although the algorithms and encryption systems we discuss here are pretty standard, a software vendor's implementation of them will have a unique touch, good or bad.
In the following walkthroughs, we will use Jetico BestCrypt, which can be downloaded from www.jetico.sci.fi as a 30-day fully functional evaluation. You can purchase it for a low price if you really like it.
However, we want to at least mention PGP Freeware version 6.0.2i in this section. We mention an older version of PGP Freeware for a simple reason. It is the last version of PGP Freeware to come with the PGP Disk functionality that allows you to create mountable encrypted disks, free of charge. You can still download this version from http://www.pgpi.org/products/pgpdisk/. If you want the latest version of PGP Disk, you can purchase it from Network Associates at www.pgp.com.
It is our opinion that Jetico BestCrypt is one of the most user-friendly programs that are available for file encryption. The user interface and menus are easily understandable, and the documentation is clear and concise. We chose this program as a usable and powerful introduction for people with little or no experience using file encryption software. This is not to say that BestCrypt is only for beginners. On the contrary, its simplicity and power make it usable for anybody, beginner to advanced. Jetico also makes the widely used BCWipe software, a popular deletion program that securely removes files from your computer so they cannot be recovered.
BestCrypt is completely transparent to your other programs. The files that you encrypt with BestCrypt will operate normally after they are decrypted. If you use BestCrypt to store Word or Excel files, the files will work just as they did before when they were decrypted.
Caution
 | Back up your system before installing and using encryption software. There's an irony. You're getting ready to protect your hard drive with encryption, and you've probably just copied all your data to a backup media (tape, CD, other) in an unencrypted form. |
Take a step back and look at your file system for a minute. File systems are structured like trees, with a core root directory from which all other directories and files branch off. On Windows systems, this root directory is C:, whereas on Unix systems, the root directory is known as /. Branching off the root, you might have some files, but you will definitely have some directories, also referred to as folders. Branching out further, you have subdirectories; files exist in the various directories and subdirectories on your computer. The main purpose of a directory is to act as a container for storing files.
Let's get started. We are using Windows 98 to demonstrate the installation and use of BestCrypt; however, the software does run on all Win32 operating systems, including Windows 95, 98, Me, NT, 2000, and XP, as well as Linux. Download the trial version of BestCrypt to your computer. After double-clicking the downloaded file, the installation begins. Click Next to get through the next few screens, until you get to the Choose Destination Location screen, shown in Figure 12.18. If this location has enough disk space for the installation (about 2MB), click Next to continue.
Figure 12.18. Installation of BestCrypt.

Another option during installation will appear, asking if you want to install BCWipe. BCWipe is a popular disk wiping utility, a secure alternative to the built-in Delete function of Windows. By using BCWipe to delete your files, you ensure that they are securely removed from your file system, making them impossible to recover. This is similar to using a paper shredder in an office where confidential documents need to be shredded rather than just tossed in the trash. It is your choice whether to install this.
Moving on, the installation will begin and end in less than a minute. Few files are required to install BestCrypt, and they are all fairly small. BestCrypt will require you to restart your computer for some of its changes to take place. Go ahead and restart before continuing.
You should now have a program group of shortcuts for BestCrypt in your Start, Programs menu. Open the BestCrypt Control Panel shortcut icon, shown in Figure 12.19.
Figure 12.19. BestCrypt shortcuts.

The BestCrypt Control Panel opens, appearing similar to the Windows Explorer program. Consider the way that BestCrypt works for a moment. The program allows you to create a file (BestCrypt-file.jbc) and mount it as a disk drive that is encrypted. The file is known as a container in BestCrypt. After you have created this container, you can mount it as a disk, and it will appear in Windows Explorer as another partition, just as the C: or D: partition you currently have.
Now for the fun part—we will walk through the setup of your first encrypted disk! From this point on, we will use the terms encrypted disk and container interchangeably when referring to the encrypted disk. Figure 12.20 illustrates the BestCrypt interface for creating and managing the encrypted disk—the BestCrypt Control Panel.
Figure 12.20. BestCrypt Control Panel.

In the BestCrypt Control Panel, you can see all of your normal Windows partitions. In our example, Figure 12.20 shows four disk partitions. A C: partition is labeled WIN98, a D: partition is labeled WINSWAP, an E: partition is labeled XOLR, and an F: partition is labeled SHAREMOUNT. Your configuration will be different from ours, so you will not see exactly what we have shown. The important thing to realize is that the BestCrypt Control Panel gives you a central place to create and manage your encrypted containers.
Select the partition on your computer in which you want to store the encrypted disk. This might be the C: partition, or any other one you decide. You will notice that the disk must be created on the root of your partition, and not in a subfolder. With your chosen partition selected, choose Container, New. You see the New Container window, shown in Figure 12.21.
Figure 12.21. Creating a new container.

This is the core part, where you define your new encrypted disk. In our example, we decided to make this the Financials container, where we plan to store our Quicken files and other financial information. We are storing the container on the C: partition, but could just have easily stored it on any partition. Remember that BestCrypt is transparent to other applications. That means that after we have opened our encrypted container, files on it will be accessible to applications like Quicken, without any changes. Let's explain each of your choices here:
Filename— This is where you name the file as it will be stored on your hard drive. The filename will end up having a .jbc file extension appended to it.
Size— Specify the size you want your container to be. First make sure you have enough free space on your disk for it, and remember that this is the maximum size for your container.
Description— This is your personal description to help you in identifying this disk. If you end up having more than one of these containers, the description will help you to distinguish between them. For example, you might have one container with a description of Personal Finances and another with Client Information.
Algorithm— Select the algorithm you want to use for the encryption. Unless you have some specific needs, the default choice of BLOWFISH will suit you fine.
Key Generator— Choose the algorithm that will be used to transform your password into the pseudo-random binary encryption key. The default choice of SHA-1 is fine.
Hold Drive— Your container will be stored as a file on this drive.
In addition to these main choices, you have the following two options as well:
Mount and Format Now
Fill In Container by Random Data
Select the Mount and Format Now option. You need to mount and format your encrypted disk prior to using it. The drive letter choice you have is the drive letter as it will appear on your computer, through Windows Explorer, for example. The other option, Fill In Container by Random Data, is also a good option to check; doing so only adds to the security of your encrypted disk.
With all of your options filled in, you can proceed by clicking the Create button. Figure 12.22 shows the Enter Password screen, where you are prompted to enter your secret password. Notice that you have to enter the password twice, for confirmation. The password is extremely important; it is your only means for decrypting this disk and accessing the files stored on it. If you forget this password, you will lose access to all of the files stored on your encrypted disk.
Figure 12.22. Enter your secret password.
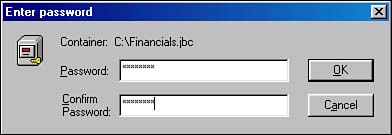
Use a good password—something with a combination of letters and numbers is best. Do not use a single dictionary type of word or other easily guessed word. You can type a phrase or sentence if you want, or even the first letter from each word of a sentence that you will remember. (See the section “Password Examples” for further information.) Commit this password to memory and do not write it down. If you absolutely must write it down, store it securely in a safety deposit box, or equivalent.
Caution
 | Remember that this password controls access to the files in your container. If you forget this password, you will not be able to access these files, and they will essentially be lost. |
Now you are asked to press random keys on your keyboard. This seed value generation is used to pseudo-randomize the seed to be used for the encryption. The encryption algorithm uses the seed to scramble the data. It is better to have the seed be as random as possible so that the encryption cannot be easily guessed. The OK button will not activate until you have typed in enough keys to fill up the progress indicator.
After you click OK, the encrypted disk container is created and the Format window appears. Select the File System with which to format this encrypted disk and click Start. If you're unsure, select the FAT file system, unless you are running Windows NT or 2000, in which case you can select NTFS. The NTFS file system was introduced with Windows NT several years ago. Its primary advantage over the FAT file system is that it provides file level security. With NTFS, you can specify which users have access to which files. Under some operating systems, you will not be able to choose a File System format. That is okay; you can proceed normally because BestCrypt knows which file system you need.
That's it! Now a warning box appears before you format, reminding you that all information on this disk will be erased. (That's okay because this new encrypted disk has no data yet.) Your container is created and you have a new encrypted disk with which to work. You will see the new encrypted disk appear in the BestCrypt Control Panel, as in Figure 12.23.
Figure 12.23. The BestCrypt Control Panel displays our newly created container.
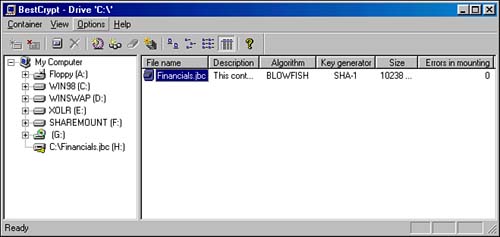
You can now move existing files to the container, or start using it as the storage location of new files that you create. It would probably be best, however, if you just played around with the new container for a week or so, to get familiar with it.
Mounting and Dismounting
From this point on, you will need to access the container by mounting it, and release access of the disk by dismounting it. The next time you shut down your computer, the container will be dismounted for you, and the next time you boot up, the disk will need to be mounted before you can use it. This is where your password comes in handy—you cannot mount without it.
BestCrypt gives you a few different ways of mounting and dismounting the encrypted disk. You can do so through the BestCrypt Control Panel, through Windows Explorer by double-clicking the .jbc file, or by right-clicking the system tray icon for BestCrypt.
Be sure to use your container over the next few days. Play around with it, and try mounting and dismounting it. Try adding, modifying, and deleting files stored in it. When you are comfortable with the way it works, you can transfer over any personal or confidential files that you want to keep encrypted and secured.