
In order to appear when using the project-level filter, a resource or role must be assigned to an activity. A schedule in which all relevant activities have roles or resources assigned is called a resource loaded schedule. Resource loading is necessary when you want to utilize the resource availability analysis tools, as described in Chapter 16. It is also necessary if you want to use any of the status using tools such as E-Mail or the Progress Reporter module, or if you want to use the mobile solutions such as Team Member on the iPhone, iPad, or Android devices. Assigning resources to activities also allows personal data to show accurately in the Personal Workspace Dashboard.
Note
If you assign resources or roles in Resource Planning, as per Chapter 16, those resources or roles are still not considered in the project.
Let's start with a project that has no resources, in fact the project schedule for writing this book. We have an activity to write Chapter 6. Currently there is no one assigned to it.

View the Resources tab for the activity. There are four action buttons.
Add Resource allows you to assign a resource to this activity. This brings up a resource selection screen, which is initially filtered to show only resources in the current project. You can change the filter to show all global resources, or only all active global resources. When you add a resource the role chosen is the resource's primary role, but this can be altered as needed.

The first resource that you add to an activity becomes the primary resource for the activity (only resources, not roles, can be the primary resource). You can change this by selecting the Primary Resource checkbox. By default this checkbox does not appear, but you can display this column by right-clicking on the list of column headings and then choosing Customize Resource Columns…
Add Role brings up the role dictionary of available roles. When you assign a role to an activity, the default values of the prices/unit and units/time are populated.
Remove removes the chosen resource or role from your activity.

Assign Resources By Role is very helpful if roles have been assigned to an activity, such as in early planning when specific resources were not yet known. For example, when a project is estimated, it is very common that only roles, not resources, are known. Once the project is approved, then actual resource assignments can be made.
After choosing Assign by Role a screen appears that shows a list of only those resources that are associated with that role.
Tip
This screen has a number of options for filtering and displaying the Roles available. In this example, the screen is showing all resources in P6 which have the role of Product Designer or Trainer. The reason why these resources appear is that on the activity we have chosen one resource, Cindy Lee, who is has the role product designer, and one role of trainer. As the filter chosen is All Resources (All Roles Required), these are shown. This happens when the resource is assigned prior to selecting the role.
To apply more filters, click on the display triangle in the left-hand side corner of the layout bar and select Filter By. This brings up a screen as shown in the following screenshot:
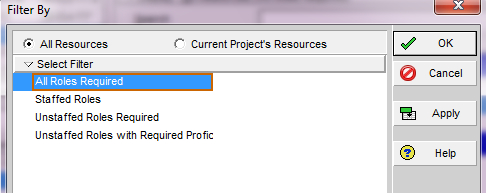
The first choice is in the two radio buttons that let you choose to see all of the resources available in P6, or only resources already assigned to the current project.
The filters are:
- All Roles Required is the default and it shows every available resource that has the roles specified in the activity. Note that certain resources may appear multiple times if they have more than one role.
- Staffed Roles lists only those roles to which a specific resource has been assigned. If you are filtering by project, you may want to view only the list of resources who are already currently assigned to a specific role within the project. For example, perhaps your project has a handful of crane operators already assigned. Rather than choose from a list of crane operators across all projects, you want to use only those who are already on the project.
- Unstaffed Roles Required is the opposite of the previous choice. This will show all resources capable of performing the needed roles who have not yet been assigned any work.
- Unstaffed Roles with Required Proficiency is where the proficiency setting comes into play. When assigning a role to an activity, you can choose the skill level required for that role. This filter will show you all resources which have that chosen skill level or above. For example, if you specify 1-Master, then only resources with mastery of that role will be shown. If you choose 5-Inexperienced, then anyone who has any proficiency in that role will appear.