- Let's get started and make your first page:
- Click on the Portfolio tab on the main menu bar.
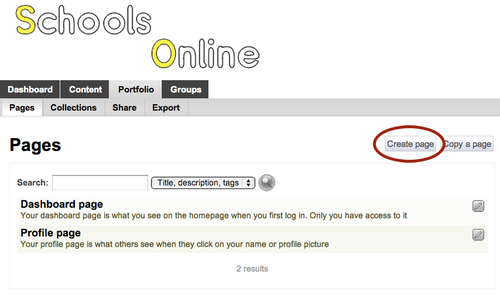
- You will see that you are in the Pages area. You can see that your profile and dashboard pages are already listed there, but this time, we're going to make a brand new page. You will see a screen similar to Punam's page as shown in the following screenshot. She has decided that she is now going to create a page about the Tudors. So let's get going, click on the Create page button:
- Now, the screen you will see is almost identical to the one that you saw while editing your profile page, apart from that you will see one more tab on the top tab bar — Edit title and description. In this Time for action create — the page and edit the content section, you will be concentrating on the Edit content tab, so click on that. You will notice that no blocks have been added automatically for you, and your page is currently empty:

- Decide what you would like your page to be about. Start by adding a text box to your page. Click on the General blocks tab. Drag a text box onto your page. Punam has written a page about "The Tudors" and used the text box to write an introduction:

- Next, add an image to your page, click on the Files, images and video blocks tab.
- Drag the Image block into the position on the page and fill in the settings to link to an image stored in your files area or upload a new image. Punam has added an image and this is what her page now looks like:

- Finally, add a video to your page. You will find the External media block under the External content tab. You are going to add a video from the popular video sharing website, YouTube (http://youtube.com). Start by dragging the External media block into your page.
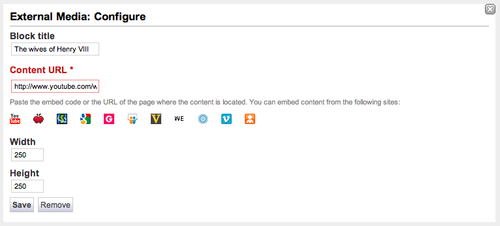
- You will then see the Options pop-up box for this block. Before you enter your settings here, you will need to navigate to the external video site and choose a video that you like. You can embed more than just video by using this block and can select from a range of services that include TeacherTube (http://teachertube.com), SciVee (http://scivee.tv), and SlideShare (http://www.slideshare.net/). Search for a video that you would like to add to your page. When you have found it, copy the URL from either the address bar or from the link provided with the video.
- On the Settings page, enter the URL in the Content URL section. Then choose a Width and Height for your video in pixels. 250 width x 250 height is usually fine. When you've finished, click on Save. Punam has found a video from the "Horrible Histories" series on YouTube:
- Her page now looks like this:
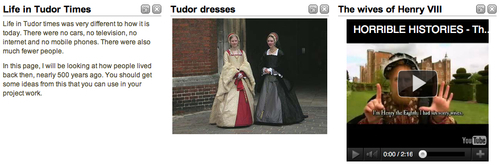
- Let's now rearrange the blocks on your page. You can move blocks around the page by using the same drag-and-drop method that you used to add them. Click on the title of any block and try dragging it around the page. You will see how the other blocks move to make space and a dotted box appears to show you where it will be positioned. Punam has decided that she would like the video to be in the middle column and the image to be in the right-hand side column:

- Release your mouse click when you are happy with the new positioning and everything will drop into place. Punam has dragged her blocks into the correct position and her page now looks like this:

- That's all for creating a new page, adding blocks, and rearranging them.
You just saw where you can go to make pages in your Mahara. You had a go at adding some blocks (text box, image, and external media) and learned how to rearrange the blocks on the page.
You may have noticed that some of the blocks that are available to you on the special pages (profile and dashboard) are not available on the standard pages. Specifically, standard pages don't include the following:
- Dashboard page only: My inbox, Latest pages, My watched pages.
- Profile page only: Wall.
- Dashboard page and profile page: My friends, My groups, My pages.
This is mainly to protect your security (as is the case with My inbox) and privacy.
There are also some blocks that are only available in group pages, which you will look at in the next chapter.
All other blocks are generically useful and can be found on any standard page that you create in Mahara. If you feel like you would get to know a bit more about the blocks available to add to your page, look for the section called Blocks, which appears later in this chapter.
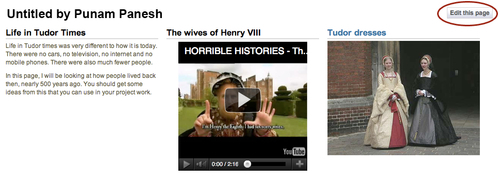
Any time you want to see your page while you are editing it, just click on the Display page >> button on the top tab row:

This will show you what your page looks like to a user (in nonediting view). This is really useful for stripping away all those unnecessary editing features and seeing your page in its normal viewing form.
As you are the owner, you will still have a handy button displayed to the top right labeled as Edit this page, so that you can pop back into editing view really quickly: