
Let's look at how you can turn standard members into institution staff and institution administrators:
- To begin, click on the Institution staff submenu option in the Manage institutions section.
- On this screen, you will see all the members who can potentially become staff in your institution as well as those who are already staff members. To create a new staff member, first click on the user that you would like to make staff. Then, click on the right facing arrow. Alternatively, you could just double-click on the user's name:
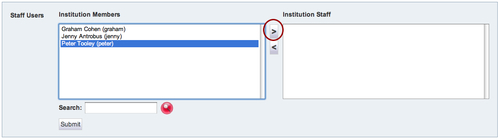
- Then, you will see that user's name appears on the right hand side under the label Institution staff:

- You can also manage your administrators in the same way, using the Institution administrators submenu tab.
You have just seen how you can assign roles in your institution.
You looked at how to turn a user into a staff member in the institution. Remember, an institution staff member is simply a person in your institution who has the ability to create controlled groups and to allow course roles such as a tutor in your group. You will be finding out more about both of these later in this chapter.
It is worth drawing your attention to the fact that, as an institution administrator, you can also choose to masquerade as one of the Mahara users in your institution. In principle, it feels wrong and unfair to use such a privilege to edit another person's ePortfolio work. There can, however, sometimes be good reasons for you to choose to masquerade.
Perhaps you would want to set up new learners with the skeleton file structure and copied pages that they would need. You could masquerade in order to set learners up in this way during an organization's user setup process. Alternatively, maybe you have had a complaint about a user and need to investigate what is happening in their learning space.
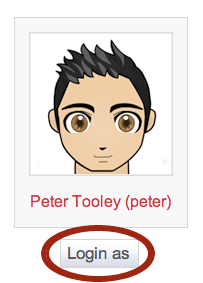
Whatever your ethical and decent reason for doing so may be, if you want to masquerade as another Mahara user, you should go first to the user's Site account settings page. Next, look under the user's avatar located to the top-left of your screen. You will see the clickable option Login as:
If the user is new and you have forced the user's password change, you will see a screen inviting you to change the user's password. If this is the case, just click on the link to log in anyway:

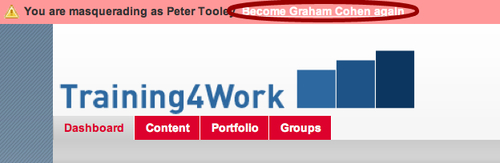
You will now find yourself masquerading as that particular user.
When you are ready to finish your masquerade, click on the banner at the top of the screen, which gives you the option to become the institution administrator again:
Now that you've looked at your institution's members and their settings, let's move on to configure the settings for the institution. To find your institution settings, click on Manage institutions on the main menu. You will find yourself, by default, on the Settings page, which looks something like this:
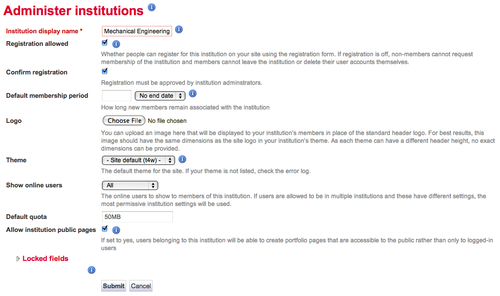
Firstly, you can edit your Institution display name here to another name if you prefer to.
Next, there is the Registration allowed checkbox option asking if you wish to set registration allowed. As you have already seen, if you set this to yes, you are allowing users to register themselves as a member of your institution, using a registration form. Some people will prefer to decide for themselves who becomes a member of their institution rather than letting people register for themselves, so turn this off if that's you.
Earlier in the chapter, when showing you how to confirm pending users, you saw that you can also choose to set the Confirm registration option. The need to confirm users places a bit more administrative duty on you, but it will mean that user accounts aren't automatically created when a user registers. You have to confirm a user before allowing them in. This is very useful in a controlled school or university setting.
You can set the Default membership period option. This option is useful if you have a regular term of membership for your institution. You can set the number of days, weeks, months, or even years for which you might wish to allow members to access your site. A university offering a three year undergraduate degree program, for example, might set a membership of a Mahara degree course institution to four years. They would then advise their new cohort of students that they will be able to access the content of their Mahara ePortfolios for one year (only) beyond the termination of their degree program.
This is also the page where you can determine the logo and theme for your institution, which is displayed when users access the Mahara site. Use the drop-down box here to choose your favored theme and logo. By default, Mahara provides a range of themes to choose from including, Aqua, Default, Fresh, Raw, Sunset, and Ultima.
If you don't think any of the default themes are suitable and you haven't been able to create your own theme, you can select the Configurable Theme option from the drop-down. This is great! You are able to select your own set of colors that correspond to different features of the site, such as the links or the main menu bar. You can use the color drop-down to select your preferred shade. If you would like a specific color, you can also enter a six digit hexadecimal value. There is no visual indicator of what features these colors affect, so you will have to try some out and come back to this page if you want to make further changes:

Next, you will see that you also have the Show online users options to show online users and to set a base quota (again, only if the site administrator has allowed this) for the file space of users in your institution. Choose the options that you would like.
You can decide whether or not to Allow institution public pages. If selected, users in the institution are able to create pages that are viewable publicly. Otherwise, any pages they create will only be seen by other site users who have permission to view them.
Finally, you may wish to lock some user data fields for your institution by using the arrow icon to the left of the words Locked fields. This prevents users from editing the fields that you lock. You may for example decide to lock a student ID for security purposes.
As an institution administrator, you will have the responsibility to respond to learner activity. Under the Admin notifications tab, you will see that you will be advised about, and have the chance to respond to, the following circumstances:
- Objectionable content: At the bottom of learner pages (excluding profiles pages), users will find the option to report objectionable content to the Mahara administrators. You will receive notifications when this happens. Then, you will need to go and investigate the reported incident. While inappropriate behavior can't be completely thwarted — in the same way that you cannot stop this sort of thing from happening in a real-world environment — you can at least use this facility to responsively investigate any reported incidents.
- Repeat virus upload and virus flag release (this requires your site to have additional virus software installed): Unfortunately, some users are not as careful at protecting their computers from viruses as they should be. Mahara has a facility, which can spot many of the files that have been affected by many of the viruses. If an infected file is identified, Mahara will disallow the user from submitting the file, requesting that they run the file through an anti-virus application before resubmitting. Repeat attempts to upload files containing viruses will be brought to your attention as an institution administrator on this page.
Click into the Pages tab and click on the Create page button. You will notice that when you edit the content, you have the tabs to drag and add blocks for external content, files, images, and video, and the general options. But you do not see the options to add blocks from your profile, your résumé, or for your journals.
This is because these latter tabs represent more personalized content. The institution pages are intended to carry person-neutral content — representing more generic content, which can be made available to institution members. If one of these pages has been made copyable, any user can then go on to add more personalized content to the pages they create from this institution page, which has been provided as a starting point.
Otherwise, the setting up of an institution page follows much the same process as that of setting up a page for yourself as a user.
There is also a feature whereby you can select Copy for new institution members. This automatically adds the page to new institution members' portfolios. To set this up, visit the Advanced options of the share options for your institution page. You will see this option appear once you select Allow copying. This is really useful if you are adding, for example, some help pages to get your user started with using Mahara, or some templates for them to start creating their own pages.
The files you upload into your institution will be available for use by all of your institution members. These could be general information documents, such as a code of practice or user guide, that you would like the whole institution to read.
Now, let's move on to look at controlled membership groups and what you can do with them as well as how to set up course roles in your groups (providing you are a staff member or an administrator).