
Let's start by seeing how you can add new users to your institution:
- Log in to your Mahara as an institution administrator (if you do not have these permissions, ask your site administrator to give them to you — they may need to set up a new site institution for you to work with). Once you have these permissions, you will see that you have a new tab called Institution administration:

- You will see that you have entered a new area of the site where you can manage your institution and that you have a different main menu bar. You can return to the main Mahara site whenever you want to, by clicking on the tab called Return to site. To start, you will be in the Manage users area:
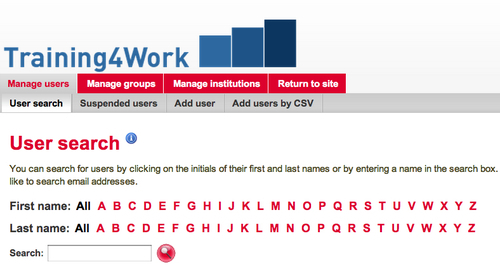
- You are going to start by adding some users to your new institution. Click on the Add user submenu item. You will see the following screen:
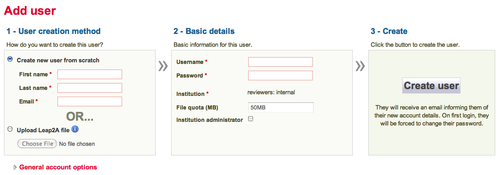
- You will see that the Add user page has three sections. In section 1 - User creation method, you can decide how your users are created. You can create a new user from scratch or upload a Leap2A file. Use the check box to decide which option to use. In Chapter 4, Organize and Showcase your Portfolio, you saw how you can export to Leap2A — this can now be used to create a new user and to add their existing portfolio (profile, pages, and so on) at the same time. For now, you will probably want to create a brand new user. Enter the name and e-mail address. Graham has decided to add a new user called Peter Tooley to his institution:

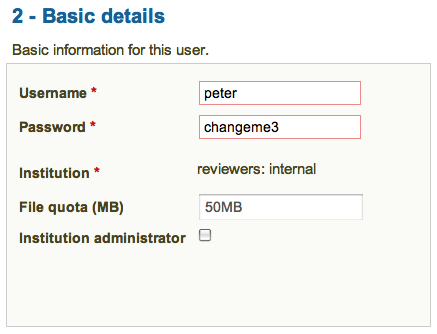
- In section 2 - Basic details, add a username and password for your user. The user will be invited to change the password, when he/she logs in for the first time. You are also allowed to change the File quota for your user. This setting controls how much space the user will have to upload files. You also have the option to make the user an Institution administrator. Graham has made Peter Tooley a standard user and given him a username and password:
- Finally, in section 3 - Create, simply click on the Create user button.
You have just learned how to add users to your institution.
When you added your user, you had to allocate him/her a username and password. It is a good idea to keep the user naming scheme consistent across the whole institution. A common scheme, for example, is to use both first name and surname in the username, such as peter.tooley. This method would reduce the likelihood of duplication.
..................Content has been hidden....................
You can't read the all page of ebook, please click here login for view all page.